設定
既存の受信音声サービスのバーチャルキュー(VQ)の設定方法は以下の通りです:
ステップ 1: VQが有効になるサービスに対してコールを配信するシナリオを選択します。
- コンタクトセンター管理者アプリケーションに管理者としてログインします。
- シナリオ > 音声へ進みます。
- VQが有効になるサービスに対するコールの配信に使われるシナリオを選択します。示されている例では、"受信サービス"というシナリオが選択されます。

ステップ 2: シナリオ名を変更します。
- シナリオ名をダブルクリックするか、編集ボタンをクリックして、シナリオビルダーアプリケーションでシナリオを開きます。
- 名前を付けて保存ボタンを使って、このシナリオを新しい名前で保存します。 この名前は任意で付けることができます。

ステップ 3: シナリオビルダーでエージェントの検索ブロックを選択します。
- シナリオ名をダブルクリックするか、シナリオ編集
 ボタンをクリックし、シナリオビルダーアプリケーションでシナリオを開きます。
 - この新しいシナリオ内で エージェントの検索ブロックを選択します。このブロックは、VQが有効になるサービスに対するコールを配信するために使われます。

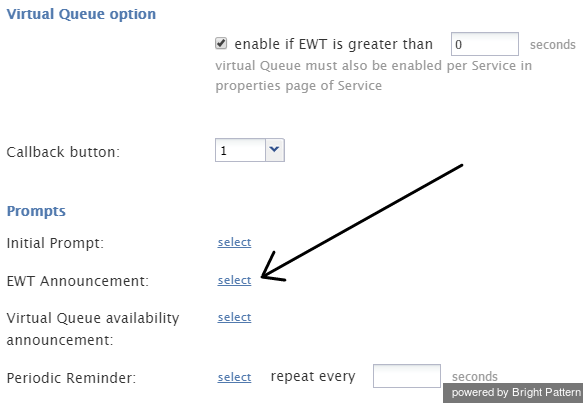
ステップ 4:VQを有効にし予想待機時間のしきい値を指定します。
- エージェントの検索ブロックの バーチャルキューオプションで、VQを有効にするチェックボックスを選択します。
- 次に、予想待機時間(EWT)のしきい値を秒単位で指定します。 VQオプションは、特定のコールのEWTが指定したしきい値を超えた場合にのみ提供されます。示されている例では、しきい値はゼロ(0)秒です。

ステップ 5: コールバックを有効にします。
コールバックボタンの ドロップダウンメニューで、数字を選択します。これは、発信者がVQオプションを受け入れるために押すダイヤルパッドの数字です。

ステップ 6:お客様に対して再生されるEWTアナウンスを作成します。
- EWTアナウンスを作成します。EWTアナウンスの例は以下の通りです: 予想待機時間は <分数または秒数>です。ここでの"予想待機時間"は EWTタイプの音声セグメントです。
ご注意: アナウンスがすでに作成済みの場合、ステップ7へ進みます。 - 新しいプロンプトまたはアナウンスを作成するには、プロンプトリストでEWT アナウンスを探し、 選択をクリックします。
使用するアナウンスを選択します。 - 表示するプロンプトリスト ウィンドウ内の追加をクリックします。
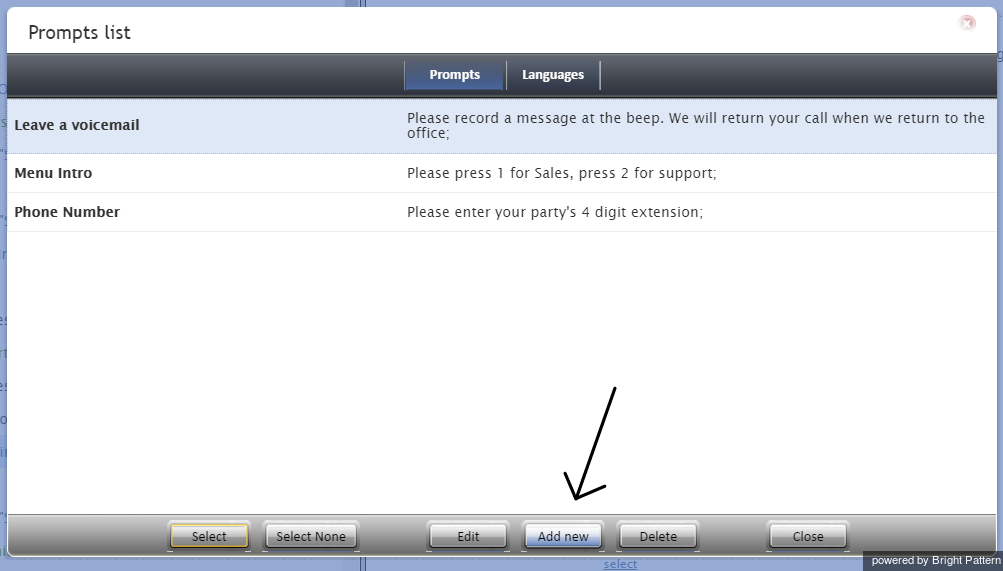
EWTアナウンスがまだ作成されていない場合、 新しいアナウンスを追加しなければなりません。 - 表示する新規プロンプトウィンドウで、アナウンス名を入力します。
- 音声セグメントの追加をクリックします。
- 表示するドロップダウンメニュ内のEWTを選択し、緑色のチェックマークをクリックします。

アナウンスに追加するセグメントを選択します。 - もう一度音声セグメントの追加をクリックします。
- 表示するドロップダウンメニュ内の 音声を選択し、アナウンスで流れるテキストを入力します。通常、テキストは予想待機時間は・・・です。 これは、お客様が電話で聞く音声アナウンスです。
- アップロードをクリックしてアナウンスのテキストに音声レコードを追加します。
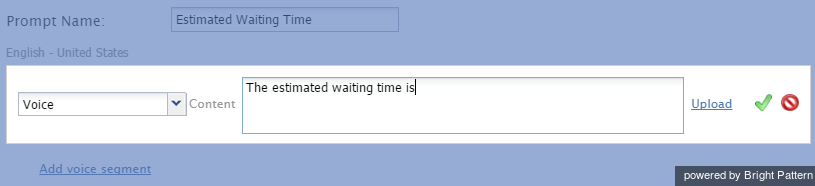
アナウンスに追加する音声セグメントを選択します。 - EWT アナウンスには2つのセグメントが追加されました。変更を保存するには、適用をクリックします。
- 表示するプロンプトリストで、先ほど作成したEWTアナウンスを選択し、 選択をクリックします。


ステップ 7: バーチャルキューの利用に関するアナウンスを作成します。
バーチャルキューの利用に関するアナウンスは、発信者にVQオプションを提案するために使われます。例えば、アナウンスには、この電話を切って、担当者が対応可能になったら折り返し電話をするには、電話途中でも[数字]を押してくださいという内容が含まれる場合があります。ここでの 数字 とは、手順5で選択した数字です。このアナウンスを作成するには、上記のステップ6に示されている指示に従ってください:
- バーチャルキューの利用に関するアナウンス:の横にある選択をクリックします。
- 表示するプロンプトリスト内の 追加をクリックします。
- "バーチャルキューの利用に関するアナウンス"という音声セグメントを追加し、コンテンツボックスに"この電話を切って、担当者が対応可能になったら折り返し電話をするには、電話途中でも1を押してください。"を入力します。
- お客様に対して再生される音声レコードをアップロードします。
- 変更を保存するには、適用をクリックします。
- 表示するプロンプトリストで、先ほど作成した新しいアナウンスを選択し、 選択をクリックします。
エージェントの検索ブロックのプロンプトセクションに、作成した2つのアナウンスが含まれます。

ステップ 8: コールバックのリクエストブロックのプロパティを指定します。
エージェントの検索ブロックのコールバッグ出口の下に、コールバックのリクエストブロックを挿入しそのパラメータを指定します。

パラメータ
パラメータは以下の通りです:
- タイトルテキスト:ブロック名です。
- 確認プロンプト:コールバックのリクエストを確認します (例えば、 “ありがとうございます。折り返しご連絡いたします。”)
- コールバックの電話番号: コールバック用の電話番号を指定します。コールバックを元のコールに使用された電話番号に対して行われる場合、元のコールの発信者IDである$(item.from)変数を使用できます。ただし、コールバック用の別の電話番号をお客様に提供したい場合は、このチュートリアルの例に示すように、次のシナリオブロックの組み合わせを使う必要があります:変数の設定, メニュ, 数字の取得 。この場合、 コールバッグの電話番号を、変数の設定 ブロックで指定された新しい変数に設定します。
- リクエストをキャンセルするまでの時間:受付可能なエージェントが見つからない場合にバーチャルコールが終了するまでの時間(秒単位)を指定します。
- エージェントが受付可能になるまで待機する:選択すると、コールバックは明示的なエージェント予約後に行われます。選択しないと、EWTベースのコールバックメカニズムが使われます。詳しい情報については、 仕組み をご覧ください。
- ダイヤルのスタート:EWTベースのコールバックメカニズムの場合、このパラメーターは、EWT期限が切れる前にコールバックの試行がいつ行われるか(秒単位で)指定します。例えば、エージェントがより早く受付可能になると、その時点でコールバックが行われます。
- 無応答タイムアウト:応答なし出口へ進む前に、お客様がコールバックの試行に応答するまでブロックが待機する時間(秒単位)を指定します。

ステップ 9: IVRプロンプトを使って、コールバックの受信についてお客様に通知します。
指定された無応答タイムアウトが切れる前にお客様がコールバックの試行に応答すると、コールバックのリクエストブロックが終了します。応答されたコールを直接エージェントの検索ブロックに接続してエージェントに対してすぐに配信する代わりに、IVRプロンプトを使って、このコールがリクエストされたコールバックであることをお客様に通知することをお勧めします。そうすることによって、お客様に対してコールの目的が伝われ、さらにエージェントがすぐに対応できない場合に備えて、短い待機時間が設けられます。
本ガイドで挙げられた シナリオ例 では、メニューブロック は、配信対象のコールをエージェントの検索ブロックへ転送する前に 、上記のようなアナウンスを行い、お客様からの確認を待つのに使われます。
ステップ 10: 条件付き出口をいつ利用するかを指定します。
コールバックのリクエストブロックの条件付き出口を使って、コールバックの試行中にあらゆる"異常"な条件(応答なしや話中)が発生したときの次のステップを指定します。 本ガイドで挙げられた シナリオ例では、 条件付き出口の下に配置されている終了ブロックを介して表示される条件下でコールが終了します。

ステップ 11: 他のサービスに対してVQを有効にして作業結果を保存します。
- VQを有効する他のサービスへコールを配信するために使うこのシナリオの他のエージェントの検索ブロックに対して、ステップ3からステップ10の作業を繰り返します。
- シナリオビルダーの下にある保存ボタンをクリックして新しいシナリオを保存します。
ステップ 12: コンタクトセンター管理者アプリケーションで残りの VQ設定ステップを完了します。
- 残りのVQ設定手順を完了するには、コンタクトセンター管理アプリケーションを開きます。
- 管理者としてログインします。
ステップ 13: ご希望のサービスに対してVQ機能を有効にします。
設定されたVQは、ご希望のサービスに対して明示的に有効化されるまで操作できません。
- 上記のように設定された特定のサービスに対してVQ機能を有効にするには、そのサービスのプロパティタブの コールバック機能の有効化チェックボックスを選択します。
- VQ機能が設定されている他の全サービスに対してVQ機能を有効にする前に、バーチャルキューレポートを使って、有効化されるサービスのVQパフォーマンスをモニタリングし、必要に応じてそのパラメーターを調整することができます。レポートの詳しい情報については、レポートリファレンスガイドおよびレポートをご覧ください。
ステップ 14: シナリオをテストします。
他のサービス設定の重要な変更と同様に、新しいシナリオはテストしなければなりません。
- テストのダイヤルインシナリオエントリーを作成し、それを新しいシナリオに関連付け、さまざまなVQ条件を模倣したテストコールを行い、すべてが予定どおりに機能することを確認します。
- コールセンターの営業時間外の時間帯で、現在の生産シナリオを ダイヤルインシナリオエントリーのシナリオ(VQが有効になったシナリオ)に置き換えます (これらのシナリオエントリーは、シナリオ > 音声リストで現在のシナリオを選択すると、シナリオエントリータブに表示されます。置き換えを行うには、リストされたダイヤルインシナリオエントリーのいずれかをクリックし、 シナリオドロップダウンリストから新しいシナリオを選択します)。