How to Customize an Activity Object
Salesforce.com (SFDC) activity history is a list of associated tasks or the history of activities that have been carried out on an object. For example, the activity history section on a contact record may contain a list of actions that the sales rep has taken in working that lead, such as emails sent, calls made, and so forth. In addition to the predefined activity history objects, these fields can be extended with customized activities to track against objects.
In course of configuration the integration of Salesforce with our contact center software it's often necessary to modify activity objects, we list the most common steps below:
Procedure
The following instructions will show you how to create a custom activity field in SFDC, update the field using Bright Pattern's Attached Data scenario block, and update regular fields using Attached Data.
These steps are applicable to both the Salesforce Classic view and the Salesforce Lightning view.
Step 1: Create custom fields for an object
In Salesforce Classic
- In Salesforce.com, click Setup.
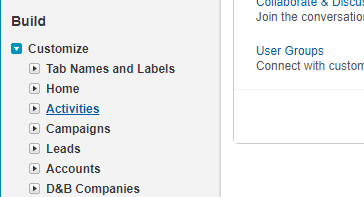
- In the Build section, click Customize > Activities. Make sure you click just the “Activities” link--don’t click the drop-down beneath “Activities”.
- On the Activities page, click Add a custom field to activities.
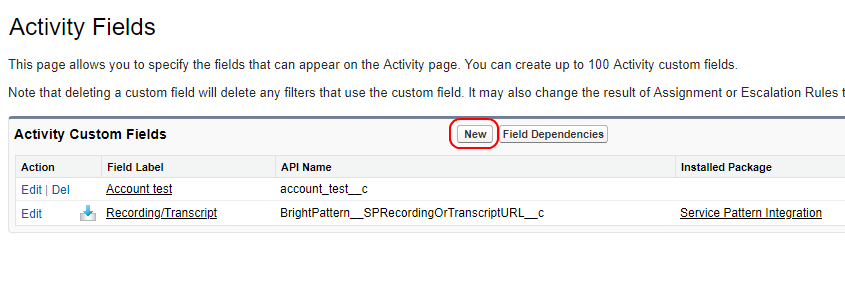
- On the Activity Fields page, you can see all the custom fields you already have. Click New to add a new one.
In Salesforce Lightning
- Navigate to Setup.
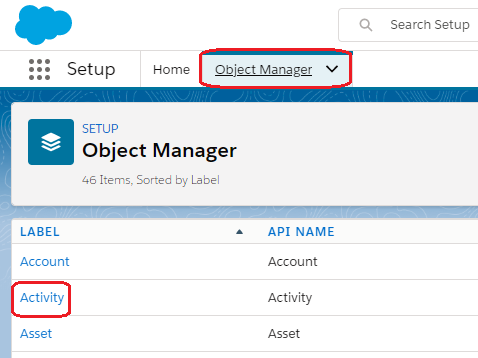
- Select the Object Manager tab at the top of the screen, then click the Activity label.
- From Activity, click Fields & Relationships, and then select the New button.
- Finally, begin configuring your New Custom Field.
New Custom Field Configuration: Classic and Lightning
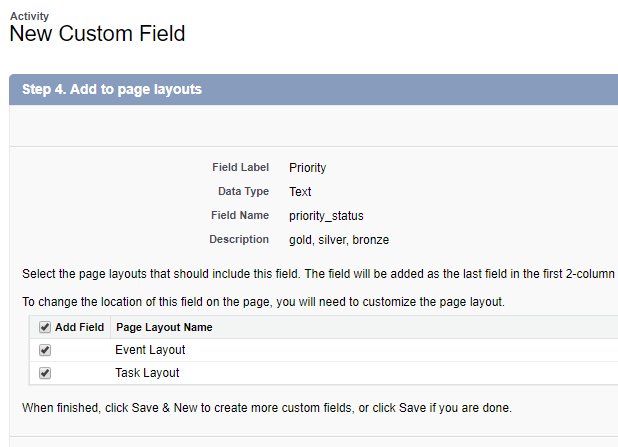
- On the New Custom Field page, select the data type of the custom field and then click Next. For this example, we select data type Text.
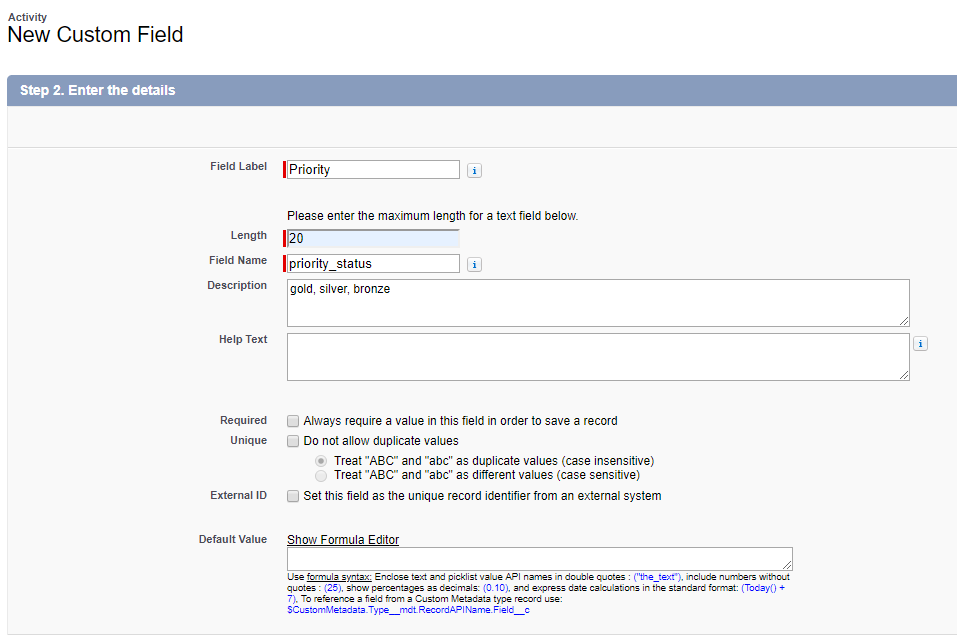
- On the New Custom Field page, specify:
- Field Label - The label for the field (e.g., “Priority”)
- Length - The number of allowable characters (e.g., “20”)
- Field Name - The name of the field in lowercase with underscores to separate words (e.g., “priority_status”; will be shown on the Activity fields page)
- The other settings are optional.
- Field Label - The label for the field (e.g., “Priority”)
- Click Next and you will be asked to establish field-level security. This is optional. Click Next again.
- You will be asked to add the custom field to page layouts. Select the layouts where you want the new custom field to appear. Later, you can go to Customize > Activities > Task Page Layouts to modify page layouts. Click Next again and Save.
- You will see that the custom field has been added to the Activity Custom Fields page. The API Name is the actual custom field name that you will put in the Attached Data scenario block (see steps below). Copy the API Name of your custom field.
Now that you have a custom activity field, you are able to update that field using Bright Pattern Contact Center. Activity Field data may be updated via the Attached Data block in a scenario.
Step 2: Update custom field data using Attached Data scenario block
Once you have a custom field in Salesforce, you can use the Attached Data block to update it.
- In the Contact Center Administrator application, locate your Salesforce scenario and click Edit to open it in the Scenario Builder application.
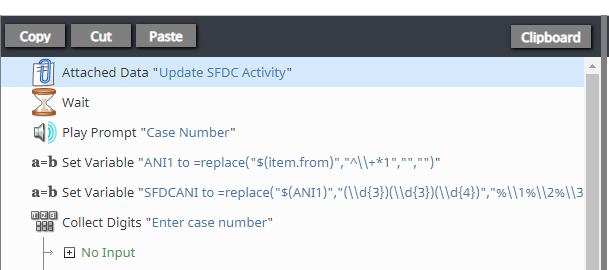
- For a voice scenario, add the Attached Data block at any point before the Connect Call block. For a chat scenario, add the Attached Data block at any point before the Connect Chat block. If you don’t know where to place it, put it at the very top of the scenario.
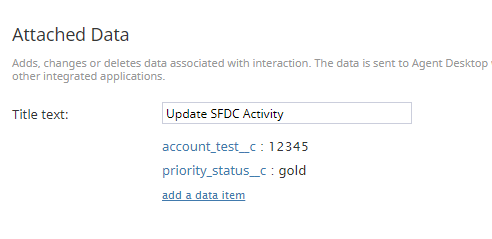
- Update properties and click add a data item:
- Title text - The name of the block (e.g., “Update SFDC Activity”)
- Name - The “API Name” of your custom field that you created in Salesforce (e.g., "account_test__c"). Note that upon saving a new custom field, SFDC automatically adds suffix “__c” to it. In order to supply interaction data to this field, use the field name, including suffix “__c” in the Attached Data scenario block. For example, to populate Custom Activity field account_test, it is required to have the scenario block Attached Data specify key account_test__c.
- Value - The value (string or variable) of the field (e.g., “12345” or "$(varname.property)").
- Title text - The name of the block (e.g., “Update SFDC Activity”)
- Note that multiple data items may be added. Save the scenario.
You can test whether it works by logging a call and viewing the case in Salesforce. You should see the custom field with the specified value.
Step 3: Update other activity field data using Attached Data (optional)
To populate regular (not custom) Activity Fields with any data from the scenario, simply follow step 2 instructions with one exception: use the field name without the “__c” suffix.
For example: "account_test", not "account_test__c".
Predefined Fields
The following is a list of predefined fields (Label/Field Name = Parameter) in SFDC:
- Due Date/ActivityDate - Interaction start time
- Call Object Identifier/CallObject - Global interaction identifier
- Call Type/CallType - Interaction type: Inbound, Outbound, or Internal
- Call Duration/CallDurationInSeconds - Interaction duration (talk + hold time) in seconds
- Call Result/CallDisposition - Interaction disposition, if available
- Comments/Description - Interaction notes entered by the agent, if any
- Subject/Subject - Service associated with the interaction, in format: SFDC object type: service name
- Status/Status - Status: Completed, Delivery Pending, Not Started, etc.
- SPRecordingOrTranscriptURL__c (note that this is a custom field) - Interaction recording URL; clicking this URL will open the Interaction Records Search Results page of the Contact Center Administrator application with the record that has the recording/transcript of this interaction
Notes
Activity history is added to the last record that the agent had open on the Agent Desktop while finishing the call (or the related after-call work).

