(Created page with "== ステップ 5: ダイヤルオプションをチェックします。 == コールセンターパラメーターの''ダイヤルオプション'' には、 '''外部プ...") |
|||
| Line 74: | Line 74: | ||
# '''保存'''をクリックします。 | # '''保存'''をクリックします。 | ||
| − | == | + | == ステップ 5: ダイヤルオプションをチェックします。 == |
| − | + | コールセンターパラメーターの''ダイヤルオプション'' には、 '''外部プレフィックス''', '''長距離プレフィックス'''、'''国際プレフィックス'''というフィールドがあります。これらのフィールドには、コールセンター定義ファイルの値が入力されていました。これらの値は、コンタクトセンターのダイヤルアウトエントリで設定された電話番号のプレフィックスと一致します。プレフィックスは、電話番号がダイヤルされるときに電話番号に追加される番号です。 | |
We recommend checking that the dialing options set in Salesforce match the dialing options set in Bright Pattern Contact Center. | We recommend checking that the dialing options set in Salesforce match the dialing options set in Bright Pattern Contact Center. | ||
Revision as of 08:11, 9 October 2019
コールセンターをセットアップする
Salesforceにおけるコールセンターをセットアップするには、コールセンター定義ファイルを使ってコールセンターを定義しなければなりません。このファイルは、Salesforce CRMコールセンターと複数のCTIベンダーの統合をサポートするために使用されます。特定のCTIアダプターに入るコールセンターの初回レコードは、アダプターのコールセンター定義ファイルをインポートして定義しなければなりません。
ステップ1: コールセンタをセットアップします
- Salesforce Lightningのセットアップ ビューへ進みます。新しいタブが開きます。
- プラットホームツール > 機能設定 > サービス > コールセンター> コールセンターへ進みます。Salesforceの場合、複数のコールセンターを持つことができます。既存のコールセンターは、コールセンターページで確認できます。
ステップ2: コールセンター定義ファイルを保存します
以下をコピーし、テキストドキュメントに貼り付けします。XMLとして保存します。
<callCenter>

<section sortOrder="0" name="reqGeneralInfo" label="General information">
<item sortOrder="0" name="reqInternalName" label="Internal name">CSIMIntegration</item>
<item sortOrder="1" name="reqDisplayName" label="Display name">CSIM Integration</item>
<item sortOrder="2" name="reqAdapterUrl" label="Agent Desktop URL"></item>
<item sortOrder="3" name="reqUseApi" label="Use CTI API">true</item>
<item sortOrder="4" name="reqSoftphoneHeight" label="Softphone height">300</item>
<item sortOrder="5" name="reqSoftphoneWidth" label="Softphone width">500</item>
<item sortOrder="6" name="custTenantUrl" label="Tenant URL (if different from AD URL)">example.com</item>
<item sortOrder="7" name="muteRecordingUrls" label="Mute Recording Urls"></item>
<item sortOrder="8" name="reqSalesforceCompatibilityMode" label="Salesforce Compatibility
Mode">Lightning</item>
</section>

<section sortOrder="1" name="reqDialingOptions" label="Dialing Options">
<item sortOrder="0" name="reqOutsidePrefix" label="Outside Prefix">9</item>
<item sortOrder="1" name="reqLongDistPrefix" label="Long Distance Prefix">1</item>
<item sortOrder="2" name="reqInternationalPrefix" label="International Prefix">011</item>
</section>

</callCenter>
ファイルについて
このコールセンター定義ファイルにはmuteRecordingUrlsという項目が含まれており、これらのページにアクセスすると、コールの録音が自動的にミュート(消音)され、エージェントの画面録音が一時停止されます。 muteRecordingUrls機能のおかげで、エージェントが機密データ(クレジットカード番号など)を受信する場合にコンタクトセンターが規則への準拠性を維持できます。
さらに、Salesforce Lightningとの互換性を確保するreqSalesforceCompatibilityModeという項目も含まれています。これがないと、Bright Pattern統合はSalesforce Lightningビューで利用できません。
ステップ3: ファイルをコールセンターにインポートします
- リストから対象のコールセンター (例: "BrightPattern 統合")を選択します。
- インポート ボタンをクリックします。
- ファイルの選択をクリックし、定義ファイルを選びます。
- 再度 インポート をクリックします。
インポートができない場合は、同タイプのコールセンターがすでに設定されている可能性があります。コールセンター定義ファイルを正しくインポートするには、場合によってコールセンターの既存の名前("CSIM統合"など)を別の名前に変更する必要があります。上記のコールセンター定義ファイル のreqInternalNameをご覧ください。
定義ファイルをコールセンターにインポートすると、コールセンターの詳細ページが表示されます。
ステップ3: コールセンタープロパティを編集します。
コールセンターを定義したら、Bright Pattern コンタクトセンターとの統合を有効にするコールセンターのパラメーターを設定できます。
- コールセンター詳細ページでは、 リストの上にある編集をクリックします。 コールセンター詳細ページが開きます。File:SFDC-Lightning-Call-Center-Edit2-54.PNGコールセンター詳細の編集
- 編集する最も重要なプロパティは、エージェントデスクトップURLです。 エージェントデスクトップURLフィールドでは、以下の通りURLを変更します:
https://<host>.brightpattern.com/agentdesktop/Lightning.jsp?enableSFOpenCTI=1&sflogin=1
<host> の代わりに、お持ちのホストネームを必ず入力してください。Salesforce LightningでのURLは例の通りに表示されます:
https://example.brightpattern.com/agentdesktop/Lightning.jsp?enableSFOpenCTI=1&sflogin=1 - Salesforce 互換モードでは、 Lightningを入力します。
- オプション: Salesforceのホームページ(Classicビュー)またはすべてのページ(Lightningビュー)に表示されるエージェントデスクトップコールウィジェットのサイズを調整します。 ソフトフォンの高さおよび ソフトフォンの幅フィールドの既定値を置き換えることにより、サイズを調整します。既定のサイズは300(W)x 500(H)です。サイズがこれより小さすぎる場合、エージェントデスクトップコールウィジェットはカットされたまま表示されます。
- 保存をクリックします。
ステップ4: (オプション) 複数のコールセンターがある場合、テナント URLを更新します。
複数のテナント(つまり、コールセンター)がある場合は、現在設定を行うコールセンターのテナントURL情報を更新しなければなりません。コールセンターが1つの場合は、この手順をスキップしてください
- コールセンター詳細 ページでは、以下のエージェントデスクトップURLを変更します。そのために、
<tenant-name>.<service-provider-domain-name>
の代わりにBright Pattern コンタクトセンターテナントアクセスURLを入力します (以下の例を参照:URLはご利用のSalesforceバージョンに基づいて変更されます):
https://<tenant-name>.<service-provider-domain-name>/agentdesktop?enableSFOpenCTI=1&sflogin=1&apexClass=BrightPattern.CSIMIntegration - 例:
https://demo.brightpattern.com/agentdesktop?enableSFOpenCTI=1&sflogin=1&apexClass=BrightPattern.CSIMIntegration - example.com を完全修飾テナントURL (例えば、 example.brightpattern.com)に置き換え、テナントURLを変更します。
- 保存をクリックします。
ステップ 5: ダイヤルオプションをチェックします。
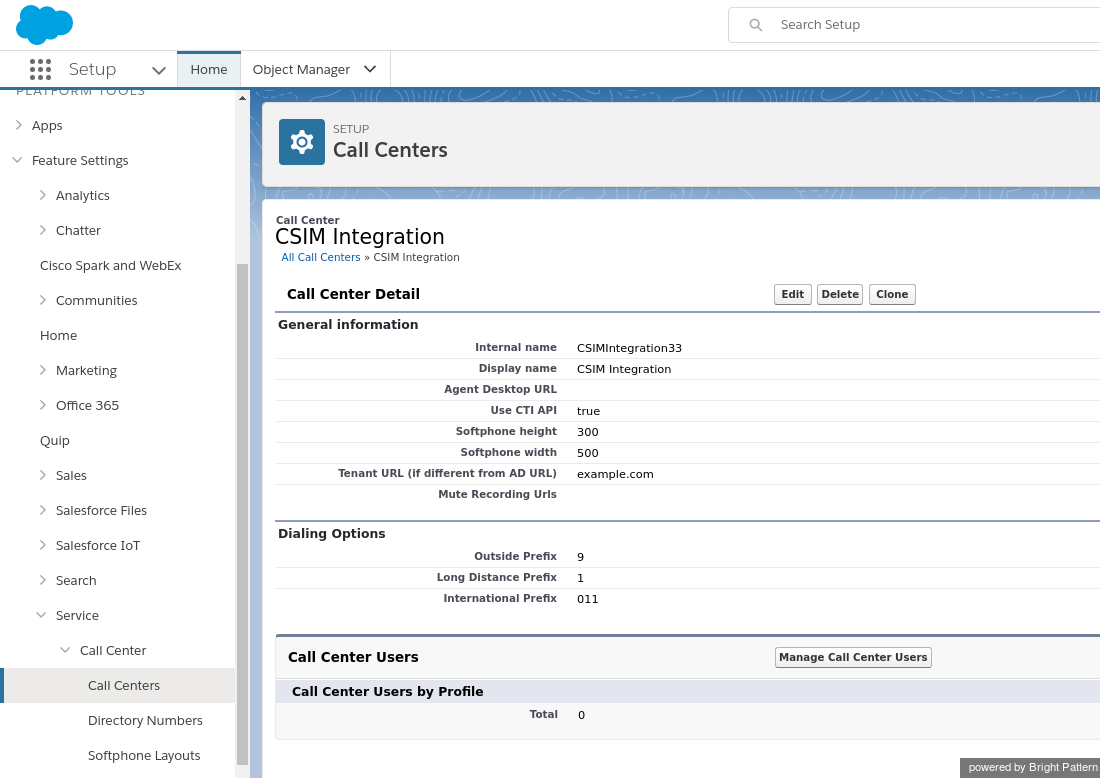
コールセンターパラメーターのダイヤルオプション には、 外部プレフィックス, 長距離プレフィックス、国際プレフィックスというフィールドがあります。これらのフィールドには、コールセンター定義ファイルの値が入力されていました。これらの値は、コンタクトセンターのダイヤルアウトエントリで設定された電話番号のプレフィックスと一致します。プレフィックスは、電話番号がダイヤルされるときに電話番号に追加される番号です。
We recommend checking that the dialing options set in Salesforce match the dialing options set in Bright Pattern Contact Center.
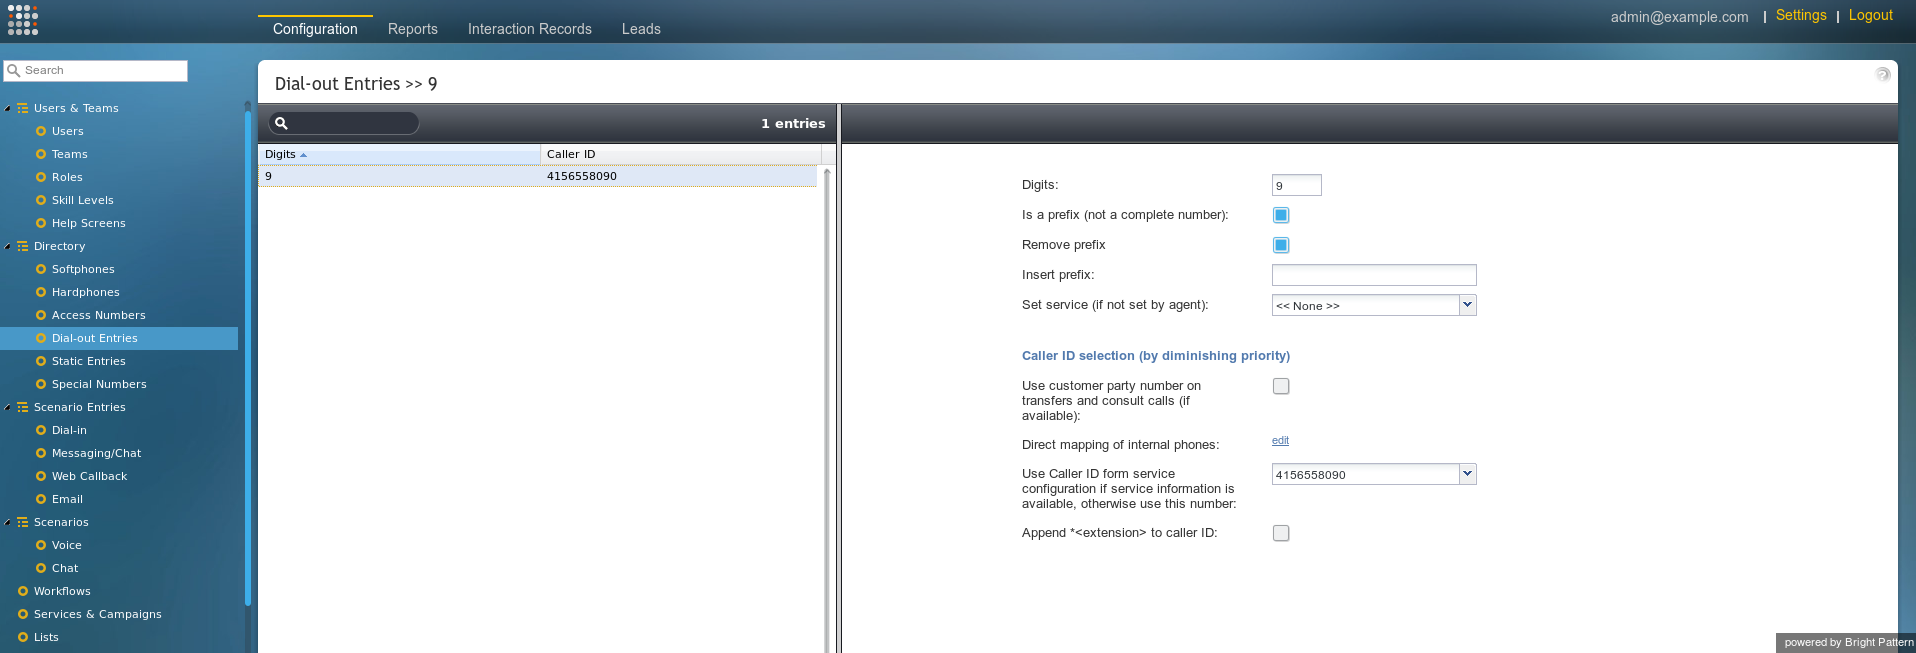
- In the Contact Center Administrator application, go to Configuration > Directory > Dial-out Entries.
- Check that the prefixes set in dial-out entries match the following prefixes set in Salesforce:
- Outside Prefix - This number (e.g., "9") will be added by Salesforce to any phone number dialed using the “Click-To-Call” feature. If you do not such a dial-out entry configured, leave the "Outside Prefix" field empty in Salesforce.
- Long Distance Prefix - This number (e.g., "1" for US numbers) will be added by Salesforce to any long-distance phone number dialed using "Click-To-Call." If you do not such a dial-out entry configured, leave the "Long Distance Prefix" field empty in Salesforce.
- International Prefix - This number (e.g., "011") will be added by Salesforce to any international phone number dialed using "Click-To-Call." If you do not such a dial-out entry configured, leave the "International Prefix" field empty in Salesforce.
- Outside Prefix - This number (e.g., "9") will be added by Salesforce to any phone number dialed using the “Click-To-Call” feature. If you do not such a dial-out entry configured, leave the "Outside Prefix" field empty in Salesforce.
For more information on prefixes, see the Contact Center Administrator Guide, section Dial-Out Entries.
Step 6: Assign Salesforce users to the call center
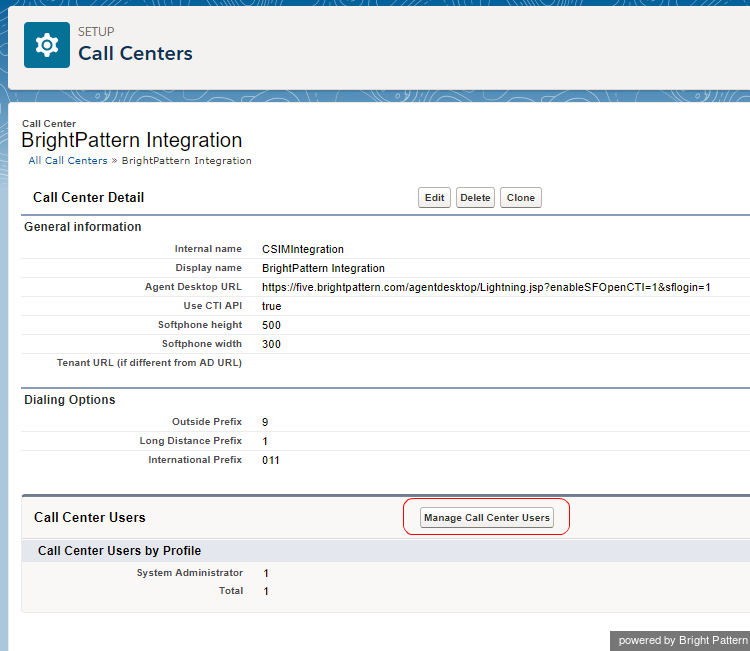
- In the Call Center Users section, click Manage Call Center Users.
- Select the name of the call center to which you want to assign users.
- In the Call Center Users related list, click Manage Call Center Users.
- On the Manage Users page, click Add More Users.
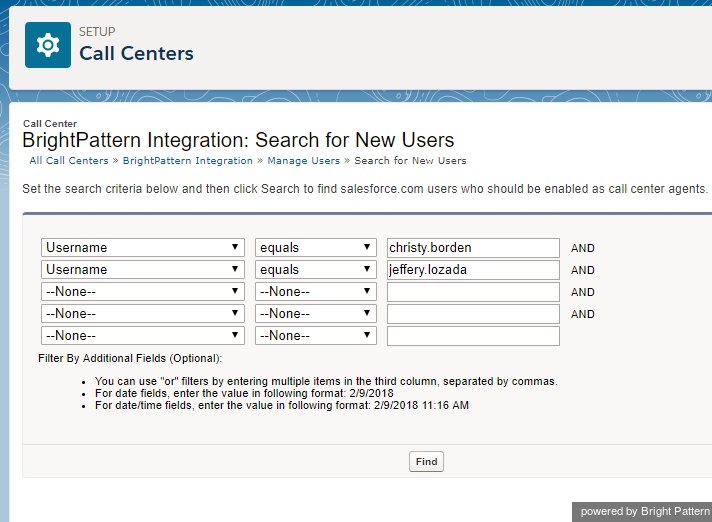
- Specify criteria to find the users who should be assigned to the call center.
- Click Find. Note that all users who already belong to a call center will be excluded from the search results because a user can be assigned to one call center at a time only.
- Select the checkbox next to each user who should be assigned to the call center. At the bottom of the screen, click Add to Call Center.
Note: To reassign a user to another call center, first remove this user from the currently assigned call center and then add the user to the desired call center. You can view the currently assigned call center in the User Detail page.


