(Created page with "この記事では、 設定されたチャットサービスにおいて対話型ボットとして利用で...") |
|||
| (25 intermediate revisions by the same user not shown) | |||
| Line 5: | Line 5: | ||
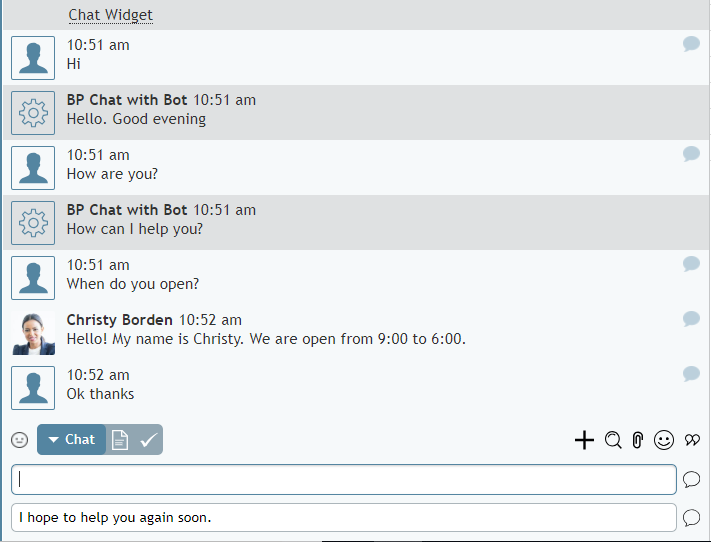
| − | [[File:BPChat-Ex-1.PNG|thumb|450px|center| | + | [[File:BPChat-Ex-1.PNG|thumb|450px|center|統合されたLexボットおよびエージェントへの提案を示すチャット]] |
| − | == | + | == 手順 == |
| − | + | この手順では、初めてのAmazon Lexボットを設定するプロセスについて説明します。 Amazon Lexおよびその他のAWSリソースの詳細については、 | |
| + | [https://docs.aws.amazon.com/lex/latest/dg/what-is.html AWS’s Amazon Lex Developer Guide]をご覧ください。 | ||
| − | === | + | === ステップ 1: AWSアカウントを作成します。 === |
| − | # | + | # 作成がまだの場合、[https://docs.aws.amazon.com/lex/latest/dg/gs-account.html AWSアカウントの作成]を行います。 |
| − | === | + | === ステップ 2: IAMユーザーの作成、管理者権限の付与、認証情報の保存を行います。 === |
| − | + | 我々の統合アカウントには、Amazon Lexボットに接続して使用するためのアクセスキーが必要です。アクセスキーは、AWS Identity and Access Management(IAM)サービスで作成および管理されます。 | |
| − | + | アクセスキーを取得するには、次の操作を行います: | |
| − | # | + | # [https://console.aws.amazon.com/iam/ AWS マネジメントコンソール > IAM ダッシュボード]へ進みます。場所が分からない場合、AWS サービスで"IAMを検索します。"<br /><br /> |
| − | # | + | # IAMルートメニューで '''ユーザー'''をクリックした後、'''ユーザーの追加'''をクリックし、IAMユーザーの作成と管理者権限の付与を行います。ユーザーを追加すると、AWSへのアクセスに使用される認証情報が生成されます。<br /><br />[[File:Lex-10.PNG|thumb|800px|center|IAMユーザーの追加]]<br /><br /> |
| − | # | + | # '''access key ID''' (例: AKIAIOSFODNN7EXAMPLE)および'''secret access key''' (例: wJalrXUtnFEMI/K7MDENG/bPxRfiCYEXAMPLEKEY)をコピーします。このデータは、[[5.3:Tutorials-for-admins/SetupanAWSLexIntegrationAccount | AWS Lexボット/チャットサジェスト統合アカウント]]の設定の際に必要になるので、保存します。<br /><br /> |
| − | + | 詳しい情報については、[https://docs.aws.amazon.com/IAM/latest/UserGuide/id_credentials_access-keys.html IAMユーザー のアクセスキーの管理]をご覧ください。 | |
| − | === | + | === ステップ 3: Lexをサービスとして追加し、サンプルボットを作成します。 === |
| − | # | + | # AWS マネジメントコンソールへサインインし、 [https://console.aws.amazon.com/lex/ Amazon Lex コンソール]を開きます。<br /><br /> |
| − | # | + | # ''ボットの作成'' ページで、カスタムボットを作成するか、サンプルテンプレートを基にすぐに使用できるボットを作成します。この例では、'''Book Trip''' サンプルを選択します。<br /><br /> |
| − | # | + | # ボットの作成ページが開きます。 今ページでAmazon Lex ボットを作成します。 |
| − | [[File:Lex-1.PNG|thumb|800px|center|Amazon Lex | + | [[File:Lex-1.PNG|thumb|800px|center|Amazon Lex ボットの作成ページ]] |
| − | === | + | === ステップ 4: ボットのワークスペースを確認します。 === |
| − | + | ボットのワークスペースが開きます。上部にエディター、設定、チャンネル、モニタリングという4つのタブがあります。この例では、'''エディター'''タブが使われます。後で他のタブに戻ることができます。 | |
| − | [[File:Lex-2.PNG|thumb|800px|center|Amazon Lex | + | [[File:Lex-2.PNG|thumb|800px|center|Amazon Lex エディタープロパティ]] |
| − | + | エディタータブには、各インテントのプロパティが含まれます。 | |
| − | === | + | === ステップ 5: インテントプロパティを編集します。 === |
| − | '' | + | ''インテント''とは、お客様が入力したキーワードによってトリガーされるアクションです。インテントは、お客様がしたいこととして捉えても良いです。例えば、Lexのサンプルボットに含まれている最初のインテントは"BookCar"です。これは、お客様がしたいこと(車を予約すること)と、ボットがお客様のテキスト入力に基づいて行うべきのことを認識することです。 |
| − | ==== | + | ==== プロパティ ==== |
| − | * ''' | + | * '''フレーズのサンプル''' :インテントをトリガーするフレーズ (つまり、キーワード)です (例: "車を予約する" または "車の予約を行う" または "車の予約")<br /><br /> |
| − | * ''' | + | * '''Lambdaの初期化と検証''' :お客様の入力を検証するAWS Lambda関数<br /><br /> |
| − | * ''' | + | * '''スロット''':インテントアクションを実行するためにお客様が提供するデータ(例えば、 "PickUpCity"というスロットは、車の貸出場所に関する顧客データを収集します)<br /><br /> |
| − | * ''' | + | * '''確認プロンプト''':インテントアクションを確認し、お客様にお客様にデータを入力するように求める質問 (例: "車のお受け取り場所は {PickUpCity}ですね。予約手続きを継続しますか ")<br /><br /> |
| − | * ''' | + | * '''フルフィルメント''':お客様の目的(インテント)を達成するために必要なAWSビジネスロジック <br /><br /> |
| − | ** '''AWS | + | ** '''AWS Lamda関数''':Amazon Lexボットのコードフックとして使われる関数です。これにより、初期化と検証、フルフィルメント、またはその両方を実行できます。<br /><br /> |
| − | ** ''' | + | ** '''パラメータをクライアントへ送信''':インテントのフルフィルメントのため、インテント情報をクライアントアプリケーション (つまり、Bright Patternシナリオ)に送信します。<br /><br /> |
| − | * ''' | + | * '''返答''':インテントをクローズするか、別のインテントを呼び出すメッセージまたは応答カード。 |
| − | === | + | === ステップ 6: 保存して作成します。 === |
| − | # | + | # この例では、エディタータブの内容を全てそのままにします。<br /><br /> |
| − | # | + | # 変更があった場合、下部の '''保存''' をクリックします。<br /><br /> |
| − | # | + | #ページの上部にある '''ビルド'''をクリックします。これにより、設定されたインテントに対応するボットが 作成されます。 |
| − | === | + | === ステップ 7: ボットをテストします。=== |
| − | + | 作成完了後、チャットウィンドウでボットをテストします。 | |
| − | # | + | #画面の右側で'''チャットボットのテスト'''をクリックし、チャットウィンドウをポップアウトします。<br /><br /> |
| − | # | + | # “旅行ツアーを予約する”など、リクエストを入力します。表示される内容をご覧ください。 |
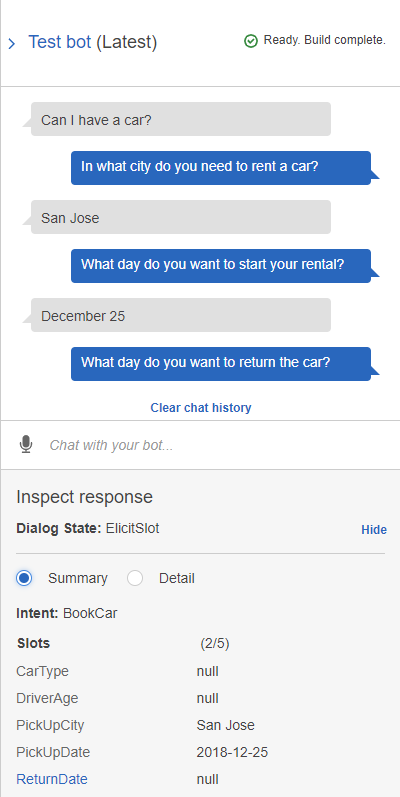
| − | [[File:Lex-9.PNG|thumb|650px|center| | + | [[File:Lex-9.PNG|thumb|650px|center| BookCarインテントを呼び出すテストチャット]] |
| − | === | + | === ステップ 8: ボットを公開します。 === |
| − | # | + | # ページの上部にある'''公開'''をクリックします。<br /><br /> |
| − | # | + | # 開いた''公開''ダイアログ で、設定されたボット用に新しいエイリアス (例: “TripBooker”) を選択または作成します。''エイリアス''は、ボットの特定のバージョンを指すために使用されます。同じボットに複数のエイリアスがあると、同じボットの異なるインテントとプロパティへアクセスできます。<br /><br /> |
| − | # | + | # もう一度 '''公開'''をクリックします。 |
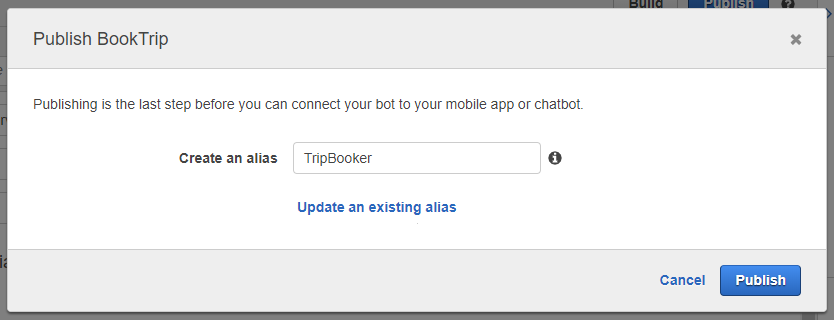
| − | [[File:Lex-3.PNG|thumb|800px|center| | + | [[File:Lex-3.PNG|thumb|800px|center|Amazon Lex ボットの原バージョン(エイリアス)を公開します。]] |
| − | == | + | ==次のステップ == |
| − | + | Bright Patternコンタクトセンターと統合できるAmazon Lexボットの基本設定が完了しました。次の操作を実行できます: | |
| − | * | + | * AWS書類の閲覧、 Amazon Lex インテントとスロットタイプの確認、必要に応じての編集を行います。 |
| − | * | + | * [[5.3:Tutorials-for-admins/SetupanAWSLexIntegrationAccount | AWS Lex ボット/チャットサジェスト統合アカウント]]を作成します。 |
| − | * | + | * [[Scenario-builder-reference-guide/HowtoCreateChatScenarioThatUsesBots | ボットを使うチャットシナリオ]]を作成します。 |
| − | * [[Tutorials-for-admins/AI/HowtoIntegrateBotswithChat | | + | * [[Tutorials-for-admins/AI/HowtoIntegrateBotswithChat | ボットに対応するウェブチャットを設定します。]] |
Latest revision as of 21:03, 7 April 2020
Amazon Lexボットの作成方法
Bright Patternコンタクトセンターは、AWSマネジメントコンソールからチャットボットを設定、テスト、展開するためのプラットフォームであるAmazon Lexと統合します。 Lexは、自動音声認識(ASR)と自然言語理解(NLU)の両方のテクノロジーを提供し、チャットボットがお客様の音声とテキストを認識し、意図を理解し、音声読み上げを可能にします。 Lexとの統合により、コンタクトセンターはチャットシナリオを通じてLexにアクセスし、チャット対話においてボットによるサポートサービスを提供できます。
この記事では、 設定されたチャットサービスにおいて対話型ボットとして利用できるAmazon Lexボットの設定方法について説明します。
手順
この手順では、初めてのAmazon Lexボットを設定するプロセスについて説明します。 Amazon Lexおよびその他のAWSリソースの詳細については、
AWS’s Amazon Lex Developer Guideをご覧ください。
ステップ 1: AWSアカウントを作成します。
- 作成がまだの場合、AWSアカウントの作成を行います。
ステップ 2: IAMユーザーの作成、管理者権限の付与、認証情報の保存を行います。
我々の統合アカウントには、Amazon Lexボットに接続して使用するためのアクセスキーが必要です。アクセスキーは、AWS Identity and Access Management(IAM)サービスで作成および管理されます。
アクセスキーを取得するには、次の操作を行います:
- AWS マネジメントコンソール > IAM ダッシュボードへ進みます。場所が分からない場合、AWS サービスで"IAMを検索します。"
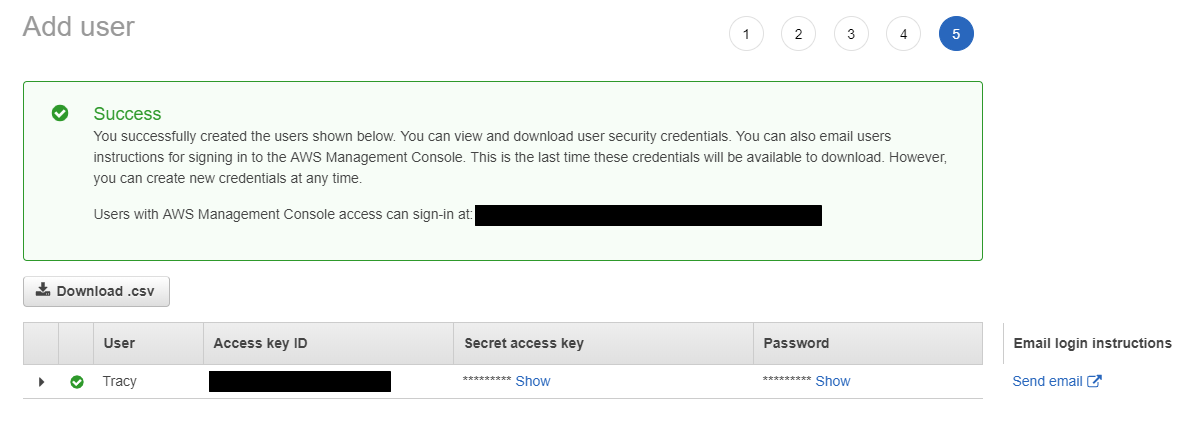
- IAMルートメニューで ユーザーをクリックした後、ユーザーの追加をクリックし、IAMユーザーの作成と管理者権限の付与を行います。ユーザーを追加すると、AWSへのアクセスに使用される認証情報が生成されます。
- access key ID (例: AKIAIOSFODNN7EXAMPLE)およびsecret access key (例: wJalrXUtnFEMI/K7MDENG/bPxRfiCYEXAMPLEKEY)をコピーします。このデータは、 AWS Lexボット/チャットサジェスト統合アカウントの設定の際に必要になるので、保存します。
詳しい情報については、IAMユーザー のアクセスキーの管理をご覧ください。
ステップ 3: Lexをサービスとして追加し、サンプルボットを作成します。
- AWS マネジメントコンソールへサインインし、 Amazon Lex コンソールを開きます。
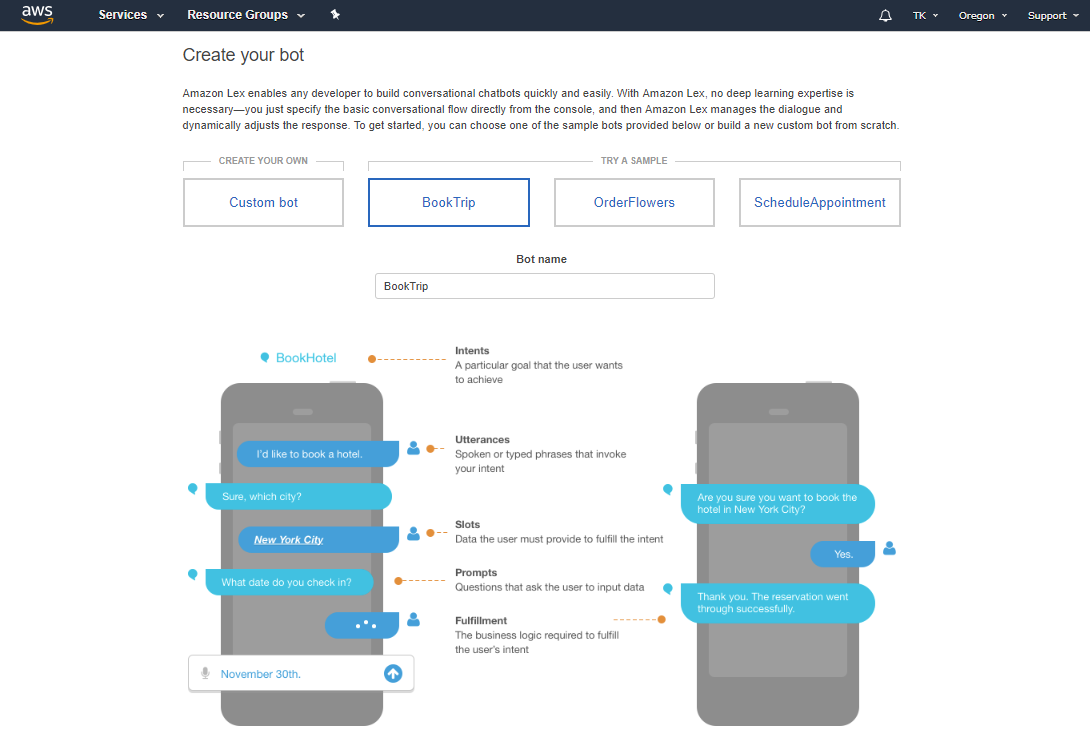
- ボットの作成 ページで、カスタムボットを作成するか、サンプルテンプレートを基にすぐに使用できるボットを作成します。この例では、Book Trip サンプルを選択します。
- ボットの作成ページが開きます。 今ページでAmazon Lex ボットを作成します。
ステップ 4: ボットのワークスペースを確認します。
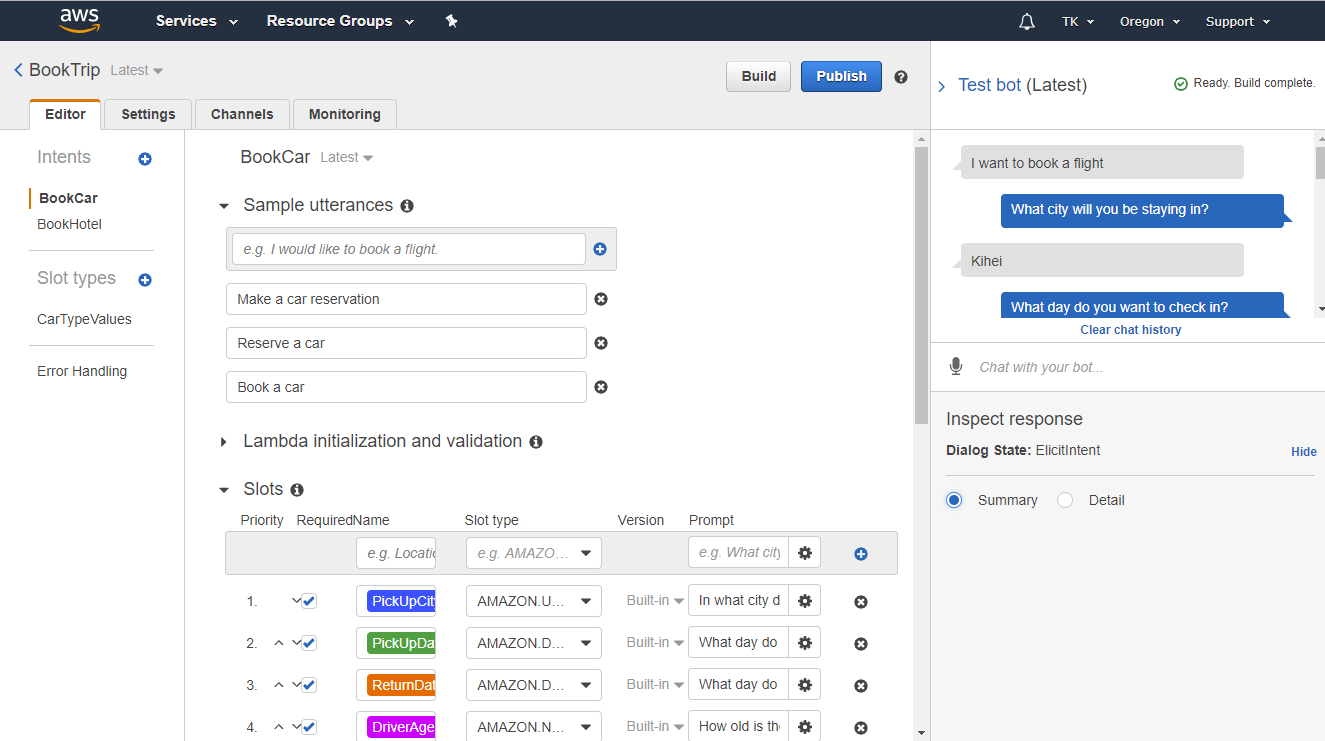
ボットのワークスペースが開きます。上部にエディター、設定、チャンネル、モニタリングという4つのタブがあります。この例では、エディタータブが使われます。後で他のタブに戻ることができます。
エディタータブには、各インテントのプロパティが含まれます。
ステップ 5: インテントプロパティを編集します。
インテントとは、お客様が入力したキーワードによってトリガーされるアクションです。インテントは、お客様がしたいこととして捉えても良いです。例えば、Lexのサンプルボットに含まれている最初のインテントは"BookCar"です。これは、お客様がしたいこと(車を予約すること)と、ボットがお客様のテキスト入力に基づいて行うべきのことを認識することです。
プロパティ
- フレーズのサンプル :インテントをトリガーするフレーズ (つまり、キーワード)です (例: "車を予約する" または "車の予約を行う" または "車の予約")
- Lambdaの初期化と検証 :お客様の入力を検証するAWS Lambda関数
- スロット:インテントアクションを実行するためにお客様が提供するデータ(例えば、 "PickUpCity"というスロットは、車の貸出場所に関する顧客データを収集します)
- 確認プロンプト:インテントアクションを確認し、お客様にお客様にデータを入力するように求める質問 (例: "車のお受け取り場所は {PickUpCity}ですね。予約手続きを継続しますか ")
- フルフィルメント:お客様の目的(インテント)を達成するために必要なAWSビジネスロジック
- AWS Lamda関数:Amazon Lexボットのコードフックとして使われる関数です。これにより、初期化と検証、フルフィルメント、またはその両方を実行できます。
- パラメータをクライアントへ送信:インテントのフルフィルメントのため、インテント情報をクライアントアプリケーション (つまり、Bright Patternシナリオ)に送信します。
- AWS Lamda関数:Amazon Lexボットのコードフックとして使われる関数です。これにより、初期化と検証、フルフィルメント、またはその両方を実行できます。
- 返答:インテントをクローズするか、別のインテントを呼び出すメッセージまたは応答カード。
ステップ 6: 保存して作成します。
- この例では、エディタータブの内容を全てそのままにします。
- 変更があった場合、下部の 保存 をクリックします。
- ページの上部にある ビルドをクリックします。これにより、設定されたインテントに対応するボットが 作成されます。
ステップ 7: ボットをテストします。
作成完了後、チャットウィンドウでボットをテストします。
- 画面の右側でチャットボットのテストをクリックし、チャットウィンドウをポップアウトします。
- “旅行ツアーを予約する”など、リクエストを入力します。表示される内容をご覧ください。
ステップ 8: ボットを公開します。
- ページの上部にある公開をクリックします。
- 開いた公開ダイアログ で、設定されたボット用に新しいエイリアス (例: “TripBooker”) を選択または作成します。エイリアスは、ボットの特定のバージョンを指すために使用されます。同じボットに複数のエイリアスがあると、同じボットの異なるインテントとプロパティへアクセスできます。
- もう一度 公開をクリックします。
次のステップ
Bright Patternコンタクトセンターと統合できるAmazon Lexボットの基本設定が完了しました。次の操作を実行できます:
- AWS書類の閲覧、 Amazon Lex インテントとスロットタイプの確認、必要に応じての編集を行います。
- AWS Lex ボット/チャットサジェスト統合アカウントを作成します。
- ボットを使うチャットシナリオを作成します。
- ボットに対応するウェブチャットを設定します。
< 前へ | 次へ >

