提供: Bright Pattern Documentation
(Created page with "== ステップ 1: ウェブチャットシナリオを作成します。== # コンタクトセンター管理者アプリケーションの ''設定 > シナリオ > チャ...") |
(Created page with "== ステップ2: シナリオの画面プロパティを指定します。 == # シナリオの画面プロパティは、画面の右側に表示されます。他のチャ...") |
||
| Line 6: | Line 6: | ||
# 画面の下にある'''+''' ボタンをクリックし、新しいチャットシナリオを追加します。または、''モバイルチャット''と呼ばれるウェブチャットシナリオテンプレートを選択して編集できます。 | # 画面の下にある'''+''' ボタンをクリックし、新しいチャットシナリオを追加します。または、''モバイルチャット''と呼ばれるウェブチャットシナリオテンプレートを選択して編集できます。 | ||
| − | == | + | == ステップ2: シナリオの画面プロパティを指定します。 == |
| − | # | + | # シナリオの画面プロパティは、画面の右側に表示されます。他のチャットシナリオと同じようにすべての値を指定します。これらの画面プロパティの詳しい情報については、''コンタクトセンター管理者ガイド''の [[contact-center-administrator-guide/Chat|チャット]]をご覧ください。 |
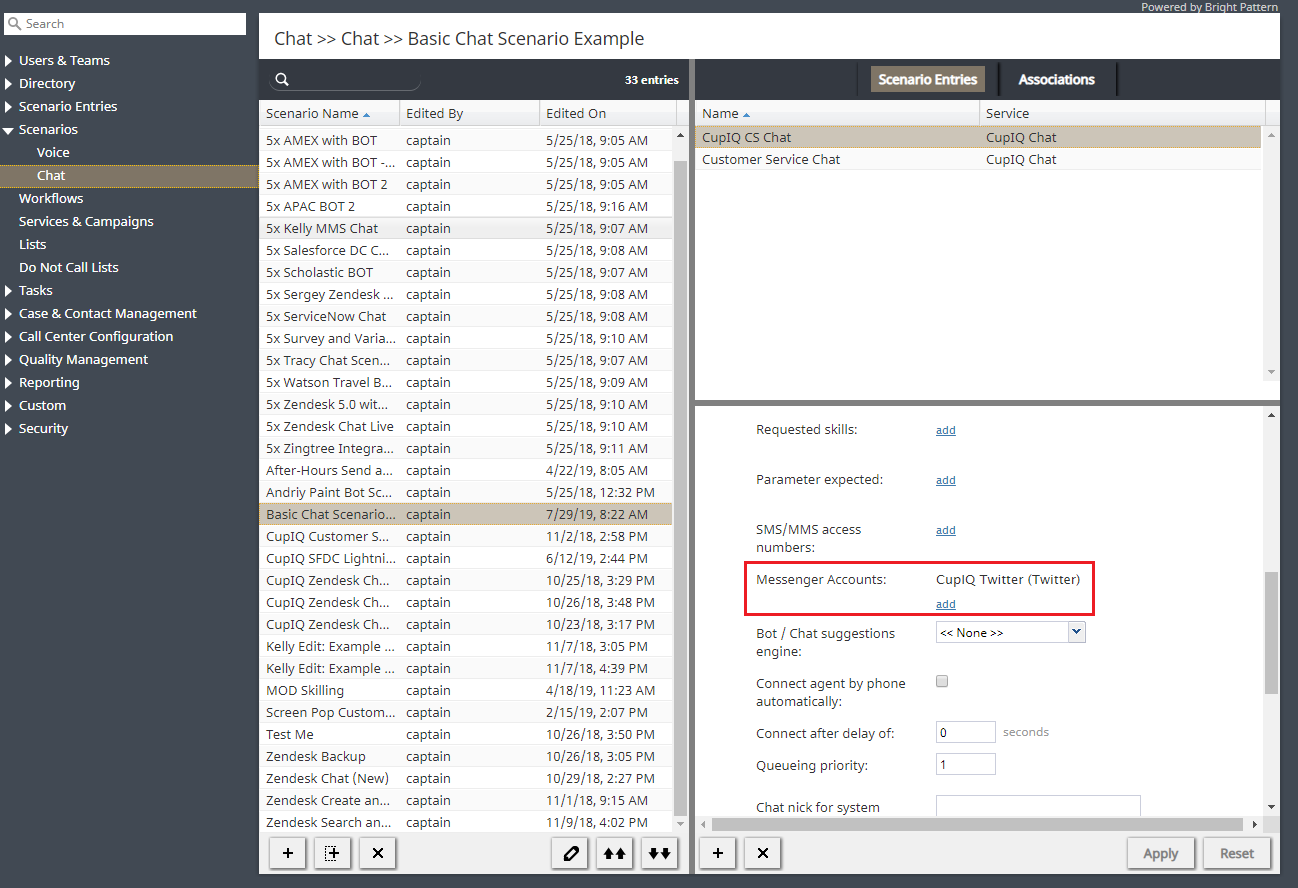
| − | # | + | # '''メッセンジャーアカウント'''というフィールドに特にご注意ください。このフィールドで、Twitter統合の名前を選択するか、'''追加/編集'''リンクをクリックして新しい統合を追加します。 |
Revision as of 14:04, 12 June 2020
• English
シナリオの設定
次の手順は、シナリオを作成するプロセスに関する手順です。
ステップ 1: ウェブチャットシナリオを作成します。
- コンタクトセンター管理者アプリケーションの 設定 > シナリオ > チャットへ進みます。
- 画面の下にある+ ボタンをクリックし、新しいチャットシナリオを追加します。または、モバイルチャットと呼ばれるウェブチャットシナリオテンプレートを選択して編集できます。
ステップ2: シナリオの画面プロパティを指定します。
- シナリオの画面プロパティは、画面の右側に表示されます。他のチャットシナリオと同じようにすべての値を指定します。これらの画面プロパティの詳しい情報については、コンタクトセンター管理者ガイドの チャットをご覧ください。
- メッセンジャーアカウントというフィールドに特にご注意ください。このフィールドで、Twitter統合の名前を選択するか、追加/編集リンクをクリックして新しい統合を追加します。
Step 3: Customize your scenario in Scenario Builder.
- Open your new scenario by double-clicking its name in the Chat list on the left. The scenario will open in the Scenario Builder application.
- Before you do anything else, save your scenario by clicking the Save As button and giving this scenario a unique name, such as "Messenger Chat," to differentiate the new scenario from the scenario template.
< 前へ | 次へ >

