Configuring Manually Rescheduled Preview Campaign Calls in Salesforce Lightning
If your preview campaign lists are created with a Salesforce.com SOQL query, it is possible for agents to manually reschedule call attempts with non-final dispositions by using the Agent Desktop widget in Salesforce Lightning. The following steps describe the configuration required to do this in your contact center environment.
Prerequisites
In order to follow this tutorial, you must do the following in your Contact Center Administrator application:
- Create or use an existing outbound preview campaign.
- Have a Salesforce.com integration account configured.
- Create a list from a Salesforce.com SOQL query.
Please make sure you have completed all steps from Salesforce Lightning integration configuration.
Download Example Workflow
Click the following link to download our example Salesforce.com workflow.
Media:Workflow_Lightning_Reschedule.zip
Procedure
- In the Contact Center Administrator application, section Configuration > Workflows, click the + button to add a new workflow.
- Double-click the workflow to open it in the Workflow Builder.
- Configure the workflow to update the SFDC calling list by adding the following workflow blocks. As you can see in our example workflow, the following blocks are required for updating the SFDC calling list:
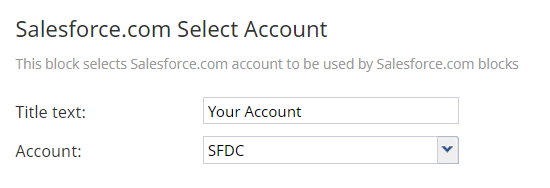
- Salesforce.com Select Account - This block specifies the Salesforce.com integration account to use.
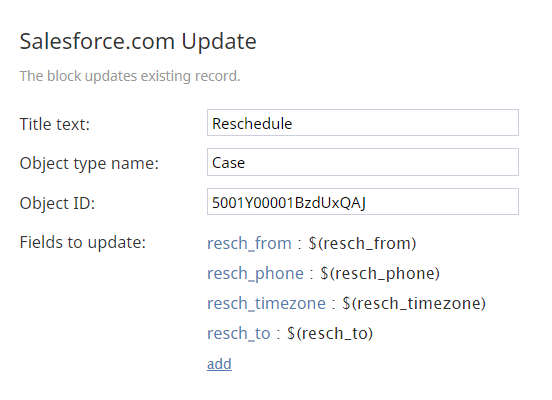
- Salesforce.com Update - In this block’s properties, you must set the following:
- Object type name - Case
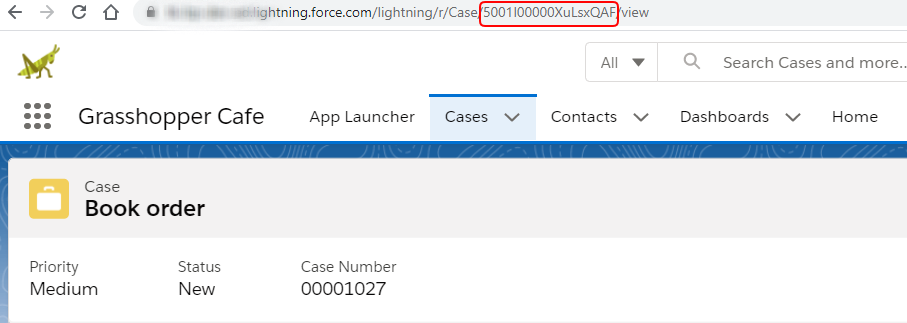
- Object ID - The object ID. To find the object ID:
In Salesforce, go to your object (e.g., case, account, etc.). In the address field of the browser, copy the object ID (string).
For example: - Fields to update - Click add to add fields with the following name/value pairs:
- name: resch_from | value: $(resch_from)
- name: resch_phone | value: $(resch_phone)
- name: resch_timezone | value: $(resch_timezone)
- name: resch_to | value: $(resch_to)
- name: resch_from | value: $(resch_from)
- Object type name - Case
- Salesforce.com Select Account - This block specifies the Salesforce.com integration account to use.
- Save the workflow.
- In the Workflow Entry pane, specify the following:
- Name - The name of the workflow entry
- Service - The name of the service that the workflow will use
- Triggers - The dispositions that will trigger manual call rescheduling (e.g., “Agent completes interaction with disposition Wrong person”). Ensure that your agents know which dispositions will trigger manual call rescheduling (e.g., “Wrong person” or “Bad record”). Note that the dispositions must not be final.
- Name - The name of the workflow entry
Results
If all goes well, agents who are logged in and Ready on the Agent Desktop widget in Salesforce Lightning will be able to reschedule preview campaign calls manually.
Agents must disposition the call with the disposition that was configured to trigger the workflow, fill in all the fields in the reschedule section, and complete the interaction. See section How to Reschedule Campaign Calls Manually from the Integrated Agent Desktop Widget for a detailed description of how agents can manually reschedule a campaign call.
Other Configuration Notes
This section describes other configuration or administrative tasks to be aware of when setting up your Salesforce integration and/or campaign.
(Optional) Edit the softphone size of your Salesforce call center
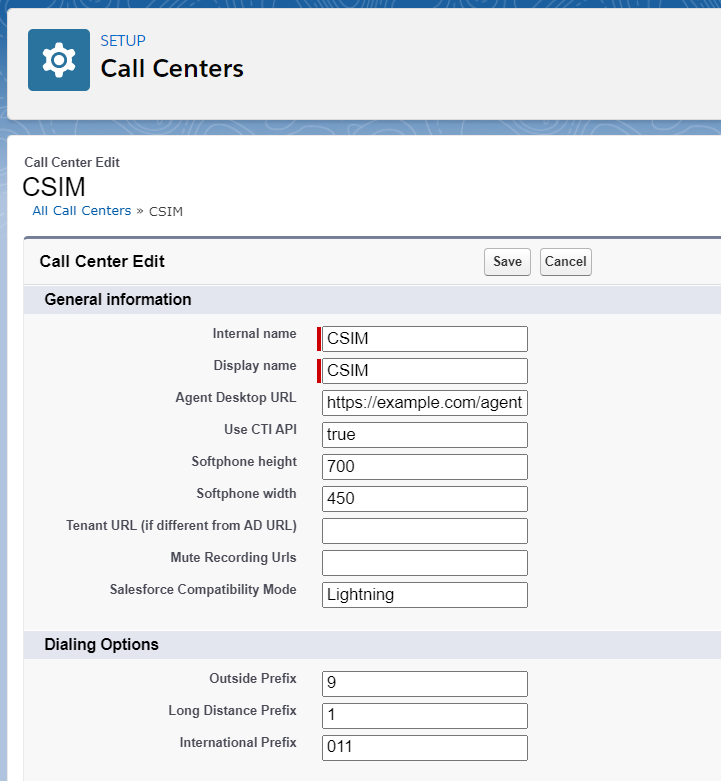
The reschedule options that will appear in the integrated Agent Desktop widget (aka the softphone) may take up more space than the widget frame can display, and some of the fields may appear truncated. To address this, you can edit the softphone size in Salesforce Lightning call center properties.
In Salesforce Lightning Setup, go to section Call Centers and edit the call center’s softphone to be wider than the default size. We recommend setting softphone height to 700 and softphone width to 450 for optimal viewing of the reschedule options in the widget.


