Web HTMLスニペットを使ってJavaScript変数を伝える方法
Web HTMLスニペットの使用方法で説明したように、web HTMLスニペットとは、チャットウィジェットの設定を定義するコードです。
このスニペットには、設定済みのチャットウィジェットのフォーマットとスタイル、チャットアプリケーションへのパス、モバイル/ Web APIのエンドポイント、コンタクトセンターのURL、チャットへのパスが含まれています。スニペットを編集して、first_name、last_name、email、phone_numberなどの一般的な変数をチャットを介して伝えることができます。スニペットを介してカスタム変数を伝えることもできます。
ここでは、スニペットでカスタム変数をフォーマットする方法について説明します。
Procedure
Step 1: Locate your chat scenario entry
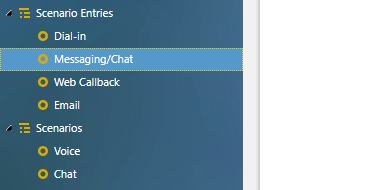
- In Contact Center Administrator, go to Configuration > Scenario Entries > Messaging/Chat and Select the desired chat scenario entry to view its properties.
- In the Properties tab, under Web HTML snippet, click the HTML snippet button.
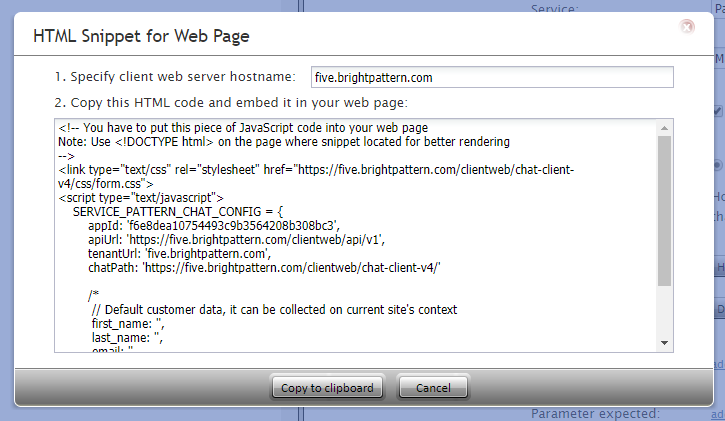
- The HTML Snippet for Web Page dialog will open.
Step 2: Enter your contact center's hostname and copy snippet
- In the field Specify client web server hostname, enter your contact center’s name (i.e., “example.brightpattern.com”). This action will populate the snippet with the hostname, making it ready to be copied.
- Click Copy to clipboard to copy the snippet.
- It looks like this:
<link type="text/css" rel="stylesheet" href="https://example.brightpattern.com/clientweb/chat-client-v4/css/form.css">
<script type="text/javascript">
   SERVICE_PATTERN_CHAT_CONFIG = {
       appId: '94066',
       apiUrl: 'https://example.brightpattern.com/clientweb/api/v1',
       tenantUrl: 'five.brightpattern.com',
       chatPath: 'https://example.brightpattern.com/clientweb/chat-client-v4/'

       /*
        // Default customer data, it can be collected on current site's context
        first_name: ,
        last_name: ,
        email: ,
        phone_number:
		*/
   };
</script>
<script src="https://example.brightpattern.com/clientweb/chat-client-v4/js/init.js"></script>
Step 3: Edit default customer data parameters
Notice that in the code comments, some customer data parameters are given: first_name, last_name, email, and phone_number. This customer information is the default set of data collected from the chat's pre-chat form and is passed to the system during the chat interaction.[1]
To pass custom variables through the chat, simply replace this:
      /*
        // Default customer data, it can be collected on current site's context
        first_name: ,
        last_name: ,
        email: ,
        phone_number:
		*/
With the following, where "variable_name" is the name of your variable, and "Value" is the value:
parameters:{
variable_name: 'Value',
}
For example:
 <link type="text/css" rel="stylesheet" href="https://example.brightpattern.com/clientweb/chat-client-v4/css/form.css">
 <script type="text/javascript">
    SERVICE_PATTERN_CHAT_CONFIG = {
        appId: '70a6624585ef2b0981fed84fcd12d4db',
        apiUrl: 'https://example.brightpattern.com/clientweb/api/v1',
        tenantUrl: 'example.brightpattern.com',
        chatPath: 'https://example.brightpattern.com/clientweb/chat-client-v4/',
		 parameters:{
		 test_var: 'Hello World',

		 }
    };
 </script>
 <script src="https://example.brightpattern.com/clientweb/chat-client-v4/js/init.js"></script>
Note: You should use either the default customer data parameters or your own parameters, but not both. Customer parameters use variable $(item.externalChatData) to collect all customer data from the pre-chat form. If you include both default and custom parameters, you will have duplicate entries of first_name, last_name, email, and phone_number.
For more information, see the Scenario Builder Reference Guide, section Variables.
Step 4: Paste the snippet into your HTML file
Once you are done with step 3, paste the snippet into your HTML for use on your webpage.
- ↑ Note that default variables like "name" can be passed without using parameters declaration.


