(Created new topic from branched topic Documentation:ServicePattern:viber-integration-guide:IntegrationConfiguration:5.1) |
|||
| Line 3: | Line 3: | ||
Viber integration configuration involves linking your Viber Public Account to your Bright Pattern Contact Center tenant. You can add a Viber integration account to Bright Pattern Contact Center by following these steps. | Viber integration configuration involves linking your Viber Public Account to your Bright Pattern Contact Center tenant. You can add a Viber integration account to Bright Pattern Contact Center by following these steps. | ||
| − | |||
== Step 1: Get your Viber Public Account credentials. == | == Step 1: Get your Viber Public Account credentials. == | ||
| Line 9: | Line 8: | ||
Note that a Public Account is not the same as a personal (i.e., nonbusiness, regular-use) account. Viber integration is supported for Public Accounts only. | Note that a Public Account is not the same as a personal (i.e., nonbusiness, regular-use) account. Viber integration is supported for Public Accounts only. | ||
| − | |||
== Step 2: Create a new integration account. == | == Step 2: Create a new integration account. == | ||
| − | # Log in as Admin to the Contact Center Administrator application. | + | # Log in as Admin to the Contact Center Administrator application.<br /><br /> |
| − | # Navigate to ''Configuration > Integration Accounts''. | + | # Navigate to ''Configuration > Integration Accounts''.<br /><br /> |
| − | # Click the '''Add''' "+" button to add a new account. | + | # Click the '''Add''' "+" button to add a new account.<br /><br /> |
# In the ''Create integration account'' window that appears, select '''Messenger''' and click '''OK'''. | # In the ''Create integration account'' window that appears, select '''Messenger''' and click '''OK'''. | ||
| Line 40: | Line 38: | ||
[[File:Viber-Integration-50.png|450px|thumbnail|center|Viber integration account]] | [[File:Viber-Integration-50.png|450px|thumbnail|center|Viber integration account]] | ||
| + | |||
== Step 4: Log in and/or complete Agent Desktop installation. == | == Step 4: Log in and/or complete Agent Desktop installation. == | ||
| − | # Sign in to Agent Desktop with your username and password, being sure to select your desired phone device. | + | # Sign in to Agent Desktop with your username and password, being sure to select your desired phone device.<br /><br /> |
| − | # By default, you log in with a [[contact-center-administrator-guide/Softphones|softphone]]. To choose another device, click the current ''Phone device'' setting and select the desired type of device from the menu that appears. For more information about the available device options, see the Bright Pattern Contact Center ''Agent Guide'', section [[agent-guide/SelectingaPhoneDevice|Selecting a Phone Device]]. | + | # By default, you log in with a [[contact-center-administrator-guide/Softphones|softphone]]. To choose another device, click the current ''Phone device'' setting and select the desired type of device from the menu that appears. For more information about the available device options, see the Bright Pattern Contact Center ''Agent Guide'', section [[agent-guide/SelectingaPhoneDevice|Selecting a Phone Device]].<br /><br /> |
# Click the '''Login''' button. | # Click the '''Login''' button. | ||
| Line 62: | Line 61: | ||
| − | + | ||
</translate> | </translate> | ||
Latest revision as of 21:49, 28 January 2019
Integration Configuration
When Bright Pattern Contact Center is integrated with Viber, your Bright Pattern Agent Desktop environment is equipped to handle customer-initiated interactions from the Viber application on a customer’s mobile phone, tablet, or computer. Incoming messages are routed to the integrated Agent Desktop environment, where agents have direct access to the phone, live chat, email, SMS text, various other mobile messenger apps, customer and agent records, interaction details, and more.
Viber integration configuration involves linking your Viber Public Account to your Bright Pattern Contact Center tenant. You can add a Viber integration account to Bright Pattern Contact Center by following these steps.
Step 1: Get your Viber Public Account credentials.
If you have not done so already, apply for a Public Account at viber.com. A Public Account is a business account that enables your contact center to interact with Viber users.
Note that a Public Account is not the same as a personal (i.e., nonbusiness, regular-use) account. Viber integration is supported for Public Accounts only.
Step 2: Create a new integration account.
- Log in as Admin to the Contact Center Administrator application.
- Navigate to Configuration > Integration Accounts.
- Click the Add "+" button to add a new account.
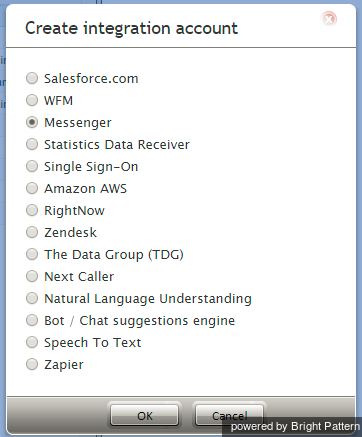
- In the Create integration account window that appears, select Messenger and click OK.
Step 3: Specify Viber integration account properties.
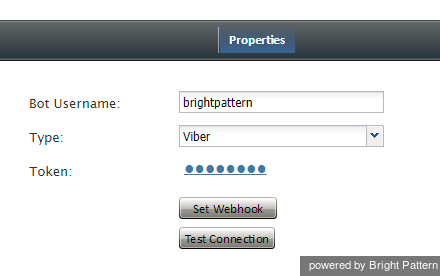
Using the credentials that you saved when you first applied for a Viber Public Account, enter values for the following screen properties. (If you do not know your credentials, ask your system administrator.)
- Bot Username - The exact name of your Viber Public Account username
- Type - For this integration account, select Viber as the type of integration.
- Token - The password that is given to you after your Public Account application is approved
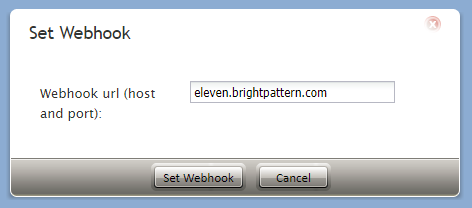
- Set Webhook - Set Webhook is necessary for Viber to send you a message from the customer. Clicking the Set Webhook button opens the Set Webhook window, where the Webhook URL is entered.
- Webhook url - The Webhook URL is the address of your server and port number (e.g., “office.yourcompany.com”). If you do not know the server URL, ask your system administrator.
- Test Connection - This button tests the credentials and confirms whether the connection is valid.
Click Apply to save your changes.
Step 4: Log in and/or complete Agent Desktop installation.
- Sign in to Agent Desktop with your username and password, being sure to select your desired phone device.
- By default, you log in with a softphone. To choose another device, click the current Phone device setting and select the desired type of device from the menu that appears. For more information about the available device options, see the Bright Pattern Contact Center Agent Guide, section Selecting a Phone Device.
- Click the Login button.
Note that if this is your first login into Agent Desktop on the given computer, you will be prompted to install the Agent Desktop Helper Application.
Setting the agent state to Ready will allow incoming Viber messages to be routed to you. If you accept such a message, the customer’s message opens in Agent Desktop in the same manner as any other web chat or SMS text. All of Agent Desktop’s features and controls are available to you in the integrated interface.
For more information about using Agent Desktop, see the Bright Pattern Contact Center Agent Guide.


