From Bright Pattern Documentation
• 5.19
Add a Password Reset Integration Account
The Password Reset Module (PRM) integrates Windows Active Directory Domain Services (AD DS) and Bright Pattern Contact Center (BPCC). After the PRM is enabled, installed, and configured, administrators can automate password resets by adding the Windows AD Password Reset Block to voice and chat scenarios.
For Password Reset Module installation and configuration instructions, see Password Reset Module Installation and Password Reset Module Configuration.
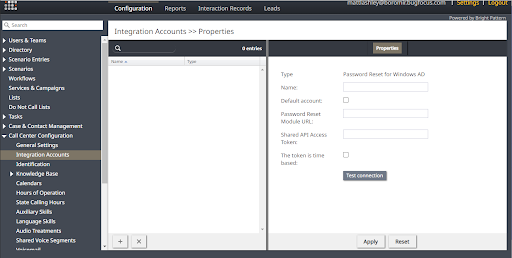
In the Contact Center Administrator (CCA), go to Call Center Configuration > Integration Accounts.
- Click the Add account button .
- Select Password Reset and click "OK".
| If Password Reset isn’t an option, contact your service provider. Password Reset must be enabled for a Bright Pattern Contact Center before it can be integrated. | ||
- Enter a value for Name.
- If this is the default Password Reset for Windows AD integration account, click the 'Default account checkbox.
- Enter the Password Reset Module URL.
- This is the URL of the server hosting the Password Reset Module (PRM). Requests transport over HTTPS and the https:// prefix is added. If the PRM listens on a port other than 443, append it to the URL.
- Valid URL examples:
- https://passwordreset.example.com:8080
- passwordreset.example.com
- http://passwordreset.example.com
- Enter the Shared API Access Token.
- The value entered is masked with asterisks in the text box and stored encrypted in the database when applied.
- If the PRM uses time-based tokens, click The token is time based checkbox.
- Click Test Connection. The system sends a request to the PRM using the configured parameters, then displays a success or error message.
- Click Apply to save the configuration.


