Configure Facebook Messenger for Integration with Bright Pattern Contact Center
Integrating Facebook Messenger with Bright Pattern Contact Center requires a Bright Pattern Contact Center integration account. The connection parameters page in Bright Pattern Contact Center administrator contains settable parameters for a Facebook Page username, a Facebook Page ID, a Facebook access token, and a webhook verify token.
For more information about the Bright Pattern Contact Center integration connection parameters page, see Integrate Facebook Messenger with Bright Pattern Contact Center.
These instructions describe how to set up Facebook Messenger to get the required values to fill in the Bright Pattern Contact Center integration account connection parameters page.
- Create a Facebook App
- Create a Facebook Page and Set the Username
- Link the Facebook App to the Facebook Page
- Generate a Facebook Access Token
- Set the Webhook and Callback URL
| These instructions are current at the time of publication. Check for updated instructions by visiting Meta for Developers. | ||
Dependencies
- A Meta Developer's account
- Administrator access to Bright Pattern Contact Center Administrator
Create a Facebook App
- Log in to http://developers.facebook.com/.
- Click My Apps.
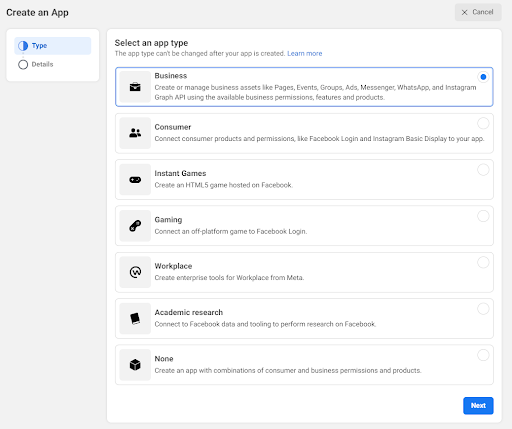
- Click Create App.
- Select Business as the app type, then click Next.
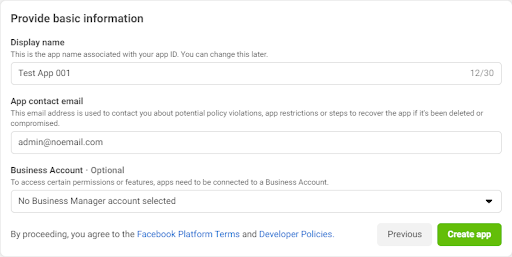
- Enter values for Display Name and App contact email, then click Create App.
- On the Add products to your app page, find the Messenger tile, then click Set up to open the Messenger > Settings page.
Create a Facebook Page and Set the Username
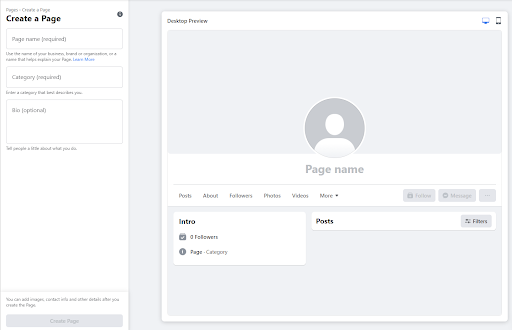
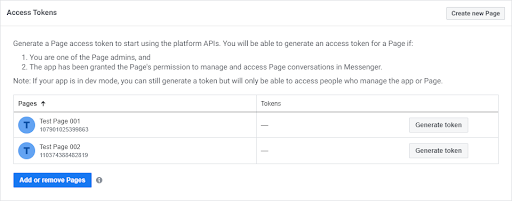
- Click Create New Page in the Access Tokens section of the Settings page.
- Enter values for Page name and Category, then click Create Page.
- Click See all Profiles, then select a Page.
- Click the Page's profile picture in the top right.
- Click Settings & privacy, then click Settings.
- Below General Page settings, click Edit next to Username.
- Enter a username.
| This username will be entered into the Page Username field of the Connection Parameters page in Bright Pattern Contact Center Administrator when configuring a Facebook Integration account. | ||
- Click Save changes.
- Click the profile photo in the top right.
- Click See all Profiles, then select a Page.
- Click Save.
- Navigate to the page.
Link the Facebook App to the Page
- Click Messenger > Settings in the App Dashboard.
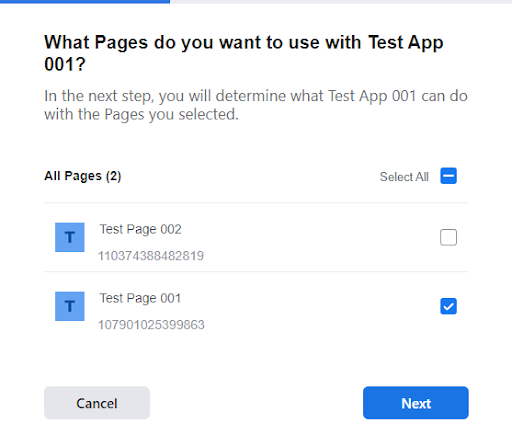
- Find the Access Tokens section and click Add or remove Pages.
- Select the Pages to use with the app, then click Next.
Generate a Facebook Access Token
- Click Messenger > Settings in the App Dashboard.
- In the Access Tokens section, find the added Page, then click Generate token.
- Copy the generated token.
| This token will be entered into the Token field of the Connection Parameters page in Bright Pattern Contact Center Administrator when configuring a Facebook Integration account. | ||
Set the Webhook and Callback URL
- Click Messenger > Settings in the App Dashboard.
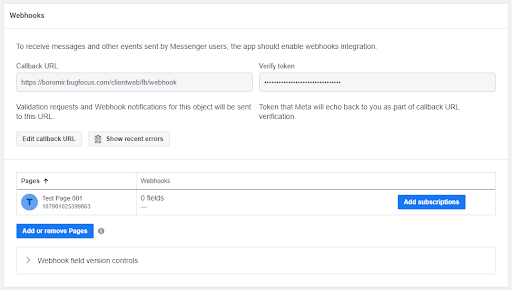
- In the Webhooks section, enter values for Callback URL and Verify token.
The format of the Callback URL:
https://tenant_url/clientweb/fb/webhook
- tenant_url is the domain of your Bright Pattern Contact Center client web server.
| The Verify token is generated in Bright Pattern Contact Center Administrator and is found in the Webhook Verify Token field in the connection parameters page of the Facebook Messenger integration account. For more, see configuring a Facebook Integration account. | ||
- In the Webhooks section, click Add Subscription on the Page’s row in the Pages table.
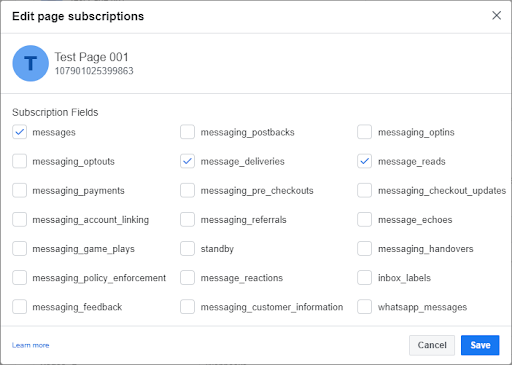
- Select messages, message_deliveries, and message_reads in the Edit page subscriptions dialog, then click Save.

