Cisco SPA Hardphone Configuration
These instructions will show you how to configure and register a Cisco hardphone manually on the Cisco Configuration Utility web interface. We are using a Cisco SPA508G as an example. Note that this example can be used for any Cisco hardphone in the “SPA” model family.
Prerequisites
You should have Bright Pattern Contact Center version 5.2.x or later.
In order to configure your Cisco phones with Bright Pattern Contact Center software, you will require a special outbound proxy; Bright Pattern Operations will create this for you upon request. (See Step 5.1.b. in the following procedure.)
Procedure
1. Locate the IP address of the phone
On your phone, press the Menu button, and then select the Network option; the IP address should be listed here.
2. Check for software updates on the Cisco phone (important)
Make sure you are running the latest firmware version for your phone. We recommend updating your phone at least once per year. For updates, visit the Cisco Software Download page.
3. Perform a factory reset (important)
On your phone, press the Menu button, and then select Factory Reset. The phone will restart.
4. Open the phone’s configuration utility web interface
- Enter the IP address of the Cisco phone in the address bar of your web browser.
- In the top right corner of the page, click Admin Login and then click advanced.

Alternatively, you may navigate directly to the following to get to the same place: http://<your-phone-IP-address>/admin/advanced - Click Voice and then select the extension tab you wish to configure. In this example, we are configuring Ext 2.


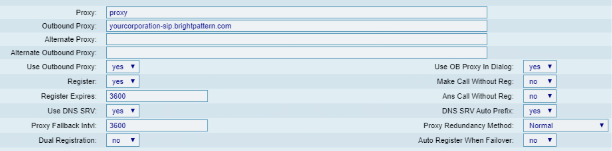
5. Edit the extension settings
Note: Configuration requires the following settings to be changed. Any settings not specifically mentioned in this step are set by user.
- In the extension settings, under Proxy and Registration, set:
- Proxy: The access domain of your Bright Pattern tenant, which is found in the Bright Pattern Service Provider application, section Tenants > Properties
- Outbound Proxy: The setting created for you upon request to Bright Pattern Operations (e.g., “yourcorporation-sip.brightpattern.com”)
- Use Outbound Proxy: Select “yes” (default is “no”)
- Register: Select “yes”
- Use DNS SRV: Select “yes”
- DNS SRV Auto Prefix: Select “yes”
- Under Subscriber Information, set:
- User ID: The phone extension number (e.g., “1000”)
- Password: The password of the phone extension, set by user

6. Edit System configuration settings
- Click the System tab to edit system configuration settings.

- Under Optional Network Configuration, set:
- NTP Enable: Select “yes”
- Secondary NTP Server: Set “0.pool.ntp.org”

< Previous | Next >

