Integration Configuration
This procedure describes how to configure the Microsoft Dynamics 365 CRM and Microsoft Azure to enable MS Dynamics integration with Bright Pattern Contact Center software. Part of this procedure includes enabling (i.e., authenticating and authorizing) Bright Pattern scenario blocks for use with Dynamics 365 data via the Web API.
Step 1: Sign in to Microsoft Dynamics 365
If you haven't already done so, get a Microsoft Dynamics 365 account and create a user ID. Get a trial organization of Microsoft Dynamics 365 or sign in to your instance.
Step 2: Configure Microsoft Azure and Dynamics 365 CRM for Web API access
- In the Azure Portal > Azure Active Directory > App Registrations, click Add New to add a new registered app.
- Edit the registered app fields with the following values:
- Application type - Web app / API
- Application ID - The Client ID
- Object ID - This ID will be filled in for the registered app
- Home page - http://localhost [Note: use exactly this value as it also will be hardcoded in the Azure Portal]
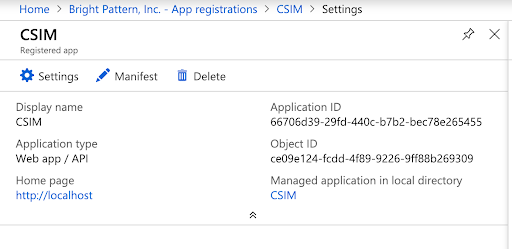
App registration fields
- Application type - Web app / API
- In the newly created app, go to Required Permissions > APIs > Add to add API access.
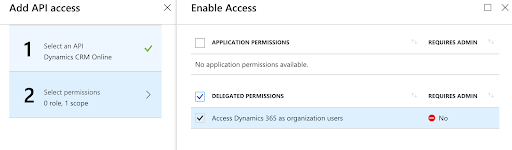
Add API access - In Add API access, make the following selections:
- In Select an API, select Dynamics CRM Online API.
- Select the checkbox for Delegated Permissions.
- When done, click Grant Permissions.
- In Select an API, select Dynamics CRM Online API.
- In the newly created app, go to Keys and:
- In Description, name the app key.
- In Expires, set Never expires.
- Click Save. Once saved, the key value will be shown. The key value is the Client Secret, which you need for later configuration steps.
- Copy the key value now because this is the only moment you can see the actual key.
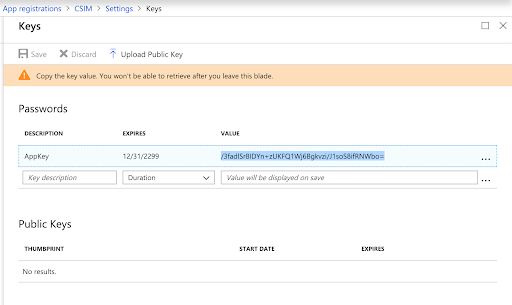
The key is the Client Secret
- In Description, name the app key.
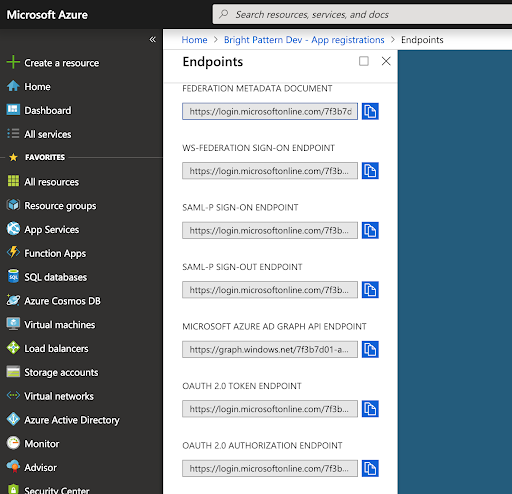
- Go to App Registrations > Endpoints and copy the OAUTH 2.0 Authorization Endpoint and OAUTH 2.0 Token Endpoint values.
OAUTH 2.0 endpoint values - Open the Dynamics 365 CRM (not Azure) application, and go to Settings > Security > Security Roles.
- Add new role (or copy existing role).
- Make sure the role has required privileges (the screenshot shown only grants access to the Account CRM object).
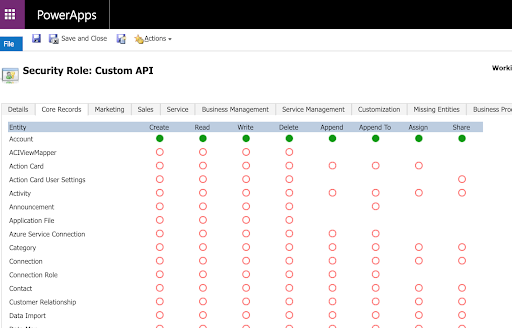
Role assignment
- Add new role (or copy existing role).
- Go to Settings > Security > Users.
- Switch view to Application Users.
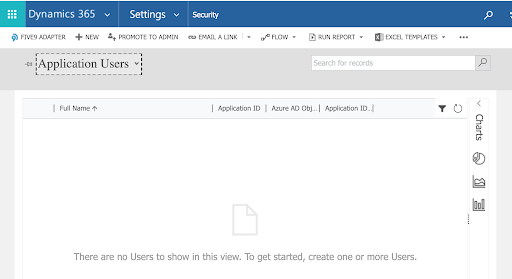
Application Users view
- Switch view to Application Users.
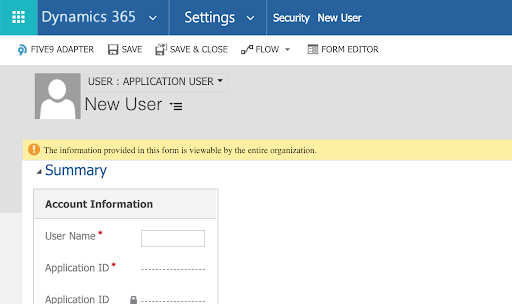
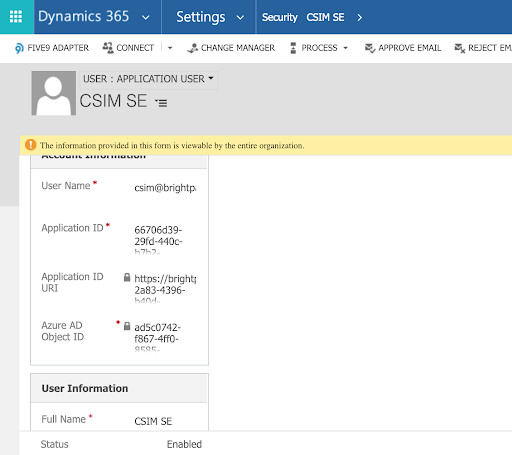
- Add new user.
- Once new user form is shown, change it to Application User.
User account information
- Once new user form is shown, change it to Application User.
- In Account Information, fill in the following:
- User Name
- Application ID - Your application ID (i.e., the Client ID) that you got from step 2
- User Name
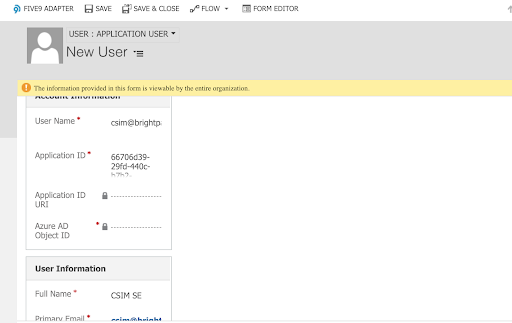
- In User Information, fill in the following:
- Full Name - User's first name and last name
- Primary Email - User's email address
Completed New User record
- Full Name - User's first name and last name
- Save the record. At this time, the Application ID URI and Azure AD Object ID fields are filled in.
Save user record - Click Manage Roles.
- In Manage User Roles, add the custom role created on step 2.7 to that user.
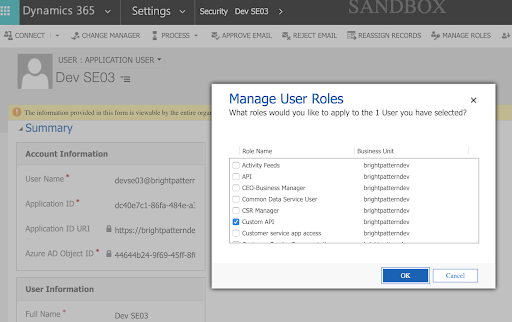
Manage User Roles
- In Manage User Roles, add the custom role created on step 2.7 to that user.


This completes Microsoft Dynamics 365 CRM and Azure configuration.
Step 3: Get configuration values for access to CRM Web API
The following configuration (Configuration DB table) will be needed by the Bright Pattern Scenario Engine in order to use the CRM Web API. These configuration values should be provided by the Azure portal.
CREATE TABLE 'ms_dynamics_365_data' (
 'ID' varchar(255) NOT NULL,
 'VERSION' bigint(20) DEFAULT NULL,
 'DEFAULT_ACCOUNT' tinyint(1) NOT NULL DEFAULT '0',
 'TENANT_ID' varchar(255) NOT NULL,
 'NAME' varchar(255) NOT NULL,
 'CLIENT_ID' varchar(255) NOT NULL,
 'CLIENT_SECRET' varchar(255) DEFAULT NULL,
 'REFRESH_TOKEN' longtext NOT NULL, (encrypted)
 'AUTHORIZATION_URL' varchar(255) NOT NULL,
 'TOKEN_URL' varchar(255) NOT NULL,
 'API_URL' varchar(255) NOT NULL,
PRIMARY KEY ('ID')
 ) ENGINE=InnoDB DEFAULT CHARSET=utf8;
Step 4: Get refresh token for Web API access by adding integration account
A refresh token can be obtained only after you provide your credentials to access the CRM Web API. These credentials are placed in the Microsoft Dynamics 365 integration account properties.
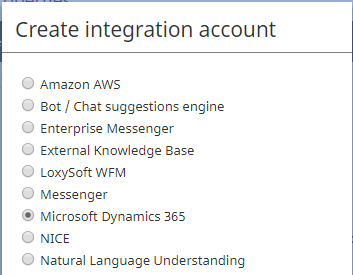
- In Contact Center Administrator > Integration Accounts, add an integration account of type Microsoft Dynamics 365.
Select integration account type - Edit properties:
- Type - By default, “Microsoft Dynamics 365” because this is the type of integration account you are creating
- Name - The unique name (any) of the account
- Default account - Because it is possible to have multiple integration accounts of this type, select this checkbox to enable this account as the default
- Authorization URL - The authorization code (see “How to Get Authorization URL”)
- Token URL - The “Home page” value (i.e., “http://localhost”) you entered in step 2.2 of this procedure
- API URL - The API's URL with your instance name (e.g., “https://example.crm.dynamics.com/api/data/v9.0”)
- Client ID - The application ID you got from step 2.2 of this procedure
- Client Secret - The key you got from step 2.2 of this procedure
- Request token - Uses the credentials you've provided to access Microsoft's Web API and request a refresh token. When clicked, the token will appear in the Refresh token field
- Refresh token - The refresh token you got from requesting the authorization URL (see “How to Get Authorization URL”).
- Test connection - Tests the credentials and confirms whether the connection between Bright Pattern and Microsoft is valid.
- Type - By default, “Microsoft Dynamics 365” because this is the type of integration account you are creating

How to Get Authorization URL
Get a one-time authorization code using AUTHORIZATION as base URL, client ID (i.e., the application ID), client secret (i.e., key), redirect URL (i.e., “http://localhost”), and API_URL (e.g., “https://brightpatterndev.crm.dynamics.com/api/data/v9.0”).
Like this:
<base_url>?grant_type=client_credentials&client_id=<CLIENT_ID>&client_secret=<CLIENT_SECRET>&response_type=code&redirect_url=http://localhost& scope=offline_access&resource=<API_URL>
For example:
https://login.microsoftonline.com/7f3b7d01-a049-4dfd-9dbd-d394e711c3a0/oauth2/authorize? grant_type=client_credentials&client_id=dc40e7c1-86fa-484e-a38b-bec0d31c945a&client_secret=uxjgDon7fWbis1ijuCDwPifHooG4BV2lVTUFRGVttt4%3D&response_type=code&redirect_url=http://localhost&scope=offline_access&resource=https://brightpatterndev.crm.dynamics.com
This will return a one-time-use code at redirect URL. This code should not be saved in the database; it is only used once to obtain a refresh token:
http://localhost/?code=&session_state=XXX
Now use this code to obtain access and refresh tokens by issuing HTTP POST request to the token URL (i.e., “http://localhost”) with the following body:
redirect_uri=http://localhost&client_id=<CLIENT_ID>&client_secret=<CLIENT_SECRET>&grant_type=authorization_code&code=
In response, the token service will return the following JSON encoded data:
{
	"token_type":"Bearer",
	"scope":"user_impersonation",
	"expires_in":"3599",
	"ext_expires_in":"3599",
	"expires_on":"1548192804",
	"not_before":"1548188904",
	"resource":"https://<your.instance.name>.crm.dynamics.com",
	"access_token":"XXX",
	"refresh_token":"YYY",
	"id_token":"ZZZ"
}
You only need refresh_token. Store it to the REFRESH_TOKEN field in the Configuration DB table.
Step 5: Get access token to let Scenario Engine and Workflow Engine use CRM Web API
The server components will use refresh token from configuration to obtain an access token first. Access tokens typically expire within 1 hour by default.
Issue HTTP POST request to the <TOKEN_URL> with the following body:
client_id=<CLIENT_ID>&client_secret=<CLIENT_SECRET>&grant_type=refresh_token&refresh_token=<REFRESH_TOKEN>
In response, the token service will return the following JSON encoded data:
{
	"token_type":"Bearer",
	"scope":"user_impersonation",
	"expires_in":"3599",
	"ext_expires_in":"3599",
	"expires_on":"1548192804",
	"not_before":"1548188904",
	"resource":"https://example.crm.dynamics.com",
	"access_token":"XXX",
	"refresh_token":"YYY"
}
Use the access token from the previous step to work with 'API_URL by adding an Authorization HTTP header with the following value:
Authorization: Bearer <access_token>
Once the access token expires, repeat step 1 to get a new access token.
< Previous | Next >