Contact Identification and Screen Pop
Using Microsoft Dynamics scenario blocks, you can identify repeat customers using contact information stored in your Dynamics 365 database.
This article explains how to create a voice scenario that
- Uses the Microsoft Dynamics Select Account scenario block to access your CRM database via credentials established in your Microsoft Dynamics 365 integration account
- Uses the Microsoft Dynamics Search Object scenario block to use the caller’s phone number to search for the contact in the CRM database
- Uses the Microsoft Dynamics Screen Pop scenario block to screen-pop the caller’s contact information to the agent accepting the call
- Finds a skilled agent and connects the call
Prerequisites
If you have not already done so, please complete Dynamics 365 integration configuration.
Note: Scenarios utilizing Microsoft Dynamics blocks require referencing exact Microsoft entity terminology. For more information about contact objects, see Microsoft’s Contact Entity Reference.
Scenario Example
Click the following link to download an annotated version of this voice scenario example. Media:App_MS+Dynamics+Search+and+Pop+Contact.zip
For instructions on how to import this file into your contact center, see the Contact Center Administrator Guide, section Scenarios Overview > How to Export and Import Scenarios.
For general information about scenarios, refer to the Scenario Builder Reference Guide, section Scenario Builder Overview.
Scenario Flow
Scenarios are made up of scenario blocks that specify how interactions are processed. Detailed descriptions of Bright Pattern scenario blocks are available in this guide's Scenario Block Definitions section.
Finally, note that this is an example scenario only and not intended for production use. All conditional exits should be defined with actions for production use.
Scenario Overview
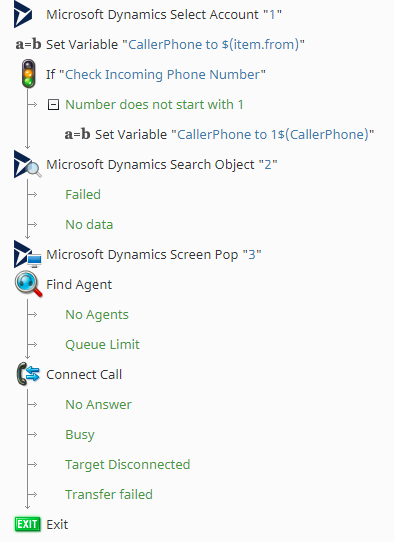
The diagram shown illustrates what the complete scenario looks like when designed in the Scenario Builder application.
1. "Microsoft Dynamics Select Account" specifies the integration account
All scenarios that incorporate Microsoft Dynamics scenario blocks should include the Microsoft Dynamics Select Account block. In this block, you are selecting a Microsoft Dynamics 365 integration account.
It's possible for your contact center to have multiple integration accounts of the same type, so it's important to specify which one will be used for this scenario. If you do not see the desired account listed, go back and add an integration account.
2. "Set Variable" assigns a variable to the caller’s number
In this example, the Set Variable block is used to assign a variable to the caller’s phone number.
Variable $(item.from) specifies the origination address (e.g., phone number, chat user display name, or chat user IP address). This variable is also known as ANI.
3. "If" checks the incoming phone number for the “1” prefix
Using the If block, we set a condition that specifies what happens if the caller’s phone number does not begin with “1.” If it does not, then we use another Set Variable to specify that variable “CallerPhone” should have a value of 1$(CallerPhone). That adds the “1” where it’s missing.
4. "Microsoft Dynamics Search Object" finds the caller in the CRM database
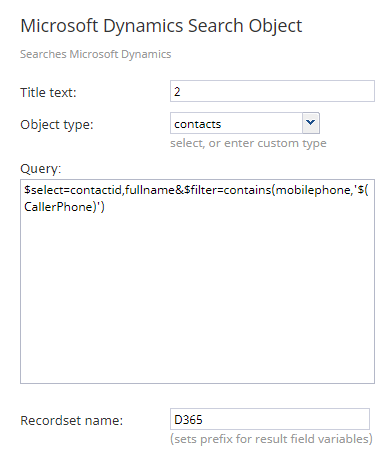
The Microsoft Dynamics Search Object block is where you define the following:
- The type of object being searched for (e.g., account, contact, opportunity, etc.); this is noted in the Object type field
- The specific search query, that is, what it is that you're looking for (e.g., a last name, business phone number, etc.); this is configured in the Query field
In our example, we want to see if a saved contact’s mobile phone matches the incoming caller’s phone number. To do this, first, we enter contacts in the Object type field; you may enter an object type or select one from the drop-down menu. This tells the system to look at contacts objects. Note that the value in the Object type field is the Dynamics Entity Set Name. For more information, see Microsoft’s Contact Entity Reference.
Then, in the Query field, we configure a query that tells the system to look in our Dynamics contacts specifically for a contact whose saved mobile phone number matches the value of the $(CallerPhone) variable (i.e., the point of origination). Note: The $(CallerPhone) value must match the Dynamics contact's saved mobile phone number exactly (e.g., 16505555555).
Finally, the results of the search will be passed to the Recordset name field (e.g., "D365"). The recordset name will be used in the Microsoft Dynamics Screen Pop block
5. "Microsoft Dynamics Screen Pop" displays the caller’s contact object
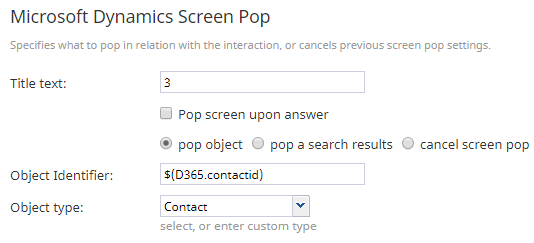
The Microsoft Dynamics Screen Pop block can be configured to do the following:
- Pop a Dynamics object (e.g., contact, invoice, etc.)
- Pop the results of a Dynamics search (i.e., the results from the Microsoft Dynamics Search Object block)
- Cancel the screen pop of a specific Dynamics 365 object that may have been set by a previous use of this block in the same scenario.
In our example, if a saved Dynamics contact object matches the mobile phone number we searched for in the Microsoft Dynamics Search Object block, we want the contact object to pop in the agent’s Dynamics screen.
This is accomplished by selecting the Pop object option, then entering the $(D365.contactid) variable in the Object identifier field. D365 is the recordset name (i.e., search results) from the Microsoft Dynamics Search Object block and contactid is the unique Dynamics identifier of the contact. For more information, see Microsoft’s Contact Entity Reference.
If the system finds a matching contact object, it will pop when the call is connected. If the phone number of the incoming caller does not match the listed mobile phone of the contact, a new contact object will pop.
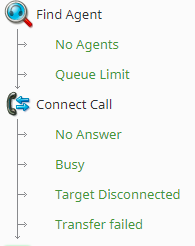
6. "Find Agent" / "Connect Call"
Finally, we add the Find Agent block followed by the Connect Call block. The most basic voice scenario consists of these two blocks. Together, they find an available agent then connect the call to this agent. For more information about these blocks, see How to Create a Basic Scenario.
As a reminder, all conditional exits should have a defined action to ensure the integrity of your scenario.
7. Save!
Be sure to click Save to apply your changes. Note that closing your web browser window or tab will close Scenario Builder without saving, and you will lose your work.


