imported>Sergem |
(Updated via BpDeleteTranslateTags script) |
||
| Line 1: | Line 1: | ||
| − | + | = How to Create a Basic Scenario = | |
This article describes how to create the most basic type of scenario, where the system finds an available agent and connects to a customer. | This article describes how to create the most basic type of scenario, where the system finds an available agent and connects to a customer. | ||
| − | == About == | + | == About == |
A basic scenario is a foundation upon which a more elaborate scenario can be built. Whether you are creating a [[#Chat|chat]] or [[#Voice|voice]] scenario, there are only two actions that need to occur: finding an agent and then connecting the agent to the customer. For a voice scenario, the blocks are [[Scenario-builder-reference-guide/FindAgent|Find Agent]] and [[Scenario-builder-reference-guide/ConnectCall|Connect Call]]; for a chat scenario, the blocks are [[Scenario-builder-reference-guide/FindAgent|Find Agent (Chat)]] and [[Scenario-builder-reference-guide/ConnectChat|Connect Chat]]. | A basic scenario is a foundation upon which a more elaborate scenario can be built. Whether you are creating a [[#Chat|chat]] or [[#Voice|voice]] scenario, there are only two actions that need to occur: finding an agent and then connecting the agent to the customer. For a voice scenario, the blocks are [[Scenario-builder-reference-guide/FindAgent|Find Agent]] and [[Scenario-builder-reference-guide/ConnectCall|Connect Call]]; for a chat scenario, the blocks are [[Scenario-builder-reference-guide/FindAgent|Find Agent (Chat)]] and [[Scenario-builder-reference-guide/ConnectChat|Connect Chat]]. | ||
| − | |||
Note that when you configure a basic scenario, the Find Agent block and Connect Call/Chat block should always be arranged back-to-back. The reason for this is the Find Agent block will find the agent but it does not open the communication channel; it sets the destination of the interaction using the [[Scenario-builder-reference-guide/Variables#.24.28destination.29|$(destination)]] variable and then passes it to the Connect Chat/Call block, which opens the channel. | Note that when you configure a basic scenario, the Find Agent block and Connect Call/Chat block should always be arranged back-to-back. The reason for this is the Find Agent block will find the agent but it does not open the communication channel; it sets the destination of the interaction using the [[Scenario-builder-reference-guide/Variables#.24.28destination.29|$(destination)]] variable and then passes it to the Connect Chat/Call block, which opens the channel. | ||
| − | |||
[[File:Basic-Scenario-Overview-53.PNG|800px|thumb|center|A basic voice scenario with defined conditional exits]] | [[File:Basic-Scenario-Overview-53.PNG|800px|thumb|center|A basic voice scenario with defined conditional exits]] | ||
| − | == Chat == | + | == Chat == |
A basic chat scenario consists of the Find Agent (Chat) block and Connect Chat block. | A basic chat scenario consists of the Find Agent (Chat) block and Connect Chat block. | ||
| − | === Find Agent (Chat) === | + | === Find Agent (Chat) === |
In the [[Scenario-builder-reference-guide/FindAgent|Find Agent (Chat)]] block, you will specify agent skills so the system knows which agents to find; also, you will specify the [[Scenario-builder-reference-guide/FindAgent#Agent_skills_required|wait time]] and [[Scenario-builder-reference-guide/FindAgent#Agent_skills_required|wait condition]] (i.e, [[Contact-center-administrator-guide/Omni-ChannelRouting|omni-channel routing]]). | In the [[Scenario-builder-reference-guide/FindAgent|Find Agent (Chat)]] block, you will specify agent skills so the system knows which agents to find; also, you will specify the [[Scenario-builder-reference-guide/FindAgent#Agent_skills_required|wait time]] and [[Scenario-builder-reference-guide/FindAgent#Agent_skills_required|wait condition]] (i.e, [[Contact-center-administrator-guide/Omni-ChannelRouting|omni-channel routing]]). | ||
| − | |||
Additionally, you may add an [[Scenario-builder-reference-guide/FindAgent#add_Interval|interval]]. For example, you may want to specify that for the first 30 seconds, transfer the call to any agent with a service capacity of 25% or higher. Note that you can set multiple intervals to look for agents. | Additionally, you may add an [[Scenario-builder-reference-guide/FindAgent#add_Interval|interval]]. For example, you may want to specify that for the first 30 seconds, transfer the call to any agent with a service capacity of 25% or higher. Note that you can set multiple intervals to look for agents. | ||
| − | |||
Also, it is possible to specify skills from different skill groups, and even multiple services, in only one Find Agent block (i.e., you do not need multiple Find Agent blocks). | Also, it is possible to specify skills from different skill groups, and even multiple services, in only one Find Agent block (i.e., you do not need multiple Find Agent blocks). | ||
| − | |||
[[File:Find-Agent-Chat-53.PNG|650px|thumb|center|The Find Agent block settings in a chat scenario]] | [[File:Find-Agent-Chat-53.PNG|650px|thumb|center|The Find Agent block settings in a chat scenario]] | ||
| − | === Connect Chat === | + | === Connect Chat === |
The [[Scenario-builder-reference-guide/ConnectChat|Connect Chat]] block allows you to specify a default service destination, an override service destination, and additional [[Scenario-builder-reference-guide/ConnectChat#Settings|settings]]. | The [[Scenario-builder-reference-guide/ConnectChat|Connect Chat]] block allows you to specify a default service destination, an override service destination, and additional [[Scenario-builder-reference-guide/ConnectChat#Settings|settings]]. | ||
| − | |||
[[File:Connect-Chat-53.PNG|650px|thumb|center|The Connect Chat block settings]] | [[File:Connect-Chat-53.PNG|650px|thumb|center|The Connect Chat block settings]] | ||
| − | == Voice == | + | == Voice == |
A basic voice scenario consists of a Find Agent block and a Connect Call block. | A basic voice scenario consists of a Find Agent block and a Connect Call block. | ||
| − | === Find Agent === | + | === Find Agent === |
Like [[#Find_Agent_.28Chat.29|Find Agent (Chat)]], Find Agent allows you to specify agent skills, wait time and condition, and transfer interval; however, there are additional settings for the voice elements associated with this block. Specific voice options include [[Scenario-builder-reference-guide/FindAgent#Virtual_Queue_option|Virtual Queue]] and [[Scenario-builder-reference-guide/FindAgent#Prompts|prompts]]. | Like [[#Find_Agent_.28Chat.29|Find Agent (Chat)]], Find Agent allows you to specify agent skills, wait time and condition, and transfer interval; however, there are additional settings for the voice elements associated with this block. Specific voice options include [[Scenario-builder-reference-guide/FindAgent#Virtual_Queue_option|Virtual Queue]] and [[Scenario-builder-reference-guide/FindAgent#Prompts|prompts]]. | ||
| − | |||
[[File:Find-Agent-Voice-53.PNG|650px|thumb|center|The Find Agent block settings in a voice scenario]] | [[File:Find-Agent-Voice-53.PNG|650px|thumb|center|The Find Agent block settings in a voice scenario]] | ||
| − | === Connect Call === | + | === Connect Call === |
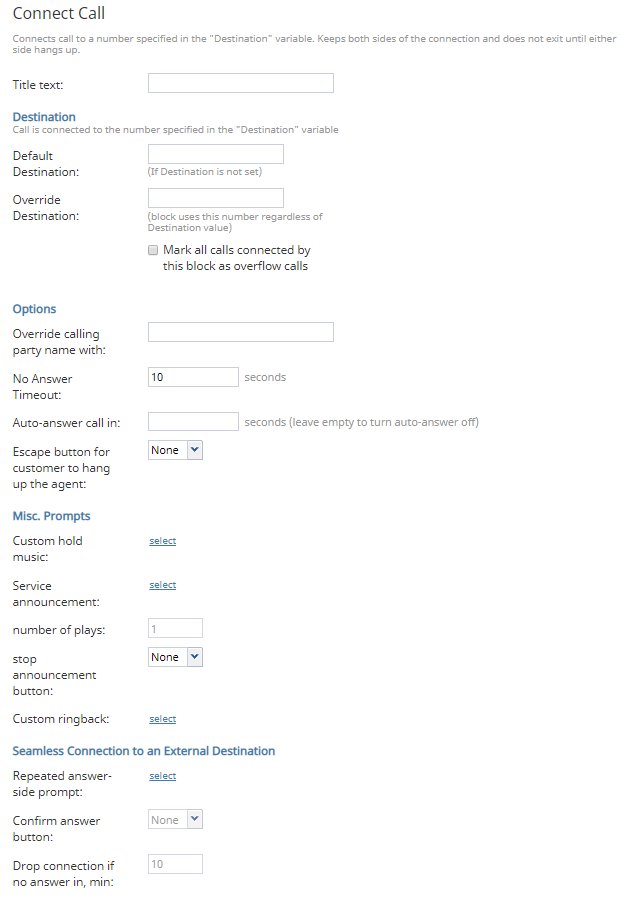
In the [[Scenario-builder-reference-guide/ConnectCall|Connect Call]] block, you can set your [[Scenario-builder-reference-guide/ConnectCall#Settings|destinations]] and other options such as [[Scenario-builder-reference-guide/ConnectCall#Custom_hold_music_2|custom hold music]], [[Scenario-builder-reference-guide/ConnectCall#Service_announcement_2|service announcements]], and so forth. | In the [[Scenario-builder-reference-guide/ConnectCall|Connect Call]] block, you can set your [[Scenario-builder-reference-guide/ConnectCall#Settings|destinations]] and other options such as [[Scenario-builder-reference-guide/ConnectCall#Custom_hold_music_2|custom hold music]], [[Scenario-builder-reference-guide/ConnectCall#Service_announcement_2|service announcements]], and so forth. | ||
| − | |||
[[File:Connect-Call-53.PNG|650px|thumb|center|The Connect Call block settings]] | [[File:Connect-Call-53.PNG|650px|thumb|center|The Connect Call block settings]] | ||
| − | == Suggested Reading == | + | == Suggested Reading == |
In order to better understand the basic principles of scenario design, we recommend reading the following articles: | In order to better understand the basic principles of scenario design, we recommend reading the following articles: | ||
* [[Scenario-builder-reference-guide/ScenarioBuilderOverview|Scenario Builder Overview]] | * [[Scenario-builder-reference-guide/ScenarioBuilderOverview|Scenario Builder Overview]] | ||
* [[Scenario-builder-reference-guide/ScenarioBuilderBasics|Scenario Builder Basics]] | * [[Scenario-builder-reference-guide/ScenarioBuilderBasics|Scenario Builder Basics]] | ||
| − | |||
And finally, don't forget to save your work early and often! | And finally, don't forget to save your work early and often! | ||
| − | |||
| − | |||
| − | |||
| − | |||
| − | |||
| − | |||
| − | |||
Latest revision as of 04:14, 29 May 2024
How to Create a Basic Scenario
This article describes how to create the most basic type of scenario, where the system finds an available agent and connects to a customer.
About
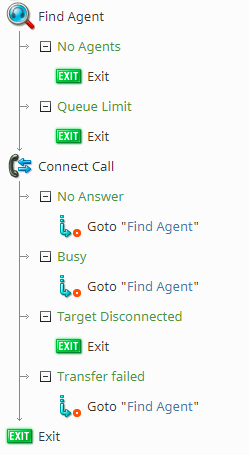
A basic scenario is a foundation upon which a more elaborate scenario can be built. Whether you are creating a chat or voice scenario, there are only two actions that need to occur: finding an agent and then connecting the agent to the customer. For a voice scenario, the blocks are Find Agent and Connect Call; for a chat scenario, the blocks are Find Agent (Chat) and Connect Chat.
Note that when you configure a basic scenario, the Find Agent block and Connect Call/Chat block should always be arranged back-to-back. The reason for this is the Find Agent block will find the agent but it does not open the communication channel; it sets the destination of the interaction using the $(destination) variable and then passes it to the Connect Chat/Call block, which opens the channel.
Chat
A basic chat scenario consists of the Find Agent (Chat) block and Connect Chat block.
Find Agent (Chat)
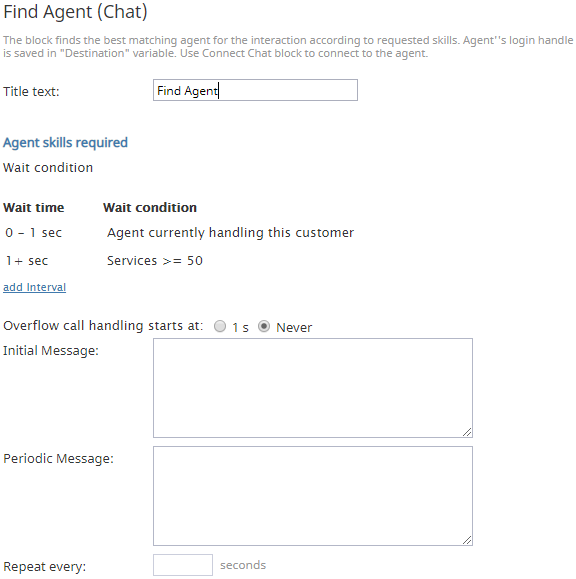
In the Find Agent (Chat) block, you will specify agent skills so the system knows which agents to find; also, you will specify the wait time and wait condition (i.e, omni-channel routing).
Additionally, you may add an interval. For example, you may want to specify that for the first 30 seconds, transfer the call to any agent with a service capacity of 25% or higher. Note that you can set multiple intervals to look for agents.
Also, it is possible to specify skills from different skill groups, and even multiple services, in only one Find Agent block (i.e., you do not need multiple Find Agent blocks).
Connect Chat
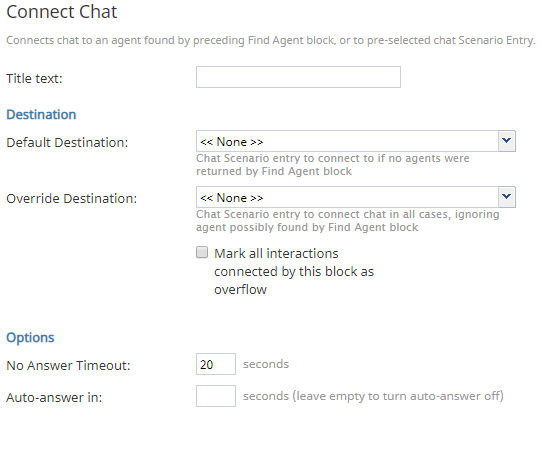
The Connect Chat block allows you to specify a default service destination, an override service destination, and additional settings.
Voice
A basic voice scenario consists of a Find Agent block and a Connect Call block.
Find Agent
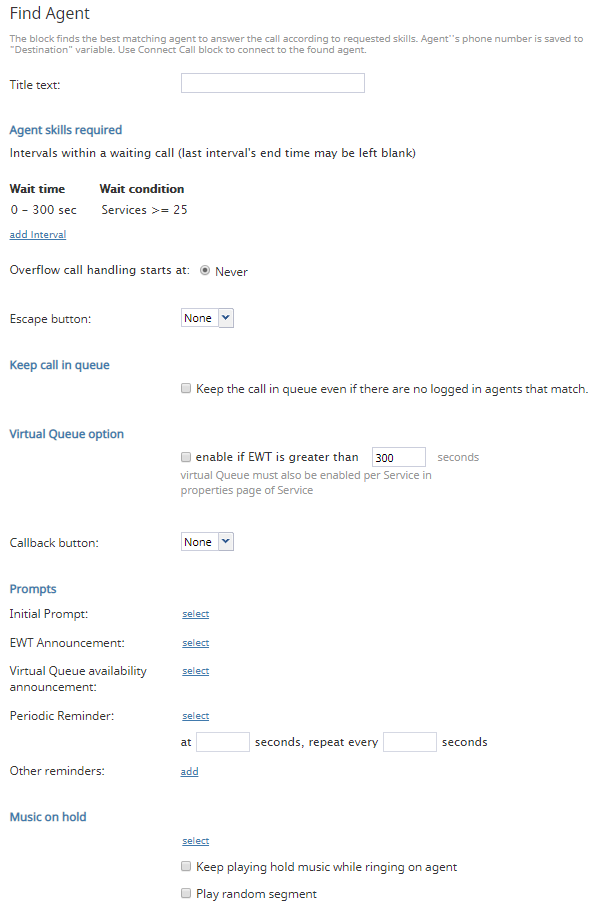
Like Find Agent (Chat), Find Agent allows you to specify agent skills, wait time and condition, and transfer interval; however, there are additional settings for the voice elements associated with this block. Specific voice options include Virtual Queue and prompts.
Connect Call
In the Connect Call block, you can set your destinations and other options such as custom hold music, service announcements, and so forth.
Suggested Reading
In order to better understand the basic principles of scenario design, we recommend reading the following articles:
And finally, don't forget to save your work early and often!

