How to Use Conversational IVR in a Scenario
To invoke Bright Pattern’s conversational IVR feature through a scenario, you simply need to modify an inbound voice scenario to include bot-specific scenario blocks such as Chat Bot Select Account and Ask a Bot, along with the Play-Listen scenario block. These blocks work with integrated Speech-to-Text technologies to recognize and transcribe voice input, as well as with integrated chatbots to analyze voice input, offer suggested replies, and intelligently route callers to agents.
This article will show you how to include these blocks in a basic voice scenario to:
- Greet the customer and listen for a response
- Reply up to three times to the customer using voice prompts
- Collect information from the customer
- Find an agent and connect the call when it’s determined that the bot/IVR is not being helpful
- Screen-pop the collected data and/or IVR conversation transcription to the agent upon accepting the interaction
Prerequisites
If you have not already done so, please complete these steps before proceeding:
- Set up a Speech-to-Text engine through your service provider
- Set up a Text-to-Speech engine through your service provider
- Download and import our bot scenario template: File:App Conversational IVR Example.zip
Scenario Flow
Scenarios are made up of scenario blocks that specify how interactions are processed. Detailed descriptions of Bright Pattern scenario blocks are available in this guide's Scenario Block Definitions section.
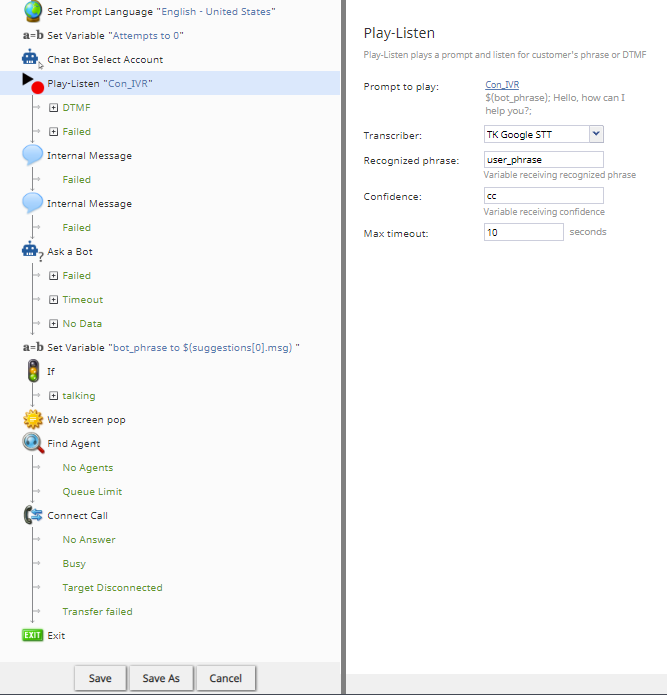
The following sequence of actions illustrates how scenario blocks function in a bot-driven voice scenario that invokes conversational IVR. This example scenario uses an integrated Watson Assistant chatbot and Google Speech-to-Text.
Action 1: "Set Prompt Language" specifies which language the voice of your conversational IVR will use
Conversational IVR utilizes voice prompts to speak to callers on the phone. You can set any language for all the voice prompts to be used in this scenario by editing the properties of the Set Prompt Language scenario block.
In Language, select the desired language for prompts. In our example, we selected "English - United States."
In TTS voice, select the Text-to-Speech (TTS) voice type to be used. In our example, we selected "en-US-standard-C."
These settings allow prompt text to be read and spoken over the phone in English.
Action 2: "Set Variable" counts how many times the customer talks to the bot
In this example, we want the caller to talk to the chatbot no more than three times before the caller is routed to an agent. Limiting the interaction in this way prevents the customer from abandoning the call when the bot becomes unhelpful.
With the Set Variable block, we are counting the number of attempts to interact with the bot. The counter begins at zero, so we specify a value of "0."
Action 3: "Chat Bot Select Account" specifies the integration account for your bot
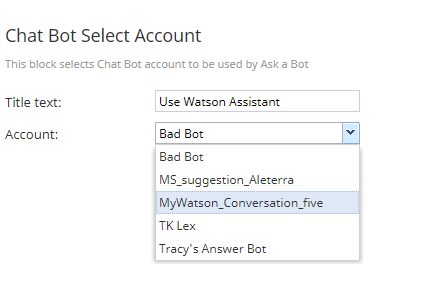
All scenarios that incorporate bots will include the Chat Bot Select Account block. In this block, you are selecting a bot/chat suggestions engine integration account that has already been configured for your contact center.
It's possible for your contact center to have many integration accounts, so it's important to specify which one will be used for this scenario. If you do not see the desired account listed, go back and add an integration account.
Action 4: "Play-Listen" talks to the caller and collects a response
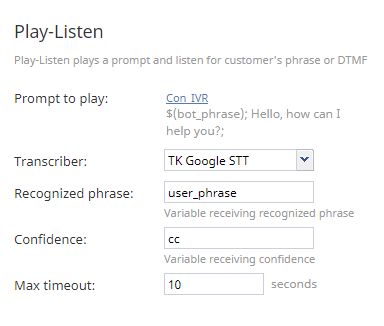
The Play-Listen block uses text-to-speech and speech-to-text technologies to convert bot response text into a voice prompt and to recognize and transcribe the customer’s reply into a text message.
Specify or create a voice prompt so that the conversational IVR can "talk" to the customer. In this example, the customer will be greeted by the prompt you specify here.
The transcriber is the Speech-To-Text integration account that you have already configured for your contact center.
In this example, we set the recognized phrase (i.e., the variable) to be "user_phrase," which is the variable that receives what the customer says. We use this variable in later blocks in this scenario to send the customer’s response to the agent in a text message (see "Internal Message"). You can add any variable you want, as long as you use the same variable name later.
Confidence is the variable that shows how much of the customer’s vocal input the STT engine understands. As with the recognized phrase variable, you can enter anything you want here, as long as you use it consistently later. Your STT engine conveys confidence numerically, where the higher the number (e.g., "0.999") is, the more confident the STT engine is that it has recognized vocals correctly. A low number (e.g., "0.001") shows that the engine has very low confidence in its vocal recognition. For example, if the customer says, "I need a new phone," and the engine hears, "I need a sea foam," the confidence will be likely very low. The confidence level is available in your service engine (e.g., your Watson Assistant).
Max timeout is the number of seconds that the conversational IVR will wait for the caller’s response before timing out and moving through the scenario.
In the conditional exits of Play-Listen, you can define what the scenario should do if the caller uses DTMF touch-tones or if the caller is silent.
Action 5: "Ask a Bot" lets the bot talk to the customer
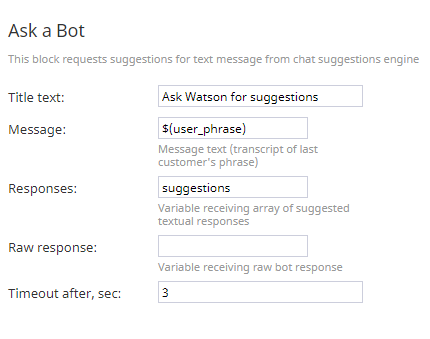
The Ask a Bot block allows the bot to automate the conversation before an agent is connected. It delivers the bot's raw response (i.e., suggestions) to the customer.
Notice that in the Message field, we’ve plugged in variable $(user_phrase), which is the same variable we set earlier in the scenario. Placing user_phrase here allows the scenario to pass the caller’s vocal input (i.e., his or her spoken phrase) to the integrated chatbot (in this case, Watson Assistant), for processing in the bot’s dialog flow. This processing creates suggestions, which can be passed to the agent on Agent Desktop.
A raw response is configured in your Watson Assistant dialog flow settings; it's unrelated to Bright Pattern. In this example, we’ve left this field empty.
In timeout, you set the number of seconds to wait for the bot’s suggestions before timing out.
In the Ask a Bot block’s conditional exits, we have dragged over some other blocks that tell the scenario what to do if this block fails, times out, or if there’s no data. See the scenario template for more detailed comments on what we did in this example.
Action 6: "If" defines what to do if no data is collected by the bot
Within Ask a Bot, there is a conditional exit called No Data. Here, we dragged over some other scenario blocks to define what the scenario should do if the bot fails to collect information from the caller.
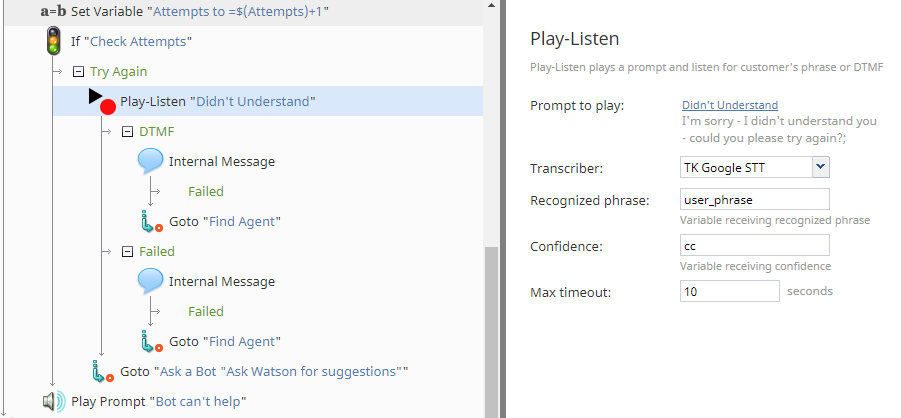
First, use Set Variable to set variable name "Attempts" to =$(Attempts)+1. This is used for counting how many times the bot attempts to talk to the caller and offer a suggested reply.
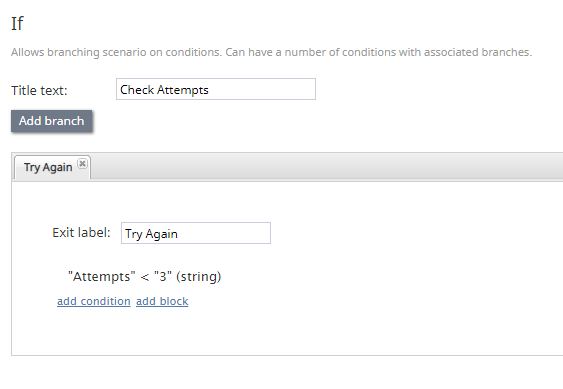
Then use If to add a condition that says if the bot tries to talk less than three times, try again. Remember, in Action 2 of this procedure, we used Set Variable to start counting bot step interactions.
Under the If block, we added another Play-Listen block that will be triggered if the condition is met. In this Play-Listen block, we define that if the bot has to make another attempt to collect data from the caller, then the prompt is, "I’m sorry, I didn’t understand you…."
If that still fails to collect information, the scenario uses Goto to find an agent and connect the call. The Play Prompt block tells the caller that the bot can’t understand, and thus, an agent will be connected.
Action 7: "Set Variable" defines the bot’s suggestions
Set Variable is used for defining the variable name of the bot’s responses (i.e., suggestions). Suggestions align with what you have configured your Watson Assistant, or other chatbot, to say.
In this example, we named the variable "bot_phrase" and gave it a value of "$(suggestions[0].msg)." Later, when we pass the conversational IVR transcript to the agent via screen-pop, we will be invoking the conversation via "bot_phrase" and "user_phrase" variables.
Action 8: Another "If" will find an agent if the caller speaks
In this example, we added the condition that scenario will branch if the "user_phrase is not empty" (i.e., the caller is talking).
Action 9: "Web Screen pop" passes the conversation transcript to the agent
In the Web Screen pop properties, we defined what text to display to the agent upon accepting the call. In the “Text to display” field, we entered the variables “user_phrase” and “bot_phrase” in basic HTML. This will appear as plain text to the agent on Agent Desktop.
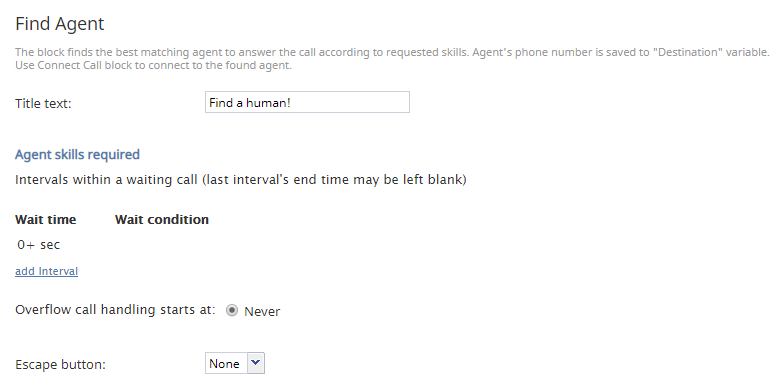
Action 10: "Find Agent" looks for a skilled agent
The Find Agent block looks for the next available skilled agent to accept the call. You can use Find Agent to set wait times and send the customer messages about estimated waiting time (EWT).
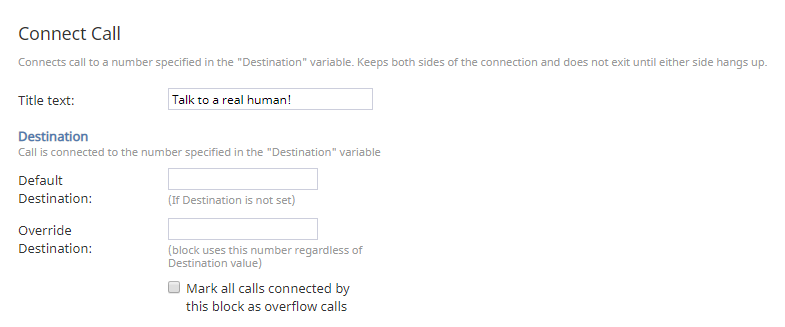
Action 11: "Connect Call" always comes after "Find Agent"
Although Find Agent uses criteria to identify the proper agent to receive the call, it does not have a "delivery" mechanism. Connect Call is the delivery mechanism for the interaction.
Action 12: "Exit" ends the scenario
The Exit block completes the scenario. Without it, the scenario will loop through this configured flow until the customer ends the call.
Last Action: Save!
Be sure to click Save to apply your changes. Note that closing your web browser window or tab will close Scenario Builder without saving, and you will lose your work.
Recommended Reading
For more information on inbound voice configuration and bot setup, see these Bright Pattern tutorials:

