| Line 9: | Line 9: | ||
== Step 2: Edit properties == | == Step 2: Edit properties == | ||
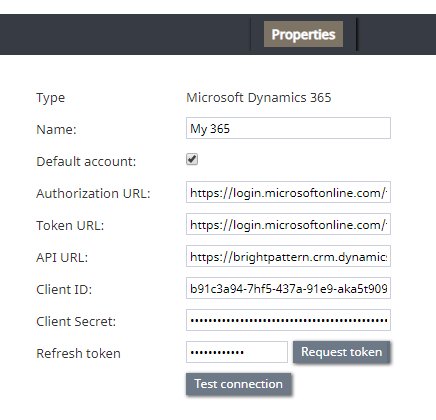
| − | [[File: | + | [[File:Dynamics365-IntegrationA1-53.PNG|650px|thumbnail|center|Microsoft Dynamics 365 integration account properties]] |
=== Type === | === Type === | ||
| − | By default, “Microsoft Dynamics 365” because this is the type of integration account you are creating | + | By default, “Microsoft Dynamics 365” because this is the type of integration account you are creating. |
=== Name=== | === Name=== | ||
| − | + | A unique name (any) for the integration account. If you have multiple Dynamics integration accounts, you may wish to choose a name that matches that of your registered app. | |
=== Default account=== | === Default account=== | ||
| − | Because it is possible to have multiple integration accounts of this type, select this checkbox to enable this account as the default | + | Because it is possible to have multiple integration accounts of this type, select this checkbox to enable this account as the default. |
=== Authorization URL=== | === Authorization URL=== | ||
| − | The | + | The “OAuth 2.0 Authorization Endpoint“ value that you copied from the Azure Portal in ''Azure Active Directory > App Registrations > Endpoints'' during [[Microsoft-dynamics-365-integration-guide/Configuration/WebAPIAccessConfiguration#Step_4:_Get_the_key_.28the_Client_Secret.29_and_endpoint | Web API Access Configuration]], Step 4.3. |
=== Token URL=== | === Token URL=== | ||
| − | The | + | The “OAuth 2.0 Token Endpoint” value that you copied from the Azure Portal in ''Azure Active Directory > App Registrations > Endpoints'' during [[Microsoft-dynamics-365-integration-guide/Configuration/WebAPIAccessConfiguration#Step_4:_Get_the_key_.28the_Client_Secret.29_and_endpoint | Web API Access Configuration]], Step 4.3. |
=== API URL=== | === API URL=== | ||
| − | The API | + | The API URL, which consists of your server URL (e.g., "https://brightpattern.crm.dynamics.com/") and "api/data/v9.0". |
| + | |||
| + | For example: | ||
| + | https://brightpattern.crm.dynamics.com/api/data/v9.0 | ||
=== Client ID=== | === Client ID=== | ||
| − | The application ID you got when adding a new registered app. See | + | The “Application (client) ID” from the Azure portal in ''Azure Active Directory > App Registrations > Registered App Settings''. |
| + | |||
| + | The application ID you got when adding a new registered app. See [[Microsoft-dynamics-365-integration-guide/Configuration/WebAPIAccessConfiguration#Step_1:_Add_new_registered_app | Web API Access Configuration]], Step 1.3.3. | ||
=== Client Secret=== | === Client Secret=== | ||
| − | The | + | The top-secret App Key you copied from the Azure Portal in ''Azure Active Directory > App Registrations > Registered App Settings''> API Access > Keys''. See [[Microsoft-dynamics-365-integration-guide/Configuration/WebAPIAccessConfiguration#Step_1:_Add_new_registered_app | Web API Access Configuration]], Step 4.1.4. |
=== Request token=== | === Request token=== | ||
| Line 40: | Line 45: | ||
=== Refresh token=== | === Refresh token=== | ||
| − | The refresh token that allows access to Microsoft's Web API | + | The refresh token that allows access to Microsoft's Web API. |
=== Test connection === | === Test connection === | ||
Revision as of 19:54, 5 April 2019
<translate>
Add Integration Account
After you have obtained all your credentials to access Dynamics 365 data via the Web API, it's time to use those credentials to connect Bright Pattern Contact Center to your Dynamics 365 apps. Connections to CRMs such Dynamics 365 are established through integration accounts, which are added in Bright Pattern's Contact Center Administrator application.
For more information, see the Contact Center Administrator Guide, section Microsoft Dynamics 365 Integration.
Step 1: Add new account
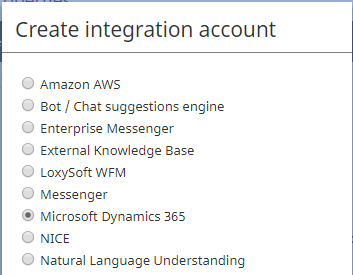
- In Contact Center Administrator > Integration Accounts, add an integration account of type Microsoft Dynamics 365.
Step 2: Edit properties
Type
By default, “Microsoft Dynamics 365” because this is the type of integration account you are creating.
Name
A unique name (any) for the integration account. If you have multiple Dynamics integration accounts, you may wish to choose a name that matches that of your registered app.
Default account
Because it is possible to have multiple integration accounts of this type, select this checkbox to enable this account as the default.
Authorization URL
The “OAuth 2.0 Authorization Endpoint“ value that you copied from the Azure Portal in Azure Active Directory > App Registrations > Endpoints during Web API Access Configuration, Step 4.3.
Token URL
The “OAuth 2.0 Token Endpoint” value that you copied from the Azure Portal in Azure Active Directory > App Registrations > Endpoints during Web API Access Configuration, Step 4.3.
API URL
The API URL, which consists of your server URL (e.g., "https://brightpattern.crm.dynamics.com/") and "api/data/v9.0".
For example:
https://brightpattern.crm.dynamics.com/api/data/v9.0
Client ID
The “Application (client) ID” from the Azure portal in Azure Active Directory > App Registrations > Registered App Settings.
The application ID you got when adding a new registered app. See Web API Access Configuration, Step 1.3.3.
Client Secret
The top-secret App Key you copied from the Azure Portal in Azure Active Directory > App Registrations > Registered App Settings> API Access > Keys. See Web API Access Configuration, Step 4.1.4.
Request token
Uses the credentials you've provided to access Microsoft's Web API and request a refresh token. When clicked, the token will appear in the Refresh token field.
Refresh token
The refresh token that allows access to Microsoft's Web API.
Test connection
Tests the credentials and confirms whether the connection between Bright Pattern and Microsoft is valid.
Step 3: Save!
Click Apply to save your changes. This completes the process of adding a Microsoft Dynamics 365 integration account.
</translate>


