(Created page with "作成されたカスタムアクティビティフィールドは、Bright Patternコンタクトセンターを使って 更新できます。アクティビティフィー...") |
|||
| Line 33: | Line 33: | ||
# カスタムフィールドが ''アクティビティカスタムフィールド'' ページに追加されます。 '''API名'''は、添付データシナリオブロック に実際に入るカスタムフィールド名です (以下の手順を参照)。作成されたカスタムフィールドの '''API名''' をコピーします。<br><br>[[File:SFDC-Activity-Custom-List-53.PNG|thumb|800px|center]]<br><br> | # カスタムフィールドが ''アクティビティカスタムフィールド'' ページに追加されます。 '''API名'''は、添付データシナリオブロック に実際に入るカスタムフィールド名です (以下の手順を参照)。作成されたカスタムフィールドの '''API名''' をコピーします。<br><br>[[File:SFDC-Activity-Custom-List-53.PNG|thumb|800px|center]]<br><br> | ||
| − | 作成されたカスタムアクティビティフィールドは、Bright Patternコンタクトセンターを使って 更新できます。アクティビティフィールドのデータ更新は、[[scenario-builder-reference-guide/AttachedData|添付データ]] | + | 作成されたカスタムアクティビティフィールドは、Bright Patternコンタクトセンターを使って 更新できます。アクティビティフィールドのデータ更新は、[[scenario-builder-reference-guide/AttachedData|添付データ]] シナリオブロックを介してできます。 |
=== Step 2: Update custom field data using Attached Data scenario block === | === Step 2: Update custom field data using Attached Data scenario block === | ||
Revision as of 15:56, 19 October 2019
アクティビティオブジェクトのカスタマイズ方法
Salesforce.com (SFDC) のアクティビティ履歴とは、関連付けられたタスクのリスト、またはオブジェクトで実行されたアクティビティの履歴です。例えば、コンタクトレコードのアクティビティ履歴セクションには、送信メールや発信コールなど、営業担当者が主に行ったアクションのリストが含まれる場合があります。事前定義されたアクティビティ履歴のオブジェクトに加えて、これらのフィールドにオブジェクトの追跡を行うためにカスタマイズしたアクティビティを追加できます。
手順
次の手順は、SFDCでカスタムアクティビティフィールドの作成、Bright Patternの添付データシナリオブロックを使ってフィールドの更新、添付データを使って通常のフィールドの更新方法に関連します。
これらの手順は、Salesforce ClassicビューとSalesforce Lightningビューの両方に適用できます。
ステップ1: オブジェクトのカスタムフィールドを作成します。
Salesforce Classicの場合
- Salesforce.comでセットアップをクリックします。
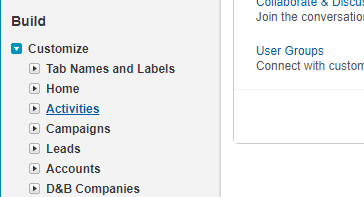
- 作成 セクションで、 カスタマイズ > アクティビティをクリックします。 “アクティビティ”の下にあるドロップダウンメニューをクリックせず、必ず“アクティビティ”リンク のみをクリックします。
- アクティビティページで、 アクティビティにカスタムフィールドを追加するをクリックします。
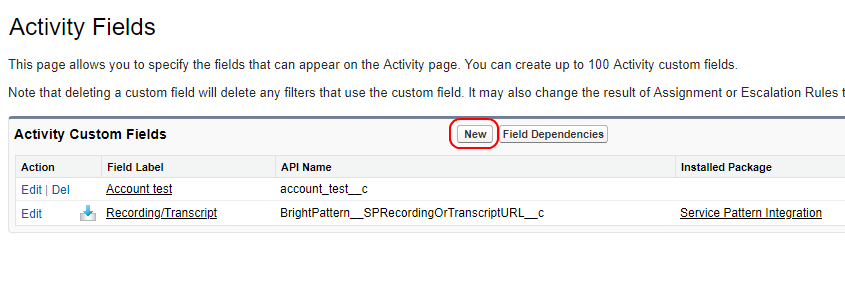
- アクティビティフィールド ページで、既存のカスタムフィールドを確認できます。新規をクリックし、新しいフィールドを追加します。
Salesforce Lightningの場合
- セットアップへ進みます。
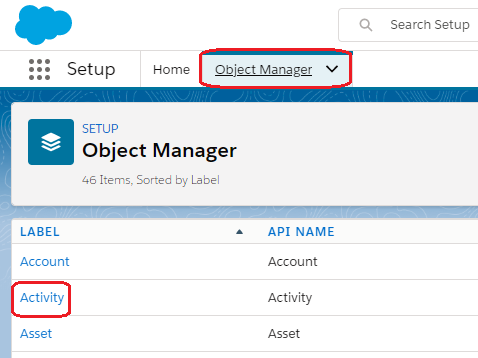
- 画面の上部にあるオブジェクト管理タブを選択し、アクティビティラベルをクリックします。
- アクティビティで、 フィールド & 関係をクリックし、 新規 ボタンをクリックします。
- 最後に、新しいカスタムフィールドの設定を開始します。
新しいカスタムフィールドの設定: ClassicとLightning
- 新しいカスタムフィールドページでは、カスタムフィールドのデータタイプを選択し、次へをクリックします。例えば、ここで テキストというデータタイプを選択します。
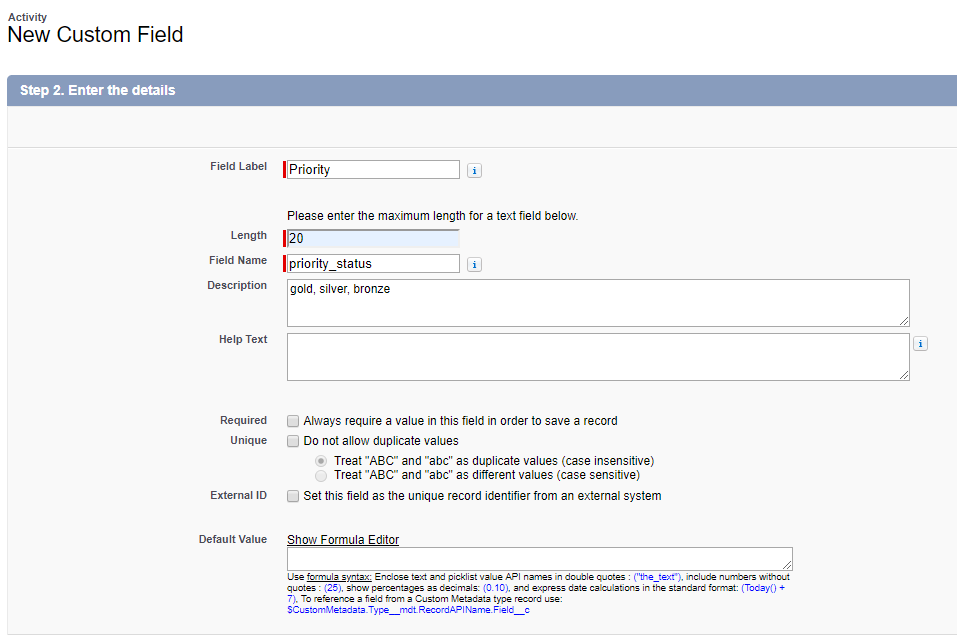
- 新しいカスタムフィールド ページでは、以下を指定します:
- フィールドラベル :フィールド専用のラベルです (例:“優先度”)
- 長さ:入力できる文字数 (例:“20”)
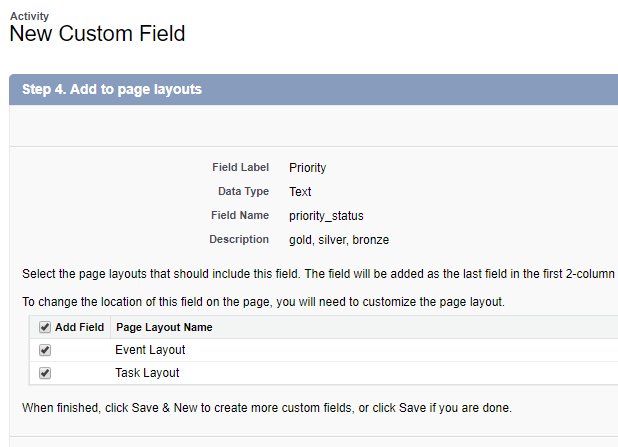
- フィールド名:単語区切りに使うアンダースコア付きの小文字のフィールド名 (例: “priority_status”。これは、アクティビティフィールドページで表示されます。)
- 他の設定はオプションです。
- フィールドラベル :フィールド専用のラベルです (例:“優先度”)
- 次へをクリックすると、フィールドレベルのセキュリティ設定が求められます。それもオプションです。次へ を再度クリックします。
- カスタムフィールドをページレイアウトに追加するように求められます。新しいカスタムフィールドを表示するレイアウトを選択します。その後、カスタマイズ > アクティビティ > タスクページレイアウトへ移動してページレイアウトを編集できます。次へを再度クリックし、 保存をクリックします。
- カスタムフィールドが アクティビティカスタムフィールド ページに追加されます。 API名は、添付データシナリオブロック に実際に入るカスタムフィールド名です (以下の手順を参照)。作成されたカスタムフィールドの API名 をコピーします。
作成されたカスタムアクティビティフィールドは、Bright Patternコンタクトセンターを使って 更新できます。アクティビティフィールドのデータ更新は、添付データ シナリオブロックを介してできます。
Step 2: Update custom field data using Attached Data scenario block
Once you have a custom field in Salesforce, you can use the Attached Data block to update it.
- In the Contact Center Administrator application, locate your Salesforce scenario and click Edit to open it in the Scenario Builder application.
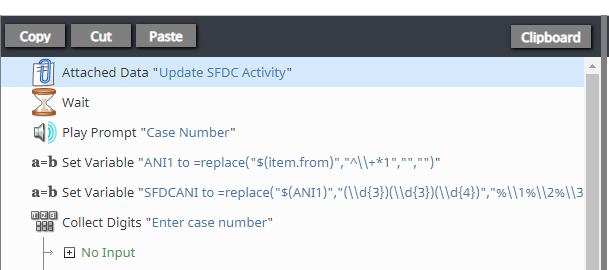
- For a voice scenario, add the Attached Data block at any point before the Connect Call block. For a chat scenario, add the Attached Data block at any point before the Connect Chat block. If you don’t know where to place it, put it at the very top of the scenario.
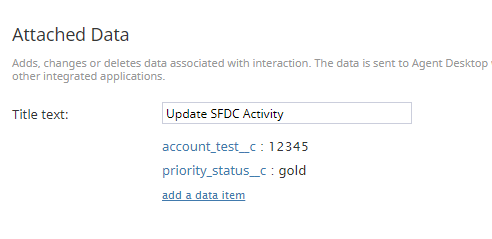
- Update properties and click add a data item:
- Title text - The name of the block (e.g., “Update SFDC Activity”)
- Name - The “API Name” of your custom field that you created in Salesforce (e.g., "account_test__c"). Note that upon saving a new custom field, SFDC automatically adds suffix “__c” to it. In order to supply interaction data to this field, use the field name, including suffix “__c” in the Attached Data scenario block. For example, to populate Custom Activity field account_test, it is required to have the scenario block Attached Data specify key account_test__c.
- Value - The value (string or variable) of the field (e.g., “12345” or "$(varname.property)").
- Title text - The name of the block (e.g., “Update SFDC Activity”)
- Note that multiple data items may be added. Save the scenario.
You can test whether it works by logging a call and viewing the case in Salesforce. You should see the custom field with the specified value.
Step 3: Update other activity field data using Attached Data (optional)
To populate regular (not custom) Activity Fields with any data from the scenario, simply follow step 2 instructions with one exception: use the field name without the “__c” suffix.
For example: "account_test", not "account_test__c".
Predefined Fields
The following is a list of predefined fields (Label/Field Name = Parameter) in SFDC:
- Due Date/ActivityDate - Interaction start time
- Call Object Identifier/CallObject - Global interaction identifier
- Call Type/CallType - Interaction type: Inbound, Outbound, or Internal
- Call Duration/CallDurationInSeconds - Interaction duration (talk + hold time) in seconds
- Call Result/CallDisposition - Interaction disposition, if available
- Comments/Description - Interaction notes entered by the agent, if any
- Subject/Subject - Service associated with the interaction, in format: SFDC object type: service name
- Status/Status - Status: Completed, Delivery Pending, Not Started, etc.
- SPRecordingOrTranscriptURL__c (note that this is a custom field) - Interaction recording URL; clicking this URL will open the Interaction Records Search Results page of the Contact Center Administrator application with the record that has the recording/transcript of this interaction
Notes
Activity history is added to the last record that the agent had open on the Agent Desktop while finishing the call (or the related after-call work).

