提供: Bright Pattern Documentation
(Created page with "===ステップ 3: Jaspersoft Studioで使用するために、レポートテンプレートライブラリからファイルを追加します。 === #'''参照'''をクリ...") |
(Created page with "=== ステップ 4: プロジェクトフォルダー内のファイルにパスを組み込みます。 === # これらの .''jar'' ファイルをプロジェクトエク...") |
||
| Line 27: | Line 27: | ||
# '''終了'''をクリックします。<br /><br />[[File:Import-File-System-Finish.png|650px|thumbnail|center|Libs > インポート > ファイルシステム > report-template-libs]] | # '''終了'''をクリックします。<br /><br />[[File:Import-File-System-Finish.png|650px|thumbnail|center|Libs > インポート > ファイルシステム > report-template-libs]] | ||
| − | === | + | === ステップ 4: プロジェクトフォルダー内のファイルにパスを組み込みます。 === |
| − | # | + | # これらの .''jar'' ファイルをプロジェクトエクスプローラーで選択します。4つのファイルを一度に選択できます。<br /><br /> |
| − | # | + | # 選択したファイルを右クリックし、'''パスの組み込み > パスの組み込みのために追加'''を選択します。そうすると、各 .''jar''ファイルにプロジェクトのルートフォルダーへのパスが追加されます。<br /><br />[[File:Build-Paths.png|650px|thumbnail|center|パスの組み込み > パスの組み込みのために追加]] |
=== Step 5: Add remaining ''report-template-libs'' files to the project === | === Step 5: Add remaining ''report-template-libs'' files to the project === | ||
Add the files ''report_logo_bar.png'' and ''report_logo.png'' to the root folder of the project by following step 2 and step 3 of this procedure. Instead of selecting the .''jar'' files, select the .''png'' files from the ''report-template-libs'' folder. | Add the files ''report_logo_bar.png'' and ''report_logo.png'' to the root folder of the project by following step 2 and step 3 of this procedure. Instead of selecting the .''jar'' files, select the .''png'' files from the ''report-template-libs'' folder. | ||
Revision as of 15:14, 12 November 2019
• English
ライブラリのインポート
ライブラリとローカリゼーションリソースをダウンロードしたら、次はライブラリをインポートします。
Jaspersoft Studioをコンピューターにインストールしたばかりの場合、ワークスペースのプロジェクトエクスプローラータブにフォルダーやプロジェクトが含まれていない可能性があります。その場合、次のステップへ進む前に、マイ・レポートという新しいフォルダーを追加しなければなりません。
手順
ステップ 1: マイ・レポートプロジェクトにライブラリを追加します。
- Jaspersoft Studioで画面の左側にあるプロジェクト タブに移動します。
- マイ・レポートを選択します。
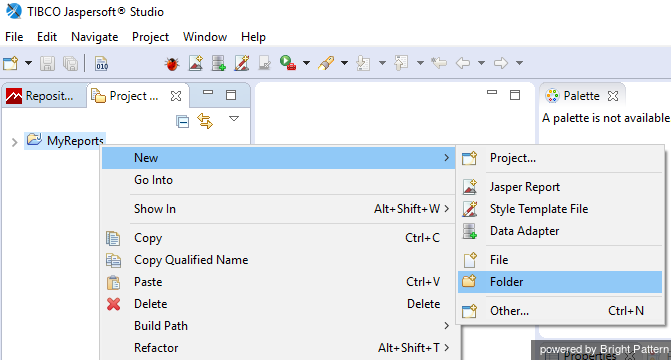
- マイ・レポートを右クリックし、新規 > フォルダーを選択します。
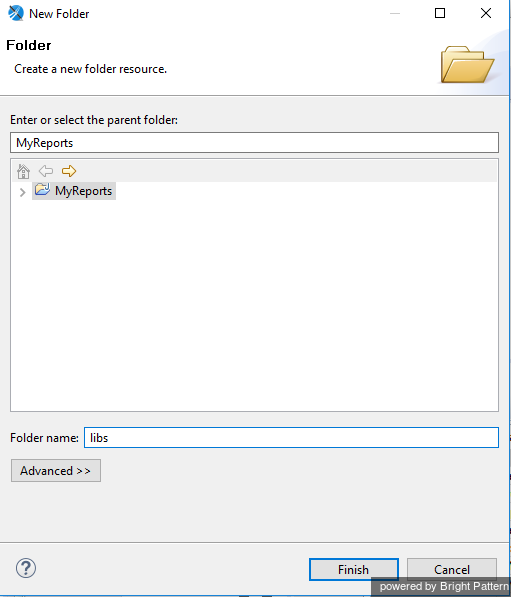
- 表示されるダイヤログボックスでは、マイ・レポートという親フォルダーを選択し、新しいフォルダーにlibsという名前をつけます。このフォルダーにはライブラリが保管されます 。
- 終了をクリックします。
ステップ 2: ファイルをインポートします。
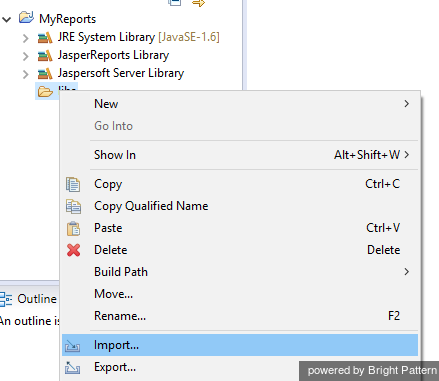
- libsフォルダーを右クリックし、インポートを選択します。
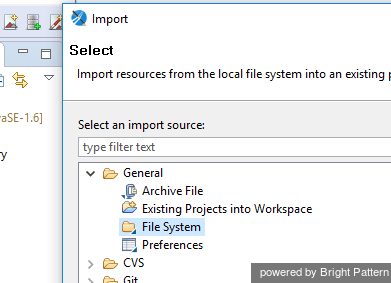
- 表示されるダイヤログウィンドウでは、ファイルシステムを選択します。
- 次へをクリックします。
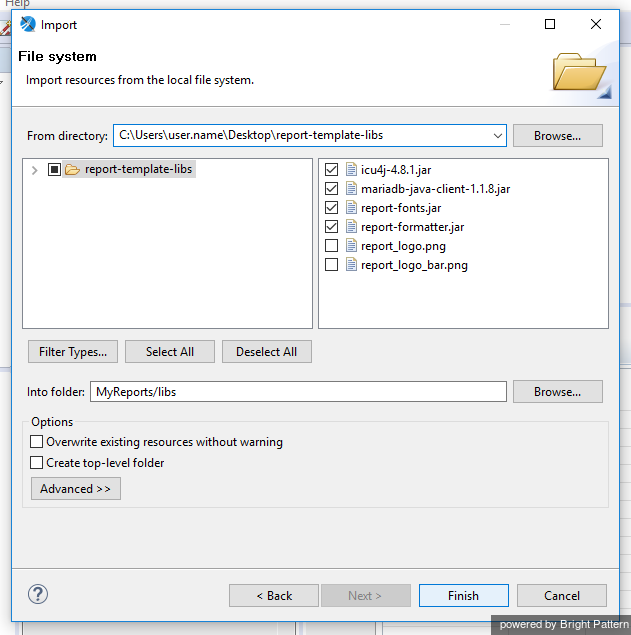
ステップ 3: Jaspersoft Studioで使用するために、レポートテンプレートライブラリからファイルを追加します。
- 参照をクリックし、先ほどダウンロードと展開したパッケージのreport-template-libsフォルダーを探します。
- report-template-libs フォルダーを選択しOKをクリックします。
- 以下のファイルを選択します:
- report-formatter.jar (出力フォーマット用のスクリプトレット機能の提供)
- mariadb-java-client-1.1.6.jar (データベース接続)
- icu4j-4.8.1.jar (Unicodeとローカリゼーションサポート)
- report-fonts.jar (Unicodeフォント)
- report-formatter.jar (出力フォーマット用のスクリプトレット機能の提供)
- 終了をクリックします。
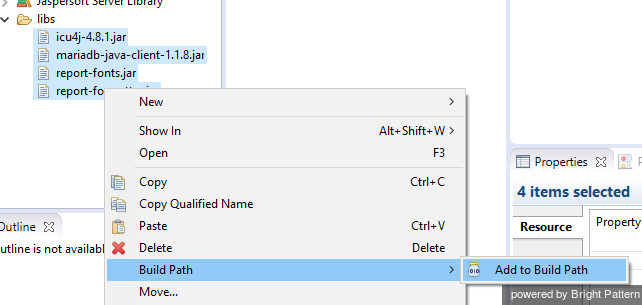
ステップ 4: プロジェクトフォルダー内のファイルにパスを組み込みます。
- これらの .jar ファイルをプロジェクトエクスプローラーで選択します。4つのファイルを一度に選択できます。
- 選択したファイルを右クリックし、パスの組み込み > パスの組み込みのために追加を選択します。そうすると、各 .jarファイルにプロジェクトのルートフォルダーへのパスが追加されます。
Step 5: Add remaining report-template-libs files to the project
Add the files report_logo_bar.png and report_logo.png to the root folder of the project by following step 2 and step 3 of this procedure. Instead of selecting the .jar files, select the .png files from the report-template-libs folder.

