提供: Bright Pattern Documentation
(Created page with "== インポートの方法 == ローカリゼーションリソースをインポートするには、次の手順に従います:") |
(Created page with "=== ステップ 1: ''マイ・レポート'' プロジェクトで ''リソース'' というフォルダーを作成します。=== * Jaspersoft Studioで画面の左側...") |
||
| Line 5: | Line 5: | ||
ローカリゼーションリソースをインポートするには、次の手順に従います: | ローカリゼーションリソースをインポートするには、次の手順に従います: | ||
| − | === | + | === ステップ 1: ''マイ・レポート'' プロジェクトで ''リソース'' というフォルダーを作成します。=== |
| − | * | + | * Jaspersoft Studioで画面の左側にある ''プロジェクト''タブへ移動します。 <br /><br /> |
| − | * | + | *'''マイ・レポート'''を選択します。<br /><br /> |
| − | * | + | * ''マイ・レポート''を右クリックし、'''新規 > フォルダー'''を選択します。<br /><br /> |
| − | * | + | * 表示されるダイヤログボックスでは、'''マイ・レポート'''という親フォルダーを選択し、新しいフォルダーに''リソース''という名前を付けます。このフォルダーはローカリゼーション リソースを含みます。<br /><br /> |
| − | * | + | * '''終了'''をクリックします。 |
=== Step 2: Import files === | === Step 2: Import files === | ||
Revision as of 12:12, 13 November 2019
• English
ローカリゼーションリソースのインポート
ローカリゼーションリソースはJaspersoft Studioにインポートされるため、レポートは複数の言語で表示されます。これらのリソースは、以前にダウンロードおよび展開したパッケージの report-template-libsフォルダーの comサブフォルダーにあります。
インポートの方法
ローカリゼーションリソースをインポートするには、次の手順に従います:
ステップ 1: マイ・レポート プロジェクトで リソース というフォルダーを作成します。
- Jaspersoft Studioで画面の左側にある プロジェクトタブへ移動します。
- マイ・レポートを選択します。
- マイ・レポートを右クリックし、新規 > フォルダーを選択します。
- 表示されるダイヤログボックスでは、マイ・レポートという親フォルダーを選択し、新しいフォルダーにリソースという名前を付けます。このフォルダーはローカリゼーション リソースを含みます。
- 終了をクリックします。
Step 2: Import files
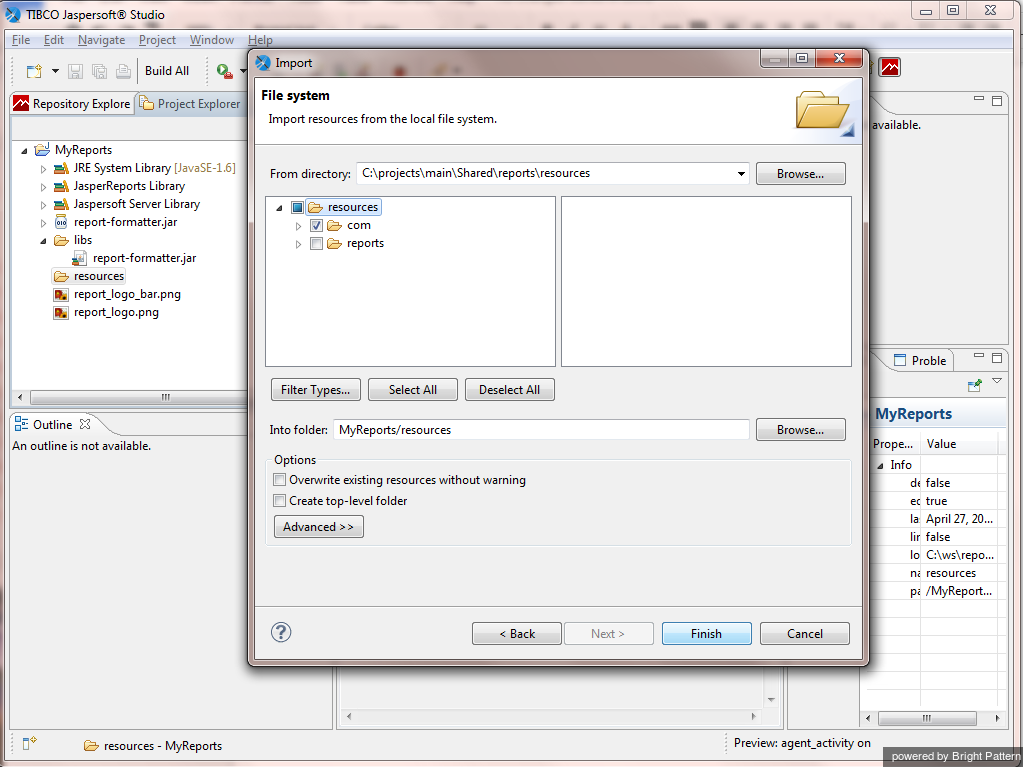
- Right-click the resources folder and select Import….
- In the dialog window that pops up, select File System.
- Click Next.
- Open the report-template-libs folder of the previously downloaded and extracted package and click OK.
- Select the com subfolder and click Finish.
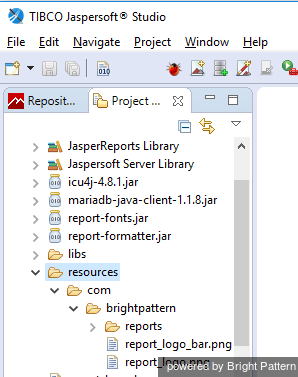
MyReports now contains folder resources and subfolder com.
Step 3: Build paths to the files within the project folder
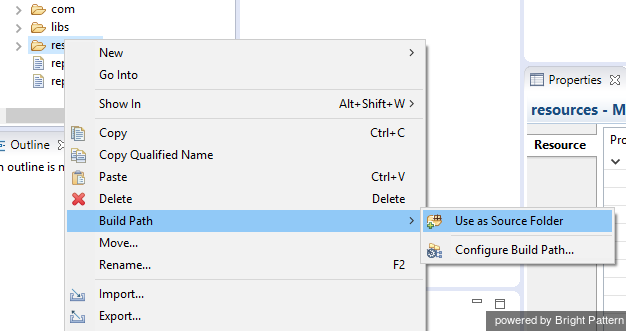
Right-click resources and select Build Path > Use As Source Folder. Doing so makes resources a source folder available at the top of MyReports.


