(Created page with "== 必須条件 == アクティビティフォームフィールドは、 コンタクト, Contact-center-adminis...") |
|||
| (25 intermediate revisions by the same user not shown) | |||
| Line 11: | Line 11: | ||
アクティビティフォームフィールドは、 [[Contact-center-administrator-guide/CustomFields#Contact|コンタクト]], [[Contact-center-administrator-guide/CustomFields#Company|会社]], [[Contact-center-administrator-guide/CustomFields#Activity_History|アクティビティ履歴]]のカスタムフィールドにマッピングできます。 これを行うには、まずこれらのカスタムフィールドを設定します。詳しい情報については、 ''コンタクトセンター管理者ガイド''の[[Contact-center-administrator-guide/CustomFields|カスタムフィールド]]をご覧ください。 | アクティビティフォームフィールドは、 [[Contact-center-administrator-guide/CustomFields#Contact|コンタクト]], [[Contact-center-administrator-guide/CustomFields#Company|会社]], [[Contact-center-administrator-guide/CustomFields#Activity_History|アクティビティ履歴]]のカスタムフィールドにマッピングできます。 これを行うには、まずこれらのカスタムフィールドを設定します。詳しい情報については、 ''コンタクトセンター管理者ガイド''の[[Contact-center-administrator-guide/CustomFields|カスタムフィールド]]をご覧ください。 | ||
| − | == | + | == 手順 == |
| − | === | + | === ステップ 1: コンタクトセンター管理者アプリケーションでアクティビティフォームを設定します。=== |
| − | + | コンタクトセンター管理者アプリケーションの[[Contact-center-administrator-guide/ActivityForms|フォーム > アクティビティ]]から開始します。 ''新しいフォームの追加''' [[File:Create-New-Form-53.PNG|26px]] ボタンをクリックし、 フォームビルダーを起動します。 | |
| − | === | + | === ステップ 2: フォームビルダーアプリケーションでフォームを作成します。 === |
| − | + | フォームビルダーアプリケーションで、エージェントが閲覧および操作できるフィールドの追加を開始します。フィールドはインタラクティブまたは静的にすることができます(つまり、フィールドを'''編集可能'''にするかどうかを設定できます)。 | |
| − | [[File:Activity-Form-With-Custom-Activity-History-Fields-53.PNG|800px|thumb|center| | + | [[File:Activity-Form-With-Custom-Activity-History-Fields-53.PNG|800px|thumb|center|アクティビティフォームの設定]] |
| − | + | フォームを設定する際に、カスタムフィールド値をフォームフィールドにマッピングするかどうかを指定できます。カスタムフィールド値をフォームフィールドにマッピングすると、フォームフィールドに入力されたデータを他のフォームやレポートでも使用できます。 | |
| − | + | カスタムフィールド値をマッピングするには、フィールドプロパティを編集する際に '''データフィールド''' [[File:Data-Field-Button-53.PNG|26px]] ボタンをクリックします。 これにより、特定のフォームフィールドにマップできるデータフィールドがウィンドウに表示されます。 | |
| − | [[File:Map-Activity-History-Field-53.PNG|800px|thumb|center| | + | [[File:Map-Activity-History-Field-53.PNG|800px|thumb|center|フォームフィールドをカスタム履歴アクティビティのフィールドにマッピングします。]] |
| − | + | 操作が完了したら、'''保存''' [[File:Activity-Form-Save-Button-53.PNG|40px]] ボタンをクリックし、フォームに名前を付けます。 | |
| − | ==== | + | ==== ステップ 2a: フォームページを追加します。 ==== |
| − | + | アクティビティフォームは、必要に応じて詳しくまたは簡潔にすることができます。フォームを詳しくする場合は、[[Form-builder-reference-guide/DynamicUIOverview#Pages|ページパレット]]にある | |
| + | '''新しいページ''' [[File:Activity-Form-Add-Page-53.PNG|26px]] ボタンを使って、ページを追加できます。ページを追加すると、名前を付けている場合は既定のページ名が変更されます。つまり、ページ名は"新しいページ"ではなく"ページ2"、"ページ3"などになります。 | ||
| − | + | さらに、 '''クローンページ''' [[File:Activity-Form-Clone-Button-53.PNG|26px]] ボタンを使ってページをクローンできます。このボタンをクリックすると、 "<ページ名>のクローン"という新しいページが作成され、元のページの全てのコントロールがコピーされます。 | |
| − | [[File:Activity-Form-Copy-and-Add-53.PNG|800px|thumb|center| | + | [[File:Activity-Form-Copy-and-Add-53.PNG|800px|thumb|center|フォームにページをクローンまたは追加できます。]] |
| − | === | + | === ステップ 3:フォームをサービスに関連付けします。 === |
| − | + | フォームの作成が完了したら、このフォームを設定済みのサービスに関連付けします。関連付けを行うには、コンタクトセンター管理者アプリケーションの[[Contact-center-administrator-guide/ActivityTab|サービス & キャンペーン > アクティビティタブ]]へ戻ります。 [[Contact-center-administrator-guide/ActivityTab#Enable_screenpop_activity_form|スクリーンポップアクティビティフォームの有効化]]の設定から、作成したアクティビティフォームの名前を選択します。 | |
| − | [[File:Activity-Form-Configuration-5-53.PNG|800px|thumb|center| | + | [[File:Activity-Form-Configuration-5-53.PNG|800px|thumb|center|フォームに関連するサービスのアクティビティタブを設定しなければなりません。]] |
| − | + | アクティビティタブからで以下の追加設定が可能です:フォームがポップされた時に[[Contact-center-administrator-guide/KnowledgeBase|ナレッジベース]] の記事を表示するかどうか、ウェブがポップされた前後にアクティビティフォームを表示するかどうかなど。 | |
| − | + | アクティビティフォームとサービスの関連付けが終了したら、[[Contact-center-administrator-guide/ActivityForms#Used_in...|フォーム > アクティビティ > 対象のサービス]] に戻り、フォームに関連づけられたサービス名を確認できます。 | |
| − | [[File:Activity-Form-Configuration-2-53.PNG|800px|thumb|center| | + | [[File:Activity-Form-Configuration-2-53.PNG|800px|thumb|center|'' 対象のサービス''タブでフォームがサービスに接続されているかどうかを確認します。]] |
| − | == | + | == 使用中のフォーム == |
| − | + | アクティビティフォームとサービスとの関連付けが終了したら、エージェントデスクトップでフォームが機能しているかどうかを確認します。次の画像では、ポップされたアクティビティフォームがエージェントの画面でどのように表示するかを確認できます。 | |
| − | [[File:Activity-Form-In-Action-.PNG|800px|thumb|center| | + | [[File:Activity-Form-In-Action-.PNG|800px|thumb|center|エージェントデスクトップでポップされたアクティビティフォーム]] |
Latest revision as of 19:54, 20 April 2020
アクティビティフォームの設定方法
アクティビティフォームは、エージェントがエージェントデスクトップで直接処理するフォームであり、さまざまな目的に使用できます。ただし、アクティビティフォームの主な目的は、対話中に情報を収集することです。アクティビティフォームは、情報を収集してアクティビティ履歴フォームへ渡すために使われます。
この記事では、コンタクトセンター管理者アプリケーションとフォームビルダーアプリケーションでアクティビティフォームを設定するために必要な手順について説明します。
必須条件
アクティビティフォームフィールドは、 コンタクト, 会社, アクティビティ履歴のカスタムフィールドにマッピングできます。 これを行うには、まずこれらのカスタムフィールドを設定します。詳しい情報については、 コンタクトセンター管理者ガイドのカスタムフィールドをご覧ください。
手順
ステップ 1: コンタクトセンター管理者アプリケーションでアクティビティフォームを設定します。
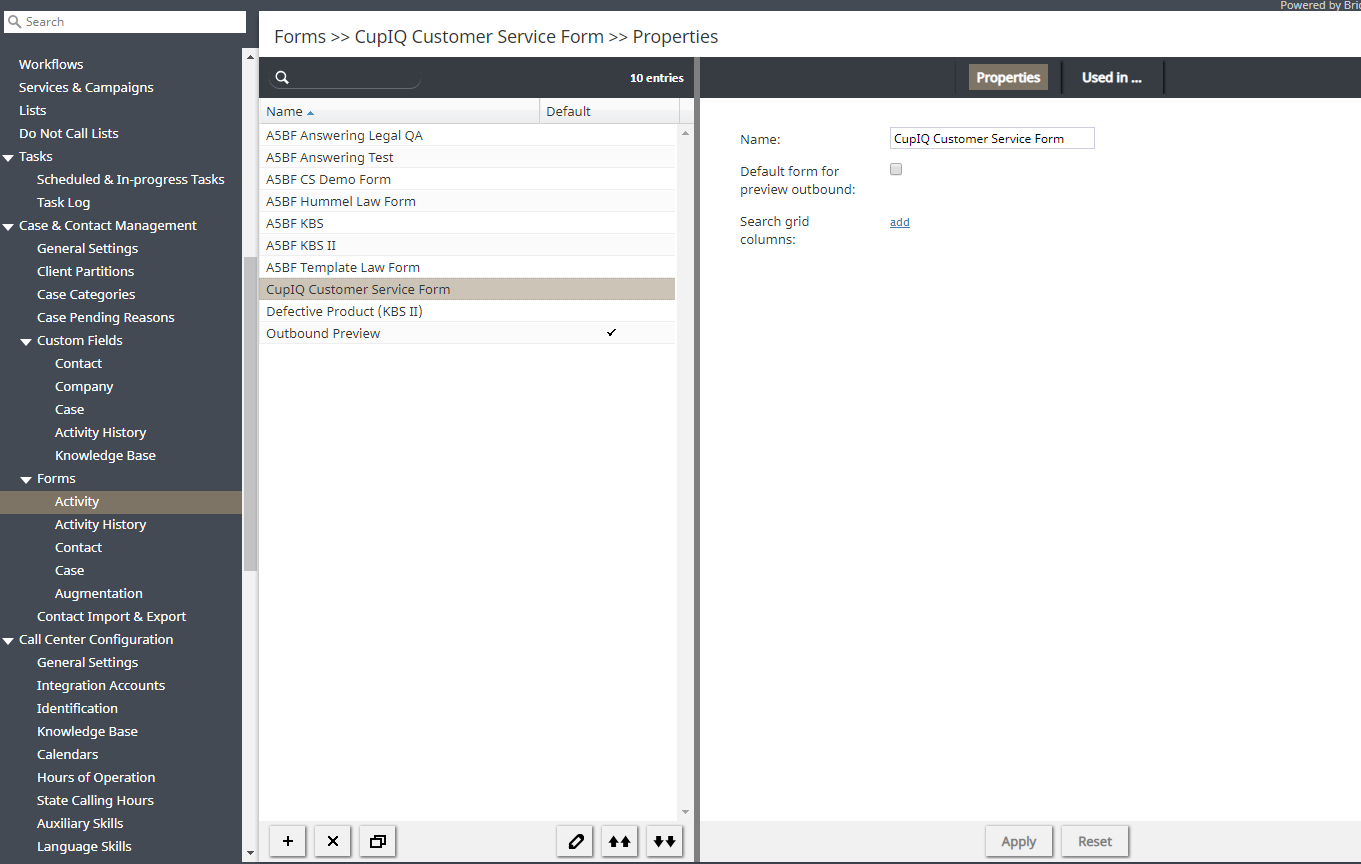
コンタクトセンター管理者アプリケーションのフォーム > アクティビティから開始します。 新しいフォームの追加' ボタンをクリックし、 フォームビルダーを起動します。
ステップ 2: フォームビルダーアプリケーションでフォームを作成します。
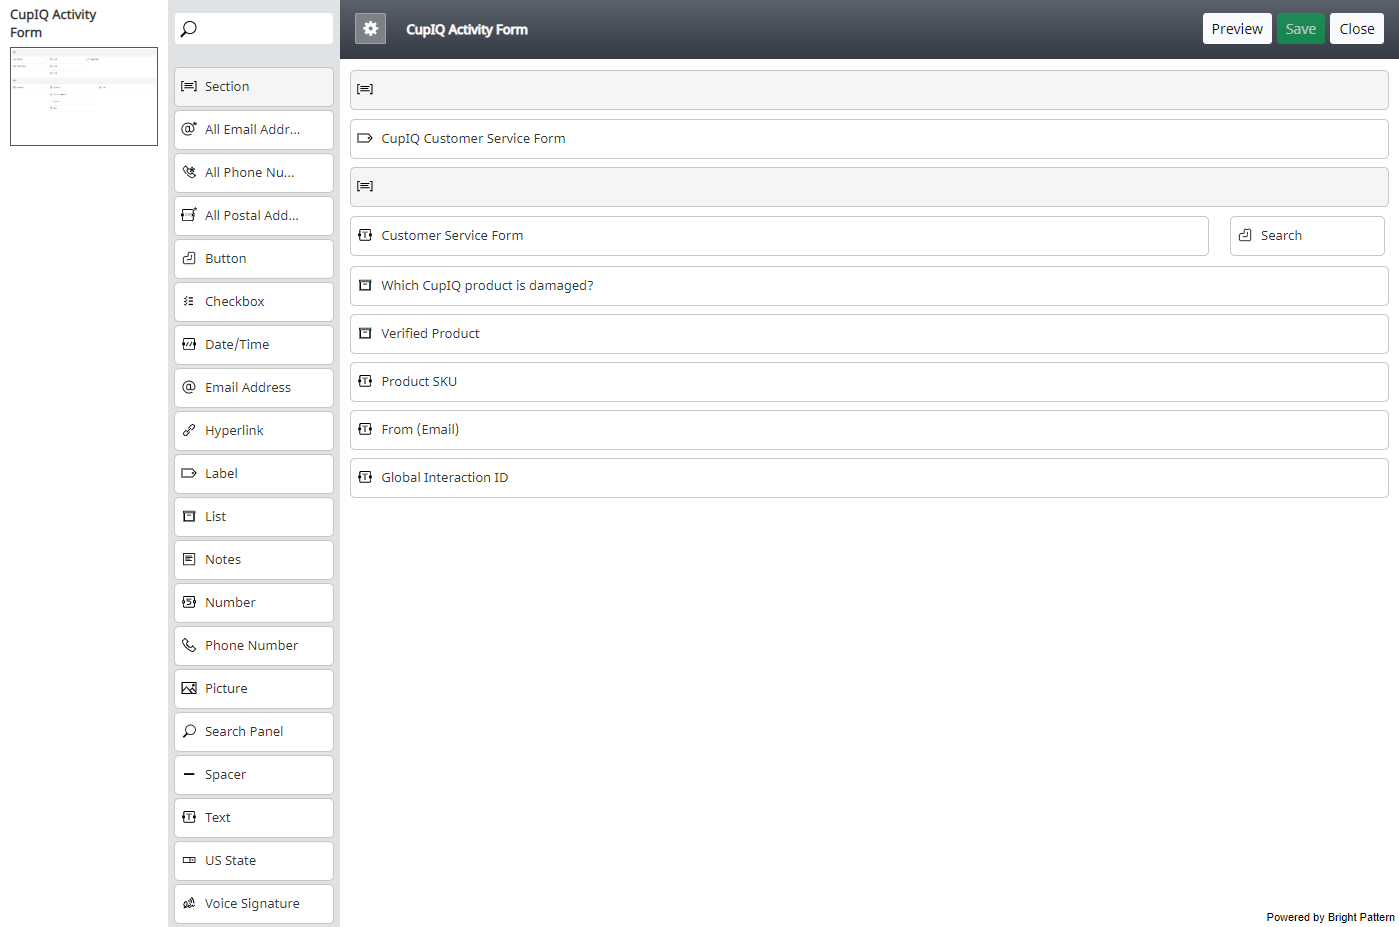
フォームビルダーアプリケーションで、エージェントが閲覧および操作できるフィールドの追加を開始します。フィールドはインタラクティブまたは静的にすることができます(つまり、フィールドを編集可能にするかどうかを設定できます)。
フォームを設定する際に、カスタムフィールド値をフォームフィールドにマッピングするかどうかを指定できます。カスタムフィールド値をフォームフィールドにマッピングすると、フォームフィールドに入力されたデータを他のフォームやレポートでも使用できます。
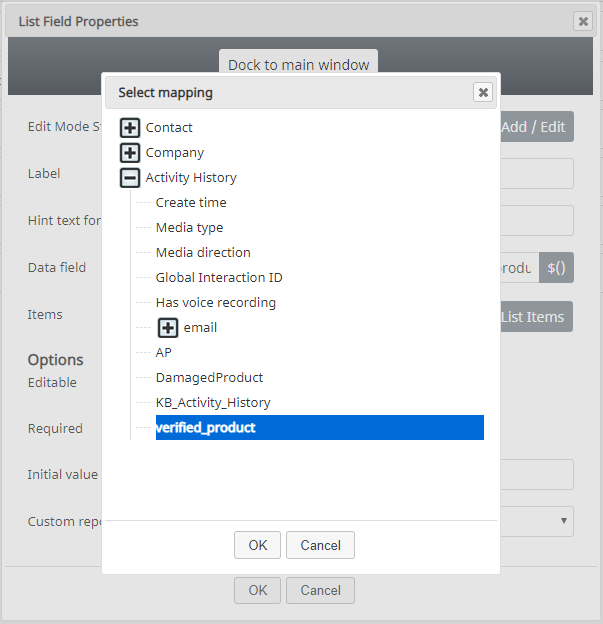
カスタムフィールド値をマッピングするには、フィールドプロパティを編集する際に データフィールド ボタンをクリックします。 これにより、特定のフォームフィールドにマップできるデータフィールドがウィンドウに表示されます。
操作が完了したら、保存 ボタンをクリックし、フォームに名前を付けます。
ステップ 2a: フォームページを追加します。
アクティビティフォームは、必要に応じて詳しくまたは簡潔にすることができます。フォームを詳しくする場合は、ページパレットにある
新しいページ ボタンを使って、ページを追加できます。ページを追加すると、名前を付けている場合は既定のページ名が変更されます。つまり、ページ名は"新しいページ"ではなく"ページ2"、"ページ3"などになります。
さらに、 クローンページ ボタンを使ってページをクローンできます。このボタンをクリックすると、 "<ページ名>のクローン"という新しいページが作成され、元のページの全てのコントロールがコピーされます。
ステップ 3:フォームをサービスに関連付けします。
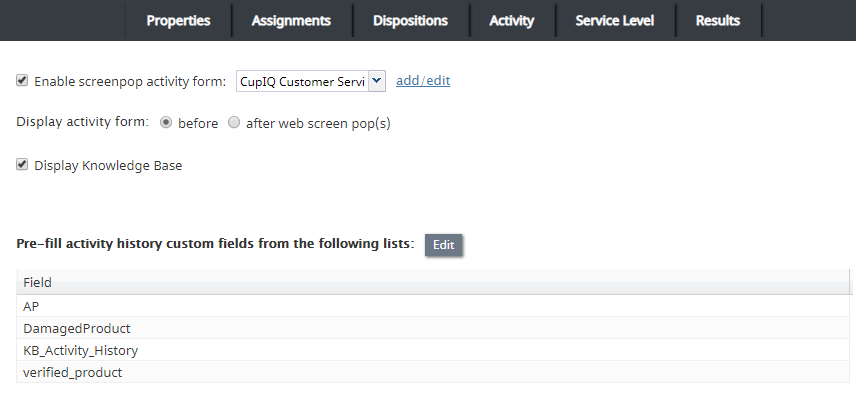
フォームの作成が完了したら、このフォームを設定済みのサービスに関連付けします。関連付けを行うには、コンタクトセンター管理者アプリケーションのサービス & キャンペーン > アクティビティタブへ戻ります。 スクリーンポップアクティビティフォームの有効化の設定から、作成したアクティビティフォームの名前を選択します。
アクティビティタブからで以下の追加設定が可能です:フォームがポップされた時にナレッジベース の記事を表示するかどうか、ウェブがポップされた前後にアクティビティフォームを表示するかどうかなど。
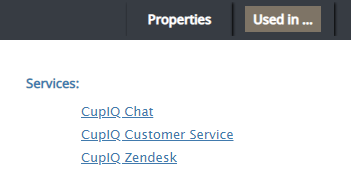
アクティビティフォームとサービスの関連付けが終了したら、フォーム > アクティビティ > 対象のサービス に戻り、フォームに関連づけられたサービス名を確認できます。
使用中のフォーム
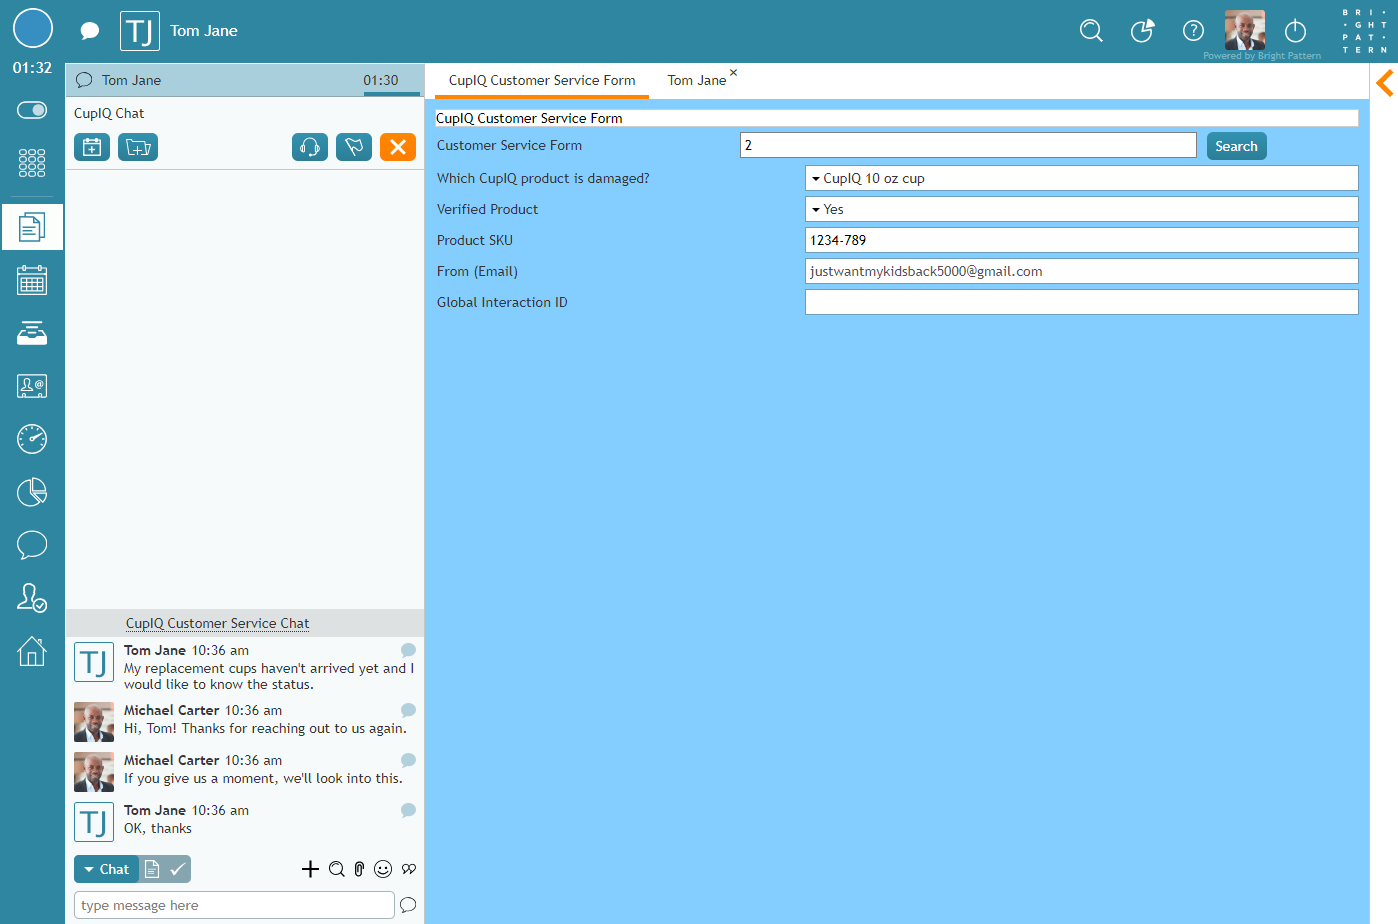
アクティビティフォームとサービスとの関連付けが終了したら、エージェントデスクトップでフォームが機能しているかどうかを確認します。次の画像では、ポップされたアクティビティフォームがエージェントの画面でどのように表示するかを確認できます。

