(Marked this version for translation) |
(Updated via BpDeleteTranslateTags script) |
||
| Line 1: | Line 1: | ||
| − | + | = Creating a Data Adapter= | |
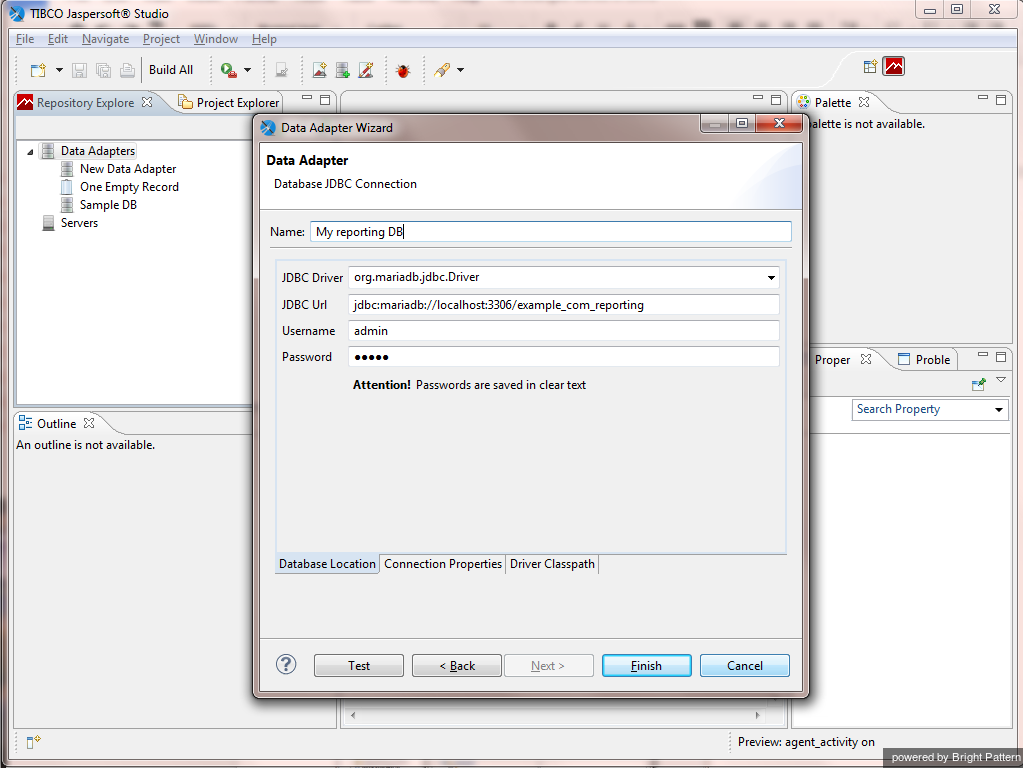
Data adapters allow Jaspersoft Studio to use SQL queries to get data from your Reporting Database. In the following procedure, you will create a data adapter that uses the Java Database Connectivity (JDBC) API for the programming language Java, which defines how a database can be accessed by a client. JDBC provides methods to query and update data in a database. | Data adapters allow Jaspersoft Studio to use SQL queries to get data from your Reporting Database. In the following procedure, you will create a data adapter that uses the Java Database Connectivity (JDBC) API for the programming language Java, which defines how a database can be accessed by a client. JDBC provides methods to query and update data in a database. | ||
| − | |||
'''Note that creating a data adapter is not required unless you have direct database access; direct database access is a licensed fee.''' | '''Note that creating a data adapter is not required unless you have direct database access; direct database access is a licensed fee.''' | ||
| − | |||
[[File:reporting-db-spec-image2.png|thumb|600px|center|]] | [[File:reporting-db-spec-image2.png|thumb|600px|center|]] | ||
| − | == Procedure == | + | == Procedure == |
To create a data adapter, navigate to the Repository Explorer tab in the left-hand corner of the screen, and proceed through the following steps. | To create a data adapter, navigate to the Repository Explorer tab in the left-hand corner of the screen, and proceed through the following steps. | ||
| − | === Step 1: Create a data adapter === | + | === Step 1: Create a data adapter === |
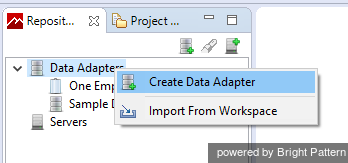
# In ''Repository Explorer'', select and right-click '''Data Adapters'''.<br /><br /> | # In ''Repository Explorer'', select and right-click '''Data Adapters'''.<br /><br /> | ||
# Then select '''Create Data Adapter'''. | # Then select '''Create Data Adapter'''. | ||
| − | |||
[[File:Create-Data-Adapter.png|450px|thumbnail|center|Repository > Create Data Adapter]] | [[File:Create-Data-Adapter.png|450px|thumbnail|center|Repository > Create Data Adapter]] | ||
| − | === Step 2: Choose your connection === | + | === Step 2: Choose your connection === |
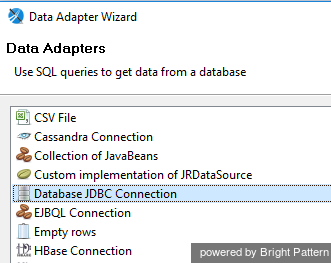
* In the window that pops up, select '''Database JDBC Connection''' and click '''Next'''. | * In the window that pops up, select '''Database JDBC Connection''' and click '''Next'''. | ||
| − | |||
[[File:Database-JDBC.png|450px|thumbnail|center|Create Data Adapter > Database JDBC Connection]] | [[File:Database-JDBC.png|450px|thumbnail|center|Create Data Adapter > Database JDBC Connection]] | ||
| − | === Step 3: Specify JDBC properties === | + | === Step 3: Specify JDBC properties === |
You will be defining the properties (i.e., driver, database server host, authentication) for the Java Database connection. | You will be defining the properties (i.e., driver, database server host, authentication) for the Java Database connection. | ||
| − | |||
In the window that pops up, specify the following: | In the window that pops up, specify the following: | ||
* '''Name:''' Name of the data adapter; note that "New Data Adapter" is the default name but it may be renamed | * '''Name:''' Name of the data adapter; note that "New Data Adapter" is the default name but it may be renamed | ||
| Line 41: | Line 36: | ||
* '''Password:''' Password for access to your Reporting Database | * '''Password:''' Password for access to your Reporting Database | ||
| − | |||
Then click '''Finish'''. | Then click '''Finish'''. | ||
| − | === Notes === | + | === Notes === |
* For database server host name, database name, and username, open the Contact Center Administrator application and navigate to [[contact-center-administrator-guide/ReportingSettings|Reporting Settings]]. | * For database server host name, database name, and username, open the Contact Center Administrator application and navigate to [[contact-center-administrator-guide/ReportingSettings|Reporting Settings]]. | ||
| − | |||
* In the ''JDBC Url'' field, do not include "<" or ">" symbols. Replace "''<your database server host name>''" and "''<your reporting database name>''" with your respective host and database names. | * In the ''JDBC Url'' field, do not include "<" or ">" symbols. Replace "''<your database server host name>''" and "''<your reporting database name>''" with your respective host and database names. | ||
| − | |||
| − | |||
| − | |||
| − | |||
| − | |||
| − | |||
| − | |||
| − | |||
Latest revision as of 04:01, 29 May 2024
Creating a Data Adapter
Data adapters allow Jaspersoft Studio to use SQL queries to get data from your Reporting Database. In the following procedure, you will create a data adapter that uses the Java Database Connectivity (JDBC) API for the programming language Java, which defines how a database can be accessed by a client. JDBC provides methods to query and update data in a database.
Note that creating a data adapter is not required unless you have direct database access; direct database access is a licensed fee.
Procedure
To create a data adapter, navigate to the Repository Explorer tab in the left-hand corner of the screen, and proceed through the following steps.
Step 1: Create a data adapter
- In Repository Explorer, select and right-click Data Adapters.
- Then select Create Data Adapter.
Step 2: Choose your connection
- In the window that pops up, select Database JDBC Connection and click Next.
Step 3: Specify JDBC properties
You will be defining the properties (i.e., driver, database server host, authentication) for the Java Database connection.
In the window that pops up, specify the following:
- Name: Name of the data adapter; note that "New Data Adapter" is the default name but it may be renamed
- JDBC Driver: org.mariadb.jdbc.Driver (Note: copy and paste this driver name into the field, or use the pull-down menu to select this driver.)
- JDBC Url: jdbc:mariadb://<your database server host name>:3306/< your reporting database name>
- Username: Username for access to your Reporting Database
- Password: Password for access to your Reporting Database
Then click Finish.
Notes
- For database server host name, database name, and username, open the Contact Center Administrator application and navigate to Reporting Settings.
- In the JDBC Url field, do not include "<" or ">" symbols. Replace "<your database server host name>" and "<your reporting database name>" with your respective host and database names.
< Previous


