Integration Configuration
Step 1: Sign in to your business’s LINE@ account and enable the Messaging API.
To use LINE as a business, you must have a registered LINE@ account.
- Navigate to the LINE Developers page and view your LINE@ account page.
- At the bottom of the page, select the Start using Messaging API button, agree to the terms and conditions, and click OK.
- At the bottom of the confirmation page, click the LINE@ MANAGER button, which will take you to to the the LINE@ Manager Bot Settings page.
- On the Bot Settings page, click Enable API.
Step 2: Allow webhooks.
After your LINE@ account has the Messaging API enabled, you will need to enable webhooks. Enabling webhooks for your LINE@ account on the LINE@ Manager allows you to receive messages from LINE users.
- From the LINE@ Manager side menu, navigate to Settings > Bot Settings.
- Under Request Settings, select Allow for “Use webhooks.” Selecting this is important because it lets you receive messages from LINE users.
LINE provides the following optional settings:
- Allow bots to join group chats: Bright Pattern LINE integration does not currently support group chats. Note that selecting Allow will not enable bots to group chats.
- Auto Reply Message: This option should be removed or set to Don’t allow so that LINE users will receive only chat messages from the integration account scenario.
- Greeting Message: This option should be removed or set to Don’t allow so that the customized greeting message that is sent to LINE users is set in the scenario only.
Step 3: Get a Channel access token and set a webhook URL on the Channel Console.
Your bot application requires a Channel access token to call APIs, along with a webhook URL to receive webhook payloads. Channel access tokens are issued from LINE’s Channel Console. The webhook URL is the endpoint of your bot application’s server where webhook payloads are sent.
- In the LINE Business Center, go to your LINE@ account page.
- In the Messaging API section, select the LINE Developers button to go to the Channel Console.
- To issue a Channel access token for accessing APIs, click ISSUE for the “Channel access token” item.
- Click EDIT and set a webhook URL for your Channel.
Note the following:
For troubleshooting purposes, you should verify that the webhook is set properly by using the Verify button. (See Step 5 of this procedure, after the integration account is added.)
The webhook URL must refer to the BP client web server used by the contact center in the following form:
https://<host name>/clientweb/line/webhook/<url-encoded access token>
The host name is the host name of the BP client web server used by your contact center.
Step 4: Create a new integration account in Contact Center Administrator.
- Log in as Admin to the Contact Center Administrator application.
- Navigate to Configuration > Integration Accounts.
- Click the Add "+" button to add a new account.
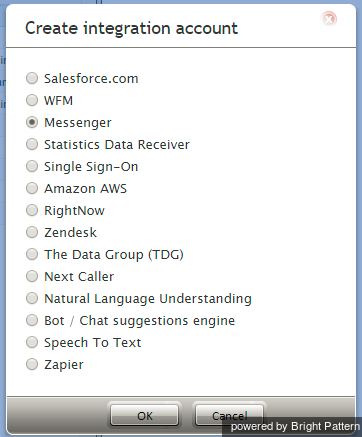
- In the Create integration account window that appears, select Messenger and click OK.
Step 5: Specify LINE integration account properties.
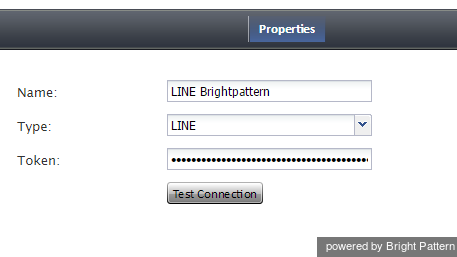
Using the credentials for your LINE@ account, enter values for the following screen properties. (If you do not know your credentials, ask your system administrator.)
- Name - The name of your integration account (this does not need to be your LINE@ account name)
- Type - For this integration account, select LINE as the type of integration.
- Token - The access token for your LINE@ account
- Test Connection - This button tests the credentials and confirms whether the connection is valid.
Click Apply to save your changes.
Your integration account is now configured for LINE. Next, you can do a real test of your connection by setting up a messenger chat scenario and responding to chat interactions from within the Agent Desktop application.


