Single Sign-On
Administrators can use the Settings page to set up single sign-on for their AI Agent 2.0 project.
Google Authentication
To enable single sign-on via Google authentication, administrators can navigate to Settings > Authentication and toggle the Google Auth Enabled switch on. Then, press Save at the bottom of the page.
Users can log in by clicking Sign In with Google on the login page.

Bright Pattern SSO
Requirements:
- Your service provider must have enabled Users Authentication version 1.4 or later for your contact center
If Bright Pattern SSO information, including client ID and client secret, is not pre-populated upon enabling BP SSO, administrators can enable single sign-on via Bright Pattern authentication as follows:
- In AI Agent 2.0, navigate to Settings > Authentication to toggle the BP SSO Enabled switch on.
- Enter your contact center domain name in the BP SSO URL field (e.g.
https://example.brightpattern.com). - In a new tab or browser window, navigate to the Authentication Settings page for your Bright Pattern contact center (e.g.
example.brightpattern.com/auth/settings). - Go to Applications for Internal SSO > SSO Client Applications > Add Application.
- Enter a name, e.g. “AI Agent 2.0”.
- In the Callback URLs field, enter your AI Agent 2.0 URL in the following format:
https://aiagent.brightpattern.com/auth/callback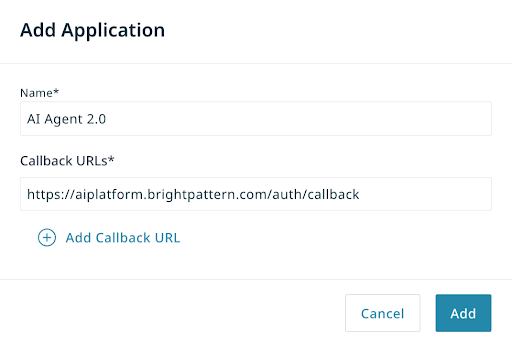
- Click Add to generate the Client ID and Client Secret. You will need these values to set up SSO inside your AI Agent 2.0 project. Note: Copy and save the Client Secret value in a secure location. You will not see it again.
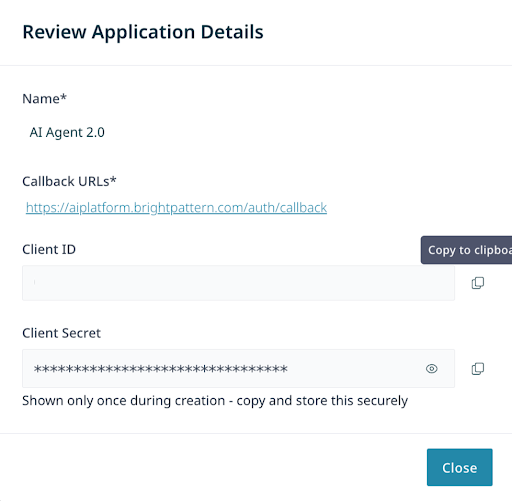
- In AI Agent 2.0, paste the Client ID value in the BP SSO Client ID field.
- Paste the Client Secret value in the BP SSO Client Secret field.
- Optional: Turn on the Enable Just-In-Time (JIT) Provisioning setting to allow new users to be created automatically after the first login. For more information, see Just-in-Time Provisioning.
- Press Save at the bottom of the page.


Users can log in by entering their Tenant URL on the login page, then clicking Sign In with Bright Pattern.

Okta Authentication
- In AI Agent 2.0, navigate to Settings > Authentication to toggle the Okta Auth Enabled switch on.
- Press Save at the bottom of the page.
- In a new tab or browser window, log in to your Okta account.
- Navigate to Security > API, then click API.
- Copy the Issuer URI for your default authorization server (e.g.
https://integrator-1234567.okta.com/oauth2/default). - Enter this value into the Okta Auth URL field in AI Agent 2.0.
- From the Okta home page, navigate to Applications > Applications.
- Click Create App Integration.
- Select OpenID and Web App, then click Create.
- Under General Settings, enter a name, e.g. “AI Agent 2.0”.
- Enable Client Credentials and Refresh Token.
- In the Sign-in redirect URIs field, enter your AI Agent 2.0 URL in the following format:
https://aiagent.brightpattern.com/auth/callback - In the Sign-out redirect URLs field, enter your top-level AI Agent 2.0 URL, e.g.
https://aiagent.brightpattern.com - Under User Consent, allow everyone.
- Click Save to save your new Okta application.
Users assigned to this application can log in by clicking Sign In with Okta on the login page.