Integrations
The Integrations page allows admins to centrally manage custom API credentials, integration accounts, and MCP server connections for use by the AI Agent 2.0 tool suite.
This page features a card for each configured integration that indicates when it was last updated and by whom, the flows it is invoked in, and whether it is successfully connected. MCP server and integration account cards feature a Test Connection icon, which tests whether the integration is currently connected to the target application. Additionally, MCP server and ServiceNow cards feature a Synchronize icon, which grants access to any new server-side tools.
Add API Credentials
Here you can set up API credentials to authenticate HTTP requests to external systems without requiring the LLM or end user to manage or reference those credentials directly.
- From the Integrations page, click Add > API Credential.
Note: API credentials can also be set up from the AI Flow builder by adding a Custom API Tool node, then selecting Create New API Credential. - Enter a name for this set of credentials in the Name field.
- From the Authentication Type drop-down menu, select one of the following options:
- Basic Auth: Enter your username and password in the Username and Password fields.
- Bearer Token: Generate a static token on the application you're trying to access, then enter that token in the Bearer Token field. This option is intended for use with legacy integrations.
- OAuth 2.0 (Client Credentials): Recommended.
- In the Client ID field, enter your client (or application) ID, which is the unique identifier of the app you are trying to access via API.
- In the Client Secret field, enter the client secret, a secret key associated with this app. You may need to generate this in the app first.
- In the Token Endpoint field, enter the endpoint URL ending in /token.
e.g. https://auth.example.com/token - In the Audience field, enter the endpoints at which the token can be used.
e.g. https://api.example.com - Use the Scope field to define the permissions scope for this API call.
e.g. users:read users:write - Click Test Connection to verify that the connection is properly established.
- Press Create to save the new API credential.
Add MCP Servers
AI Flows can connect to external capabilities using the MCP base protocol, instead of custom BPCC connectors. Several authorization types are supported.
- From the Integrations page, click Add > MCP Server.
Note: MCP servers can also be set up from the AI Flow builder by adding an MCP Server tool node, then selecting Create New MCP Server Connection. - Enter a name for this MCP server in the Name field.
- Enter the target URL endpoint in the URL field.
- From the Authentication Type drop-down menu, select one of the following options:
- None
- Bearer Token: Generate a static token on the external application you're trying to access, then enter that token in the Bearer Token field. This option is intended for use with legacy integrations.
- OAuth 2.0 (Client Credentials):
- In the Token Endpoint field, enter the endpoint URL ending in /token.
e.g. https://auth.example.com/token - In the Client ID field, enter your client ID, which is the unique identifier of the application you are trying to access.
- In the Client Secret field, enter the client secret, a secret key associated with this app. You may need to generate this in the app first.
- Use the Scope field to define the permissions for this AI Flow when accessing the external application.
- In the Token Endpoint field, enter the endpoint URL ending in /token.
- OAuth 2.0 (Authorization Code Grant):
- In the Authorization URL field, enter the endpoint URL ending in /authorize.
- Follow the four OAuth (Client Credentials) steps above.
- Press Connect.
- Click Test Connection to connect to the MCP server. Once this connection is established, the dialog window will automatically display any tools exposed by that MCP server.
- Use the checkboxes to control which tools should be selectable in AI Flows and which should be disabled. The input schema for each tool is displayed alongside it.
- Press Create to save the new MCP server.
Add Integration Accounts
This legacy option allows you to create ServiceNow, Zendesk, MS Dynamics 365, and Calendly integrations via out-of-the-box connectors. We recommend using the MCP Server option instead, as it is a more versatile tool that accomplishes the same result.

|
Important: AI Agent 2.0 has its own set of integration accounts. Integration accounts set up inside the BPCC admin portal cannot be reused. | |
Certain actions are disabled for integration account tools when used inside an AI Flow. Admins can control whether such tools are enabled from the Integrations page. This functions as a kill switch in the event of AI error in production.
- From the Integrations page, click Add > Integration Account.
- Select the account type.
- Enter a name and description, then press Next.
- Follow the relevant set of instructions below.
ServiceNow Integrations
- Enter your ServiceNow URL into the URL field.
- In a new browser window or tab, log in to your ServiceNow instance.
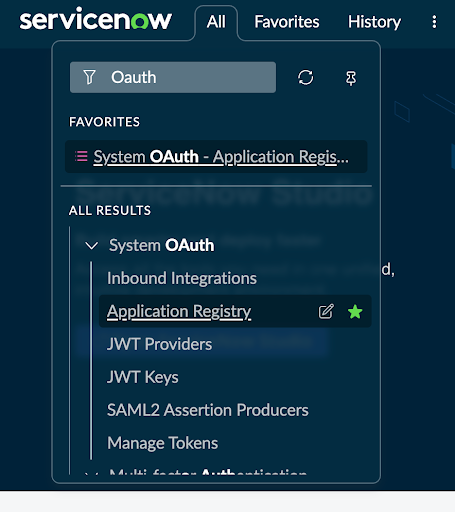
- From the home page, navigate to All > System OAuth > Application Registry.
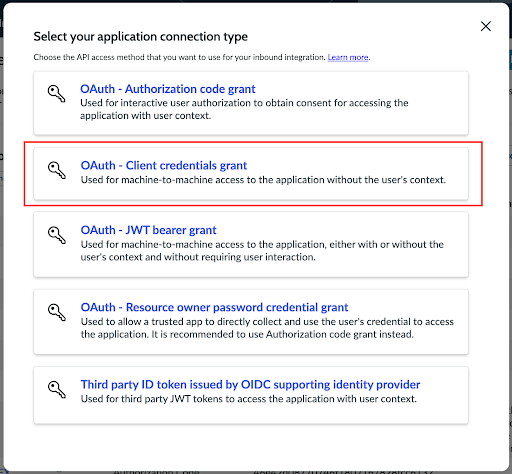
- Navigate to New > New Inbound Integration Experience > New Integration, then select OAuth - Client credentials grant.
- Enter the required information as prompted.
- For OAuth application user, select System Administrator for simplicity in your use case.
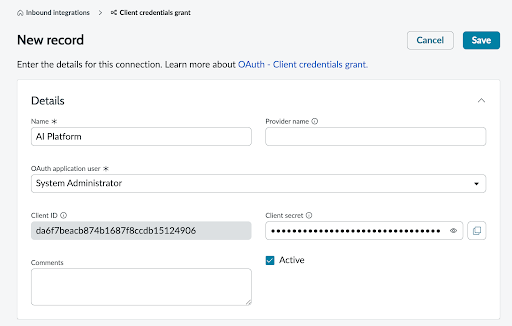
- Copy and paste the Client ID and Client Secret into the AI Agent 2.0 integration dialog.
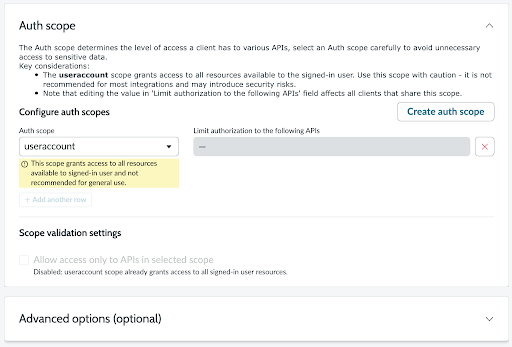
- Set Auth scope to useraccount for simplicity of use case.
- For OAuth application user, select System Administrator for simplicity in your use case.
- Click All in the top bar.
- In the search bar, enter sys_properties.list, then press Enter. You will be taken to the System Properties table.
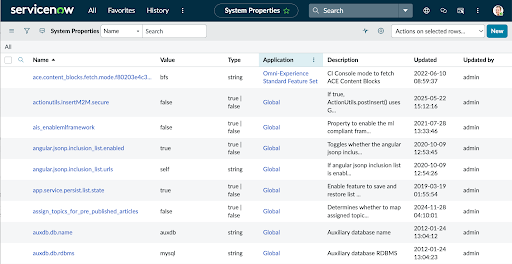
- Click the New button in the top right corner.
- Enter the details as follows:
- Name: glide.oauth.inbound.client.credential.grant_type.enabled
- Type: true | false
- Value: true
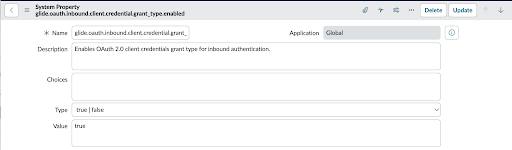
- Click Update.
- Click Request Token inside the AI Agent 2.0 integration dialog.
- Press Test Connection to confirm that your credentials are accepted.
- Press Submit to save the new ServiceNow integration.


MS Dynamics Integrations
- Enter your registered MS Dynamics application URL into the URL field, in the format https://<your-organization>.crm.dynamics.com/
- In a new browser window or tab, log in to the Microsoft Azure portal.
- In the Client ID field, enter the application (client) ID. This can be found on your registered app's Overview page in the Microsoft Azure portal.
- Generate a new client secret in the Azure portal:
- Go to Manage > Certificates & secrets.
- Click + New client secret to open the Add a client secret dialog.
- In Description, add any description
- In Expires, set to Never.
- Click Add.
- Copy the client secret when it is shown. Store it in a secure location on your computer.
- Paste the copied client secret into the Client Secret field in the AI Agent 2.0 integration dialog.
- Copy the token endpoint as follows:
- In the Azure portal, go to your registered app > Overview > Endpoints.
- In the Endpoints dialog that opens, copy the value for OAuth 2.0 token endpoint (v1).
- Paste this value into the Token Endpoint field in the AI Agent 2.0 integration dialog.
- Press Test Connection to confirm that your credentials are accepted.
- Press Submit to save the new MS Dynamics integration.
Zendesk Integrations
- Enter your Zendesk domain URL into the URL field.
- In a new browser window or tab, log in to Zendesk Admin Center.
- From the Authorization drop-down menu, select OAuth or API Token.
- OAuth:
- In Zendesk Admin Center, navigate to Apps and integrations > Zendesk API > OAuth Clients > Add OAuth client.
- Set Client name to "Bright Pattern" or similar.
- Set Client kind to Confidential.
- Click Save to save OAuth client settings, then click OK to display the client secret.
- Under Secret, click Copy to copy it to the clipboard. Store this key in a secure location on your computer.
- Paste the copied secret key into the Client Secret field in the AI Agent 2.0 integration dialog.
- Copy the Unique identifier from Zendesk.
- Paste the unique identifier into the Client ID field in the AI Agent 2.0 integration dialog.
- API Token: This option is intended for use with legacy integrations.
- Enter the email address associated with the Zendesk admin in the Email field. This can be found on the corresponding user profile page in Zendesk Support.
- In Zendesk Admin Center, navigate to Apps and integrations > APIs > API tokens.
- Click Add API token.
- Click Save to generate the token.
- Copy the token, then press Save to close the Zendesk API token dialog. Store this token in a secure location on your computer.
- Paste the token into the Token field in the AI Agent 2.0 integration dialog.
- OAuth:
- Press Test Connection to confirm that your credentials are accepted.
- Press Submit to save the new Zendesk integration.
Calendly Integrations
- Log in to your Calendly account in a new browser window or tab.
- Navigate to Integrations > API & Webhooks > Personal Access Tokens, then click Get a token now or Generate new token.
- Copy the token.
- Paste the token into the Token field in the AI Agent 2.0 integration dialog.
- Press Test Connection to confirm that the token is accepted.
- Press Submit to save the new Calendly integration.
< Previous | Next >