| Line 1: | Line 1: | ||
<translate> | <translate> | ||
= Transfer a Call = | = Transfer a Call = | ||
| − | You can use the [[Embedded-agent-desktop- | + | You can use the [[Embedded-agent-desktop-api-specification/Methods/singleStepTransfer | singleStepTransfer]] method to have a logged-in agent transfer a voice call to another number. singleStepTransfer can be used any time after the agent has accepted a call. |
The singleStepTransfer method can be attached to a web element, such as a button, on your webpage. When clicked, the button will process the API method. Add a field to enter the destination phone number. | The singleStepTransfer method can be attached to a web element, such as a button, on your webpage. When clicked, the button will process the API method. Add a field to enter the destination phone number. | ||
You may want to use singleStepTransfer with the following other methods: | You may want to use singleStepTransfer with the following other methods: | ||
| − | * [[Embedded-agent-desktop- | + | * [[Embedded-agent-desktop-api-specification/Methods/getState | getState]], to get data logs for the interaction |
| − | * [[Embedded-agent-desktop- | + | * [[Embedded-agent-desktop-api-specification/Methods/setStatus | setStatus]], to change state back to "Ready" after the call has been transferred |
In this article, you will learn how to: | In this article, you will learn how to: | ||
| Line 14: | Line 14: | ||
* Place sample JavaScript into HTML | * Place sample JavaScript into HTML | ||
| − | |||
| − | |||
| − | + | == Sample Code == | |
| − | + | In this sample code, the methods are attached to button elements. | |
| − | + | ||
| − | + | Copy this sample code for pasting into your HTML file. This is the bare minimum that you need for the SDK to work. Make sure you replace "<tenant>" with the name of your Agent Desktop web server (e.g., "example.brightpattern.com"). | |
| − | |||
| − | |||
| − | = | + | <syntaxhighlight lang="javascript"> |
<script type="text/javascript" src="https://<tenant>.brightpattern.com/agentdesktop/libs/servicepattern-sdk-v1.js"> | <script type="text/javascript" src="https://<tenant>.brightpattern.com/agentdesktop/libs/servicepattern-sdk-v1.js"> | ||
</script> | </script> | ||
| − | <iframe id="repeater" style="position:absolute; right: 8px; width: 300px; height: 700px;" src="https://<tenant>.brightpattern.com/agentdesktop/UniversalRepeater.jsp"></iframe> | + | <iframe id="repeater" style="position:absolute; right: 8px; width: 300px; height: 700px;" src="https://<tenant>.brightpattern.com/agentdesktop/UniversalRepeater.jsp"></iframe> |
<button onclick="bpspat.api.getState(log)">Get State</button> | <button onclick="bpspat.api.getState(log)">Get State</button> | ||
| − | < | + | <br> |
| − | < | + | <br> |
| − | <input id="transfer_number" type="text" placeholder="Number"/> | + | <input id="transfer_number" type="text" placeholder="Number"/> |
| − | <button onclick="bpspat.api.singleStepTransfer(document.getElementById('transfer_number').value)">Single Step Transfer</button> | + | <button onclick="bpspat.api.singleStepTransfer(document.getElementById('transfer_number').value)">Single Step Transfer</button> |
| − | < | + | <br> |
| − | < | + | <br> |
| − | < | + | <div id="log">Logs...</div> |
| − | < | + | <br> |
| − | < | + | <br> |
| − | <script type="text/javascript"> | + | <script type="text/javascript"> |
| − | window.bpspat.api.init("https://<tenant>.brightpattern.com"); | + | window.bpspat.api.init("https://<tenant>.brightpattern.com"); |
function log(data) { | function log(data) { | ||
let div = document.createElement("div"); | let div = document.createElement("div"); | ||
| Line 50: | Line 46: | ||
</script> | </script> | ||
| + | </syntaxhighlight> | ||
| + | |||
| + | |||
| + | == Example Exercise == | ||
| + | There are many ways to style your page elements and Agent Desktop widget display. The following is provided for example purposes only. | ||
| + | |||
| + | # Paste the [[5.3:Embedded-agent-desktop-sdk-specification/UseCases/Transfer#Sample_Code | | ||
| + | sample code]] into the body of your HTML file.<br /><br /> | ||
| + | # Save and open the page in your web browser. Make sure the agent is logged in and "Ready."<br /><br /> | ||
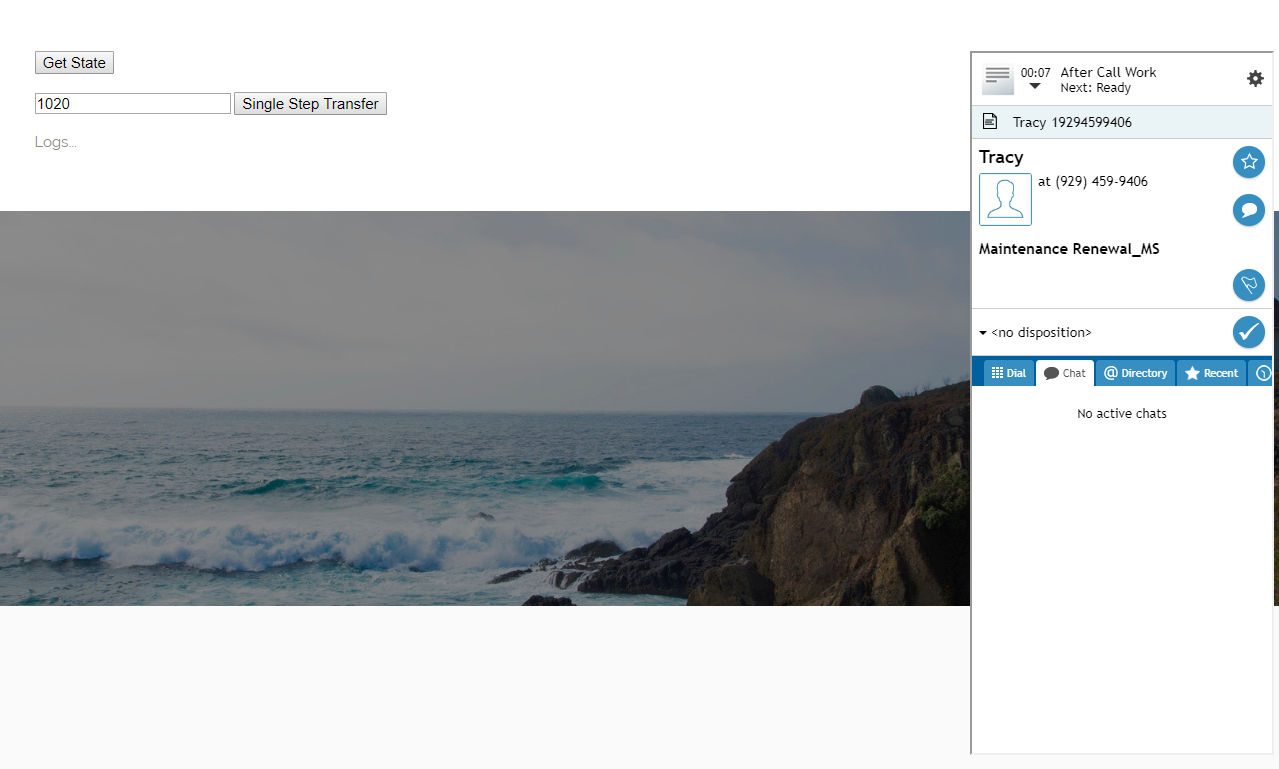
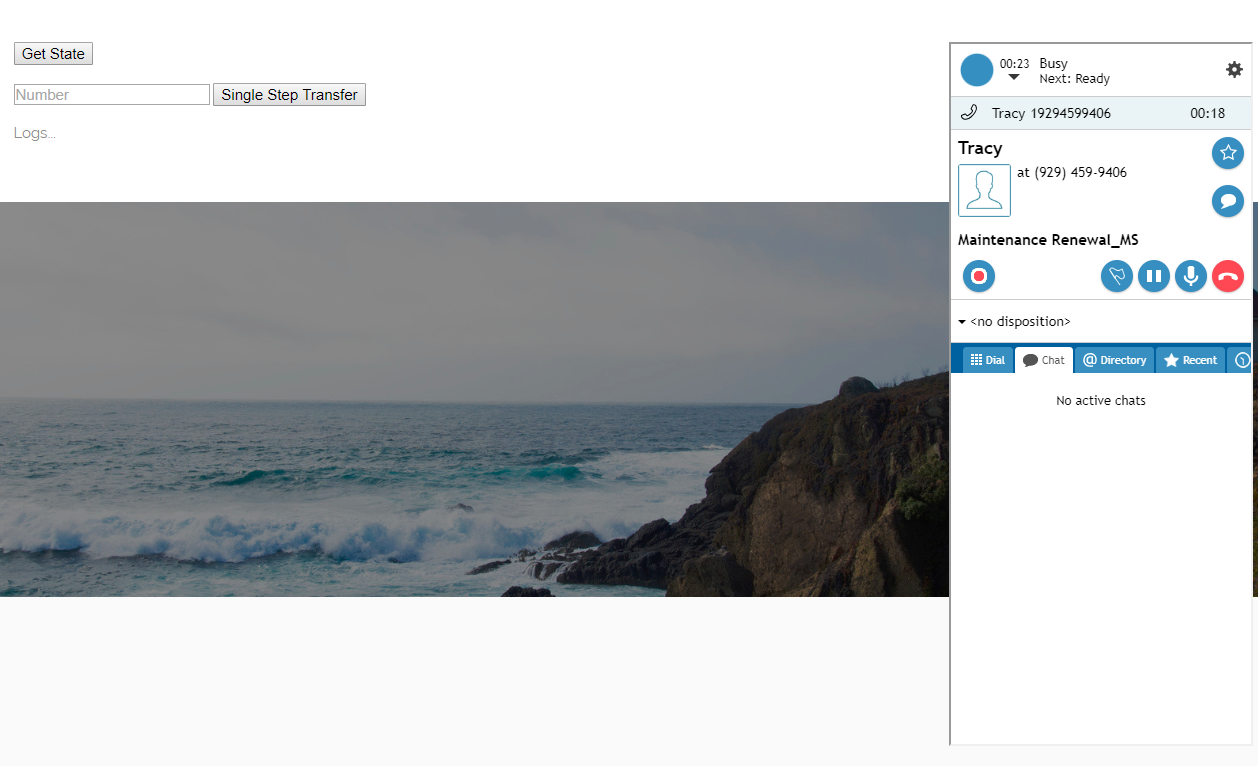
| + | # The call comes in and the agent answers.<br /><br />[[File:Transfer7-53.PNG|800px|center|Accepted call]]<br /><br /> | ||
| + | # You want to transfer the call to another agent, so you enter the destination phone number for the transferred call. Then click '''Single Step Transfer''' to transfer call.<br /><br /> | ||
| + | # The call is transferred immediately and the agent is placed in the "After-Call Work" state for dispositioning the call.<br /><br />[[File:Transfer8-53.PNG|800px|center|Enter phone number or extension]] | ||
| + | |||
| + | |||
| + | |||
Latest revision as of 23:11, 26 March 2019
Transfer a Call
You can use the singleStepTransfer method to have a logged-in agent transfer a voice call to another number. singleStepTransfer can be used any time after the agent has accepted a call.
The singleStepTransfer method can be attached to a web element, such as a button, on your webpage. When clicked, the button will process the API method. Add a field to enter the destination phone number.
You may want to use singleStepTransfer with the following other methods:
- getState, to get data logs for the interaction
- setStatus, to change state back to "Ready" after the call has been transferred
In this article, you will learn how to:
- Attach singleStepTransfer to a button
- Add a field to enter the destination number for the call
- Place sample JavaScript into HTML
Sample Code
In this sample code, the methods are attached to button elements.
Copy this sample code for pasting into your HTML file. This is the bare minimum that you need for the SDK to work. Make sure you replace "<tenant>" with the name of your Agent Desktop web server (e.g., "example.brightpattern.com").
 <script type="text/javascript" src="https://<tenant>.brightpattern.com/agentdesktop/libs/servicepattern-sdk-v1.js">
 </script>

 <iframe id="repeater" style="position:absolute; right: 8px; width: 300px; height: 700px;" src="https://<tenant>.brightpattern.com/agentdesktop/UniversalRepeater.jsp"></iframe>

 <button onclick="bpspat.api.getState(log)">Get State</button>
 <br>
 <br>
 <input id="transfer_number" type="text" placeholder="Number"/>
 <button onclick="bpspat.api.singleStepTransfer(document.getElementById('transfer_number').value)">Single Step Transfer</button>
 <br>
 <br>
 <div id="log">Logs...</div>
 <br>
 <br>
 <script type="text/javascript">
 window.bpspat.api.init("https://<tenant>.brightpattern.com");
 function log(data) {
 let div = document.createElement("div");
 div.innerHTML = JSON.stringify(data);
 document.getElementById("log").appendChild(div);
 }

 </script>
Example Exercise
There are many ways to style your page elements and Agent Desktop widget display. The following is provided for example purposes only.
- Paste the
sample code into the body of your HTML file.
- Save and open the page in your web browser. Make sure the agent is logged in and "Ready."
- The call comes in and the agent answers.
- You want to transfer the call to another agent, so you enter the destination phone number for the transferred call. Then click Single Step Transfer to transfer call.
- The call is transferred immediately and the agent is placed in the "After-Call Work" state for dispositioning the call.