(Created page with "<translate> = Requesting Number Port = Bright Pattern's Contact Center Number Provisioning application provides users with the self-service option to request a move or "port"...") |
|||
| Line 20: | Line 20: | ||
==== Prepare the Data ==== | ==== Prepare the Data ==== | ||
| − | Go to the ''Request Port'' [[File:2022.03.09_NumProv_Icon.RequestPort.off.png|40px]] page. | + | 1. Go to the ''Request Port'' [[File:2022.03.09_NumProv_Icon.RequestPort.off.png|40px]] page. |
<!--[[File:2022.03.10_NP_RequestPort.MenuIcon.png|250px|thumb|center]]--> | <!--[[File:2022.03.10_NP_RequestPort.MenuIcon.png|250px|thumb|center]]--> | ||
| − | The ''"Request Port from Another Carrier"'' page will appear. | + | 2. The ''"Request Port from Another Carrier"'' page will appear. |
| − | It reads: | + | 3. It reads: |
"Step 1 of 3: Prepare Data | "Step 1 of 3: Prepare Data | ||
| Line 38: | Line 38: | ||
[[File:2022.03.10_NP_RequestPort.01.png|450px|thumb|center]] | [[File:2022.03.10_NP_RequestPort.01.png|450px|thumb|center]] | ||
| − | Choose a porting option - uploading via spreadsheet or entering the numbers manually. | + | 4. Choose a porting option - uploading via spreadsheet or entering the numbers manually. |
| Line 44: | Line 44: | ||
==== Using a spreadsheet ==== | ==== Using a spreadsheet ==== | ||
| − | Choosing the "Excel spreadsheet" option allows you to click the "Download example spreadsheet button" [[File:2022.03.09_NumProv_Icon.DownloadExampleSpreadsheet.png|150px]] and download an example spreadsheet to use as a template to correctly format the numbers to be ported. This download can be found in your downloads folder and can be opened in a spreadsheet application. | + | 1. Choosing the "Excel spreadsheet" option allows you to click the "Download example spreadsheet button" [[File:2022.03.09_NumProv_Icon.DownloadExampleSpreadsheet.png|150px]] and download an example spreadsheet to use as a template to correctly format the numbers to be ported. This download can be found in your downloads folder and can be opened in a spreadsheet application. |
Open the spreadsheet template. Note that there are no separating punctuation marks (e.g., commas, dashes, periods, etc) between the numbers and that each number string begins with "1". | Open the spreadsheet template. Note that there are no separating punctuation marks (e.g., commas, dashes, periods, etc) between the numbers and that each number string begins with "1". | ||
| Line 51: | Line 51: | ||
| − | Edit the example spreadsheet to fit your needs or create your own to match the template. | + | 2. Edit the example spreadsheet to fit your needs or create your own to match the template. |
| − | Save the spreadsheet. | + | 3. Save the spreadsheet. |
| − | Choose the "Upload" [[File:2022.03.09_NumProv_Icon.Upload.png|75px]] button. | + | 4. Choose the "Upload" [[File:2022.03.09_NumProv_Icon.Upload.png|75px]] button. |
| Line 63: | Line 63: | ||
| − | Click the "Submit" [[File:2022.03.09_NumProv_Icon.Submit_on.png|75px]] button. | + | 5. Click the "Submit" [[File:2022.03.09_NumProv_Icon.Submit_on.png|75px]] button. |
==== Manual entry ==== | ==== Manual entry ==== | ||
| − | Choose the option "Or enter full number (you can enter several numbers separated by comma)" | + | 1. Choose the option "Or enter full number (you can enter several numbers separated by comma)" |
[[File:2022.03.10_NP_RequestPort.01.ee.png|450px|thumb|center]] | [[File:2022.03.10_NP_RequestPort.01.ee.png|450px|thumb|center]] | ||
| − | Enter the phone numbers you want to port into the text box manually, separating each phone number string with a comma. | + | |
| + | 2. Enter the phone numbers you want to port into the text box manually, separating each phone number string with a comma. | ||
* Note that there are otherwise no separating punctuation marks (e.g., commas, dashes, periods, etc) between the phone number digits themselves and that each number string begins with "1". | * Note that there are otherwise no separating punctuation marks (e.g., commas, dashes, periods, etc) between the phone number digits themselves and that each number string begins with "1". | ||
| − | Click the "Submit" [[File:2022.03.09_NumProv_Icon.Submit_on.png|75px]] button. | + | 3. Click the "Submit" [[File:2022.03.09_NumProv_Icon.Submit_on.png|75px]] button. |
| − | The "Step 2 of 3: Create Letter of Authorization" page will open. | + | 4. The "Step 2 of 3: Create Letter of Authorization" page will open. |
| Line 98: | Line 99: | ||
| − | On the "Step 2 of 3: Create Letter of Authorization" page, fill out the information form to port to the carrier previously searched for. | + | 1. On the "Step 2 of 3: Create Letter of Authorization" page, fill out the information form to port to the carrier previously searched for. |
| − | This mandatory information requested includes: | + | 2. This mandatory information requested includes: |
* Current Provider | * Current Provider | ||
| Line 111: | Line 112: | ||
| − | Once this form has been filled out, click the "Next" [[File:2022.03.08_NumProv_Icons.Next.png|75px]] button. | + | 3. Once this form has been filled out, click the "Next" [[File:2022.03.08_NumProv_Icons.Next.png|75px]] button. |
| − | The "Request Port From Another Carrier" page will open. | + | 4. The "Request Port From Another Carrier" page will open. |
| Line 122: | Line 123: | ||
==== Request Port From Another Carrier ==== | ==== Request Port From Another Carrier ==== | ||
| − | Step 3 of 3: Download, Sign and Upload the Letter of Authorization | + | 1. Step 3 of 3: Download, Sign and Upload the Letter of Authorization |
| − | Once on the "Request Port From Another Carrier" page, you will follow the steps: | + | 2. Once on the "Request Port From Another Carrier" page, you will follow the steps: |
* Download the Letter of Authorization (LOA). | * Download the Letter of Authorization (LOA). | ||
| Line 136: | Line 137: | ||
==== Download the LOA ==== | ==== Download the LOA ==== | ||
| − | Click the "Download" [[File:2022.03.09_NumProv_Icon.Download.png|75px]] button to download the Letter of Authorization file. | + | 1. Click the "Download" [[File:2022.03.09_NumProv_Icon.Download.png|75px]] button to download the Letter of Authorization file. |
| − | This download can be found in your downloads folder. | + | 2. This download can be found in your downloads folder. |
| − | It should be named "letter of authorization.pdf". | + | 3. It should be named "letter of authorization.pdf". |
| Line 148: | Line 149: | ||
==== Sign the LOA ==== | ==== Sign the LOA ==== | ||
| − | Open the "letter of authorization.pdf". | + | 1. Open the "letter of authorization.pdf". |
| − | Examine the information to make sure that all the fields are filled out correctly. | + | 2. Examine the information to make sure that all the fields are filled out correctly. |
| − | Print out the .PDF file. | + | 3. Print out the .PDF file. |
| − | Date and sign the .PDF file. | + | 4. Date and sign the .PDF file. |
| Line 162: | Line 163: | ||
==== Upload signed Letter of Authorization (PDF only) ==== | ==== Upload signed Letter of Authorization (PDF only) ==== | ||
| − | Once the information in the ''Letter of Authorization'' (LOA) .PDF file has been verified and signed, upload the file. | + | 1. Once the information in the ''Letter of Authorization'' (LOA) .PDF file has been verified and signed, upload the file. |
| − | Click the "Upload" [[File:2022.03.09_NumProv_Icon.Upload.png|75px]] button to browse your computer and upload a copy of the signed LOA. | + | 2. Click the "Upload" [[File:2022.03.09_NumProv_Icon.Upload.png|75px]] button to browse your computer and upload a copy of the signed LOA. |
| Line 170: | Line 171: | ||
| − | Click the "Finish" [[File:2022.03.09_NumProv_Icon.Finish.png|70px]] button to finish uploading the file. | + | 3. Click the "Finish" [[File:2022.03.09_NumProv_Icon.Finish.png|70px]] button to finish uploading the file. |
| − | If the upload is a success you will see a new page called "Request Port From Another Carrier". | + | 4. If the upload is a success you will see a new page called "Request Port From Another Carrier". |
| − | It will include: | + | 5. It will include: |
* A green banner that states "Order status: Pending" with a blue link that leads to the specific order details. | * A green banner that states "Order status: Pending" with a blue link that leads to the specific order details. | ||
| Line 181: | Line 182: | ||
* How many numbers have failed | * How many numbers have failed | ||
| − | It will also list the ''Order'' number, the status of the order, the order type, the name of the Authorized owner, the service address, and a link to the uploaded ''Letter of Authorization.'' | + | 6. It will also list the ''Order'' number, the status of the order, the order type, the name of the Authorized owner, the service address, and a link to the uploaded ''Letter of Authorization.'' |
| − | If you wish to port more numbers, you can click the "Start New Order" [[File:2022.03.09_NumProv_Icon.StartNewOrder.png|70px]] button to begin a new order process. | + | 7. If you wish to port more numbers, you can click the "Start New Order" [[File:2022.03.09_NumProv_Icon.StartNewOrder.png|70px]] button to begin a new order process. |
Latest revision as of 15:01, 19 May 2022
Requesting Number Port
Bright Pattern's Contact Center Number Provisioning application provides users with the self-service option to request a move or "port" phone numbers from one carrier to another. Please note that porting requests are supported for United States and Canadian numbers only.
This article explains how to request porting of phone numbers from one carrier to another.
Procedure
- Prepare the data
- Create a Letter of Authorization
- Request port from another carrier
Steps
Porting Between Carriers
Prepare the Data
1. Go to the Request Port ![]() page.
page.
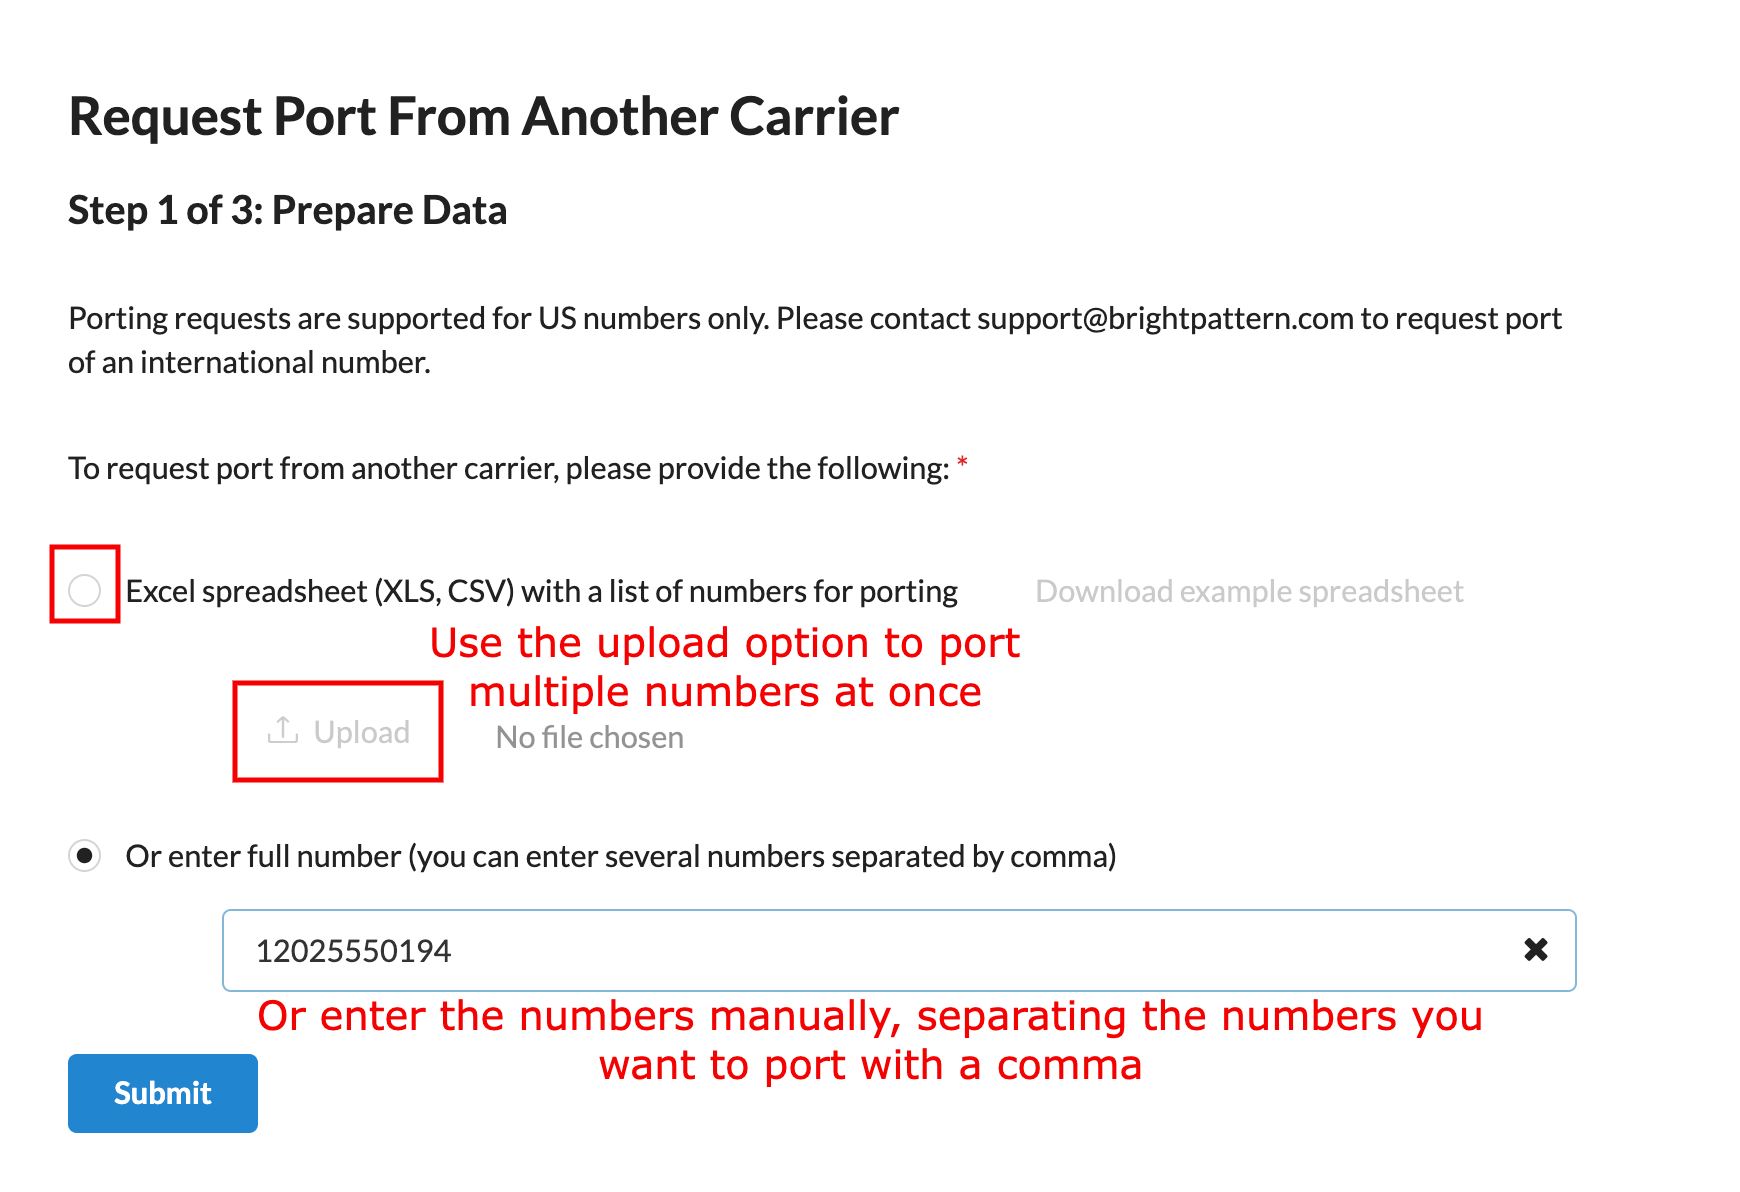
2. The "Request Port from Another Carrier" page will appear.
3. It reads:
"Step 1 of 3: Prepare Data Porting requests are supported for US/Canada numbers only. Please contact support@brightpattern.com to request port of an international number.
To request port from another carrier, please provide the following:"
- Excel spreadsheet (XLS, CSV) with a list of numbers for porting
- Or enter full number (you can enter several numbers separated by comma)
4. Choose a porting option - uploading via spreadsheet or entering the numbers manually.
Using a spreadsheet
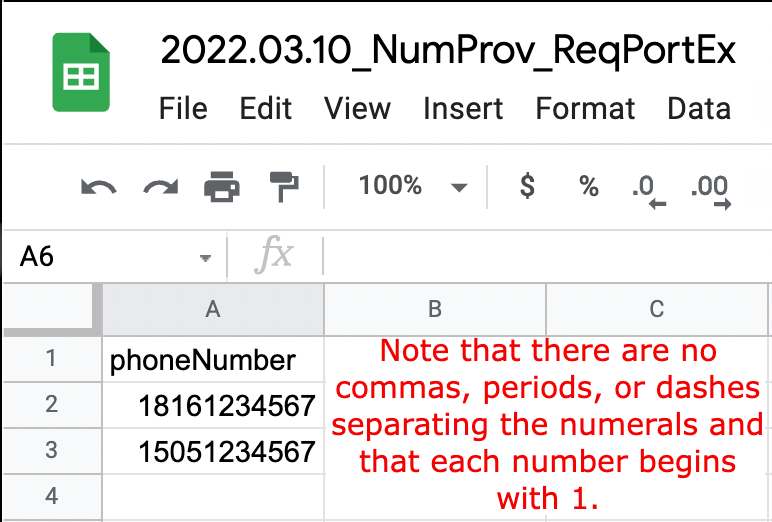
1. Choosing the "Excel spreadsheet" option allows you to click the "Download example spreadsheet button" ![]() and download an example spreadsheet to use as a template to correctly format the numbers to be ported. This download can be found in your downloads folder and can be opened in a spreadsheet application.
Open the spreadsheet template. Note that there are no separating punctuation marks (e.g., commas, dashes, periods, etc) between the numbers and that each number string begins with "1".
and download an example spreadsheet to use as a template to correctly format the numbers to be ported. This download can be found in your downloads folder and can be opened in a spreadsheet application.
Open the spreadsheet template. Note that there are no separating punctuation marks (e.g., commas, dashes, periods, etc) between the numbers and that each number string begins with "1".
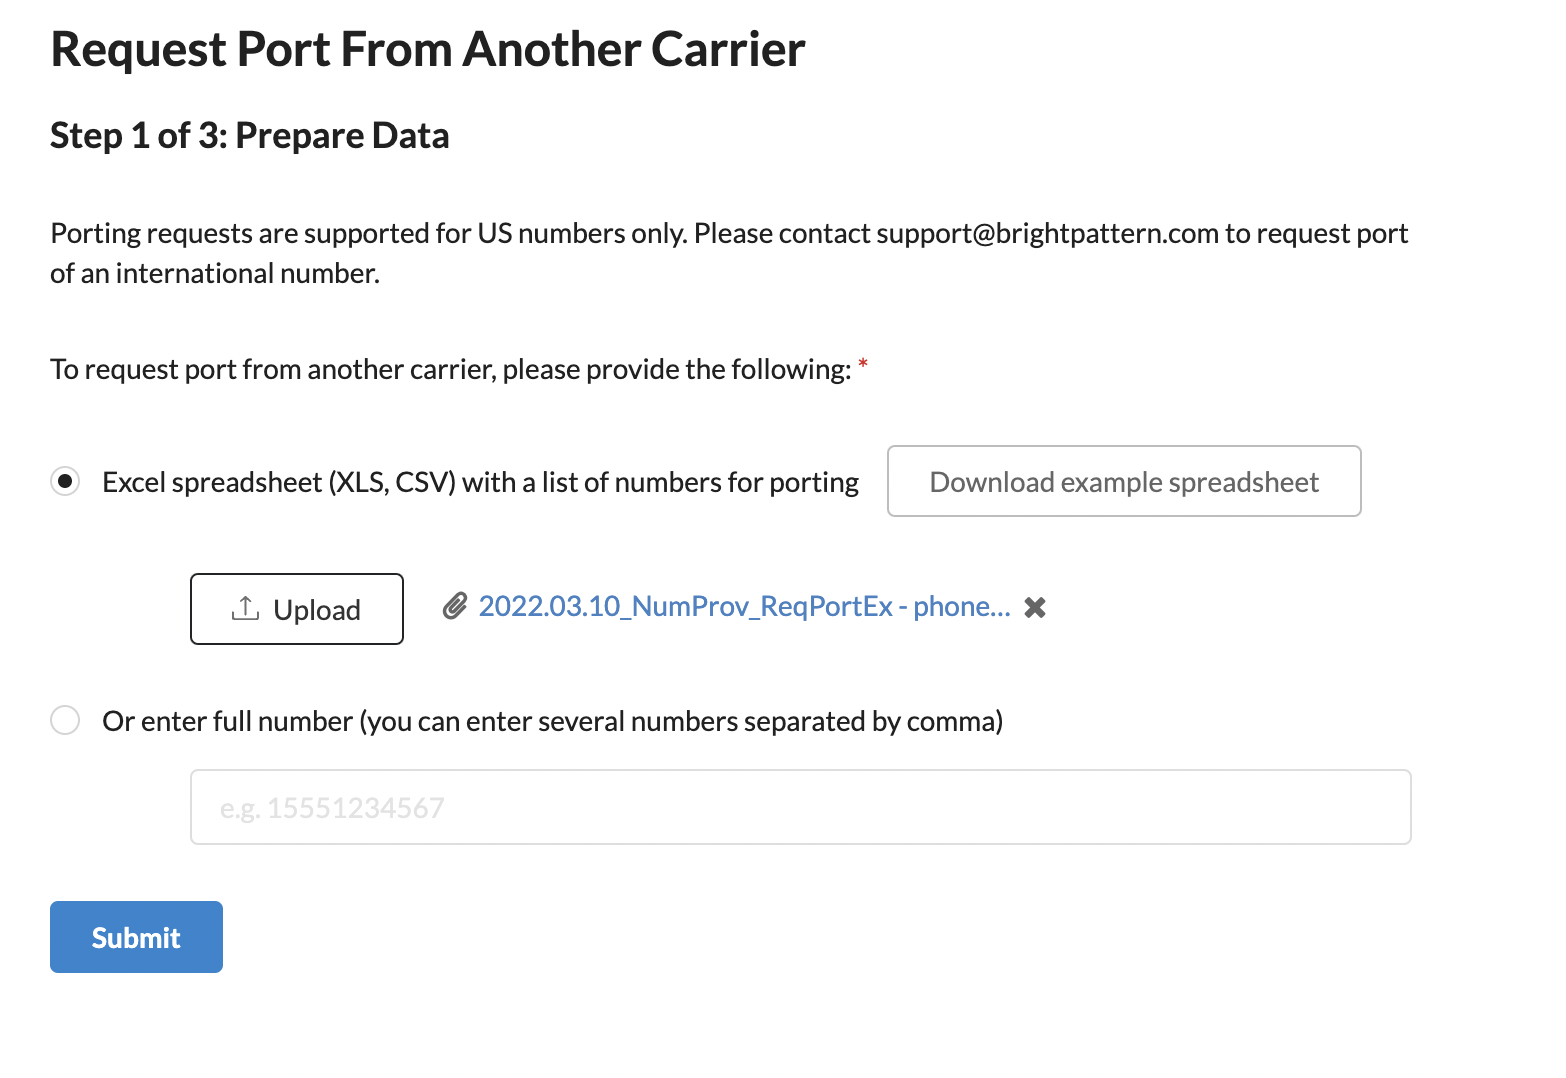
2. Edit the example spreadsheet to fit your needs or create your own to match the template.
3. Save the spreadsheet.
4. Choose the "Upload" ![]() button.
button.
Manual entry
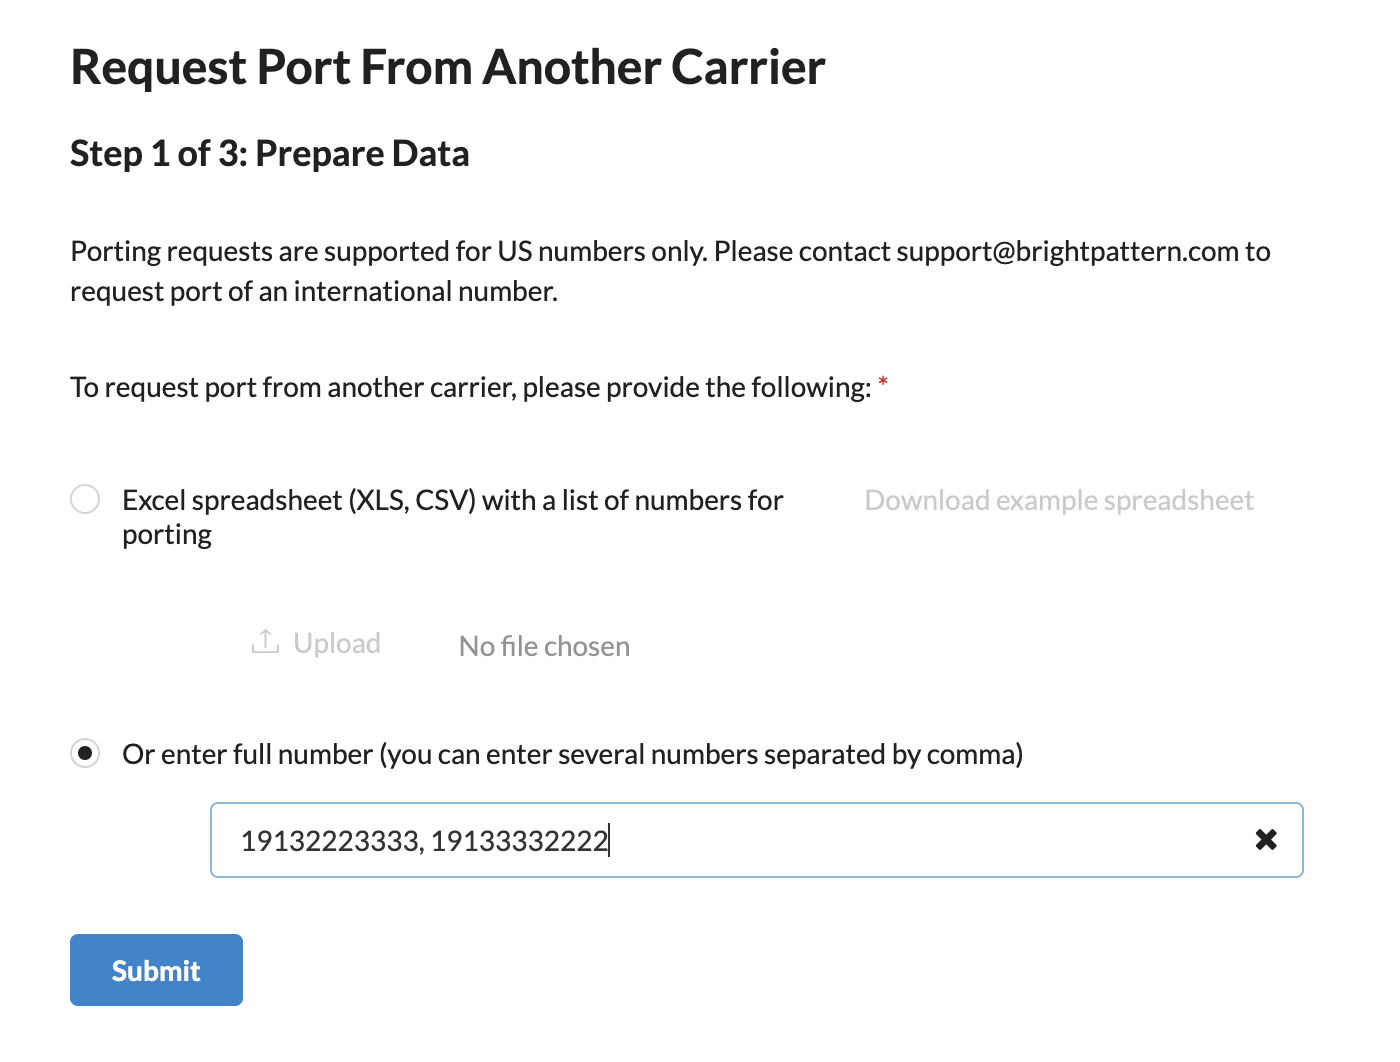
1. Choose the option "Or enter full number (you can enter several numbers separated by comma)"
2. Enter the phone numbers you want to port into the text box manually, separating each phone number string with a comma.
- Note that there are otherwise no separating punctuation marks (e.g., commas, dashes, periods, etc) between the phone number digits themselves and that each number string begins with "1".
4. The "Step 2 of 3: Create Letter of Authorization" page will open.
Create a Letter of Authorization
While completing this form:
|
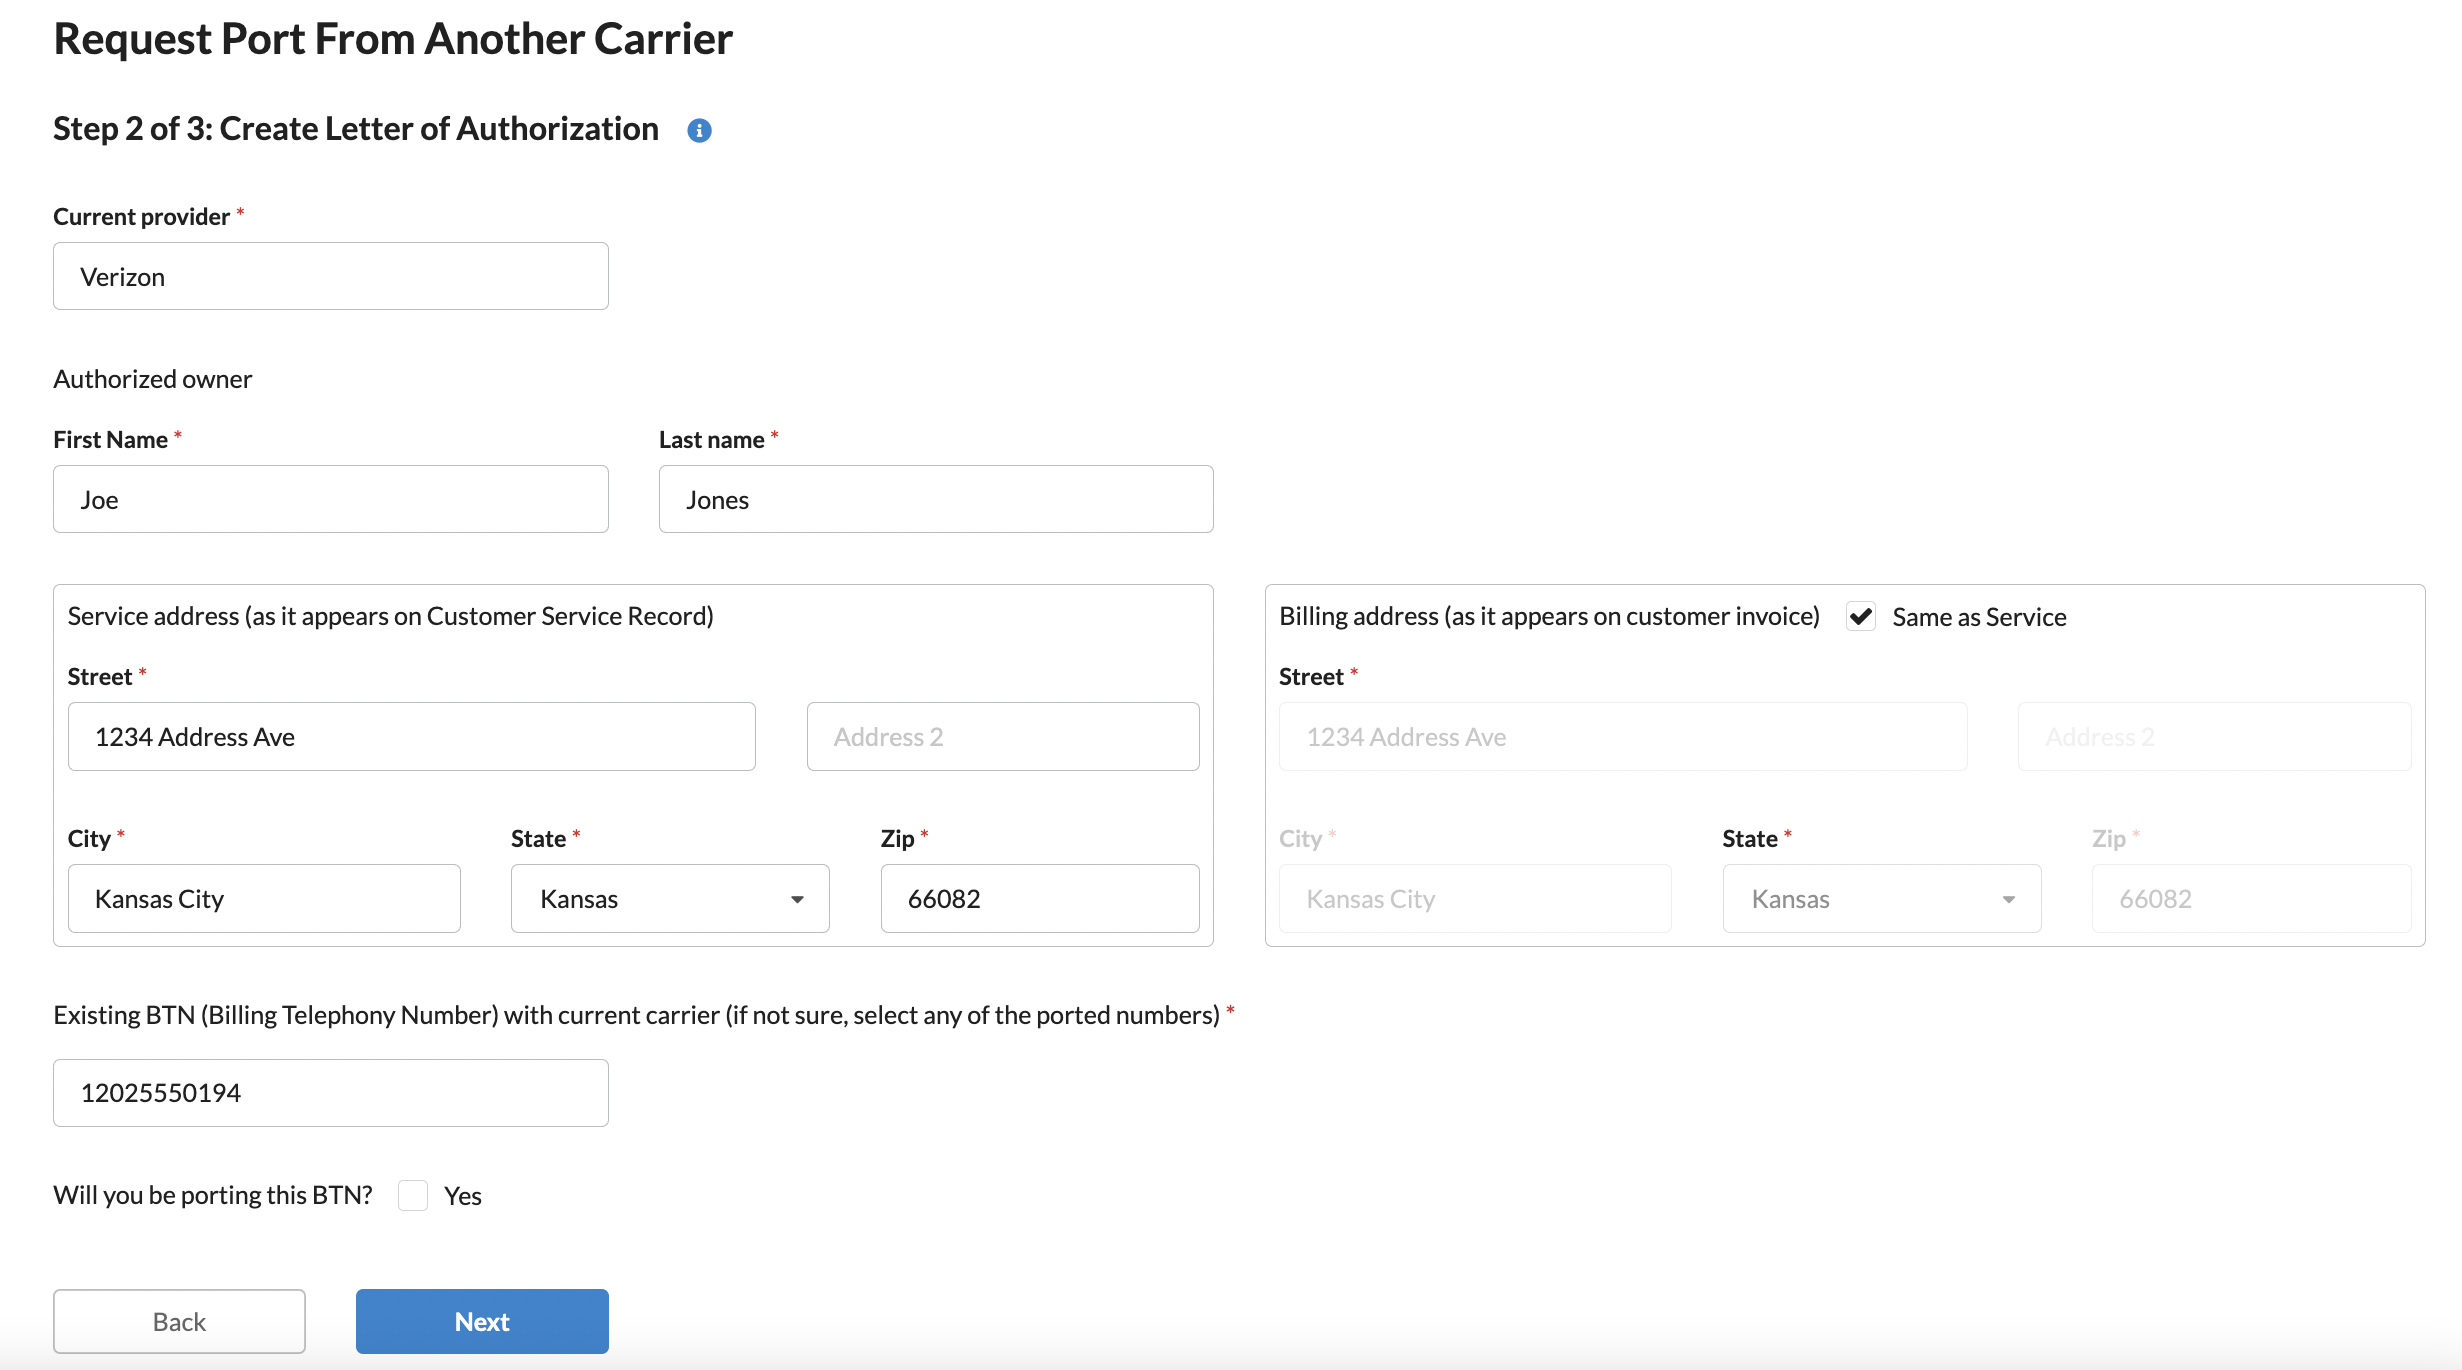
1. On the "Step 2 of 3: Create Letter of Authorization" page, fill out the information form to port to the carrier previously searched for.
2. This mandatory information requested includes:
- Current Provider
- Authorized Owner
- First name
- Last name
- Service address (as it appears on Customer Service Record)
- Billing address (as it appears on customer invoice)
- Existing BTN (Billing Telephony Number) with current carrier (if not sure, select any of the ported numbers)
3. Once this form has been filled out, click the "Next" ![]() button.
button.
4. The "Request Port From Another Carrier" page will open.
Request Port From Another Carrier
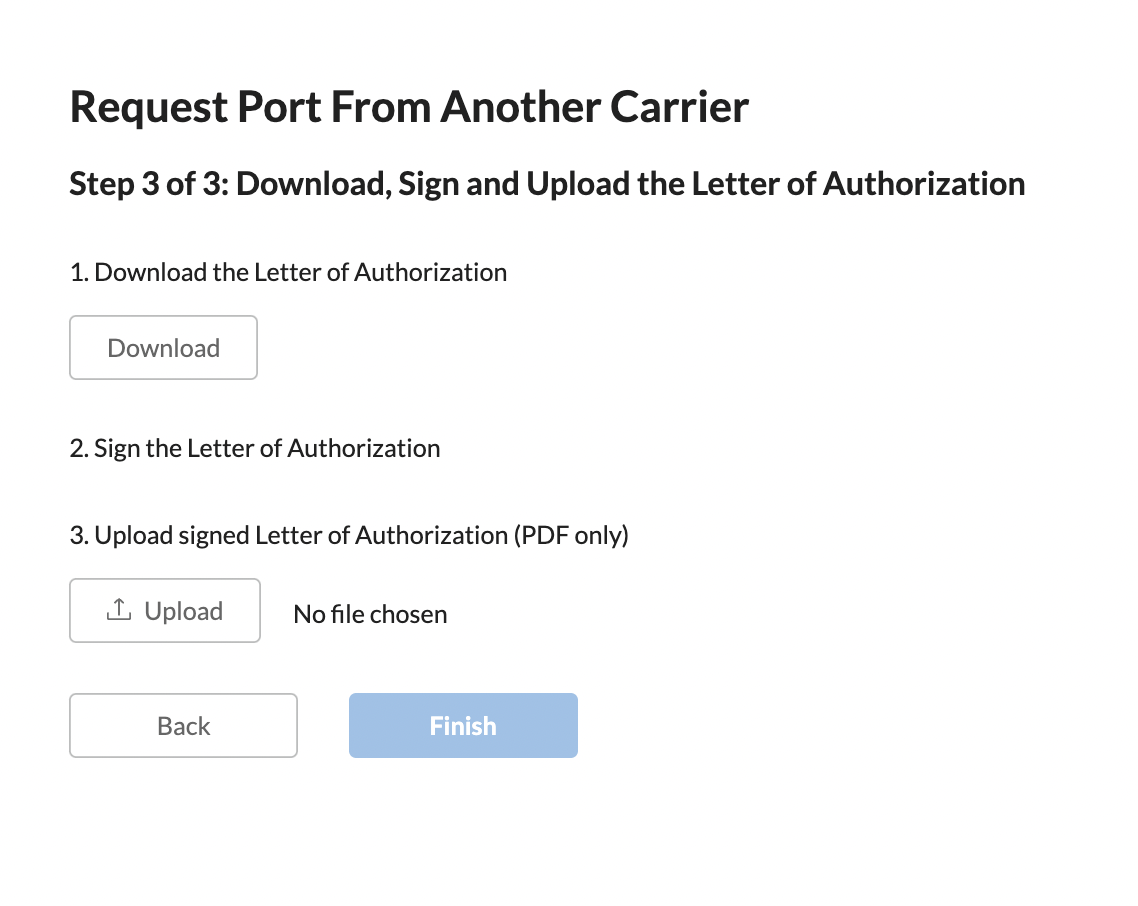
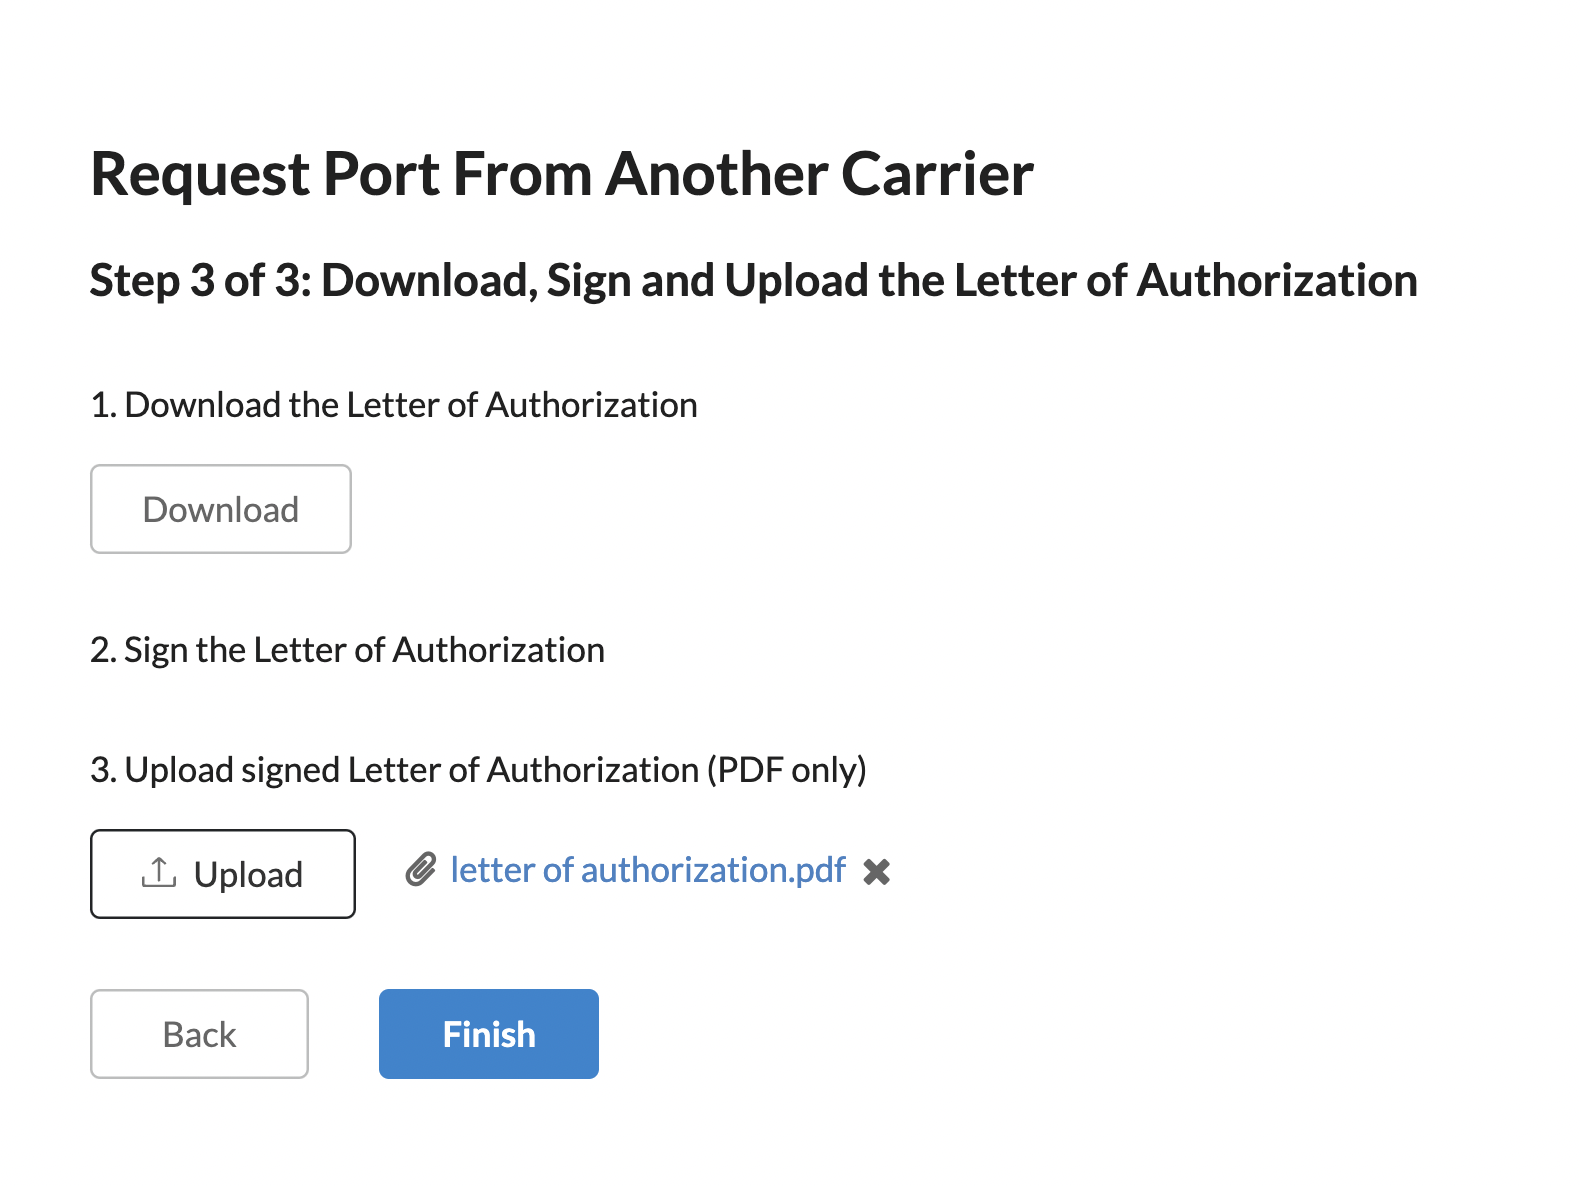
1. Step 3 of 3: Download, Sign and Upload the Letter of Authorization
2. Once on the "Request Port From Another Carrier" page, you will follow the steps:
- Download the Letter of Authorization (LOA).
- Sign the LOA
- Upload signed LOA (PDF only)
Download the LOA
1. Click the "Download" ![]() button to download the Letter of Authorization file.
button to download the Letter of Authorization file.
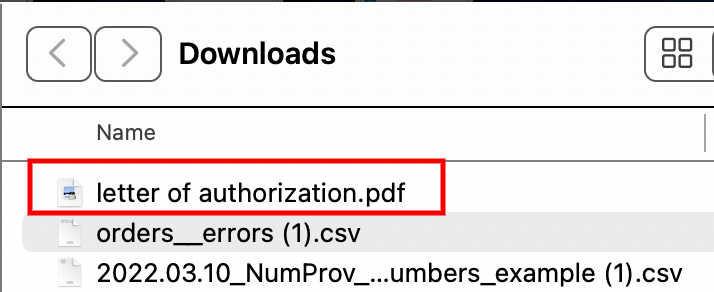
2. This download can be found in your downloads folder.
3. It should be named "letter of authorization.pdf".
Sign the LOA
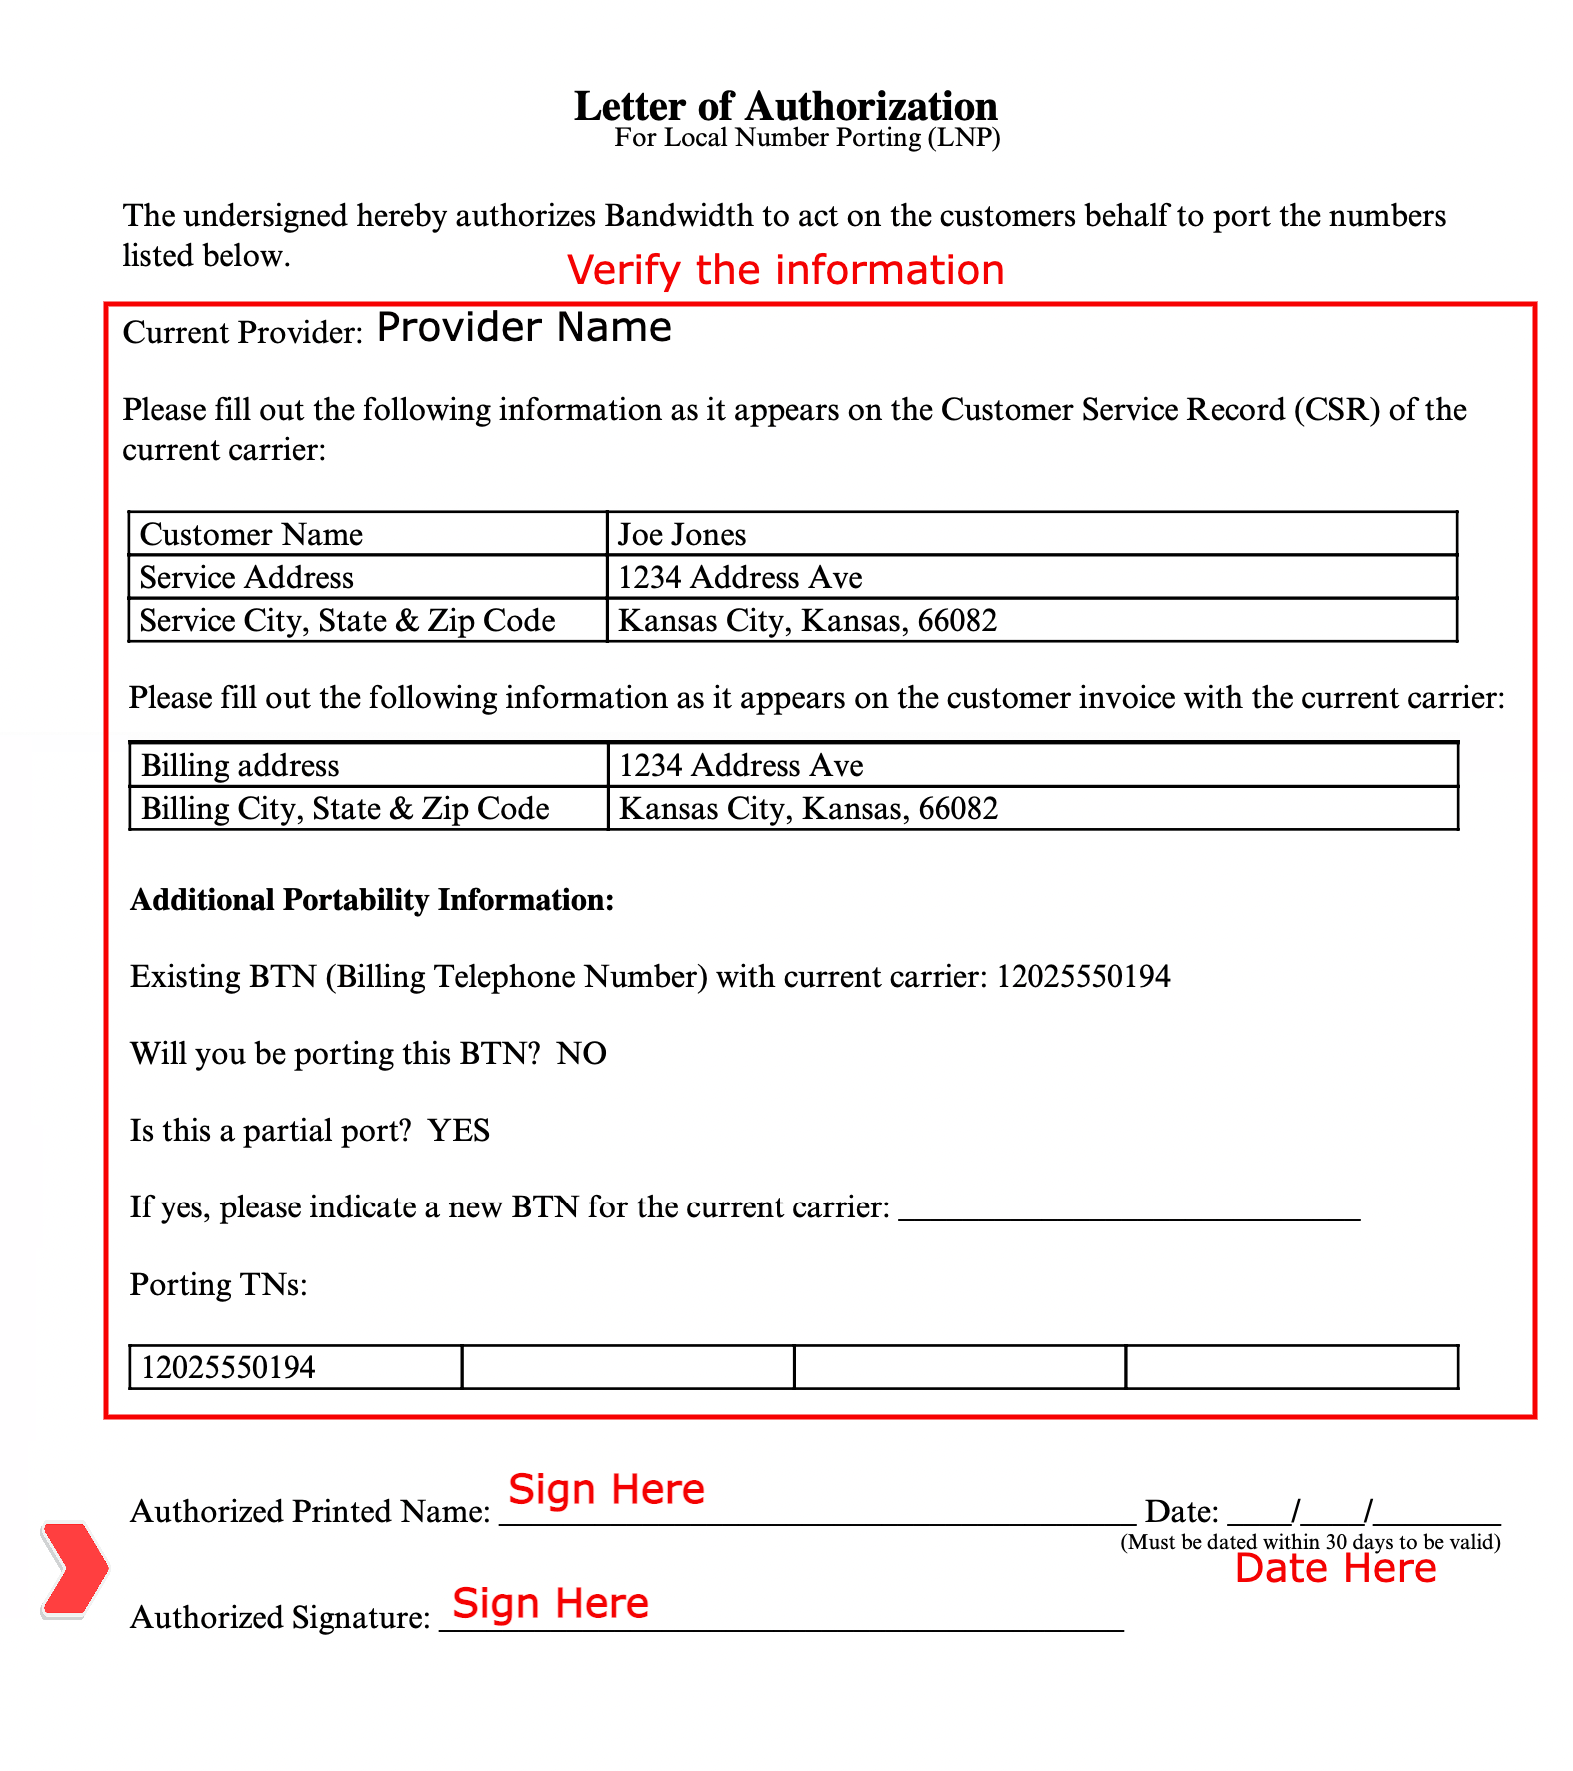
1. Open the "letter of authorization.pdf".
2. Examine the information to make sure that all the fields are filled out correctly.
3. Print out the .PDF file.
4. Date and sign the .PDF file.
Upload signed Letter of Authorization (PDF only)
1. Once the information in the Letter of Authorization (LOA) .PDF file has been verified and signed, upload the file.
2. Click the "Upload" ![]() button to browse your computer and upload a copy of the signed LOA.
button to browse your computer and upload a copy of the signed LOA.
3. Click the "Finish" ![]() button to finish uploading the file.
button to finish uploading the file.
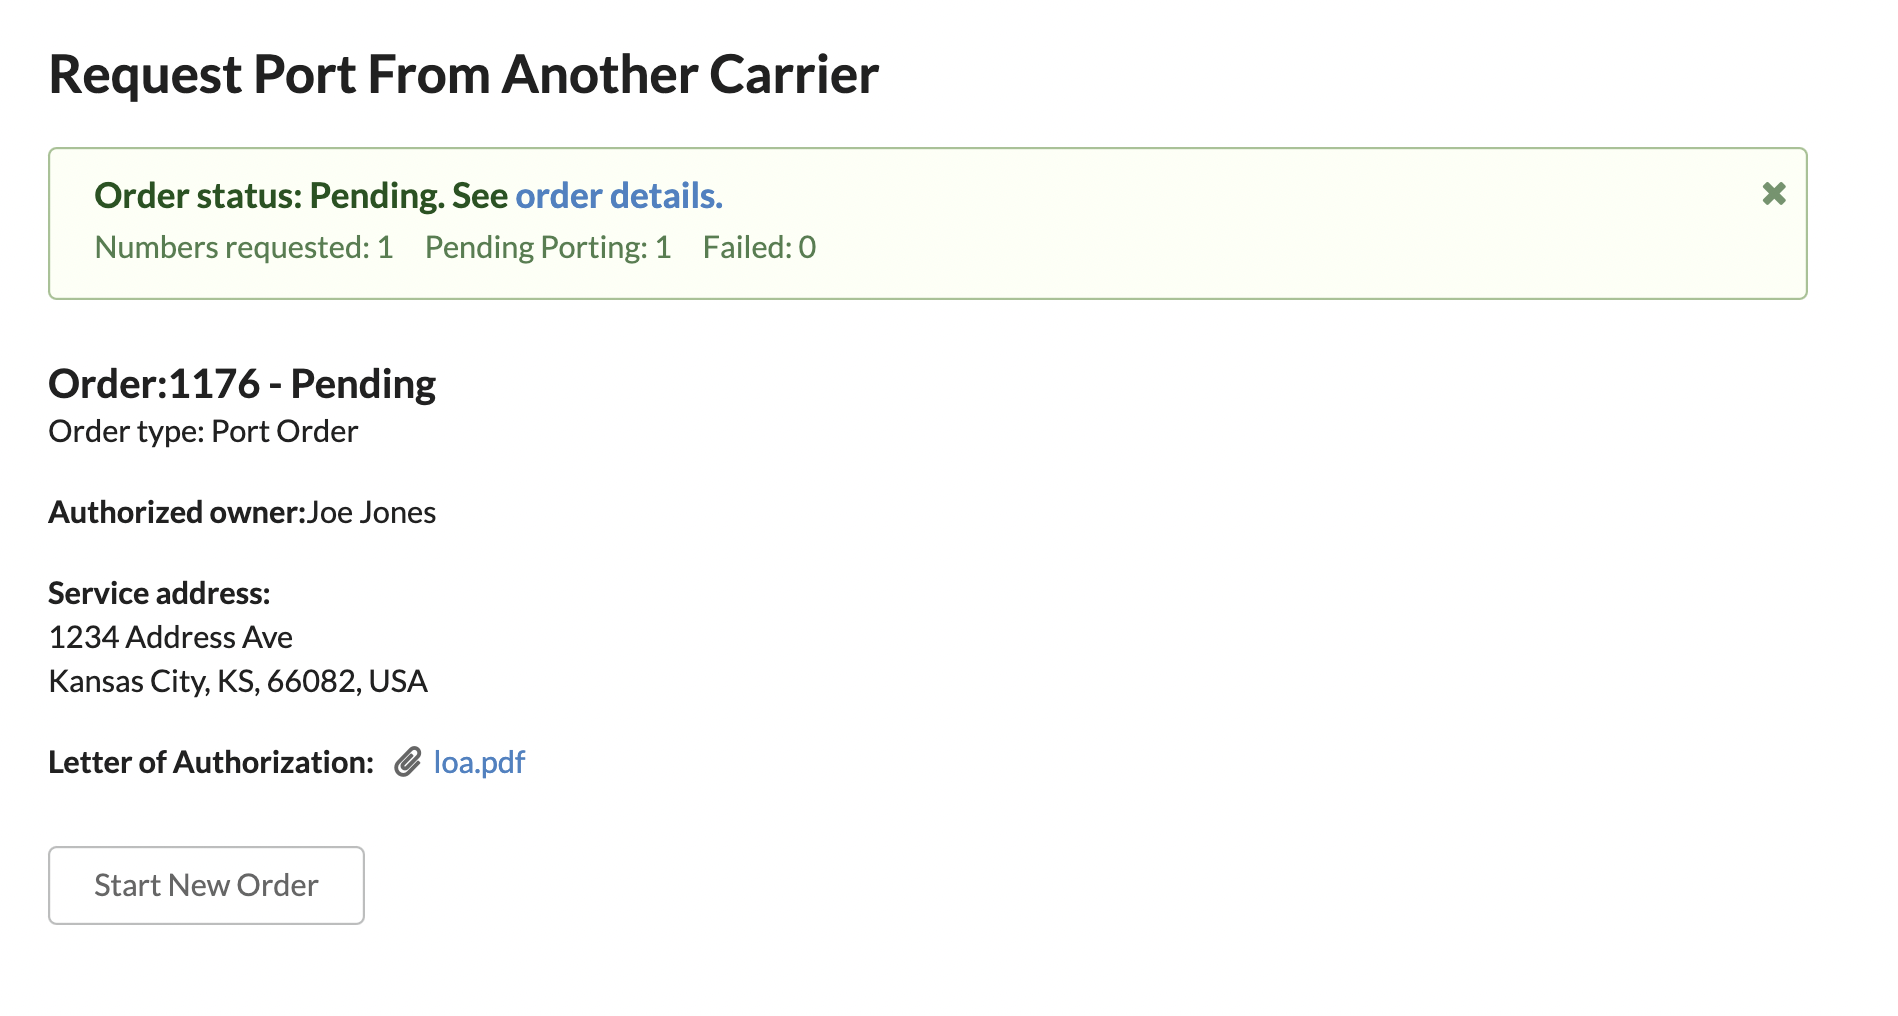
4. If the upload is a success you will see a new page called "Request Port From Another Carrier".
5. It will include:
- A green banner that states "Order status: Pending" with a blue link that leads to the specific order details.
- The number of phone numbers that you have requested to port
- How many numbers are pending porting
- How many numbers have failed
6. It will also list the Order number, the status of the order, the order type, the name of the Authorized owner, the service address, and a link to the uploaded Letter of Authorization.
7. If you wish to port more numbers, you can click the "Start New Order" ![]() button to begin a new order process.
button to begin a new order process.

