Partner Voice Integration Setup
This section of the Salesforce Integration Guide explains how to integrate your Bright Pattern Contact Center with Salesforce Voice. The steps take a new Salesforce org from empty to a working Bright Pattern telephony integration.
Setup takes about 45 to 60 minutes.
Before You Start
Make sure the following are true before you begin.
- Administrator access: You must be an administrator of the Salesforce org (you can open the gear icon and select Setup).
- Service Cloud Voice / Partner Telephony enabled: Free orgs do not include it. To confirm, in Setup, type "Voice" in the Quick Find box. If you see Partner Telephony Contact Centers, you are ready.
If it is not enabled, go to Setup > Quick Find > Partner Telephony Setup and click Turn On Service Cloud Voice.
- Omni-Channel enabled: This setting is usually already enabled. To confirm, go to Setup > Omni-Channel Settings, make sure the Enable Omni-Channel checkbox is selected, and click Save if you changed it.
- Your Bright Pattern tenant domain: The domain you use to access your contact center, usually in the format
<yourcompany>.brightpattern.com.
Integration Steps
Step 1: Install the package
- Log in to your Salesforce org as the administrator and navigate to the Install Bright Pattern SCV Voice page.
- Select Install for Admins Only (recommended), then click Install. Approve the third-party access prompts.
- Wait for the Installation Complete message. Installation takes 1 to 3 minutes; if it takes longer, you may receive an email when it finishes.
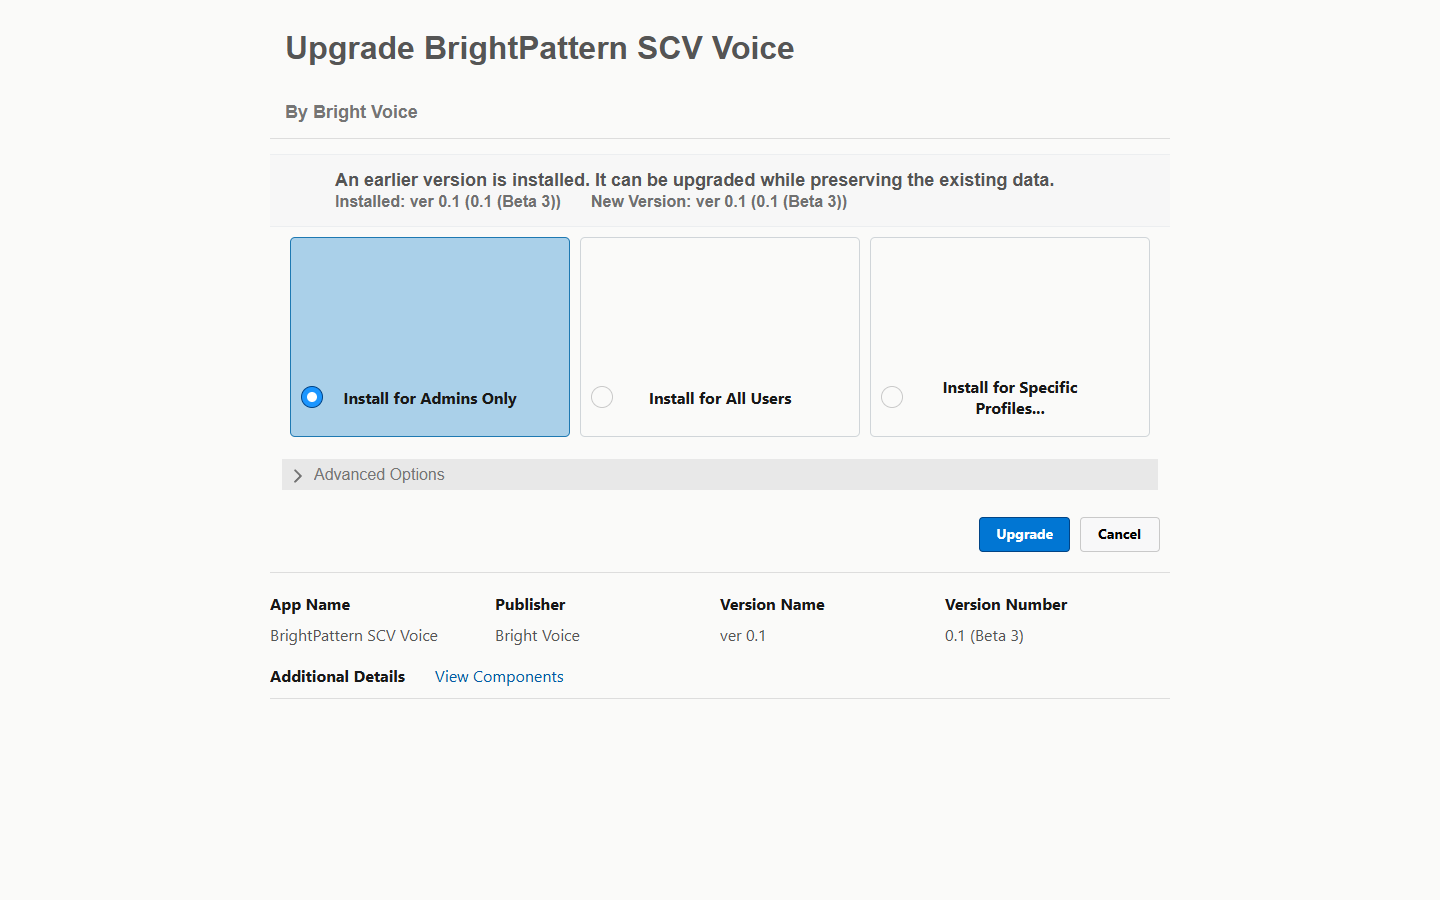
Package installation

Step 2: Open the Setup Assistant
The package includes a guided checklist, the Bright Pattern Setup Assistant, that completes most of the configuration for you and displays the exact values you need for the manual steps.
- Click the App Launcher (the grid of nine dots in the upper-left corner of the screen).
- Search for Bright Pattern Setup Assistant and open it.
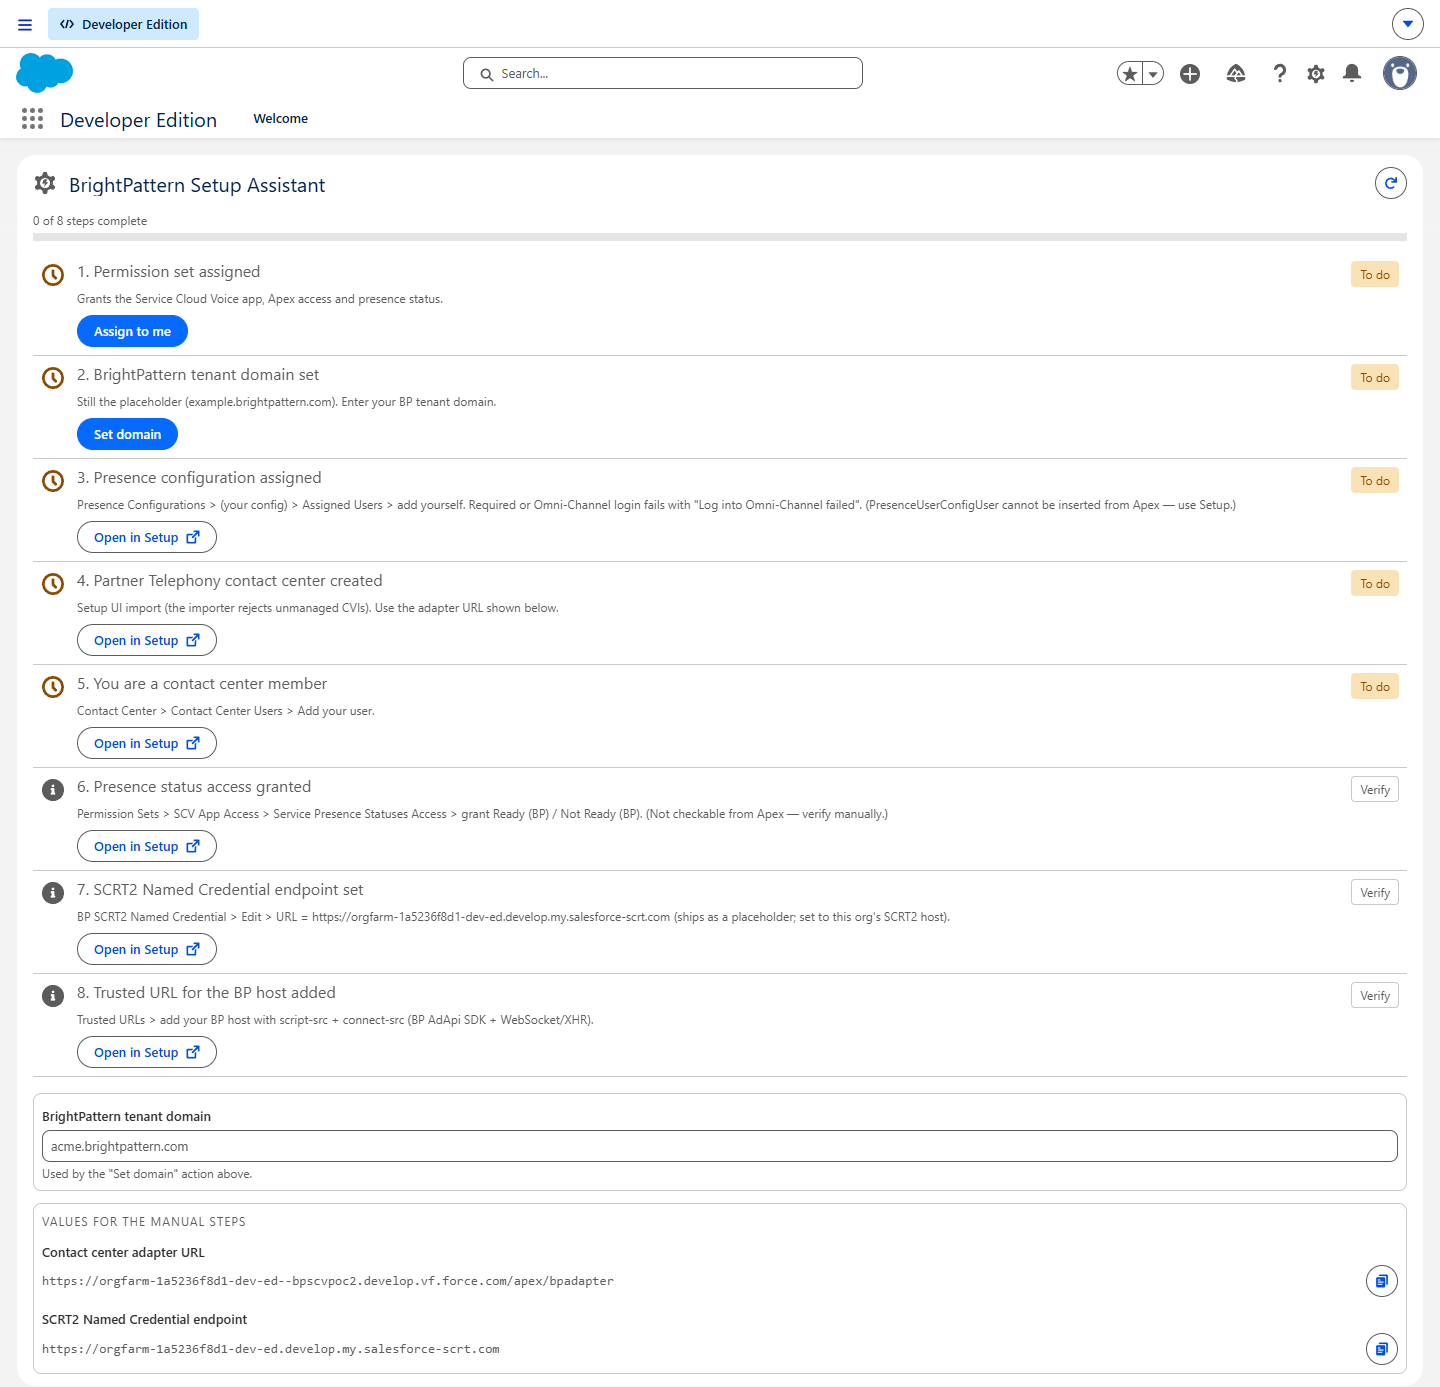
Bright Pattern Setup Assistant - The Setup Assistant displays a numbered checklist. Steps marked To do or Verify need action. Click Refresh (upper right) after each change.
- The permission set is not assigned on installation. In checklist step 1, click Assign to me.

Step 3: Set your Bright Pattern tenant domain
- At the bottom of the Setup Assistant, in the Bright Pattern tenant domain field, enter your domain (e.g.,
yourcompany.brightpattern.com). Do not include https:// or a trailing slash. - On the step Bright Pattern tenant domain set, click Set domain.
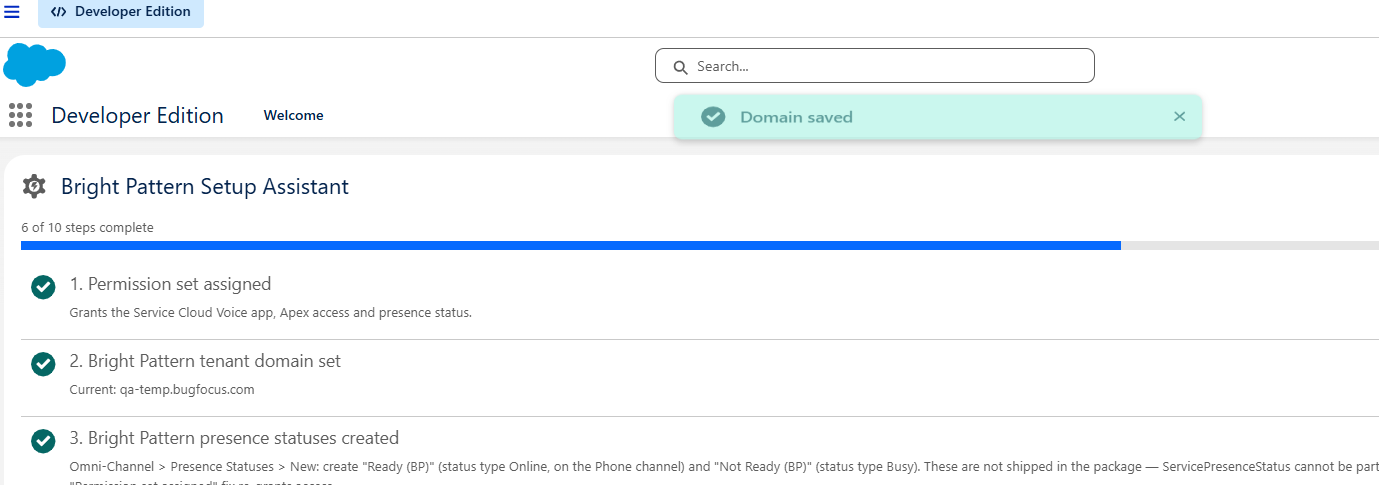
- Wait about 10 seconds, then click Refresh. The step turns green.
Tip: The same panel shows two generated values with Copy buttons: Contact center adapter URL and SCRT2 endpoint. You will paste the SCRT2 endpoint in Step 7.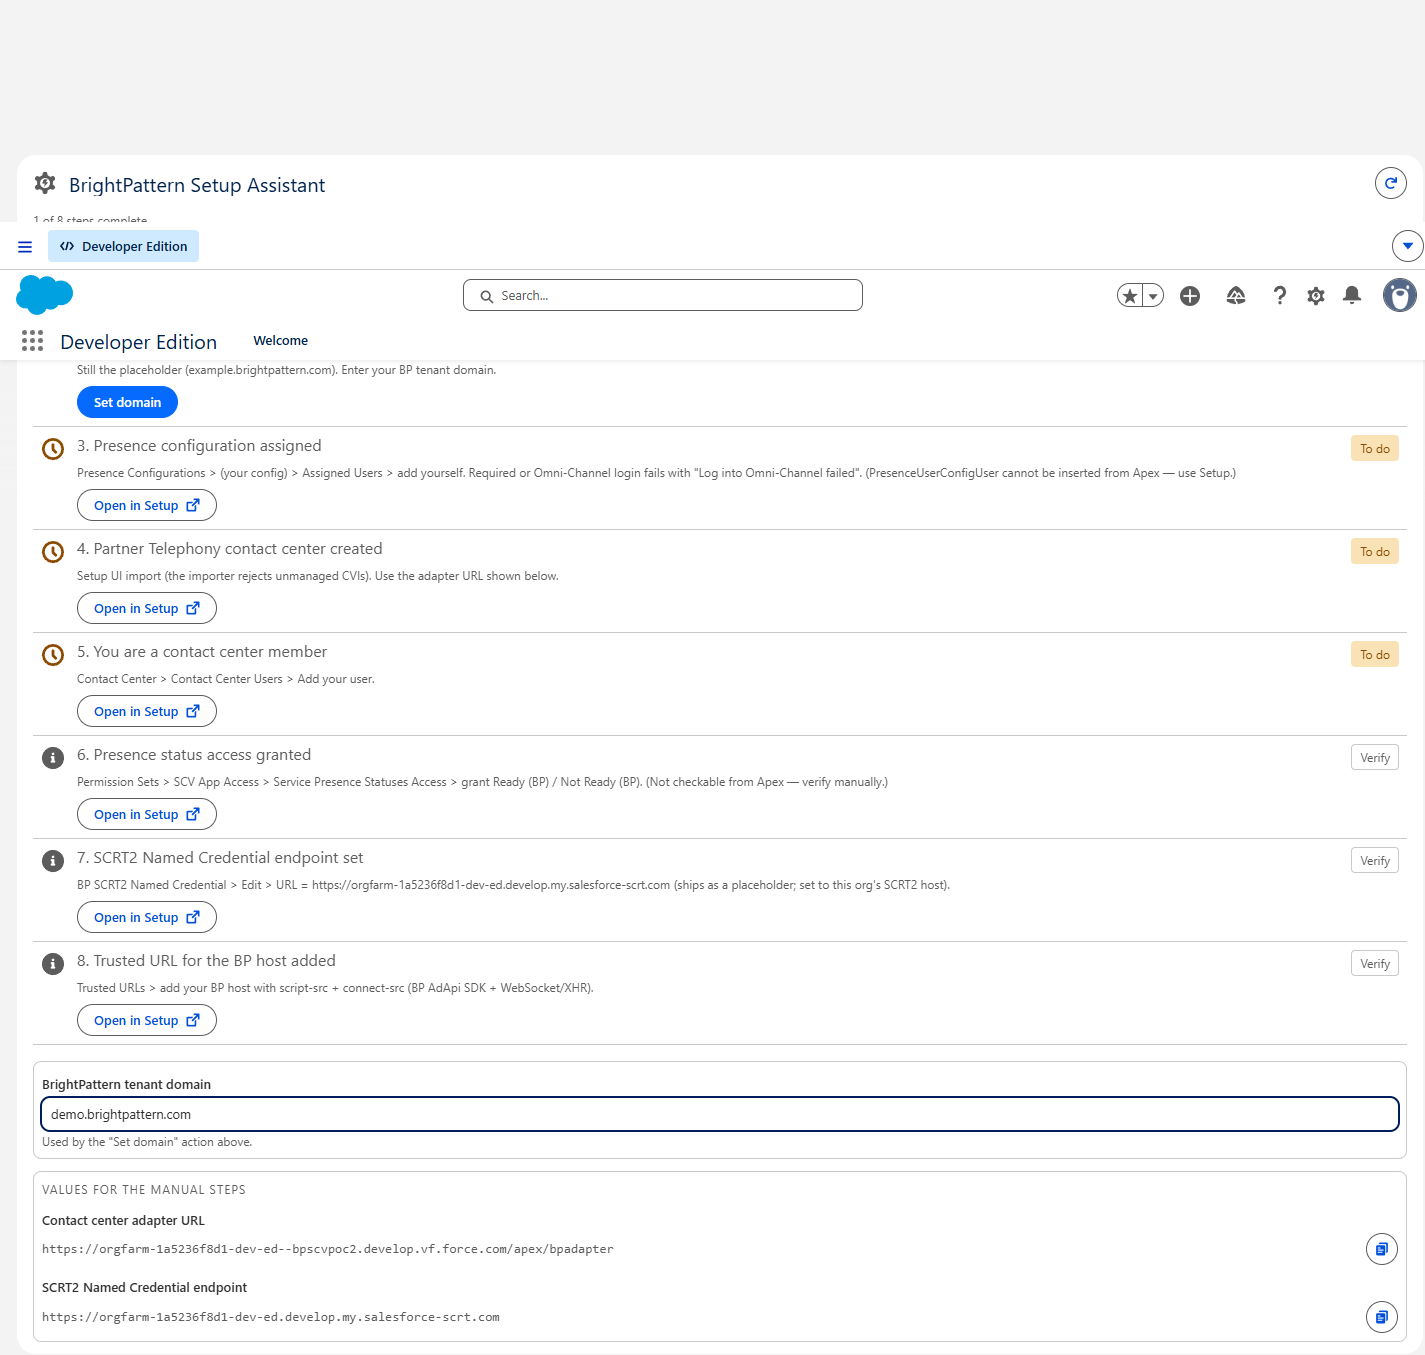
Tenant domain, adapter URL, and SCRT2 endpoint

Step 4: Create the contact center
- In the Setup Assistant, scroll to Contact center definition file.
- Download your org's certificate: go to Setup > Certificate and Key Management > BpScrtSigner and click Download Certificate. Open the downloaded .crt file in a text editor.
- Paste the certificate contents into the BpScrtSigner certificate box and click Download contact center XML.
- On the step Partner Telephony contact center created, click Open in Setup. The Partner Telephony Contact Centers page opens.
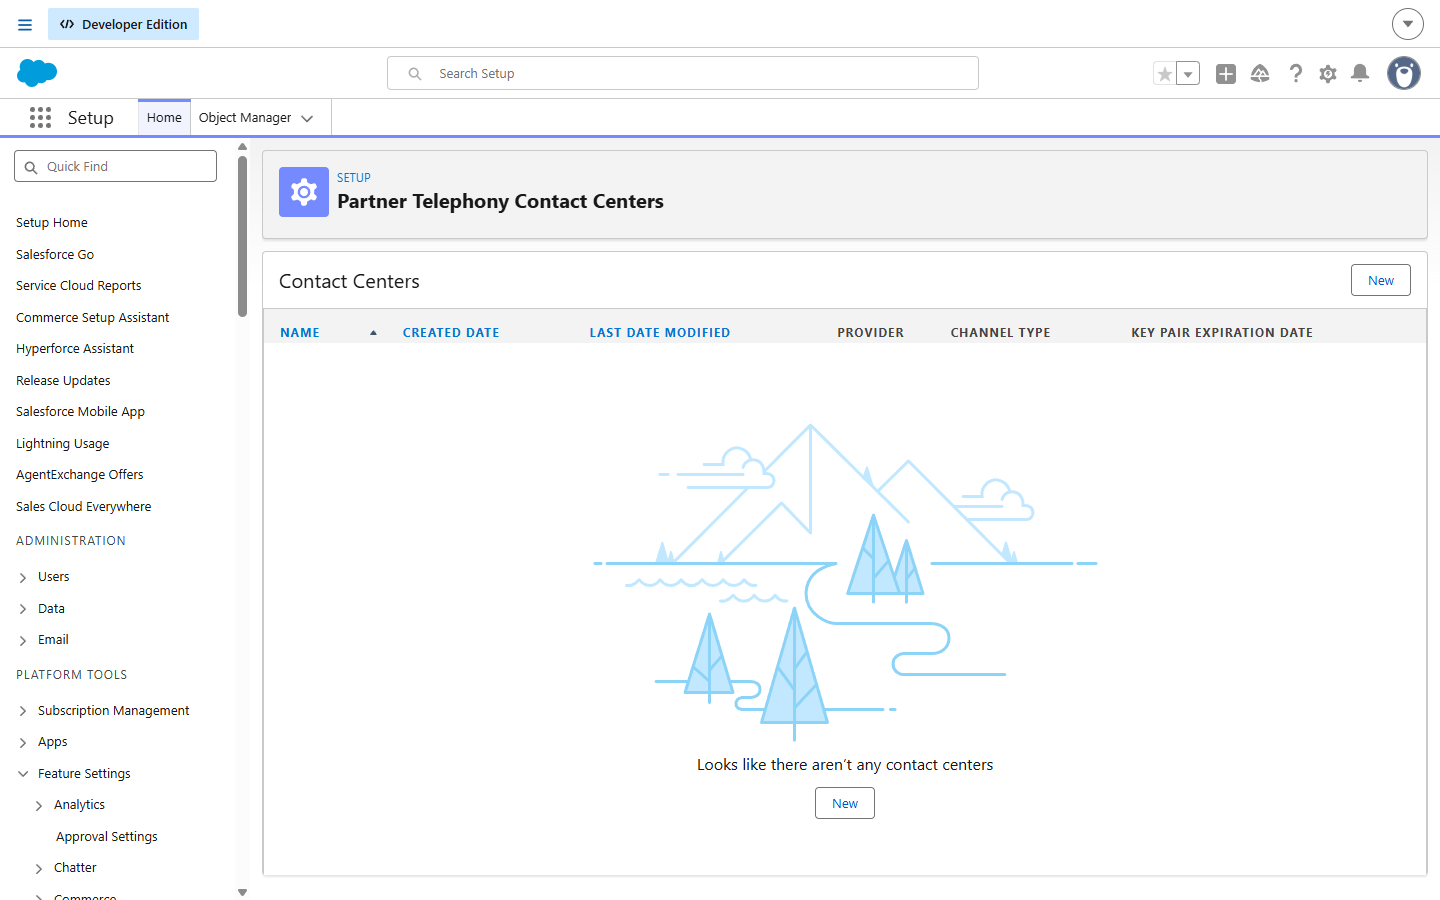
Partner Telephony Contact Centers - Click New. In Select your telephony provider, select Bright Pattern Call Center (the connector included in the package, not Amazon Connect), then click Next.
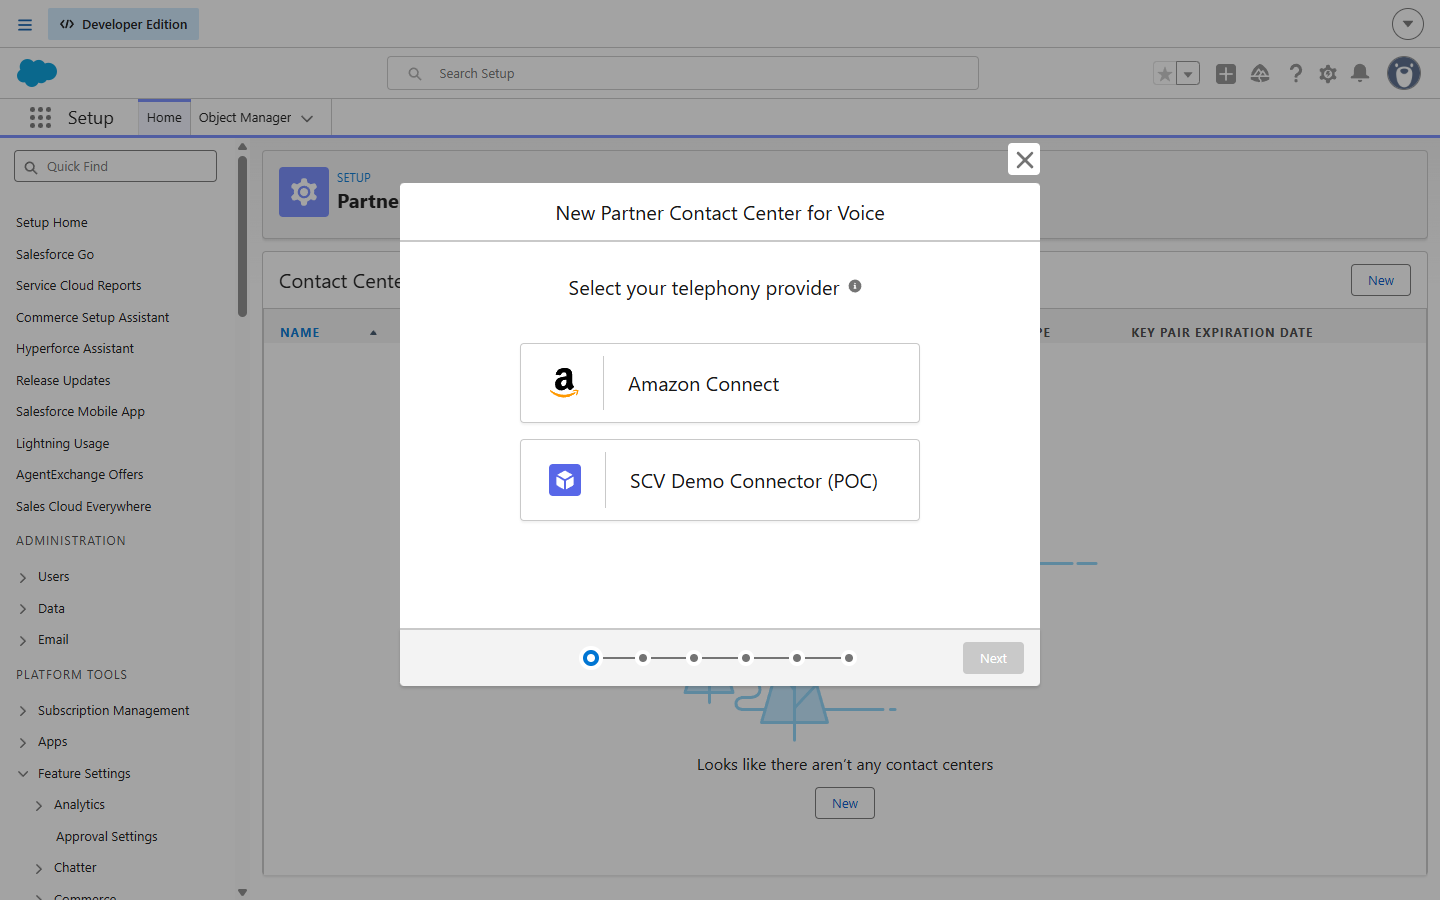
Select your telephony provider - Click Upload XML File, select the XML file you downloaded in sub-step 3, complete the wizard, and click Save.
- Return to the Setup Assistant and click Refresh. The step turns green.
Important: Do not change the contact center's internal name. The uploaded XML sets it to BrightPatternCC, which the package uses to sign calls. If you rename it, inbound calls fail without an error message.


Step 5: Add yourself to the contact center
- On the step You are a contact center member, click Open in Setup.
- Assign the required permission sets to your user. Go to Setup > Permission Sets and assign both Salesforce Voice Contact Center Admin (Partner Telephony) and Salesforce Voice Contact Center Rep (Partner Telephony). Alternatively, use the Setup Assistant's Contact center access step, which assigns them for you.
- Open the contact center you created in Step 4, find Contact Center Users, click Add, select your user, and click Save.
Step 6: Enable your phone availability
6a. Presence configuration
- On the step Presence configuration assigned, click Open in Setup. The Presence Configurations page opens.
- Open Default Presence Configuration, find Assigned Users, add your user, and click Save.

|
If the page displays "Unless you assign them to another configuration, all of your agents are assigned to the Default Presence Configuration," no action is needed. | |
6b. Presence status access
- On the step Presence status access granted, click Open in Setup. The Permission Sets page opens.
- Go to SCV App Access > Service Presence Statuses Access and click Edit.
- Move the Bright Pattern statuses, Ready (Bright Pattern) and Not Ready (Bright Pattern), to Enabled, and click Save.
Important: This setting resets after each package upgrade. Repeat this step after every upgrade.
Step 7: Allow the SCRT2 host (Remote Site Settings)
- In the Setup Assistant, next to the SCRT2 endpoint, click Copy. The value looks like https://yourorg.my.salesforce-scrt.com.
- On the step SCRT2 host allowed (Remote Site Setting), click Open in Setup. The Remote Site Settings page opens.
- Click New Remote Site and set the following:
- Remote Site Name: "BrightPattern_SCRT2"
- Remote Site URL: Paste the value you copied.
- Active: Leave selected.
- Remote Site Name: "BrightPattern_SCRT2"
- Click Save.
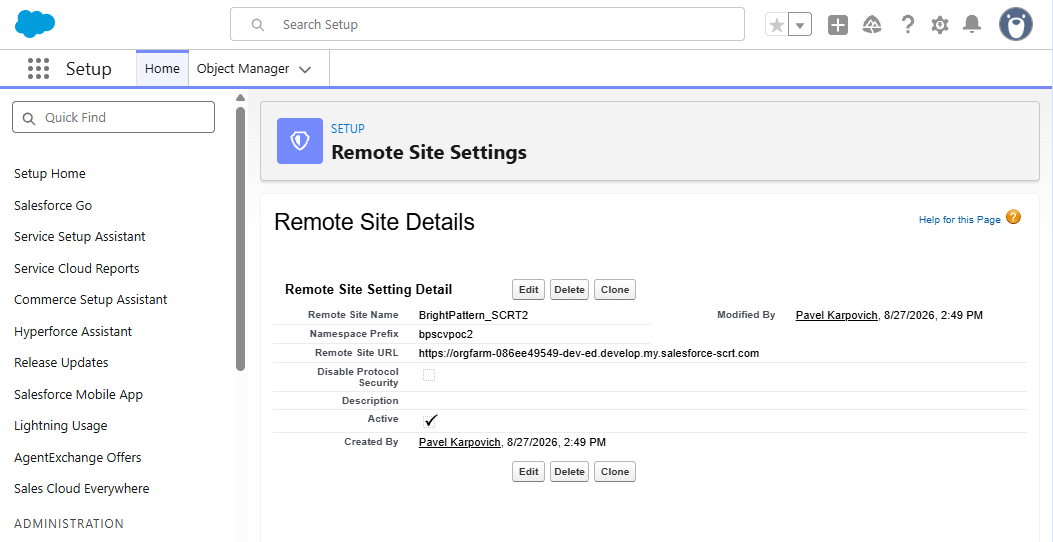
New Remote Site

Step 8: Set additional integration options
At the bottom of the Setup Assistant, the INTEGRATION CONFIG section contains additional settings. Each one corresponds to a parameter of the Open CTI call center configuration.
- Use Salesforce SSO: Equivalent to sflogin.
- Bypass any SSO: Equivalent to bypass-sso.
- Show SSO login in a popup: Equivalent to ssoSideLogin.
- Deferred dial: Equivalent to deferredDial.
- Mute URLs: Equivalent to the mute URLs field in the call center configuration.
To save these settings, click Save integration config.
Step 9: Add the Bright Pattern URL as a trusted URL
- On the step Trusted URL for the BP host added, click Open in Setup. The Trusted URLs page opens.
- Click New Trusted URL and set the following:
- API Name: "BrightPattern"
- URL: Your tenant URL (e.g., https://yourcompany.brightpattern.com)
- CSP Directives: Select connect-src and frame-src.
- API Name: "BrightPattern"
- Click Save.
Step 10: Download the security certificate
Calls are signed with a certificate created inside your org. Bright Pattern needs the public part of this certificate.
- Go to Setup > Quick Find, type "Certificate", and click Certificate and Key Management.
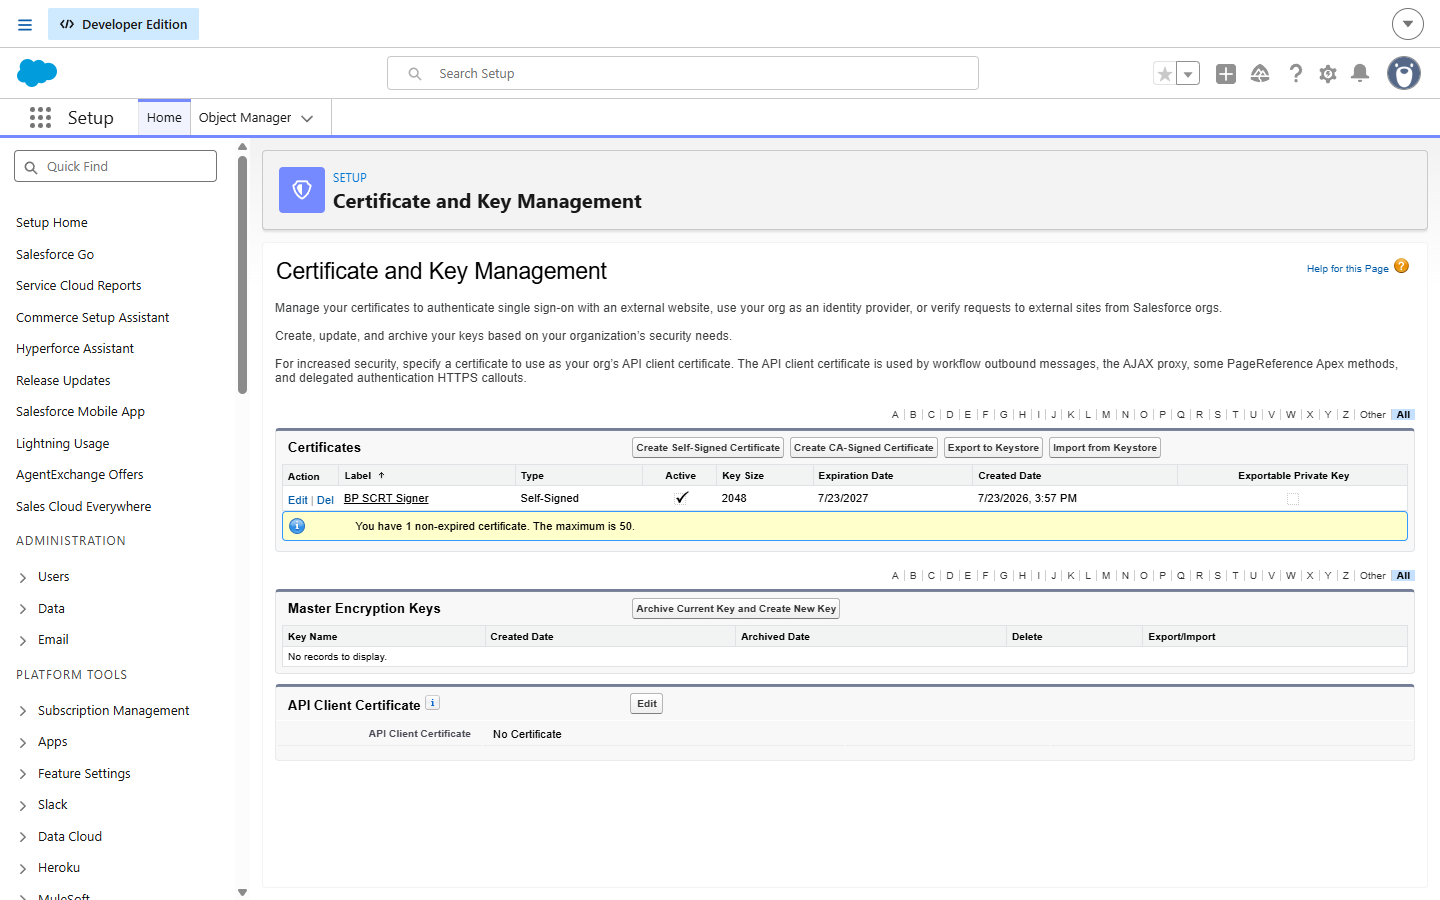
Certificate and Key Management - Click BpScrtSigner, then click Download Certificate. A .crt file is saved.
- You will use the contents of this .crt file in Step 12.

|
|
This certificate is generated for each org. A package upgrade keeps the existing key pair, so you do not need to exchange the certificate again. Only a new installation (or uninstalling and reinstalling the package) creates a new key pair, and the new certificate must then be shared with Bright Pattern. | |
Step 11: Give access to other agents (optional)
The installation sets up only your user. For each additional agent, do the following:
- Go to Setup > Permission Sets > SCV App Access and click Manage Assignments.
- Click Add Assignments, select the user, and click Assign.
- Repeat Step 5 and Step 6 for that user.
Step 12: Set up the Salesforce integration account in Bright Pattern
In the Bright Pattern Contact Center Administrator application, go to Configuration > Integration Accounts and add a Salesforce.com account. For full instructions, see Add Connected App to Enable Scenarios to Access Salesforce Data and Add Salesforce Integration Account in Bright Pattern.
Set the following:
| Field | Value |
| URL | Your Salesforce My Domain (e.g., https://YOUR-ORG.my.salesforce.com), with no trailing slash |
| Consumer key / Consumer secret | From a Salesforce Connected App or External Client App OAuth configuration. Obtain these separately, in coordination with Bright Pattern. |
| Request Token | Click after the URL, consumer key, and consumer secret are saved. Approve the OAuth prompt to store the refresh token. |
| Check limits | Click to confirm that the connection returns a JSON limits response (not a 401 error). |
| Identity provider certificate | The contents of the .crt file you downloaded in Step 4. |

Step 13: Verify the integration
Check all of the following to confirm that the integration is working.
- Click the App Launcher and open the Service Cloud Voice app.
- Open the Omni-Channel panel (at the bottom of the screen) and set your status to Available. If this fails, repeat Step 6a.
- Confirm that the Bright Pattern phone panel loads, using the tenant domain you set in Step 3.
- After Bright Pattern confirms the certificate from Step 10, place a test call to your Bright Pattern number. A call notification and a Voice Call record appear in Salesforce.
Troubleshooting
- "Log into Omni-Channel failed": Repeat Step 6a to add your user to a presence configuration. This error can also occur when the org's storage usage limit is exceeded. See Storage limit exceeded.
- Phone panel is blank or does not load: Check the tenant domain in Step 3, and make sure the trusted URL in Step 9 exactly matches your Bright Pattern domain.
- Incoming calls do not appear: Either the certificate from Step 10 has not yet been installed on the Bright Pattern side, or the SCRT2 URL in Step 7 is incorrect.
- The Open in Setup button does nothing: Refresh the page, or go to Setup > Quick Find and type the name of the page.
- Another agent cannot set their status to Available: Complete Step 11 for that agent's user.
- The tenant domain cannot be saved ("Could not save domain"): The org's storage usage limit has been exceeded. See Storage limit exceeded.
Storage limit exceeded
When an org exceeds its storage limit, Salesforce may refuse to save new or modified records anywhere in the org. This includes not only large business objects but also internal records such as custom settings (for example, the Bright Pattern Tenant Setting), logs, and presence status records.
Because of this, an exceeded storage limit can cause several errors that do not mention storage, including:
- "Could not save domain" when you click Set domain in Step 3
- "Log into Omni-Channel failed," or 401 and 500 Internal Server Error responses when you try to log in to Omni-Channel
To free up storage, do the following:
- Check what is using storage. Go to Setup > Quick Find, type "Storage Usage", and open it. (Alternatively, go to Company Information, find Used Data Space, and click View.) The page shows a breakdown of storage by object, files, and attachments.
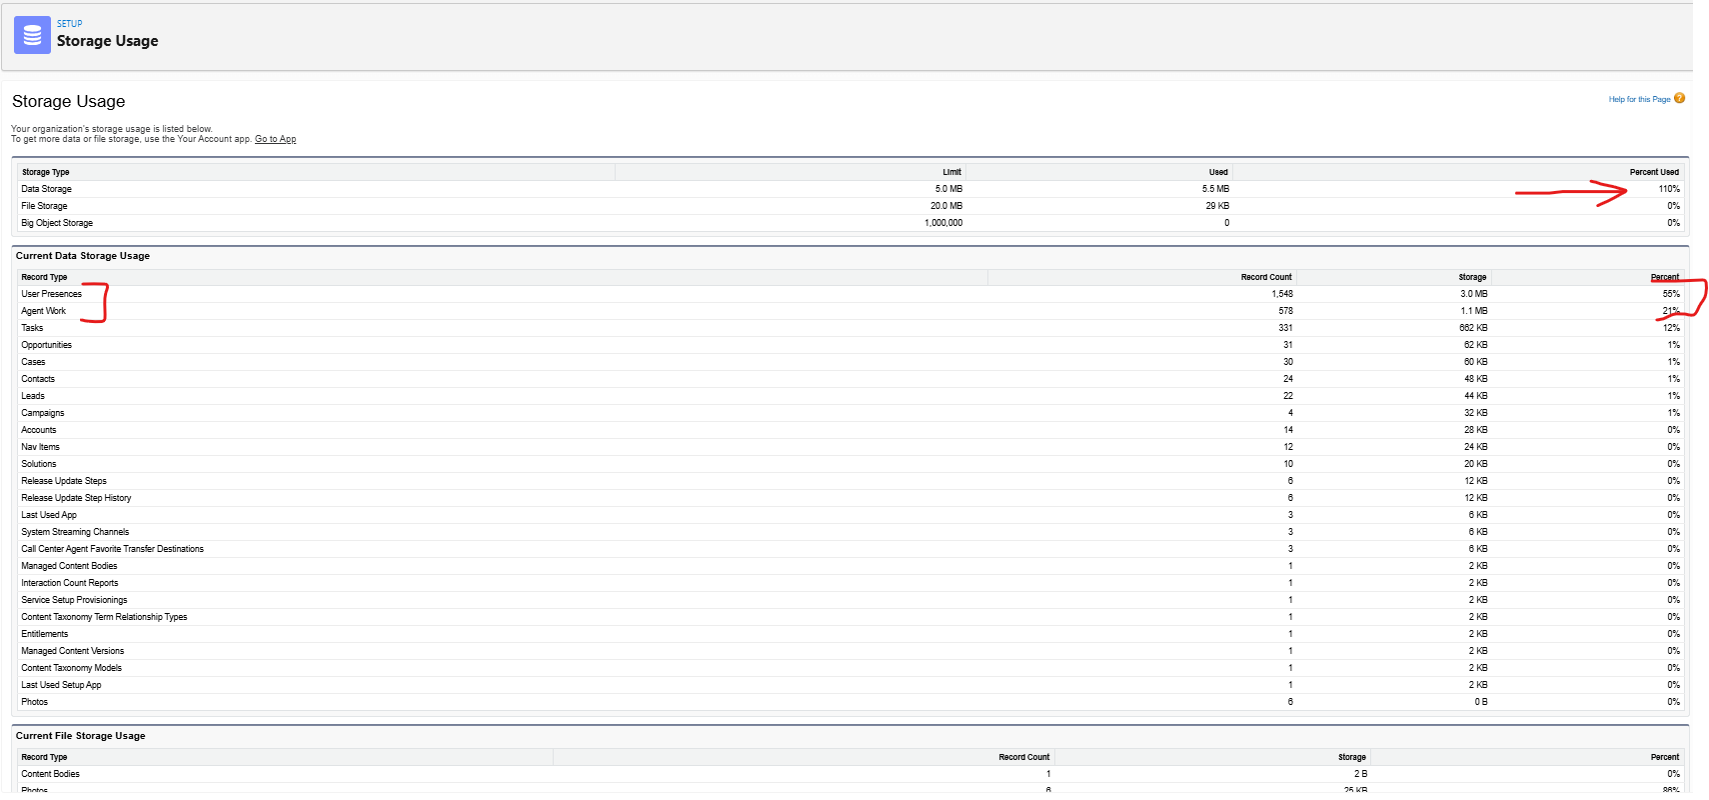
Storage Usage - Delete records and files you do not need, such as test records, old Voice Call and Task records from earlier tests, and large files or attachments (for example, saved call or screen recordings).
- If most of the storage is used by Omni-Channel records, you can delete them quickly from the Developer Console:
- In the upper right corner of Salesforce, click your name or user avatar and select Developer Console. The Developer Console opens in a separate window.
- Select Debug > Open Execute Anonymous Window.
- Paste and run the following code:
delete [SELECT Id FROM UserServicePresence];delete [SELECT Id FROM AgentWork];
These objects contain only operational history (agent presence status logs and completed work assignments), not business data such as cases or contacts, so they are safe to delete.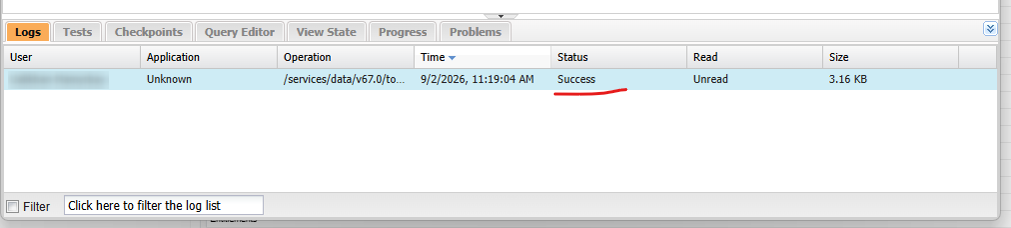
Execute Anonymous Window
- In the upper right corner of Salesforce, click your name or user avatar and select Developer Console. The Developer Console opens in a separate window.
- Return to Storage Usage and confirm that usage is below 100%.
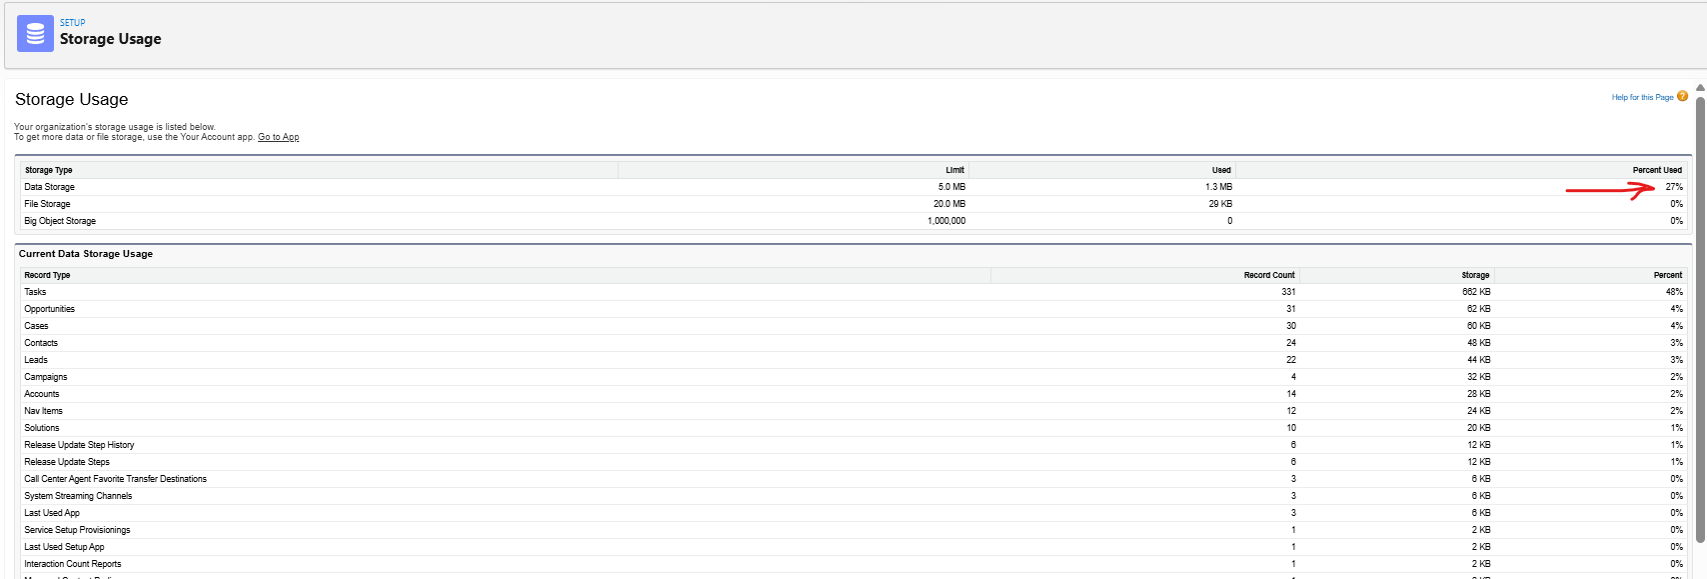
Check reduced storage usage - In the Setup Assistant, repeat the Set domain step from Step 3.
Installation status < Previous | Next >


