Facebook Messenger Integration Configuration
When Bright Pattern Contact Center is integrated with Facebook Messenger, your Bright Pattern Agent Desktop environment is equipped to handle customer-initiated interactions from the Messenger application or the Facebook application on a customer’s mobile phone, tablet, or computer. Incoming chat interactions are routed to the integrated Agent Desktop environment, where agents also have direct access to the phone, live chat, email, SMS, various other mobile messenger apps, customer and agent records, interaction details, and more.
Integration configuration involves linking your Facebook Page to your Bright Pattern Contact Center.
To configure Facebook Messenger integration, you will need system access to:
- Your organization’s Facebook App and Facebook Page
- The Contact Center Administrator application as admin
The Facebook App contains the settings for your webhook and access token. Your Facebook Page is what is used as your organization’s identity. Messaging events for your Facebook Page are sent securely to your webhook. Contact Center Administrator is where you add the Messenger integration account to Bright Pattern Contact Center.
Configuration Procedure
Step 1: Create a Facebook App and a Facebook Page
Go to developers.facebook.com, and create a Facebook App and a Facebook Page for your organization. If you have already done this, skip this step and proceed to Step 2.
Note that for your Facebook Page, you will additionally need to create a username for it. The Page username is what appears in your Facebook Page’s URL, beneath the Facebook Page’s name on the page itself, and in search results. You will need your Page username later in this configuration procedure. See Facebook’s Help Center for more information on how to create one.
Step 2: Manage your Facebook App
After registering as a developer and creating both your Facebook App and Page, log in to your Facebook app management page at developers.facebook.com. On the dashboard, you should see your App ID.
Step 3: Add Messenger as a product
Adding Messenger as a product to your Facebook App allows your Facebook Page to use the Messenger API to handle chat interactions.
- From the left-hand menu, next to Product, click + to add a new product.
- Select the product called Messenger.
- Once it has been added, you will see Messenger on the left-hand menu.
- Under Messenger, click Settings.
Step 4: Update token settings
The Messenger Platform’s Settings displays sections called Access Tokens, Webhooks, and Pages, among others.
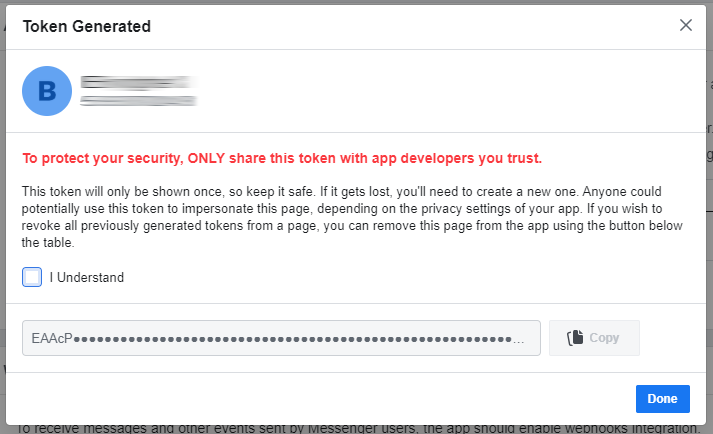
- In the Access Tokens section, next to the desired Facebook Page, click Generate Token. This will generate the Page Access Token.
- If you did not already create a Facebook Page, click the Create New Page link.
- Note that you must also set permissions for which pages the admin user can access.
- In the Token Generated dialog, click I Understand and then copy the token. You will need this when configuring your integration account in later steps.
Step 5: Create a new integration account in Contact Center Administrator
Now, in a new browser tab, configure the integration account that will link Facebook Messenger to Bright Pattern Contact Center. Keep this tab open so it is easy to switch between sites and copy and paste credentials.
- Log in as Admin to the Contact Center Administrator application.
- Navigate to Configuration > Integration Accounts.
- Click the Add "+" button to add a new account.
- In the Create integration account window that appears, select Messenger and click OK.
- In Type, select Facebook.
Step 6: Specify Facebook Messenger integration account properties
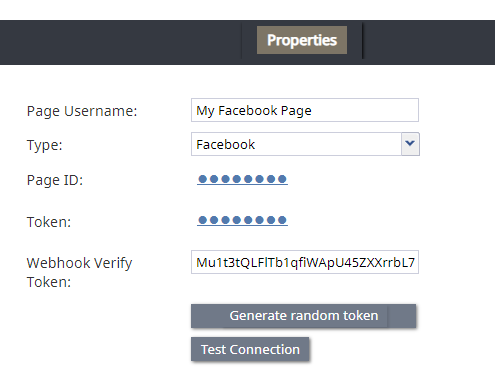
Using the credentials for your Facebook App, enter values for the following screen properties. (If you do not know your credentials, ask your system administrator.)
- Page Username - The name of your Facebook Messenger integration account (any)
- Type - Facebook
- Page ID - Your Facebook Page ID (string). You can find the Page ID in the "About" section of your page.
- Token - The Page Access Token for your Facebook Page
- Webhook Verify Token - The token used to confirm that Facebook is the real server, which is needed for Facebook to send you a message from the customer; if you do not have a token, click the Generate random token below
- Generate random token - Creates a random webhook token that you can copy and paste into your your Facebook App management page in Webhooks > Verify Token
- Test Connection - This button tests the credentials and confirms whether the connection is valid.
Click Apply to save your changes.
Step 7: Edit your page subscription settings
Now that your integration account is set up, go back to your Facebook Developers page and continue working on configuration there.
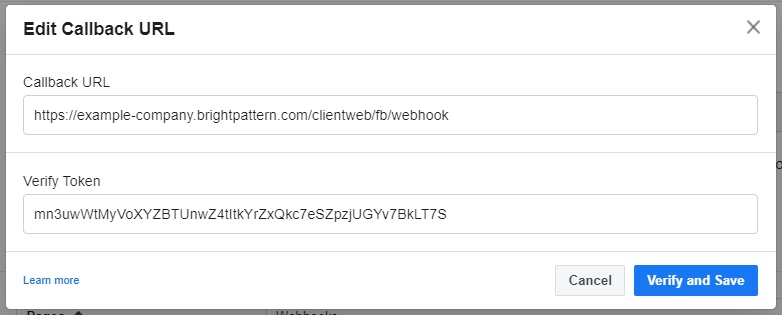
- In the Webhooks section, click Edit Callback URL to update the Callback URL and Verify Token fields.
- Enter a Callback URL for a webhook. The URL should be of the form https://<tenant_url>/clientweb/fb/webhook, where <tenant_url> should be changed to the domain of your Bright Pattern Contact Center client web server.[1]
For example: https://example-company.brightpattern.com/clientweb/fb/webhook - In Verify Token, set the Webhook Verify Token you generated in your integration account properties in Step 6 of this procedure.
- Then click Verify and Save. This allows Facebook to send an HTTP request to the callback URL to verify that it is legitimate.
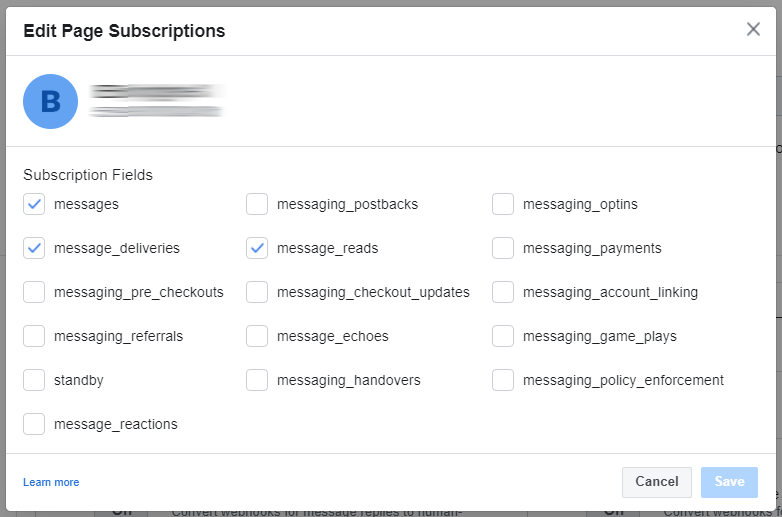
- Edit webhooks options by clicking Edit.
- In Edit Page Subscriptions, select subscription fields to subscribe to webhook events. The following are the minimum set of subscription fields needed: messages, message_deliveries, and message_reads.
- When done, click Save.
See facebook.com for more information about the Messenger Platform.
Step 8: Add "Send Message" button to your Facebook Page
Now that your integration is set up, you need to add the "Send Message" button to your Facebook Page and point it to the Messenger platform.
- ↑ Starting with Bright Pattern Contact Center version 5.3, we no longer require the Page ID to be included in the Callback URL. The Page ID is taken from the event body. Therefore, one Facebook app can work with multiple Facebook Pages, and multiple integrations can be added per each such page in Bright Pattern configuration, sharing the same webhook.


