(Created page with "5.3:シナリオビルダーリファレンスガイド/エクササイズ/音声シナリオの調査作成") |
(Updating to match new version of source page) |
||
| (39 intermediate revisions by one other user not shown) | |||
| Line 1: | Line 1: | ||
| − | = | + | = 音声シナリオの調査作成 = |
| − | + | 調査は、会社、対象のトピックなどについてお客様からフィードバックを得るのに役立つツールです。 | |
| − | + | ここでは、顧客満足度に関するデータを収集する目的で音声シナリオ調査を作成する方法について説明します。このシナリオとコンタクトセンター管理者アプリケーションにある[[Contact-center-administrator-guide/Voice#Customer_Survey|顧客調査]]テンプレートとは多少異なっています。 | |
| − | == | + | == シナリオの例 == |
| − | ''' | + | '''音声シナリオの例(コメント付バージョン)をダウンロードするには、次のリンクをクリックしてください。'''<br> |
[[File:App_Voice_Scenario_Survey.zip]] | [[File:App_Voice_Scenario_Survey.zip]] | ||
| − | + | このファイルをコンタクトセンターにインポートする方法については、''コンタクトセンター管理者ガイド''の | |
| + | [[Contact-center-administrator-guide/ScenariosOverview#How_to_Export_and_Import_Scenarios|シナリオ概要 > シナリオのエクスポートとインポート]]をご覧ください。 | ||
| − | + | シナリオに関する一般情報については、 [[Scenario-builder-reference-guide/ScenarioBuilderOverview|シナリオビルダー概要]]をご覧ください。 | |
| − | == | + | == シナリオフロー == |
| − | + | このシナリオの目的は、音声対話から顧客満足度のフィードバックを求め、報告目的でこの情報を収集することです。それを行うには、次のシナリオブロックを使います: | |
| − | * [[Scenario-builder-reference-guide/Menu| | + | * [[Scenario-builder-reference-guide/Menu|メニュー]] |
| − | * [[Scenario-builder-reference-guide/SetVariable| | + | * [[Scenario-builder-reference-guide/SetVariable|変数の設定]] |
| − | * [[Scenario-builder-reference-guide/CollectDigits| | + | * [[Scenario-builder-reference-guide/CollectDigits|数字の取得]] |
| − | * [[Scenario-builder-reference-guide/SaveSurveyResponse| | + | * [[Scenario-builder-reference-guide/SaveSurveyResponse|調査回答の保存]] |
| − | |||
| − | + | '''作成者コメント''': このシナリオは、別のシナリオで設定された[[Scenario-builder-reference-guide/ConnectCall|コールの接続]]ブロックの[[Scenario-builder-reference-guide/ConnectCall#Conditional_Exits|ターゲットの切断]]という条件付き出口から[[Scenario-builder-reference-guide/StartAnotherScenario|別のシナリオの開始]] ブロックが呼び出されたときに開始されます。コールを終了'''しなければならない'''のはエージェントであるため、エージェントは調査に参加するかどうかを発信者に尋ねてから、電話を切らずに保留するように指示することをお勧めします。 | |
| − | === | + | このシナリオの例はあくまでも例であり、実際の使用を目的としていません。全ての[[Scenario-builder-reference-guide/ScenarioBuilderOverview#Conditional_Exits|条件付き出口]]に対して、実際に使われるアクションを指定しなければなりません。 |
| − | + | ||
| + | === シナリオの概要 === | ||
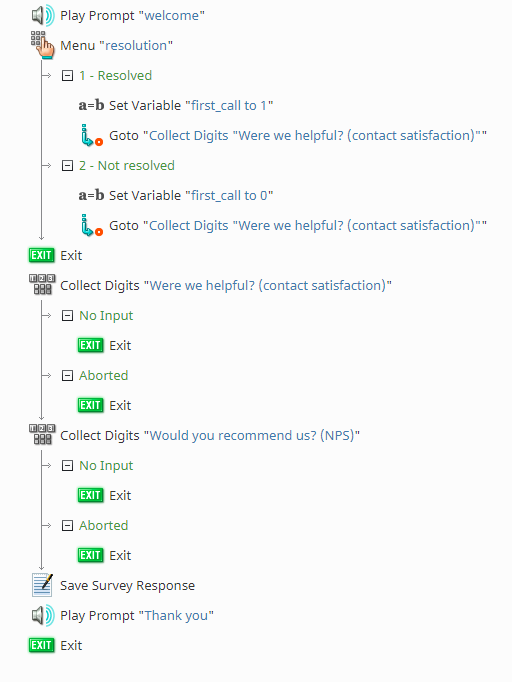
| + | 図では、シナリオビルダーアプリケーションで構成された場合のシナリオが表示されています。 | ||
| Line 30: | Line 32: | ||
| − | ==== | + | ====アクション 1: 調査についてお客様に伝えます。 ==== |
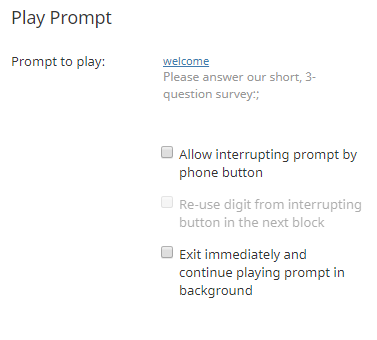
| − | + | このシナリオは、エージェントとの対話が終了した後に開始されるため、お客様に対して今から調査が開始することを伝えます。この例では、調査には3つの質問が含まれており、[[Scenario-builder-reference-guide/PlayPrompt|プロンプトの再生]]ブロックを通じてお客様に通知します。 | |
| + | |||
| + | |||
| + | [[File:Voice-Survey-1-53.PNG|800px|thumb|center|プロンプトの再生ブロックの設定]] | ||
| + | |||
| + | ==== アクション 2: メニューブロックを使って情報を収集します。==== | ||
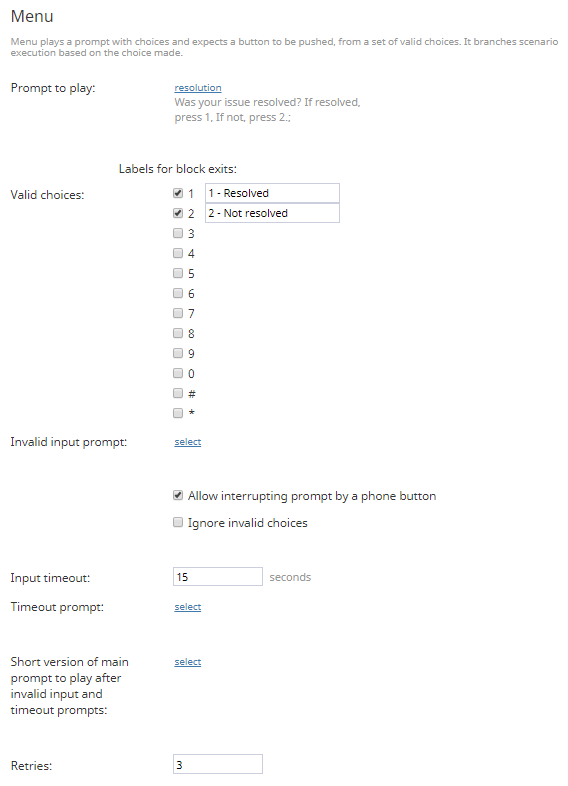
| + | 次に、 [[Scenario-builder-reference-guide/Menu|メニュー]] ブロックをせってします。この例では、先ず[[Scenario-builder-reference-guide/Menu#Prompts|再生されるプロンプト]]を設定します。このブロックはお客様に対して、問題が解決されたかどうかを質問し、回答をするための電話キーの押し方を指示します。 | ||
| − | [[ | + | 次に、電話キーの[[Scenario-builder-reference-guide/Menu#Conditional_Exits|有効なオプション]]を設定します。それらは事実上、[[Scenario-builder-reference-guide/ScenarioBuilderOverview#Conditional_Exits|条件付き出口]]です。この例では、'''1''' は''解決済''、'''2'''は''未解決''です。 |
| + | 最後に、 [[Scenario-builder-reference-guide/Menu#Input_Timeout|入力タイムアウト]] を15秒間に、[[Scenario-builder-reference-guide/Menu#Retries|再試行]]の回数を3回に設定します。そうすると、45秒以内に入力がない場合、シナリオはフローでメニューブロックに続く[[Scenario-builder-reference-guide/Exit|Exit]] ブロックに移ります (つまり、シナリオは終了します)。 | ||
| − | |||
| − | |||
| − | + | [[File:Voice-Survey-2-53.PNG|650px|thumb|center|メニューブロックの設定方法]] | |
| − | |||
| + | ==== アクション 2a: 変数の設定ブロックを使ってメニュー値を渡します。 ==== | ||
| + | お客様が電話キーの有効なオプションのいずれかを押した場合、次の2つの操作が行われるように設定しなければなりません: | ||
| + | * どのキーが押されたかについて、情報収集が必要です。 | ||
| + | *調査が3つの質問から構成されているので、残りの2つの質問への回答が必要です。 | ||
| − | |||
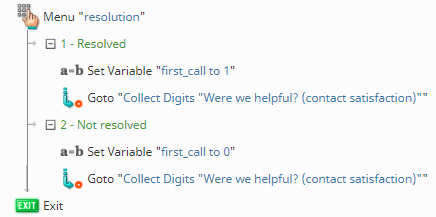
| + | 有効なオプションごとにキーの情報を収集するには、[[Scenario-builder-reference-guide/SetVariable|変数の設定]] ブロックを使います。両方の場合、''first_call''ちう変数を作成します。 有効なオプション '''1'''の場合、''first_call''の値を1に、有効なオプション'''2'''の場合、値を2に設定します。''first_call''変数は最終的に [[#Action_5:_Collect_All_Responses_in_a_Save_Survey_Response_Block|調査回答の保存]]ブロックに渡され、お客様が選択肢たオプションに対応する値を収集します。 | ||
| − | + | キーの情報を収集した後、シナリオを残り2つの質問に移動させるには、 [[Scenario-builder-reference-guide/Goto|Goto]]ブロックを使うことで、[[Scenario-builder-reference-guide/Exit|Exit]]ブロックを超え、2つの [[Scenario-builder-reference-guide/CollectDigits|数字の取得]]ブロックの内、1番目に移動します。 | |
| − | |||
| − | |||
| − | |||
| − | |||
| − | + | [[File:Voice-Survey-2a-53.PNG|800px|thumb|center|メニューブロックの有効なオプションには変数の設定ブロックが含まれています。]] | |
| − | [[ | + | ==== アクション 4: 数字の取得ブロックを使って多くのフィードバックを収集します。==== |
| + | 残り2つの質問は、2つの[[Scenario-builder-reference-guide/CollectDigits|数字の取得]] ブロックでそれぞれ構成します。シナリオフローでは、これらのブロックは連続して実行されます。 | ||
| + | 数字の取得の各ブロックでは、違う質問をする[[Scenario-builder-reference-guide/CollectDigits#Prompt_to_play_.28main_prompt.29|プロンプトが再生]]されます。この例では、数字の取得ブロック(1番目)のプロンプトは、お客様に対してエージェントの能力について、2番目のブロックのプロンプトはサービスの推薦について尋ねます。 | ||
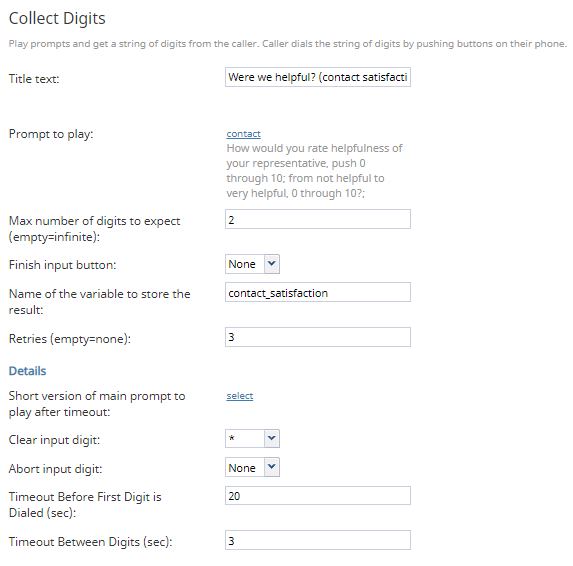
| − | + | 両方のブロックは、質問に答えるために0〜10の範囲の数字を入力するようにお客様に指示するため、各ブロックに対して [[Scenario-builder-reference-guide/CollectDigits#Max_number_of_digits_to_expect|待ち受ける数字列の最大桁数]]を'''2'''に設定します。次に、1番目のブロックで [[Scenario-builder-reference-guide/CollectDigits#Name_of_the_variable_to_store_the_result|結果を保存する変数名]]を ''contact_satisfaction''として、 2番目のブロックで[[Scenario-builder-reference-guide/CollectDigits#Name_of_the_variable_to_store_the_result|結果を保存する変数名]] を''NPS_raw''として設定します。 | |
| − | |||
| − | + | お客様が入力する数字に基づいて、''contact_satisfaction'' および ''NPS_raw''変数の両方は、値を[[Scenario-builder-reference-guide/SaveSurveyResponse|調査回答保存]] ブロックへ渡します。 | |
| − | |||
| − | + | [[File:Voice-Survey-3-53.PNG|650px|thumb|center|数字の取得ブロックの一つ]] | |
| − | [[ | + | 数字の取得ブロックは、 [[Scenario-builder-reference-guide/Menu|メニュー]]ブロックのように、設定済みオプションごとに条件付き出口が設定できませんが、必要に応じて調整できる [[Scenario-builder-reference-guide/CollectDigits#Conditional_Exits|通常の条件付き出口]] と [[Scenario-builder-reference-guide/CollectDigits#Timeout_Before_First_Digit_is_Dialed|タイムアウトオプション]] が含まれています。 |
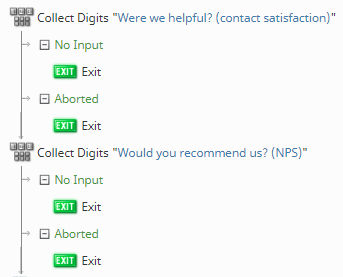
| − | + | [[File:Voice-Survey-3a-53.PNG|800px|thumb|center|数字の取得ブロックの条件付き出口はExitブロックが含まれています。]] | |
| − | [[ | + | ==== アクション 5: 調査会等の保存ブロックで全回答を収集します。==== |
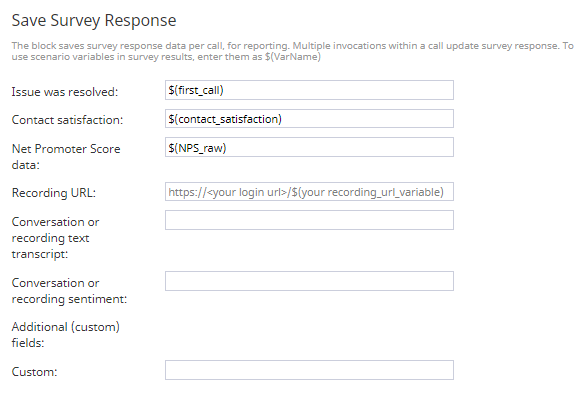
| + | シナリオを終了する前に、作成した変数で収集したすべての値を保存する必要があります。それを行うには、変数名を [[Scenario-builder-reference-guide/SaveSurveyResponse|調査回答の保存]]ブロックに入力します。 この例では、以下の通りに変数を入力します: | ||
| + | * [[Scenario-builder-reference-guide/SaveSurveyResponse#Issue_was_resolved|解決済]] フィールドに、[[Scenario-builder-reference-guide/Menu|メニュー]] ブロックからの変数(''first_call'')を入力します。 | ||
| + | * [[Scenario-builder-reference-guide/SaveSurveyResponse#Contact_satisfaction|顧客満足度]]フィールドに、1番目の [[Scenario-builder-reference-guide/CollectDigits|数字の取得]] ブロックからの変数(''contact_satisfaction'')を入力します。 | ||
| + | *[[Scenario-builder-reference-guide/SaveSurveyResponse#Net_Promoter_Score_data|ネットプロモータースコアデータ]]フィールドに、2番目の数字の取得ブロックからの変数( ''NPS_raw'')を入力します。 | ||
| − | + | お客様が入力した数字がレポートで利用可能になります。 | |
| − | |||
| − | |||
| − | |||
| − | |||
| − | |||
| + | [[File:Voice-Survey-4-53.PNG|800px|thumb|center|調査回答の保存ブロックには全ての調査の変数が含まれています。]] | ||
| − | |||
| + | ==== アクション 6: お客様へのお礼を含むプロンプトを再生します。==== | ||
| + | 最後に、お客様がすべての質問に回答し、回答が調査回答の保存ブロックに保存された後、調査に参加したお客様に対するお礼を含む [[Scenario-builder-reference-guide/PlayPrompt|プロンプトを再生]] し、[[Scenario-builder-reference-guide/Exit|Exit]] ブロックを使ってシナリオを終了します。 | ||
| − | |||
| − | |||
| + | [[File:Voice-Survey-5-53.PNG|800px|thumb|center|プロンプトを再生した後、終了します。]] | ||
| − | |||
| + | == 参考書 == | ||
| + | シナリオに使われるブロックと変数をよりよく理解するために、次の記事を読むことをお勧めします: | ||
| − | + | * [[Scenario-builder-reference-guide/ScenarioBuilderBasics|シナリオビルダーの基本情報]] | |
| − | + | * [[Scenario-builder-reference-guide/HowtoCreateaBasicScenario|基本的なシナリオの作成]] | |
| + | * [[Scenario-builder-reference-guide/HowtoCreateaVoiceScenarioThatDistributesSurveystoaPercentageofRandomCustomers|ランダムなお客様の一部に対するアンケートを配信する音声シナリオの作成]] | ||
| − | |||
| − | |||
| − | |||
| − | + | 保存操作を早めに、頻繁に行ってください! | |
Latest revision as of 11:40, 9 September 2021
音声シナリオの調査作成
調査は、会社、対象のトピックなどについてお客様からフィードバックを得るのに役立つツールです。
ここでは、顧客満足度に関するデータを収集する目的で音声シナリオ調査を作成する方法について説明します。このシナリオとコンタクトセンター管理者アプリケーションにある顧客調査テンプレートとは多少異なっています。
シナリオの例
音声シナリオの例(コメント付バージョン)をダウンロードするには、次のリンクをクリックしてください。
File:App Voice Scenario Survey.zip
このファイルをコンタクトセンターにインポートする方法については、コンタクトセンター管理者ガイドの
シナリオ概要 > シナリオのエクスポートとインポートをご覧ください。
シナリオに関する一般情報については、 シナリオビルダー概要をご覧ください。
シナリオフロー
このシナリオの目的は、音声対話から顧客満足度のフィードバックを求め、報告目的でこの情報を収集することです。それを行うには、次のシナリオブロックを使います:
作成者コメント: このシナリオは、別のシナリオで設定されたコールの接続ブロックのターゲットの切断という条件付き出口から別のシナリオの開始 ブロックが呼び出されたときに開始されます。コールを終了しなければならないのはエージェントであるため、エージェントは調査に参加するかどうかを発信者に尋ねてから、電話を切らずに保留するように指示することをお勧めします。
このシナリオの例はあくまでも例であり、実際の使用を目的としていません。全ての条件付き出口に対して、実際に使われるアクションを指定しなければなりません。
シナリオの概要
図では、シナリオビルダーアプリケーションで構成された場合のシナリオが表示されています。
アクション 1: 調査についてお客様に伝えます。
このシナリオは、エージェントとの対話が終了した後に開始されるため、お客様に対して今から調査が開始することを伝えます。この例では、調査には3つの質問が含まれており、プロンプトの再生ブロックを通じてお客様に通知します。
アクション 2: メニューブロックを使って情報を収集します。
次に、 メニュー ブロックをせってします。この例では、先ず再生されるプロンプトを設定します。このブロックはお客様に対して、問題が解決されたかどうかを質問し、回答をするための電話キーの押し方を指示します。
次に、電話キーの有効なオプションを設定します。それらは事実上、条件付き出口です。この例では、1 は解決済、2は未解決です。
最後に、 入力タイムアウト を15秒間に、再試行の回数を3回に設定します。そうすると、45秒以内に入力がない場合、シナリオはフローでメニューブロックに続くExit ブロックに移ります (つまり、シナリオは終了します)。
アクション 2a: 変数の設定ブロックを使ってメニュー値を渡します。
お客様が電話キーの有効なオプションのいずれかを押した場合、次の2つの操作が行われるように設定しなければなりません:
- どのキーが押されたかについて、情報収集が必要です。
- 調査が3つの質問から構成されているので、残りの2つの質問への回答が必要です。
有効なオプションごとにキーの情報を収集するには、変数の設定 ブロックを使います。両方の場合、first_callちう変数を作成します。 有効なオプション 1の場合、first_callの値を1に、有効なオプション2の場合、値を2に設定します。first_call変数は最終的に 調査回答の保存ブロックに渡され、お客様が選択肢たオプションに対応する値を収集します。
キーの情報を収集した後、シナリオを残り2つの質問に移動させるには、 Gotoブロックを使うことで、Exitブロックを超え、2つの 数字の取得ブロックの内、1番目に移動します。
アクション 4: 数字の取得ブロックを使って多くのフィードバックを収集します。
残り2つの質問は、2つの数字の取得 ブロックでそれぞれ構成します。シナリオフローでは、これらのブロックは連続して実行されます。
数字の取得の各ブロックでは、違う質問をするプロンプトが再生されます。この例では、数字の取得ブロック(1番目)のプロンプトは、お客様に対してエージェントの能力について、2番目のブロックのプロンプトはサービスの推薦について尋ねます。
両方のブロックは、質問に答えるために0〜10の範囲の数字を入力するようにお客様に指示するため、各ブロックに対して 待ち受ける数字列の最大桁数を2に設定します。次に、1番目のブロックで 結果を保存する変数名を contact_satisfactionとして、 2番目のブロックで結果を保存する変数名 をNPS_rawとして設定します。
お客様が入力する数字に基づいて、contact_satisfaction および NPS_raw変数の両方は、値を調査回答保存 ブロックへ渡します。
数字の取得ブロックは、 メニューブロックのように、設定済みオプションごとに条件付き出口が設定できませんが、必要に応じて調整できる 通常の条件付き出口 と タイムアウトオプション が含まれています。
アクション 5: 調査会等の保存ブロックで全回答を収集します。
シナリオを終了する前に、作成した変数で収集したすべての値を保存する必要があります。それを行うには、変数名を 調査回答の保存ブロックに入力します。 この例では、以下の通りに変数を入力します:
- 解決済 フィールドに、メニュー ブロックからの変数(first_call)を入力します。
- 顧客満足度フィールドに、1番目の 数字の取得 ブロックからの変数(contact_satisfaction)を入力します。
- ネットプロモータースコアデータフィールドに、2番目の数字の取得ブロックからの変数( NPS_raw)を入力します。
お客様が入力した数字がレポートで利用可能になります。
アクション 6: お客様へのお礼を含むプロンプトを再生します。
最後に、お客様がすべての質問に回答し、回答が調査回答の保存ブロックに保存された後、調査に参加したお客様に対するお礼を含む プロンプトを再生 し、Exit ブロックを使ってシナリオを終了します。
参考書
シナリオに使われるブロックと変数をよりよく理解するために、次の記事を読むことをお勧めします:
保存操作を早めに、頻繁に行ってください!

