| Line 28: | Line 28: | ||
=== シナリオのプロパティからのデータアクセス === | === シナリオのプロパティからのデータアクセス === | ||
====サンドボックス ==== | ====サンドボックス ==== | ||
| − | Saleforce環境が [https://help.salesforce.com/apex/HTViewHelpDoc?id=create_test_instance.htm&language=en_US | + | Saleforce環境が [https://help.salesforce.com/apex/HTViewHelpDoc?id=create_test_instance.htm&language=en_US サンドボックス]である場合、このチェックボックスを選択します。 |
====コンシューマキー ==== | ====コンシューマキー ==== | ||
Revision as of 14:25, 5 October 2019
Bright PatternにSalesforce統合アカウントを追加します。
コールセンターと接続アプリケーションがSalesforceで設定されたので、SalesforceとBright Pattern コンタクトセンター間の接続を確立する統合アカウントを作成できます。 新しい統合アカウントの追加はコンタクトセンター管理者アプリケーションで行われます。詳しい情報については、 コンタクトセンター管理者ガイド の統合アカウントをご覧ください。
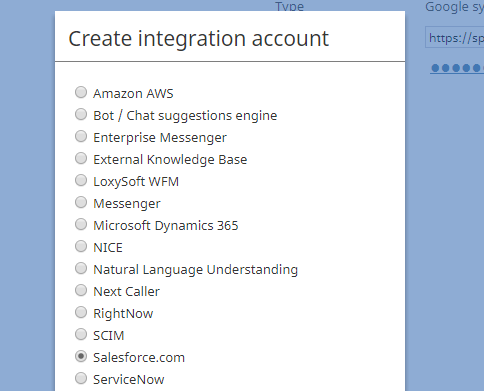
ステップ1: 新しい統合アカウントを作成します。
コンタクトセンター管理者アプリケーションで設定 >コールセンター設定 > 統合アカウント へ進み、 +をクリックし、 Salesforce.comというタイプの新しいアカウントを追加します。
ステップ 2: プロパティを編集します。
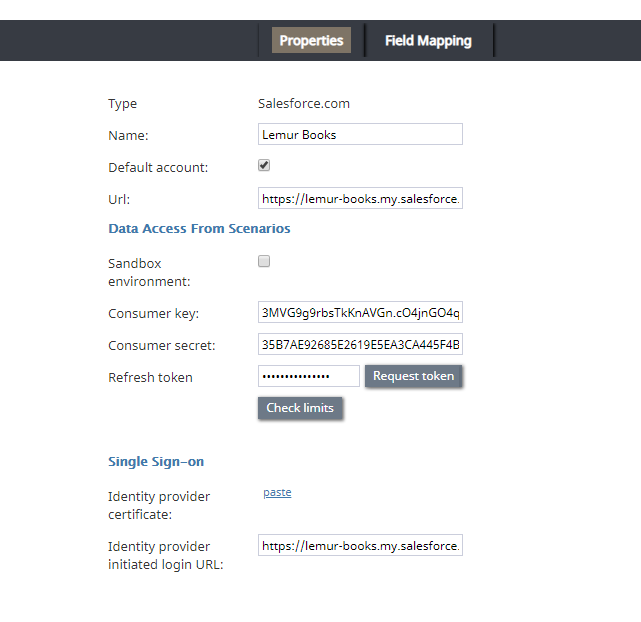
基本プロパティ
タイプ
追加される統合アカウントとしてこのタイプが選択されたため、既定値は"Salesforce.com"です。
名前
アカウントの名前(任意の名前)。
デフォルトのアカウント
お手持ちの複数のSalesforce統合アカウントの内、このアカウントをデフォルトで使う場合、このチェックボックスを選択します。
Url
ユーザーがサインインするSalesforceの登録済みドメインのURLです。 URLは次の形式でなければなりません: https://<your-domain-name>.my.salesforce.com/
シナリオのプロパティからのデータアクセス
サンドボックス
Saleforce環境が サンドボックスである場合、このチェックボックスを選択します。
コンシューマキー
以前にSalesforceで設定した接続アプリケーションのコンシューマキーです。 このキーは、Salesforce Classicの アプリケーションセットアップ> アプリケーション> 接続アプリケーション にあります。
コンシューマシークレット
Salesforceで以前に設定した接続アプリケーションのコンシューマシークレットです。 このシークレットは、Salesforce Classicの アプリケーションセットアップ> アプリケーション> 接続アプリケーション にあります。
リフレッシュトークン
トークンのリクエストをクリックし、Salesforce 接続アプリケーションへのアクセスを許可します。
制限を確認します。
制限の確認 ボタンを使うと、アカウントに関連する SFDC制限 の確認ができます。
Single Sign-on Properties
In this section, you will enable single sign-on (SSO) functionality for Salesforce integration. SSO provides simultaneous login to Bright Pattern Contact Center applications and the embedded Agent Desktop widget on Salesforce. For example, users who log in to the Agent Desktop widget on Salesforce will find themselves also logged in to Bright Pattern applications (e.g., Agent Desktop, Contact Center Administrator, etc.).
Identity provider certificate
Paste the Salesforce Identity Provider Certificate that you downloaded in the previous section, Enabling Single Sign-On, Step 3.
In Salesforce, you can find the certificate in Setup > Administration Setup > Security Controls > Certificate and Key Management.
Note: If you do not plan on configuring SSO, leave the certificate empty.
Identity provider initiated login URL
The identity provider issuer name in the following form: https://<your-domain>.my.salesforce.com.
In Salesforce, you can find this in Setup > Administer > Security Controls > Identity Provider.
Note: Even if you do not configure SSO, you still need to set something in this required field. If you do not plan on configuring SSO, enter any character or string (e.g., "https://" or "/") to invalidate the URL.
Step 3: Save
Click Apply to save your changes. Salesforce integration account configuration is now be complete.
Next, you can view our tutorials to learn how to set up scenarios to use Salesforce data.


