(Created page with "5.3:Sfdc-integration-guide/Tutorials/ScreenpopURL") |
|||
| (41 intermediate revisions by the same user not shown) | |||
| Line 1: | Line 1: | ||
| − | = | + | = SFDCオブジェクト用にスクリーンポップURLの配置または作成 = |
| − | [http://www.brightpattern.com/cloud-contact-center/ SFDC | + | [http://www.brightpattern.com/cloud-contact-center/ SFDC 統合]は、 原則としてSFDCシステム管理者により提供されるスクリーンポップシナリオブロックURLを使うことによって、Saleforce.com (SFDC)の特定のオブジェクトをスクリーンポップ候補とし、アクセスを可能にします。 一方、以下の手順は、SFDCオブジェクトスクリーンポップURLの作成方法を説明する例として挙げられます。 |
| − | Bright | + | Bright Patternコンタクトセンターは、 [[scenario-builder-reference-guide/Salesforce.comScreenpop|Salesforce.com スクリーンポップ]] シナリオブロックを使って、エージェントデスクトップアプリケーションでSFDCレコード(オブジェクト)を表示します。このブロックは、各オブジェクトIDの選択を許可する他、更にスクリーンポップオブジェクトのSFDC URLを提供します。 |
| − | ''' | + | '''ご注意:''' オブジェクトID URLは、Service CloudとSales Cloudで異なる場合があります。従って、一つのシナリオが企業全体に対応できない場合があります。 |
| Line 10: | Line 10: | ||
| − | == | + | == Sales Cloudの SFDCスクリーンポップURLの配置== |
| − | + | Salesforceを使って, スクリーンポップURLを介して実行したいタスクを手動で実行します。例えば、Sales Cloudにおけるアカウントと特定のコンタクトから新しいケースを開くには、次の手順に従って実行します: | |
| − | === | + | === ステップ 1: Sales Cloud アカウントを選んで新しいケースを作成します。 === |
| − | # | + | # Sales Cloudから ''> アカウント''を選択します。<br /><br /> |
| − | # | + | # ''コンタクト''までスクロールします。<br /><br /> |
| − | # | + | # サンプルの''コンタクト''を選択します。<br /><br /> |
| − | # | + | # コンタクトレコードから ''ケース''までスクロールし、'''新しいケース'''を選択します。図の通り、新しいケースレコードが開きます。 |
| Line 24: | Line 24: | ||
| − | === | + | === ステップ 2: スクリーンポップのSFDCオブジェクトを識別するURLを設定します。 === |
| − | # | + | # ページURLを元のリンクとしてコピーします:<br /><br />https://bpdemo-dev-ed.my.salesforce.com/500/e?retURL=%2F003E000000NoeJj&def_contact_id=003E000000NoeJj&def_account_id=001E000000NK3Pl<br /><br /> |
| − | # | + | #このURLは、スクリーンポップに必要なSFDCオブジェクトパラメータを識別します。SFDC URLの最初のセグメント(https://bpdemo-dev-ed.my.salesforce.com/) は不要ですので、削除します。デスクトップ統合では、設定されたドメインURLが使用されます。結果は次のとおりです:<br /><br />500/e?retURL=%2F003E000000NoeJj&def_contact_id=003E000000NoeJj&def_account_id=001E000000NK3Pl<br /><br /> |
| − | # | + | # オブジェクトパラメータ ('''contact_id''' と '''account_id''')は、シナリオにより定義されたオブジェクト/変数に置き換えられます。例えば:<br /><br />500/e?retURL=%2F003E000000NoeJj&def_contact_id='''$(SFContact.Id)'''&def_account_id='''$(SFContact.Account.Id)'''<br /><br /> |
| − | === | + | === 備考 === |
| − | + | 一般の '''オブジェクトIDの識別子''' (先頭の3つのフィールド文字により識別)は以下の通りです:<br /><br /> | |
| − | * 001 = | + | * 001 = アカウント |
| − | * 003 = | + | * 003 = コンタクト |
| − | * 00T = | + | * 00T = タスク |
| − | + | 原則として、 ''retURL''または ''Return URL''は、特定のオブジェクトに戻る必要がない限り、使用しません。 ''Return URL''を削除すると、既定のアクションは元のワークオブジェクトに戻されます。 | |
| − | * ''' | + | * '''削除します:''' |
retURL=%2F003E000000NoeJj& | retURL=%2F003E000000NoeJj& | ||
| − | * | + | * '''最終 URL''': |
500/e?def_contact_id=$(SFContact.Id)&def_account_id=$(SFContact.Account.Id) | 500/e?def_contact_id=$(SFContact.Id)&def_account_id=$(SFContact.Account.Id) | ||
| − | + | このURLは、 Salesforce.comスクリーンポップブロックの [[scenario-builder-reference-guide/Salesforce.comScreenpop#Object ID|オブジェクトID]] フィールドに配置されます。 | |
| Line 51: | Line 51: | ||
| − | == | + | == Service Cloud (Service Console) の SFDCスクリーンポップURLの配置== |
| − | + | Salesforceを使って, スクリーンポップURLを介して実行したいタスクを手動で実行します。例えば、Service Cloudにおけるアカウントと特定のコンタクトから新しいケースを開くには、次の手順に従って実行します: | |
| − | === | + | === ステップ 1: Service Cloud アカウントを選んで新しいケースを作成します。 === |
| − | # | + | # Service Cloudから ''> アカウント''を選択します。<br /><br /> |
| − | # | + | # 特定のアカウントまでスクロールします。<br /><br /> |
| − | # | + | # サンプルアカウントを選択します。<br /><br /> |
| − | # | + | # アカウントレコードから ''コンタクト''までスクロールします。<br /><br /> |
| − | # | + | # 対象のサンプルコンタクトを選択します。<br /><br /> |
| − | # | + | # ''コンタクト'' レコードから ''ケース''までスクロールし、'''新しいケース'''を選択します。新しいケースレコードが開きます。<br /><br /> |
| − | # | + | # 隠れているURLを見つけるには、図に示すように 左側の下矢印をクリックします。 |
| Line 68: | Line 68: | ||
| − | === | + | === ステップ 2: 新しいケースを編集します。=== |
| − | + | '''新しいケース'''を選択し、 '''編集'''リンクをクリックします。これにより ''共有するリンク''というダイヤログボックスが表示されます。 | |
| Line 75: | Line 75: | ||
| − | + | ''共有するリンク''では以下の3つのオプションが使用できます: | |
| − | * | + | *主なタブとサブタイトルを全て含む |
| − | * | + | *このタブのみを含む |
| − | * | + | *スタンダードなSalesforce URLを作成する |
| − | === | + | ===ステップ 3: スクリーンポップのSFDCオブジェクトを識別するURL を設定します。 === |
| − | # | + | # “このタブのみを含む”を選択し、対象のスクリーンポップ用の簡易URLを指定します。<br /><br /> |
| − | # | + | # ページURLを元のリンクとしてコピーします:<br /><br />https://bpdemo-dev-ed.my.salesforce.com/console#%2F500%2Fe%3Fdef_contact_id%3D003E000000NoeJk%26def_account_id%3D001E000000NK3Pm |
| − | + | このURLは、スクリーンポップに必要なSFDCオブジェクトパラメータを識別します。SFDC URLの最初のセグメント(''https://bpdemo-dev-ed.my.salesforce.com/)'' は不要ですので、削除します。デスクトップ統合では、設定されたドメインURLが使用されます。結果は次のとおりです: console#%2F500%2Fe%3Fdef_contact_id%3D003E000000NoeJk%26def_account_id%3D001E000000NK3Pm | |
| − | |||
| − | + | オブジェクトパラメータ ('''def_contact_id''' と '''def_account_id''' )は、シナリオにより定義されたオブジェクト/変数に置き換えられます。 | |
| − | + | URLデータフォーマットは 以下の通りです (参考専用): | |
%3D = “=” | %3D = “=” | ||
| Line 100: | Line 99: | ||
%3F = “?” | %3F = “?” | ||
| − | + | 従って、結果は次のようになります: | |
console#%2F500%2Fe%3Fdef_contact_id%3D'''$(SFContact.Id)'''%26def_account_id%3D'''$(SFContact.Account.Id)''' | console#%2F500%2Fe%3Fdef_contact_id%3D'''$(SFContact.Id)'''%26def_account_id%3D'''$(SFContact.Account.Id)''' | ||
| − | + | 一般の '''オブジェクトIDの識別子''' (先頭の3つのフィールド文字により識別)は以下の通りです:<br /><br /> | |
| − | * 001 = | + | * 001 = アカウント |
| − | * 003 = | + | * 003 = コンタクト |
| − | * 00T = | + | * 00T = タスク |
| − | + | このURLは、 Salesforce.comスクリーンポップシナリオブロックの [[scenario-builder-reference-guide/Salesforce.comScreenpop#Object ID|オブジェクトID]] フィールドに配置されます。 | |
[[File:sfdc-integration-guide-image41.png|thumb|800px|center|]] | [[File:sfdc-integration-guide-image41.png|thumb|800px|center|]] | ||
Latest revision as of 15:20, 21 October 2019
SFDCオブジェクト用にスクリーンポップURLの配置または作成
SFDC 統合は、 原則としてSFDCシステム管理者により提供されるスクリーンポップシナリオブロックURLを使うことによって、Saleforce.com (SFDC)の特定のオブジェクトをスクリーンポップ候補とし、アクセスを可能にします。 一方、以下の手順は、SFDCオブジェクトスクリーンポップURLの作成方法を説明する例として挙げられます。
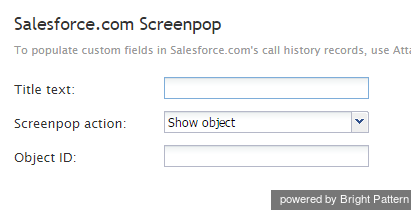
Bright Patternコンタクトセンターは、 Salesforce.com スクリーンポップ シナリオブロックを使って、エージェントデスクトップアプリケーションでSFDCレコード(オブジェクト)を表示します。このブロックは、各オブジェクトIDの選択を許可する他、更にスクリーンポップオブジェクトのSFDC URLを提供します。
ご注意: オブジェクトID URLは、Service CloudとSales Cloudで異なる場合があります。従って、一つのシナリオが企業全体に対応できない場合があります。
Sales Cloudの SFDCスクリーンポップURLの配置
Salesforceを使って, スクリーンポップURLを介して実行したいタスクを手動で実行します。例えば、Sales Cloudにおけるアカウントと特定のコンタクトから新しいケースを開くには、次の手順に従って実行します:
ステップ 1: Sales Cloud アカウントを選んで新しいケースを作成します。
- Sales Cloudから > アカウントを選択します。
- コンタクトまでスクロールします。
- サンプルのコンタクトを選択します。
- コンタクトレコードから ケースまでスクロールし、新しいケースを選択します。図の通り、新しいケースレコードが開きます。
ステップ 2: スクリーンポップのSFDCオブジェクトを識別するURLを設定します。
- ページURLを元のリンクとしてコピーします:
https://bpdemo-dev-ed.my.salesforce.com/500/e?retURL=%2F003E000000NoeJj&def_contact_id=003E000000NoeJj&def_account_id=001E000000NK3Pl - このURLは、スクリーンポップに必要なSFDCオブジェクトパラメータを識別します。SFDC URLの最初のセグメント(https://bpdemo-dev-ed.my.salesforce.com/) は不要ですので、削除します。デスクトップ統合では、設定されたドメインURLが使用されます。結果は次のとおりです:
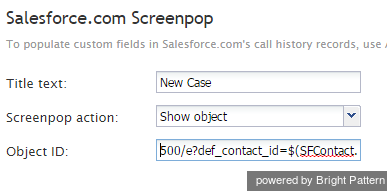
500/e?retURL=%2F003E000000NoeJj&def_contact_id=003E000000NoeJj&def_account_id=001E000000NK3Pl - オブジェクトパラメータ (contact_id と account_id)は、シナリオにより定義されたオブジェクト/変数に置き換えられます。例えば:
500/e?retURL=%2F003E000000NoeJj&def_contact_id=$(SFContact.Id)&def_account_id=$(SFContact.Account.Id)
備考
一般の オブジェクトIDの識別子 (先頭の3つのフィールド文字により識別)は以下の通りです:
- 001 = アカウント
- 003 = コンタクト
- 00T = タスク
原則として、 retURLまたは Return URLは、特定のオブジェクトに戻る必要がない限り、使用しません。 Return URLを削除すると、既定のアクションは元のワークオブジェクトに戻されます。
- 削除します:
retURL=%2F003E000000NoeJj&
- 最終 URL:
500/e?def_contact_id=$(SFContact.Id)&def_account_id=$(SFContact.Account.Id)
このURLは、 Salesforce.comスクリーンポップブロックの オブジェクトID フィールドに配置されます。
Service Cloud (Service Console) の SFDCスクリーンポップURLの配置
Salesforceを使って, スクリーンポップURLを介して実行したいタスクを手動で実行します。例えば、Service Cloudにおけるアカウントと特定のコンタクトから新しいケースを開くには、次の手順に従って実行します:
ステップ 1: Service Cloud アカウントを選んで新しいケースを作成します。
- Service Cloudから > アカウントを選択します。
- 特定のアカウントまでスクロールします。
- サンプルアカウントを選択します。
- アカウントレコードから コンタクトまでスクロールします。
- 対象のサンプルコンタクトを選択します。
- コンタクト レコードから ケースまでスクロールし、新しいケースを選択します。新しいケースレコードが開きます。
- 隠れているURLを見つけるには、図に示すように 左側の下矢印をクリックします。
ステップ 2: 新しいケースを編集します。
新しいケースを選択し、 編集リンクをクリックします。これにより 共有するリンクというダイヤログボックスが表示されます。
共有するリンクでは以下の3つのオプションが使用できます:
- 主なタブとサブタイトルを全て含む
- このタブのみを含む
- スタンダードなSalesforce URLを作成する
ステップ 3: スクリーンポップのSFDCオブジェクトを識別するURL を設定します。
- “このタブのみを含む”を選択し、対象のスクリーンポップ用の簡易URLを指定します。
- ページURLを元のリンクとしてコピーします:
https://bpdemo-dev-ed.my.salesforce.com/console#%2F500%2Fe%3Fdef_contact_id%3D003E000000NoeJk%26def_account_id%3D001E000000NK3Pm
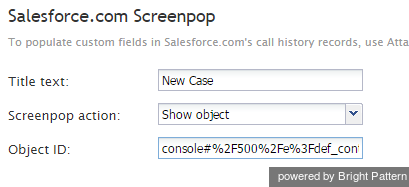
このURLは、スクリーンポップに必要なSFDCオブジェクトパラメータを識別します。SFDC URLの最初のセグメント(https://bpdemo-dev-ed.my.salesforce.com/) は不要ですので、削除します。デスクトップ統合では、設定されたドメインURLが使用されます。結果は次のとおりです: console#%2F500%2Fe%3Fdef_contact_id%3D003E000000NoeJk%26def_account_id%3D001E000000NK3Pm
オブジェクトパラメータ (def_contact_id と def_account_id )は、シナリオにより定義されたオブジェクト/変数に置き換えられます。
URLデータフォーマットは 以下の通りです (参考専用):
%3D = “=”

%26 = “&”

%2F = “/”

%3F = “?”
従って、結果は次のようになります:
console#%2F500%2Fe%3Fdef_contact_id%3D$(SFContact.Id)%26def_account_id%3D$(SFContact.Account.Id)
一般の オブジェクトIDの識別子 (先頭の3つのフィールド文字により識別)は以下の通りです:
- 001 = アカウント
- 003 = コンタクト
- 00T = タスク
このURLは、 Salesforce.comスクリーンポップシナリオブロックの オブジェクトID フィールドに配置されます。


