(Created page with "ServiceNowの以前のバージョンでは、OAuthの設定が求められる場合があります。 ServiceNowでは、OAuth 2.0の設定をお勧めします。詳しい...") |
(Created page with "# OAuthプラグインが有効であることを確認します。<br /><br />800px<br /><br /> # [ht...") |
||
| Line 74: | Line 74: | ||
ServiceNowの以前のバージョンでは、OAuthの設定が求められる場合があります。 ServiceNowでは、OAuth 2.0の設定をお勧めします。詳しい情報については、[http://wiki.servicenow.com/index.php?title=OAuth_Setup#gsc.tab=0 ServiceNow OAuth設定書類]をご覧ください。 | ServiceNowの以前のバージョンでは、OAuthの設定が求められる場合があります。 ServiceNowでは、OAuth 2.0の設定をお勧めします。詳しい情報については、[http://wiki.servicenow.com/index.php?title=OAuth_Setup#gsc.tab=0 ServiceNow OAuth設定書類]をご覧ください。 | ||
| − | # | + | # OAuthプラグインが有効であることを確認します。<br /><br />[[File:ServiceNow-OAuthb-53.png|800px|thumbnail|center|OAuth プラグイン]]<br /><br /> |
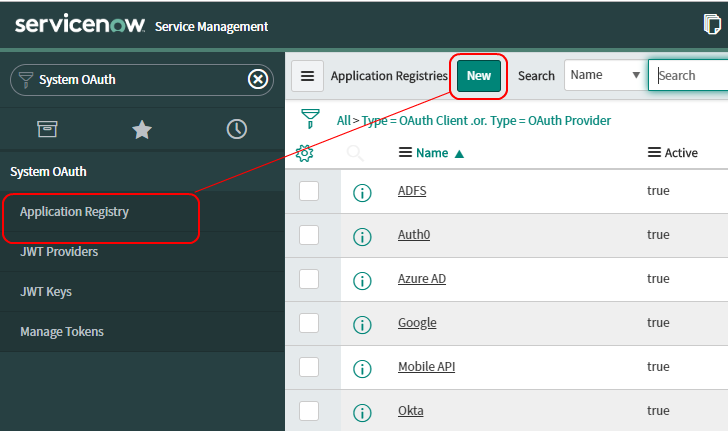
| − | # [https://docs.servicenow.com/bundle/jakarta-platform-administration/page/administer/security/task/t_CreateEndpointforExternalClients.html#t_CreateEndpointforExternalClients | + | # [https://docs.servicenow.com/bundle/jakarta-platform-administration/page/administer/security/task/t_CreateEndpointforExternalClients.html#t_CreateEndpointforExternalClients エンドポイントを作成する]には、''システムOAuth > アプリケーションレジストリー''へ移動し、'''新規'''をクリックします。<br /><br />[[File:ServiceNow-App-Registryb-53.png|800px|thumbnail|center|新しいアプリケーションレジストリーの追加]]<br /><br /> |
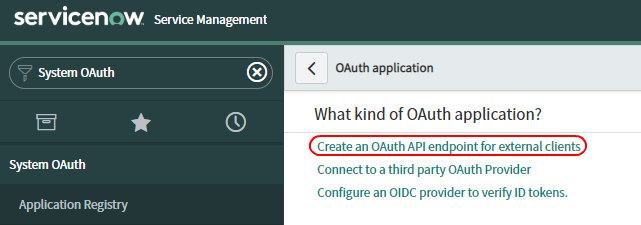
| − | # | + | # '''外部クライアント専用の OAuth APIエンドポイントの作成'''をクリックします。[[File:ServiceNow-App-Registry-Typeb-53.png|800px|thumbnail|center|エンドポイントの作成]]<br /><br /> |
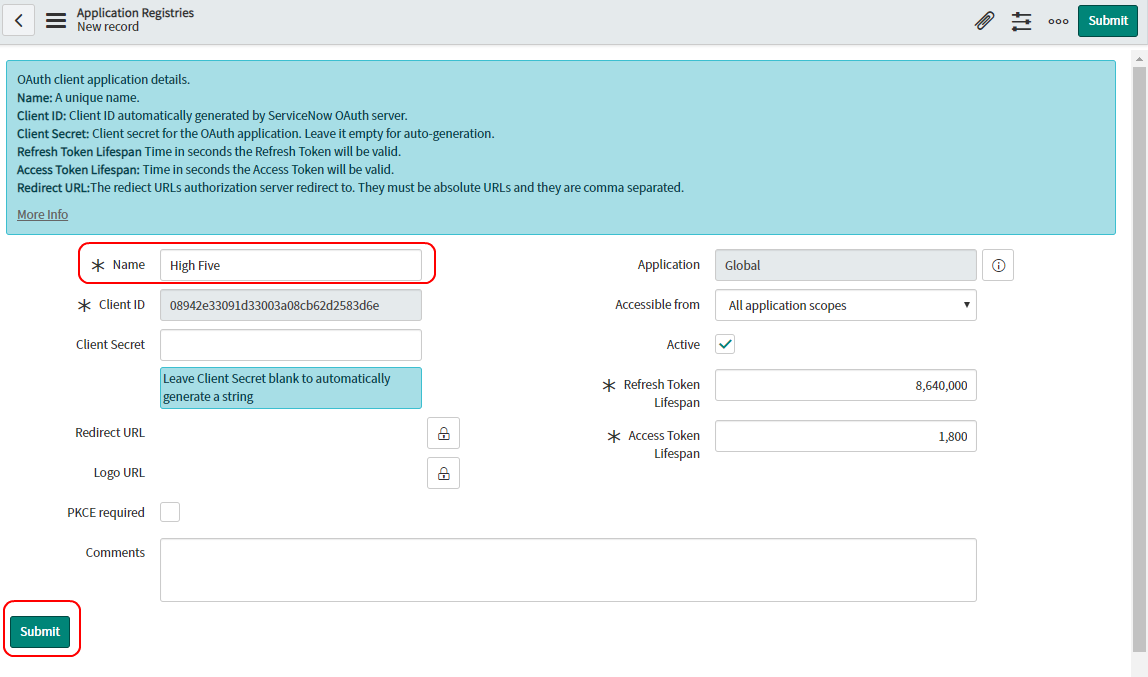
| − | # | + | # レジストリーに名前を付け '''保存'''をクリックします。クライアント IDは自動入力されます。クライアントシークレットは保存時に入力されます。<br /><br />[[File:ServiceNow-OAuth-Endpointb-53.png|800px|thumbnail|center|レジストリーに名前を付け保存]]<br /><br /> |
| − | # | + | # 作成したアプリケーションレジストリーを開くと、クライアントシークレットを表示およびコピーできます。 |
===Step 6: Create a new integration account === | ===Step 6: Create a new integration account === | ||
Revision as of 08:52, 6 March 2020
ServiceNow 統合の設定
ServiceNow統合により、ServiceNowにおいてBright Patternエージェントデスクトップアプリケーションを使うことができ、電話、ライブチャット、SMS、およびその他に設定されたメッセージ送信機能に直接アクセスできます。統合により、エージェントデスクトップアプリケーションはOpenFrameを介してServiceNowに組み込まれており、アクティビティ、ケース、対話の詳細などを最大限に活用するために、別のブラウザタブにエージェントデスクトップをポップアウトするオプションがあります。
ServiceNow統合設定には、ServiceNowの開発者をServiceNow統合アカウントでのBright Pattern コンタクトセンターにリンクすることが含まれます。
このセクションでは、以下のことが説明されています:
- ServiceNowで電話用プラグインの有効化
- OpenFrameの設定
- CORSルールの追加
- ServiceNowへのアクセスの許可
- ServiceNow統合アカウントの作成
- ServiceNowでエージェントデスクトップの画面サイズの調整
手順
この設定を行う際に、ServiceNow Madrid と Bright Patternコンタクトセンター 5.3を使いました。Madridより前のServiceNowが使われている場合、コンタクトセンターの 5.2の手順を参照してください。
ステップ1: servicenow.comで電話通信用のプラグインを有効化します。
ServiceNowドキュメントの 電話の設定へアクセスし、 ステップ5からステップ7までの手順に従って、内部および外部のユーザーとお客様間の電話通信チャネルを確立するプラグインを有効にします。
ステップ詳細は以下の通りです:
- CTIソフトフォンプラグインを有効にすることで、 OpenFrameがソフトフォン機能とコールセンター機能(電話の発信、受信、転送など)を提供できます。
- カスタマーサービス管理のデモデータプラグインを有効にする (com.sn_customerservice)ことで、追加のセキュリティを有効にします。
- OpenFrameプラグインを有効にすることで、Bright Pattern エージェントデスクトップなどの外部通信システムがServiceNowと統合されます。
ステップ 2: OpenFrame設定URLを置き換えます
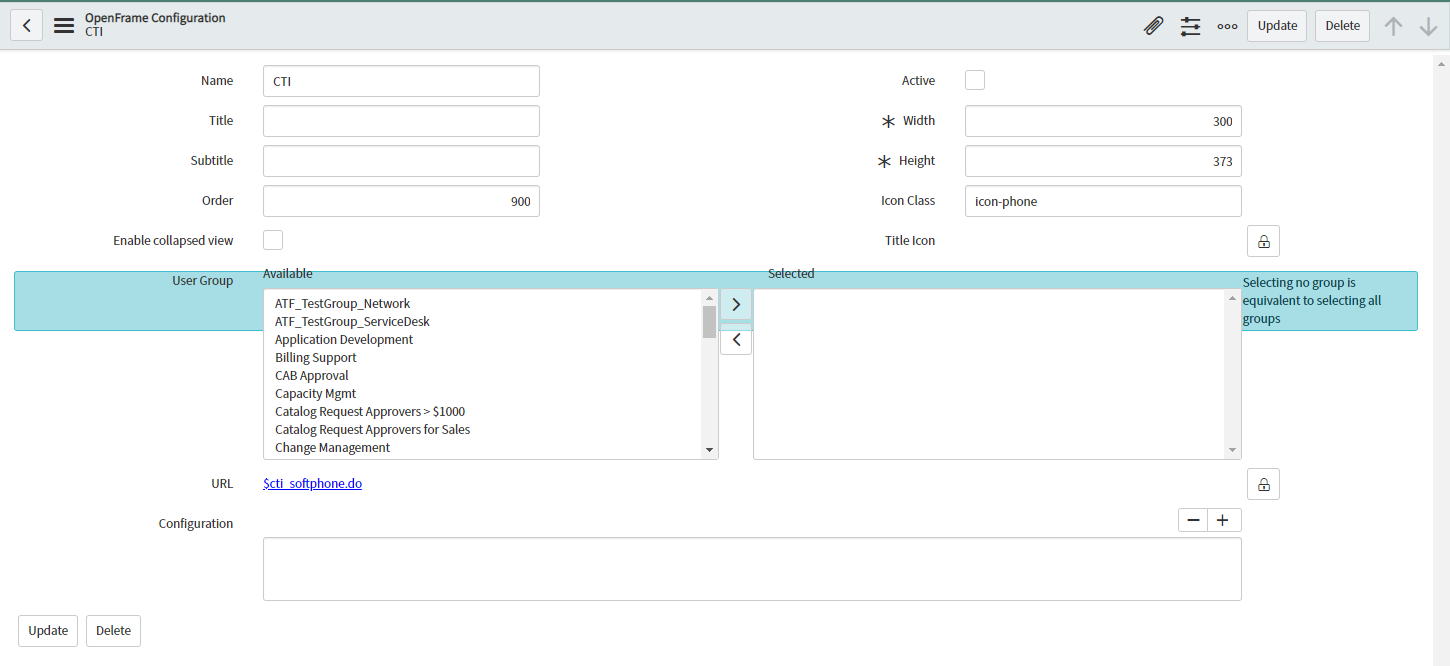
- システムプロパティ > OpenFrameへ移動し、 表示されたCTI プラグインをクリックし、OpenFrameプロパティを編集します。
- ロックアイコンをクリックし、以下のように URLを変更します:
https://<tenant>.brightpattern.com/agentdesktop/ServiceNow.jsp?topDomain=https://<dev_instance>.service-now.com
:
- <tenant>とは、コンタクトセンター名です (例えば、"example.brightpattern.com"の"example"です。)
- <dev_instance>とは、開発者アカウント です (例えば、"dev12345")。
例を挙げますと: https://example.brightpattern.com/agentdesktop/ServiceNow.jsp?topDomain=https://dev12345.service-now.com
- <tenant>とは、コンタクトセンター名です (例えば、"example.brightpattern.com"の"example"です。)
- ロックアイコンをもう一度クリックし、URL変化を保存します。ロックしないと、エージェントデスクトップは後で起動できない場合があります。
- まだ終わっていない場合、OpenFrame プラグインのアクティブをクリックし、前のステップでOpenFrameプラグインが有効になったかどうか確認します。アクティブでない場合、エージェントデスクトップのウィジェットは表示されません。
- 更新をクリックします。
URLには、アクティビティ履歴がServiceNowオブジェクトのアクティビティストリームに掲載されるときのクロスドメインエラーを回避するために、パラメータ"topDomain"が必要です。短縮されたURL "https://<tenant>.brightpattern.com/agentdesktop/ServiceNow.jsp"を使うことができますが、 "topDomain"パラメータを省略すると、アクティビティ履歴機能が無効になります。
ステップ 3: ユーザーがOpenFrameを使用できるように役割を割り当てます。
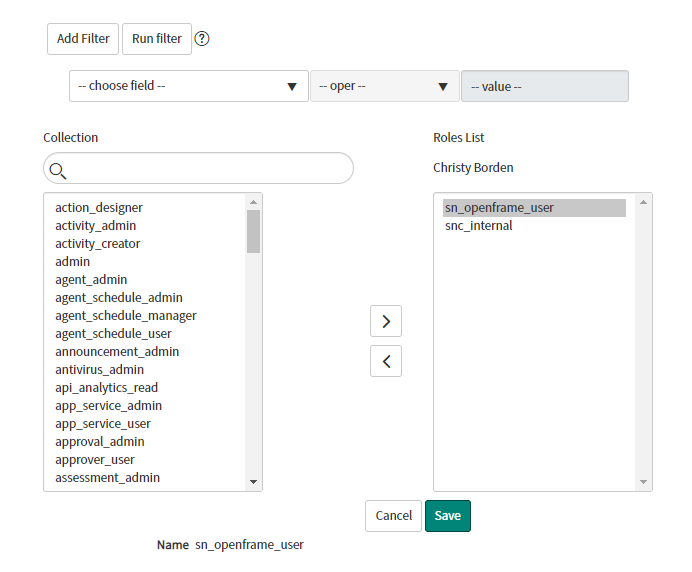
sn_openframe_user というOpenFrameユーザ役割は、OpenFrameの有効化と同時に追加されます。組み込みのエージェントデスクトップを使用するには、すべてのユーザーアカウントにsn_openframe_user という役割を割り当てる必要があります。特定のユーザー、またはユーザーがメンバーとなっているグループに割り当てることができます。
役割を特定のユーザーに割り当てるには:
- 組織 > ユーザーへ移動し、役割が割り当てられるユーザーの名前をクリックします。
- ユーザーの詳細の一番下にある 役割 の 編集をクリックします。
- フィルターを使って "sn_openframe_user"を検索し、それをユーザー役割リストに追加します。
- 保存をクリックします。
- ご希望のユーザーに対して上記の操作を繰り返します。
役割をグループに割り当てるには:
- ユーザー管理 > グループへ移動し、ご希望のグループ名をクリックします。
- グループの詳細の下にある役割の編集をクリックします。
- フィルターを使って"sn_openframe_user"を探し、それをグループ役割リストに追加します。
- 保存をクリックします。
- この役割が割り当てられたグループにユーザーを追加します。
ステップ 4: CORSルールを追加します。
CORSルールにより、Bright Pattern統合アカウントは、ServiceNowと通信できます。
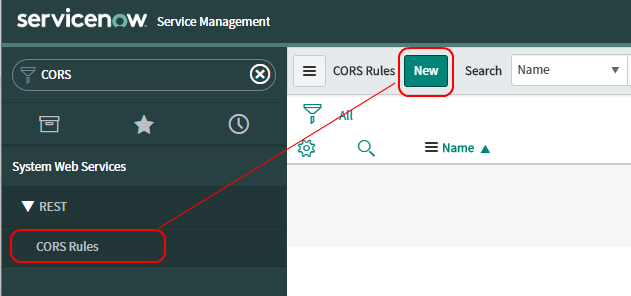
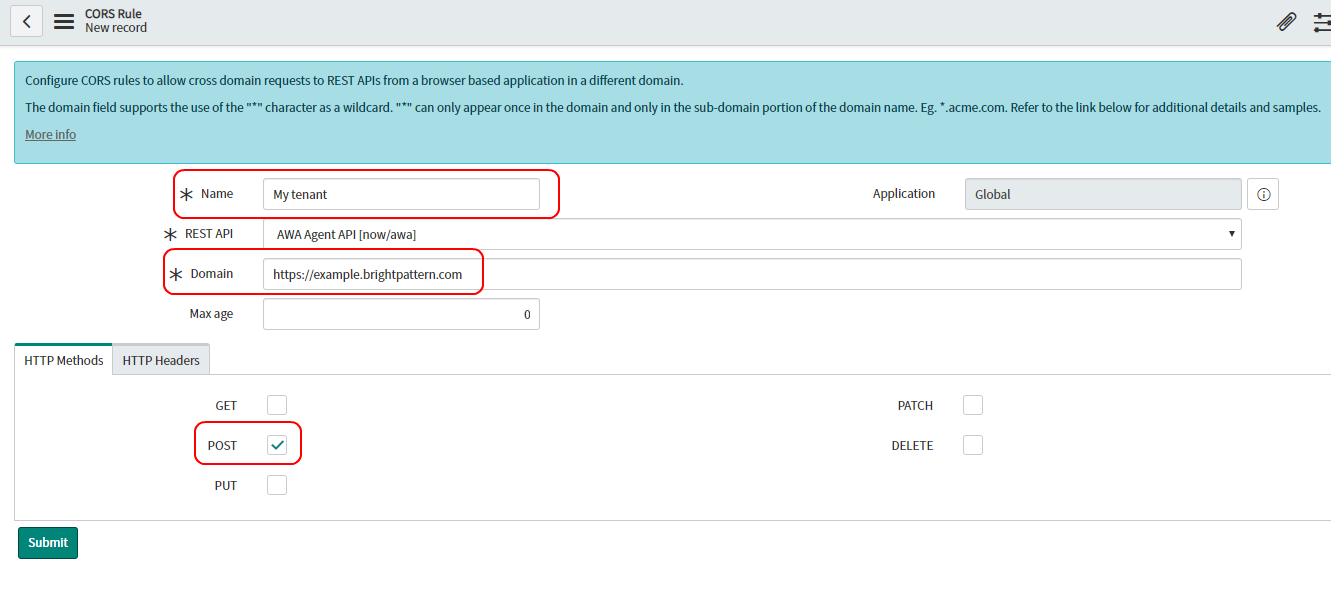
- ServiceNowのシステムWEBサービス > REST > CORS ルールへ移動し、 新規をクリックします。
- 名前にユニークな名前を入力します。
- ドメインにhttps://<tenant-name>.brightpattern.comを入力します。その場合、<tenant-name>とは、コンタクトセンターの名前を意味します。
- HTTPメソッドとしてPOSTを選択します。
- HTTPヘッダーとして Access-Control-Allow-Originを設定します。
ステップ 5: 新しいOAuth 2.0エンドポイントを設定します。
新しいServiceNow統合アカウントを作成するには、まずServiceNowの新しいOAuth 2.0エンドポイントを設定する必要があります。これにより、クライアントIDとクライアントシークレットが付与されます。これらは、ServiceNowアプリケーションへのアクセス認証手続きを行うのに必要です。この手順のステップ7で、ServiceNow統合アカウントのプロパティでクライアントIDとクライアントシークレットを指定します。
ServiceNowの以前のバージョンでは、OAuthの設定が求められる場合があります。 ServiceNowでは、OAuth 2.0の設定をお勧めします。詳しい情報については、ServiceNow OAuth設定書類をご覧ください。
- OAuthプラグインが有効であることを確認します。
- エンドポイントを作成するには、システムOAuth > アプリケーションレジストリーへ移動し、新規をクリックします。
- 外部クライアント専用の OAuth APIエンドポイントの作成をクリックします。
- レジストリーに名前を付け 保存をクリックします。クライアント IDは自動入力されます。クライアントシークレットは保存時に入力されます。
- 作成したアプリケーションレジストリーを開くと、クライアントシークレットを表示およびコピーできます。
Step 6: Create a new integration account
- Log in as Admin to the Contact Center Administrator application. Then navigate to Configuration > Integration Accounts.
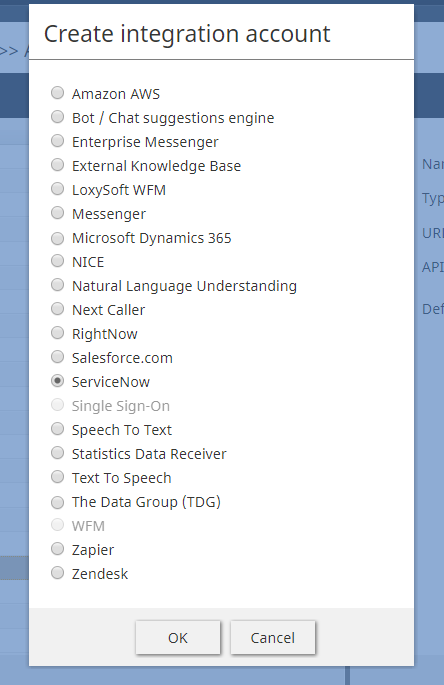
- Click the Add + button to add a new account. In the Create integration account window that appears, select ServiceNow and click OK.
Step 7: Specify ServiceNow integration account properties
Using the My Instance credentials that you saved when you first requested a ServiceNow developer instance, as well as the credentials from OAuth setup, enter values for the following screen properties. (If you do not know your credentials, ask your system administrator.) Be sure to click Apply to save your changes.
- Type - The type of integration account (i.e., in this case, ServiceNow, which is filled in because you added the account of this type).
- Name - A unique name (any) for your integration account.
- Default account - Select this checkbox if this ServiceNow integration account will be used as default.
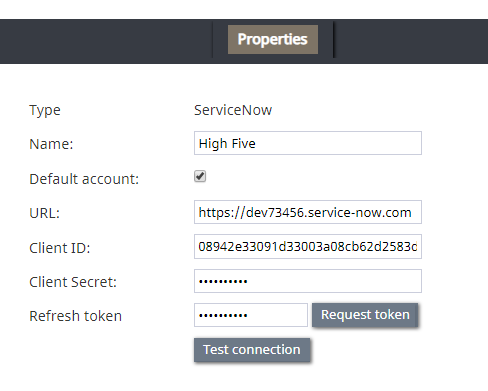
- URL - The unique URL of your instance (e.g., "https://dev73456.service-now.com")
- Client ID - The Client ID (string) is the automatically generated unique ID of the application (e.g., "08942j33191d72005a08cb62d2583d6e"). The instance uses the client ID when requesting an access token. Note that the client ID is obtained when configuring the OAuth Endpoint earlier in this procedure.
- Client Secret - The Client Secret is the shared secret string that both the instance and the application use to authorize communications with one another. The instance uses the client secret when requesting an access token. Note that the client secret is obtained when configuring the OAuth Endpoint earlier in this procedure.
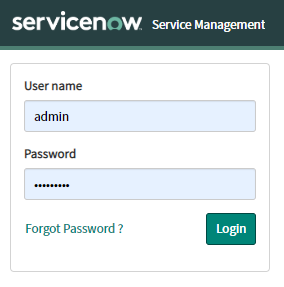
- Request Refresh Token - This button will request a refresh token. In the dialog that opens, enter the username and password of your ServiceNow instance.
- Test connection - This button tests the validity of the connection. If the connection is OK, the “Connection is valid” message appears.
Click Apply to save your changes.
Step 8: Authenticate your newly integrated account in ServiceNow
- In a separate browser window or tab, go to the ServiceNow Developer site and sign in to your developer instance.
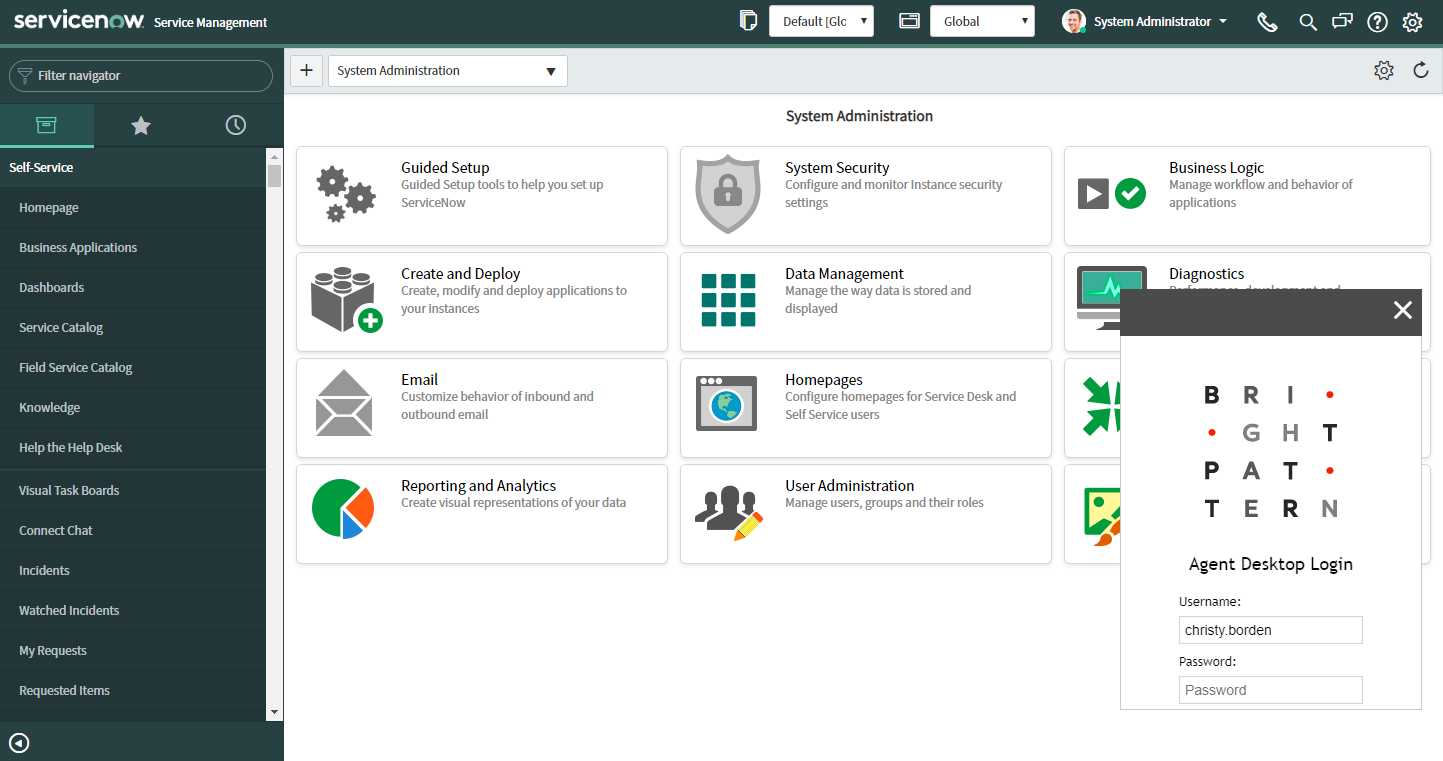
- Notice that your ServiceNow Homepage now displays a phone icon at the top right corner of the screen.
- Click on the phone icon to open the Agent Desktop application widget.
Step 9: Resize the Agent Desktop widget (optional)
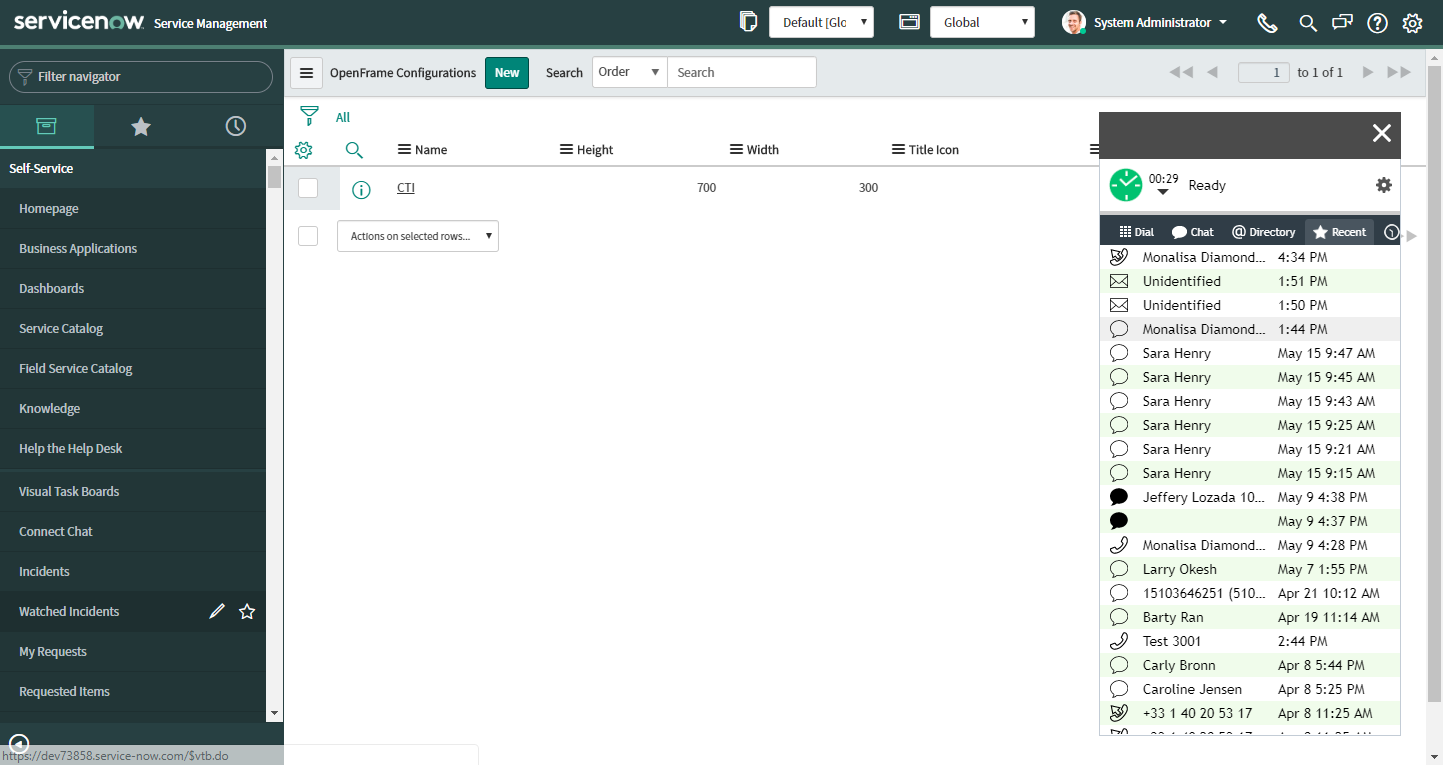
You can change the width and height of the Agent Desktop widget by adjusting ServiceNow’s OpenFrame configuration properties. Access such configuration settings by searching ServiceNow for “openframe” or by going to ServiceNow’s System Properties > OpenFrame.
The default display size in OpenFrame properties is 373 (W) x 300 (H). In the example shown, we have resized the frame to be 300 (W) x 750 (H).
The Agent Desktop widget can be dragged and dropped onto any other part of the webpage.
Step 10: Log in and complete Agent Desktop installation
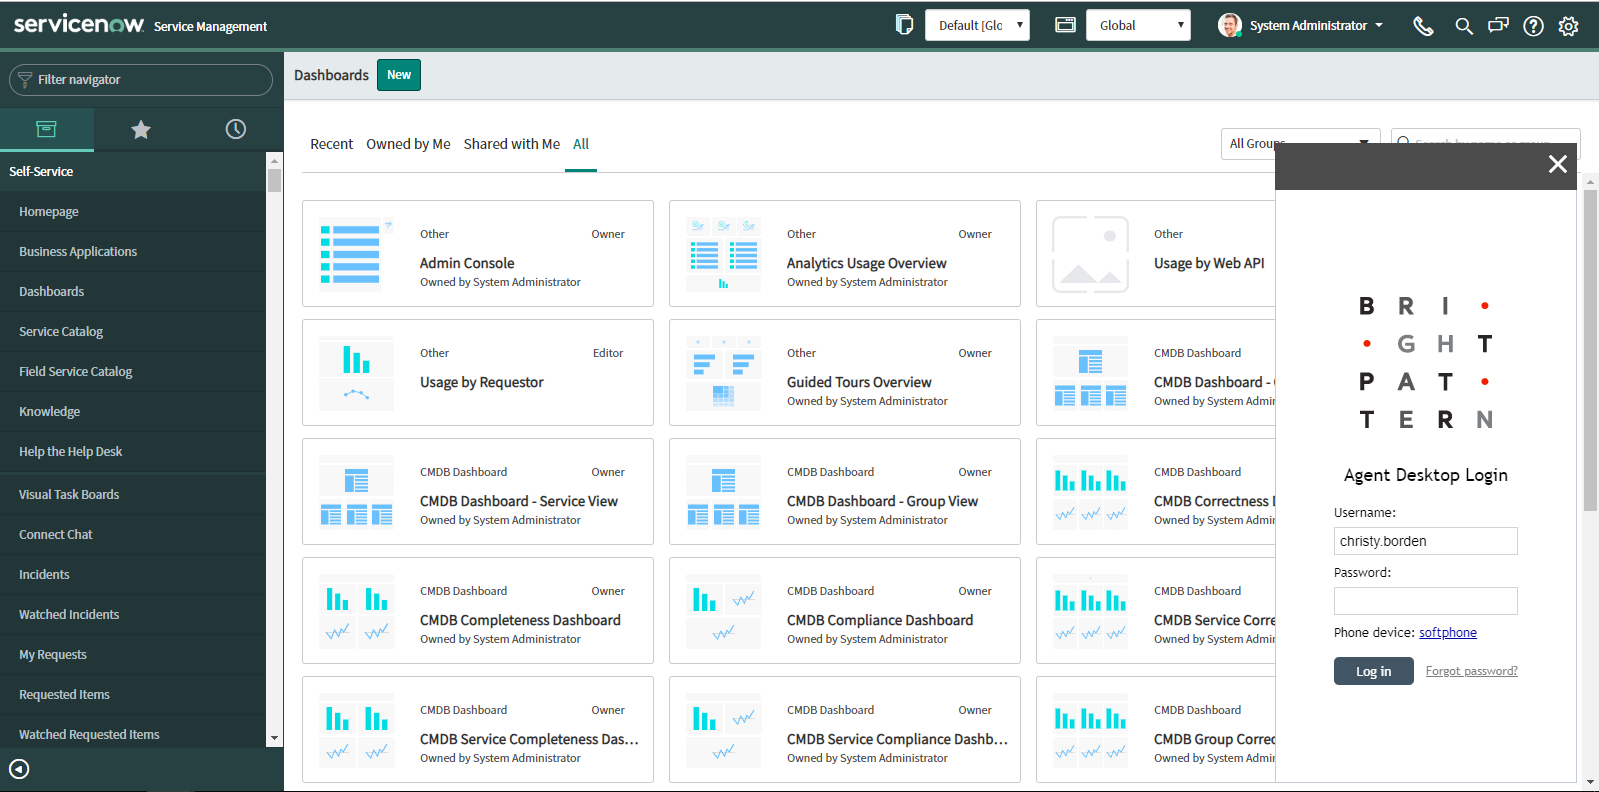
- Sign in to Agent Desktop with your username and password, being sure to select your desired phone device.
- By default, you log in with a softphone. To choose another device, click the current Phone device setting and select the desired type of device from the menu that appears. For more information about the available device options, see the Bright Pattern Contact Center Agent Guide, section Selecting a Phone Device.
- Click the Login button. Note that if this is your first login into Agent Desktop on the given computer, you will be prompted to install the Agent Desktop Helper Application.
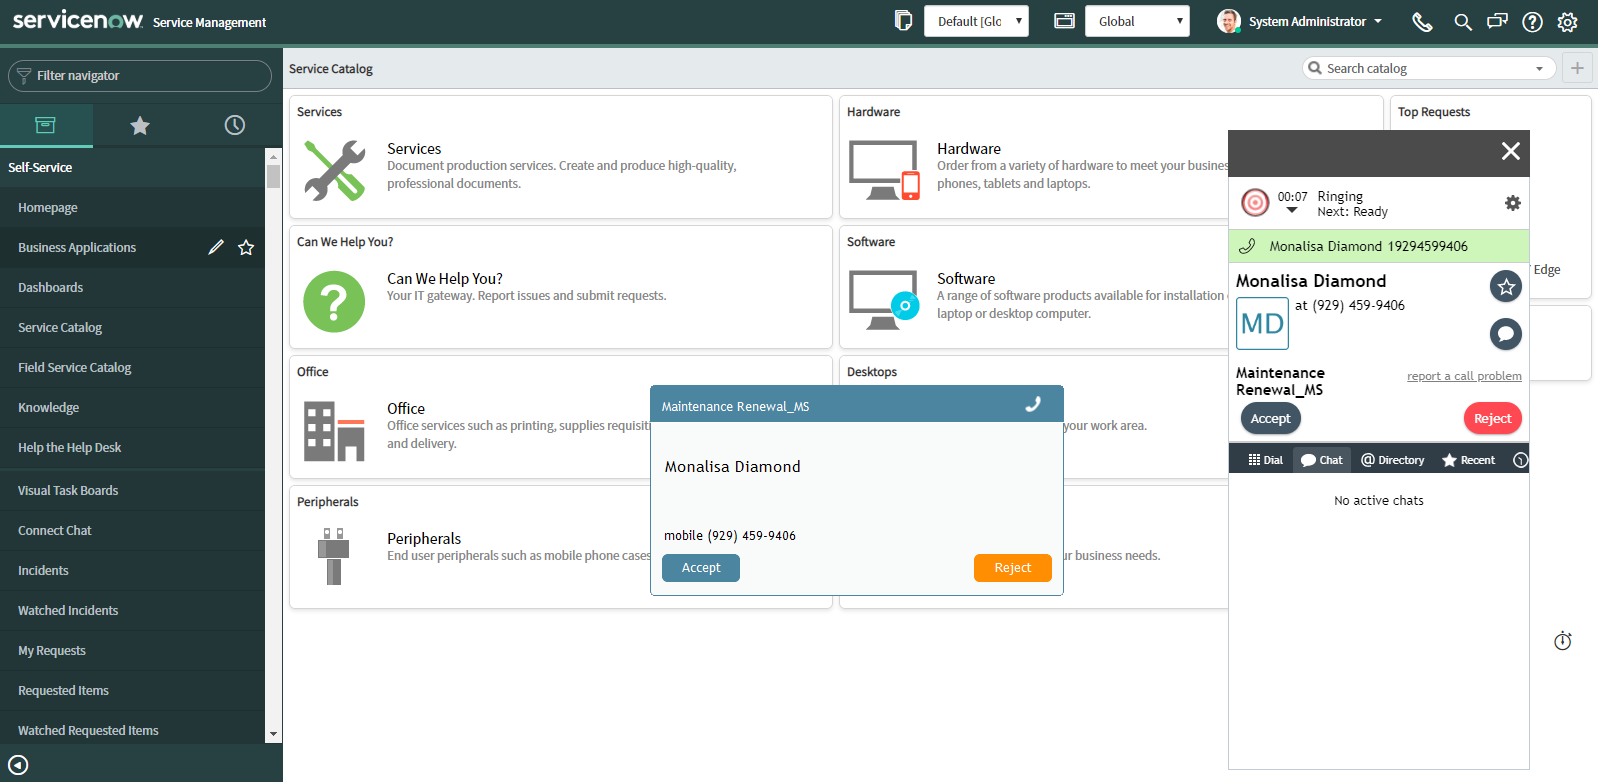
The Bright Pattern Contact Center Agent Desktop widget will now show a standard set of tabs and controls available to a contact center agent.
For more information about the Agent Desktop tabs and controls, see the Agent Guide. Note that the appearance and location of these controls has been modified to match the overall look and feel of the ServiceNow application.
You are now able to accept inbound calls and chats, initiate outbound calls and chats, send messages to other contact center users, and more.


