ServiceNow 統合の設定
ServiceNow統合により、ServiceNowにおいてBright Patternエージェントデスクトップアプリケーションを使うことができ、電話、ライブチャット、SMS、およびその他に設定されたメッセージ送信機能に直接アクセスできます。統合により、エージェントデスクトップアプリケーションはOpenFrameを介してServiceNowに組み込まれており、アクティビティ、ケース、対話の詳細などを最大限に活用するために、別のブラウザタブにエージェントデスクトップをポップアウトするオプションがあります。
ServiceNow統合設定には、ServiceNowの開発者をServiceNow統合アカウントでのBright Pattern コンタクトセンターにリンクすることが含まれます。
このセクションでは、以下のことが説明されています:
- ServiceNowで電話用プラグインの有効化
- OpenFrameの設定
- CORSルールの追加
- ServiceNowへのアクセスの許可
- ServiceNow統合アカウントの作成
- ServiceNowでエージェントデスクトップの画面サイズの調整
手順
この設定を行う際に、ServiceNow Madrid と Bright Patternコンタクトセンター 5.3を使いました。Madridより前のServiceNowが使われている場合、コンタクトセンターの 5.2の手順を参照してください。
ステップ1: servicenow.comで電話通信用のプラグインを有効化します。
ServiceNowドキュメントの 電話の設定へアクセスし、 ステップ5からステップ7までの手順に従って、内部および外部のユーザーとお客様間の電話通信チャネルを確立するプラグインを有効にします。
ステップ詳細は以下の通りです:
- CTIソフトフォンプラグインを有効にすることで、 OpenFrameがソフトフォン機能とコールセンター機能(電話の発信、受信、転送など)を提供できます。
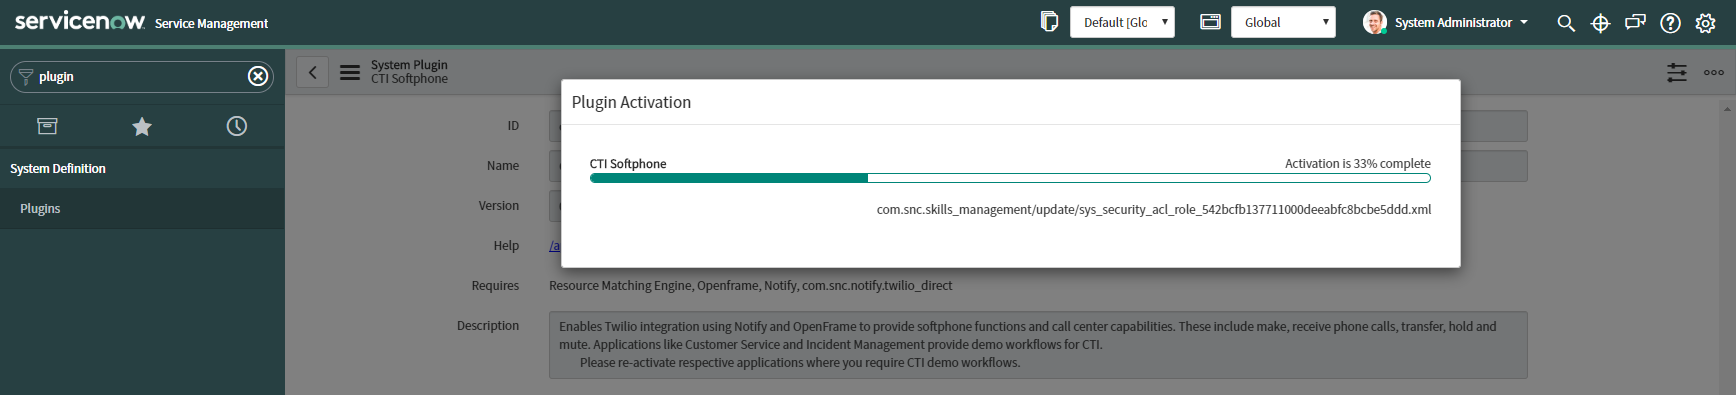
CTIソフトフォンを有効にする - カスタマーサービス管理のデモデータプラグインを有効にする (com.sn_customerservice)ことで、追加のセキュリティを有効にします。
- OpenFrameプラグインを有効にすることで、Bright Pattern エージェントデスクトップなどの外部通信システムがServiceNowと統合されます。
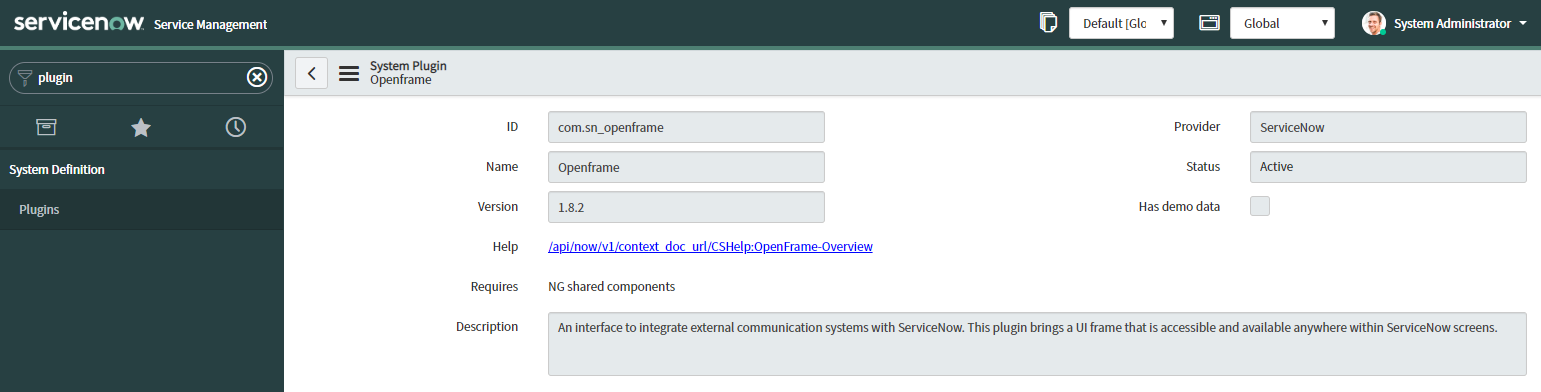
Openframe プラグインを有効にする


ステップ 2: OpenFrame設定URLを置き換えます
- システムプロパティ > OpenFrameへ移動し、 表示されたCTI プラグインをクリックし、OpenFrameプロパティを編集します。
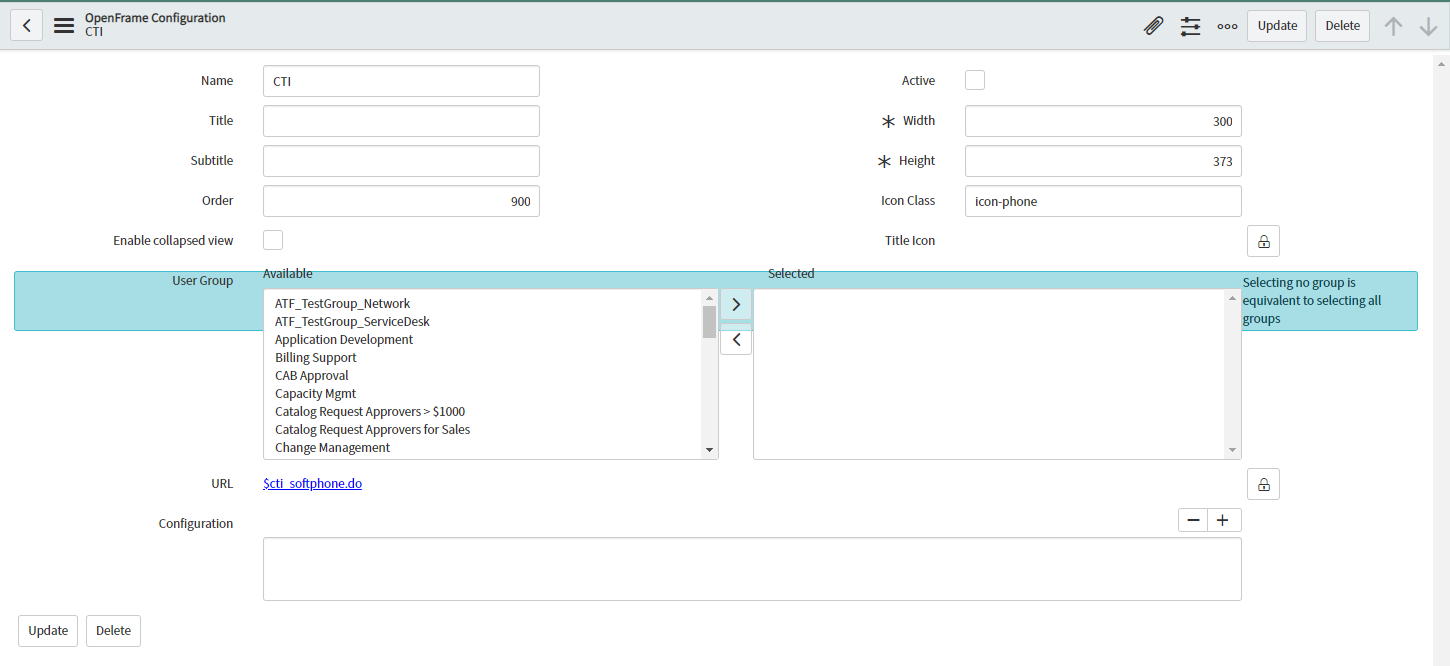
OpenFrame設定プロパティ - ロックアイコンをクリックし、以下のように URLを変更します:
https://<tenant>.brightpattern.com/agentdesktop/ServiceNow.jsp?topDomain=https://<dev_instance>.service-now.com
:
- <tenant>とは、コンタクトセンター名です (例えば、"example.brightpattern.com"の"example"です。)
- <dev_instance>とは、開発者アカウント です (例えば、"dev12345")。
例を挙げますと: https://example.brightpattern.com/agentdesktop/ServiceNow.jsp?topDomain=https://dev12345.service-now.com
- <tenant>とは、コンタクトセンター名です (例えば、"example.brightpattern.com"の"example"です。)
- ロックアイコンをもう一度クリックし、URL変化を保存します。ロックしないと、エージェントデスクトップは後で起動できない場合があります。
- まだ終わっていない場合、OpenFrame プラグインのアクティブをクリックし、前のステップでOpenFrameプラグインが有効になったかどうか確認します。アクティブでない場合、エージェントデスクトップのウィジェットは表示されません。
- 更新をクリックします。


URLには、アクティビティ履歴がServiceNowオブジェクトのアクティビティストリームに掲載されるときのクロスドメインエラーを回避するために、パラメータ"topDomain"が必要です。短縮されたURL "https://<tenant>.brightpattern.com/agentdesktop/ServiceNow.jsp"を使うことができますが、 "topDomain"パラメータを省略すると、アクティビティ履歴機能が無効になります。
ステップ 3: ユーザーがOpenFrameを使用できるように役割を割り当てます。
sn_openframe_user というOpenFrameユーザ役割は、OpenFrameの有効化と同時に追加されます。組み込みのエージェントデスクトップを使用するには、すべてのユーザーアカウントにsn_openframe_user という役割を割り当てる必要があります。特定のユーザー、またはユーザーがメンバーとなっているグループに割り当てることができます。
役割を特定のユーザーに割り当てるには:
- 組織 > ユーザーへ移動し、役割が割り当てられるユーザーの名前をクリックします。
- ユーザーの詳細の一番下にある 役割 の 編集をクリックします。
- フィルターを使って "sn_openframe_user"を検索し、それをユーザー役割リストに追加します。
- 保存をクリックします。
- ご希望のユーザーに対して上記の操作を繰り返します。

役割をグループに割り当てるには:
- ユーザー管理 > グループへ移動し、ご希望のグループ名をクリックします。
- グループの詳細の下にある役割の編集をクリックします。
- フィルターを使って"sn_openframe_user"を探し、それをグループ役割リストに追加します。
- 保存をクリックします。
- この役割が割り当てられたグループにユーザーを追加します。
ステップ 4: CORSルールを追加します。
CORSルールにより、Bright Pattern統合アカウントは、ServiceNowと通信できます。
- ServiceNowのシステムWEBサービス > REST > CORS ルールへ移動し、 新規をクリックします。
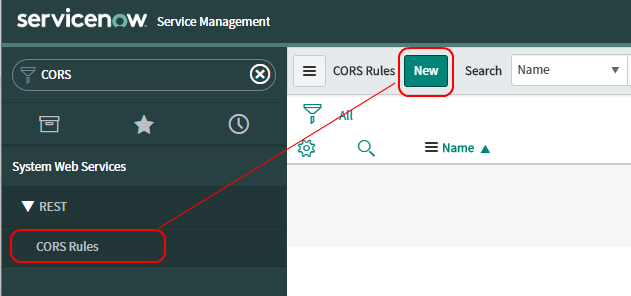
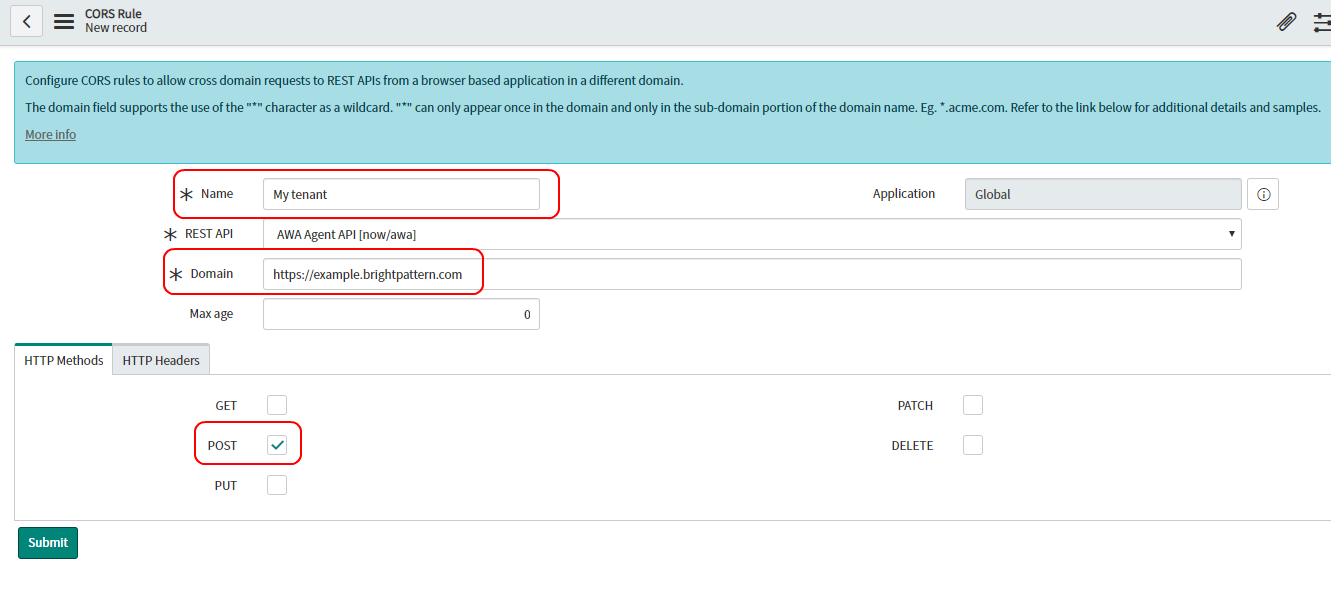
新しいCORSルールの追加 - 名前にユニークな名前を入力します。
- ドメインにhttps://<tenant-name>.brightpattern.comを入力します。その場合、<tenant-name>とは、コンタクトセンターの名前を意味します。
- HTTPメソッドとしてPOSTを選択します。
CORSルールと設定 - HTTPヘッダーとして Access-Control-Allow-Originを設定します。
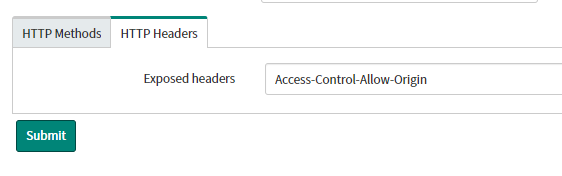
HTTP ヘッダー


ステップ 5: 新しいOAuth 2.0エンドポイントを設定します。
新しいServiceNow統合アカウントを作成するには、まずServiceNowの新しいOAuth 2.0エンドポイントを設定する必要があります。これにより、クライアントIDとクライアントシークレットが付与されます。これらは、ServiceNowアプリケーションへのアクセス認証手続きを行うのに必要です。この手順のステップ7で、ServiceNow統合アカウントのプロパティでクライアントIDとクライアントシークレットを指定します。
ServiceNowの以前のバージョンでは、OAuthの設定が求められる場合があります。 ServiceNowでは、OAuth 2.0の設定をお勧めします。詳しい情報については、ServiceNow OAuth設定書類をご覧ください。
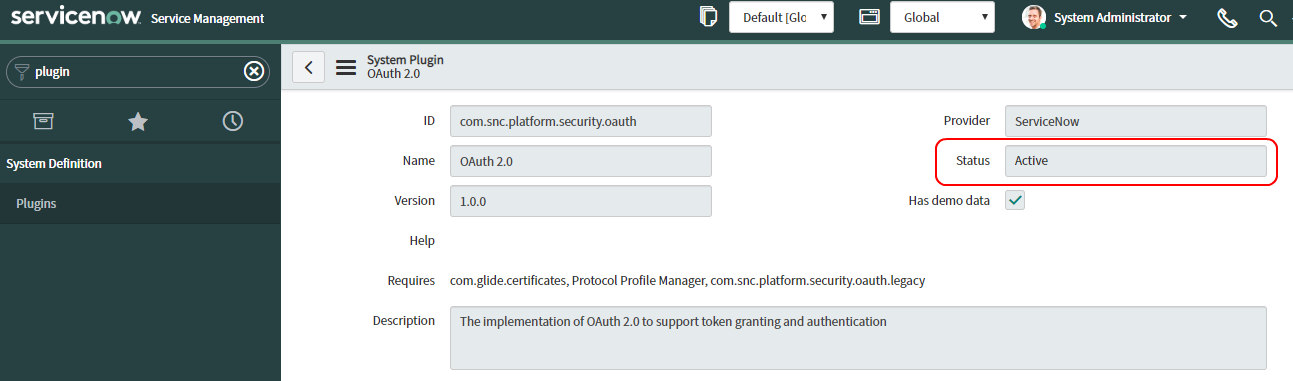
- OAuthプラグインが有効であることを確認します。
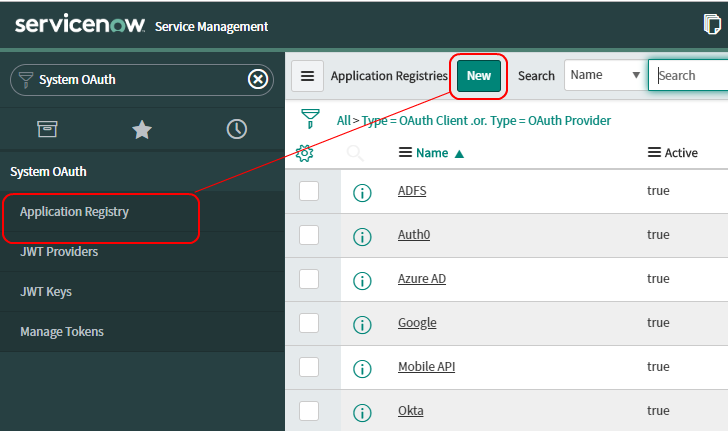
OAuth プラグイン - エンドポイントを作成するには、システムOAuth > アプリケーションレジストリーへ移動し、新規をクリックします。
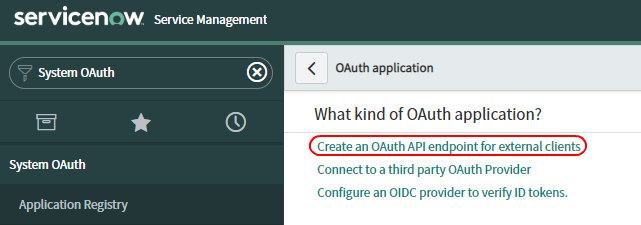
新しいアプリケーションレジストリーの追加 - 外部クライアント専用の OAuth APIエンドポイントの作成をクリックします。
エンドポイントの作成 - レジストリーに名前を付け 保存をクリックします。クライアント IDは自動入力されます。クライアントシークレットは保存時に入力されます。
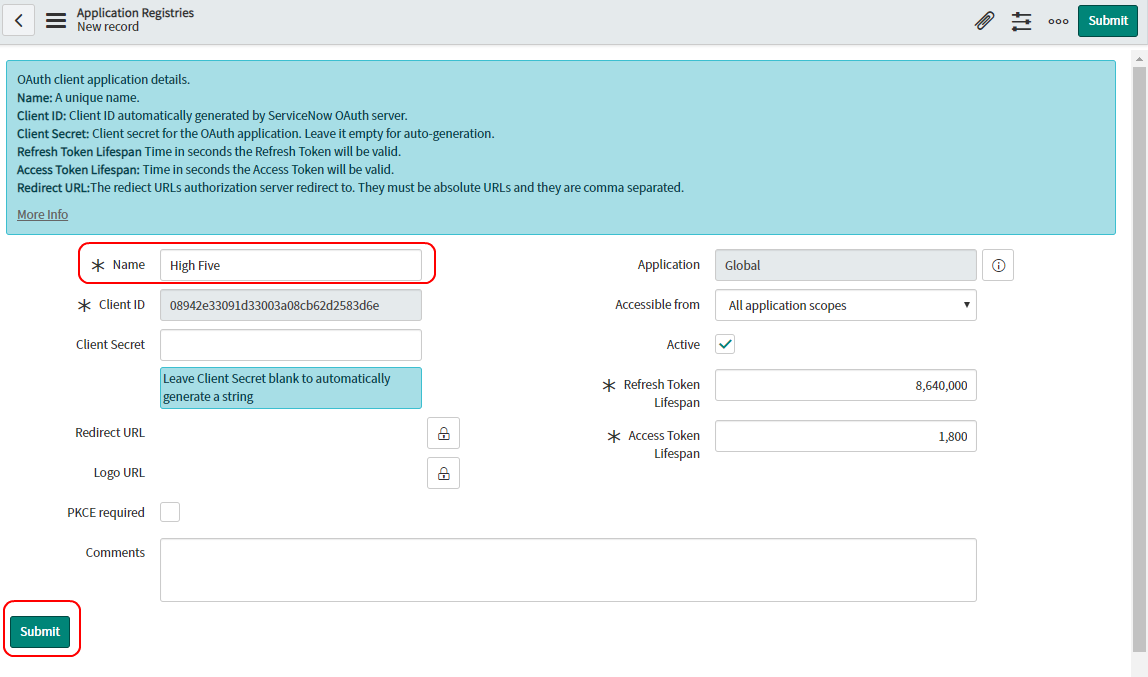
レジストリーに名前を付け保存 - 作成したアプリケーションレジストリーを開くと、クライアントシークレットを表示およびコピーできます。


ステップ 6:新しい統合アカウントを作成します。
- Contact Center 管理者アプリケーションへ管理者としてログインします。そして 設定 > 統合アカウントへ移動します。
- 追加 +ボタンをクリックし、新しいアカウントを追加します。表示される統合アカウントの作成ウィンドウでは、 ServiceNowを選択し、OKwoクリックします。
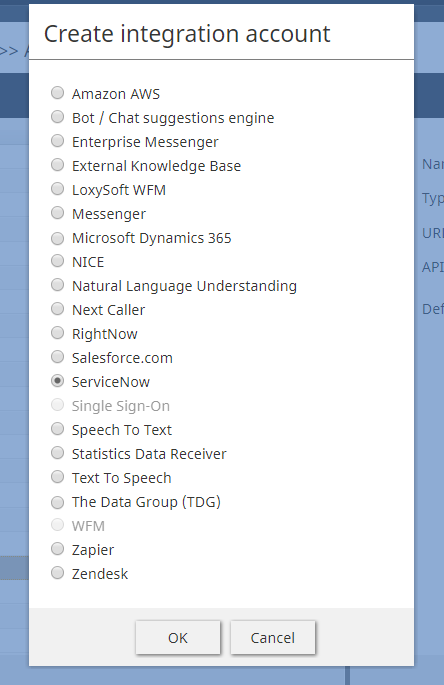
作成する統合アカウントのタイプとして "ServiceNow"を選択します。

ステップ 7: ServiceNow統合アカウントのプロパティを指定します。
ServiceNow開発者インスタンスを初めて要求した時に保存したマイ・インスタンスの認証情報と OAuth設定の認証情報を使って以下のが目のプロパティの値を入力します (認証情報がわからない場合、システム管理者にお問い合わせください)。変更を保存するには、 適用をクリックします。

- タイプ:統合アカウントのタイプです (つまり、この場合はServiceNowです。このタイプのアカウントを追加したため入力されます)。
- 名前:統合アカウントのユニークな名前です。
- 既定のアカウント:このServiceNow統合アカウントを既定のアカウントとして使用する場合は、このチェックボックスを選択します。
- URL:インスタンスのユニークなURLです (例: "https://dev73456.service-now.com")
- クライアント ID:クライアント ID (文字列) は、アプリケーションの自動生成されたユニークなIDです (例: "08942j33191d72005a08cb62d2583d6e")。インスタンスは、アクセストークンを要求するときにクライアントIDを使います。この手順通りにOAuthエンドポイントを設定するときに、クライアントIDが取得されます。
- クライアントシークレット: クライアントシークレットは、インスタンスとアプリケーションの両方が相互の通信を許可するために使う共有シークレット文字列です。インスタンスは、アクセストークンを要求するときにクライアントシークレットを使用します。この手順通りにOAuthエンドポイントを設定するときに、クライアントシークレットが取得されます。
- 更新トークンの要求:このボタンは更新トークンを要求します。開いたダイアログで、ServiceNowインスタンスのユーザー名とパスワードを入力します。
- 接続のテスト:このボタンは、接続の有効性をテストします。接続に問題がなければ、 “接続は有効です “というメッセージが表示されます。
変更を保存するには、適用をクリックします。
ステップ 8: ServiceNowで新しく統合されたアカウントを認証します。
- 別のブラウザーウィンドウまたはタブを開いて、 ServiceNow 開発者サイトへ移動し、開発者インスタンスへサインインします。
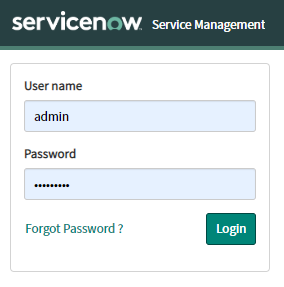
ServiceNow 開発者のサインイン - ServiceNowホームページ画面の右上に電話アイコンが配置されています。

ServiceNow ホームページから電話発信が可能です - 電話アイコンをクリックしエージェントデスクトップアプリケーションウィジェットを開きます。
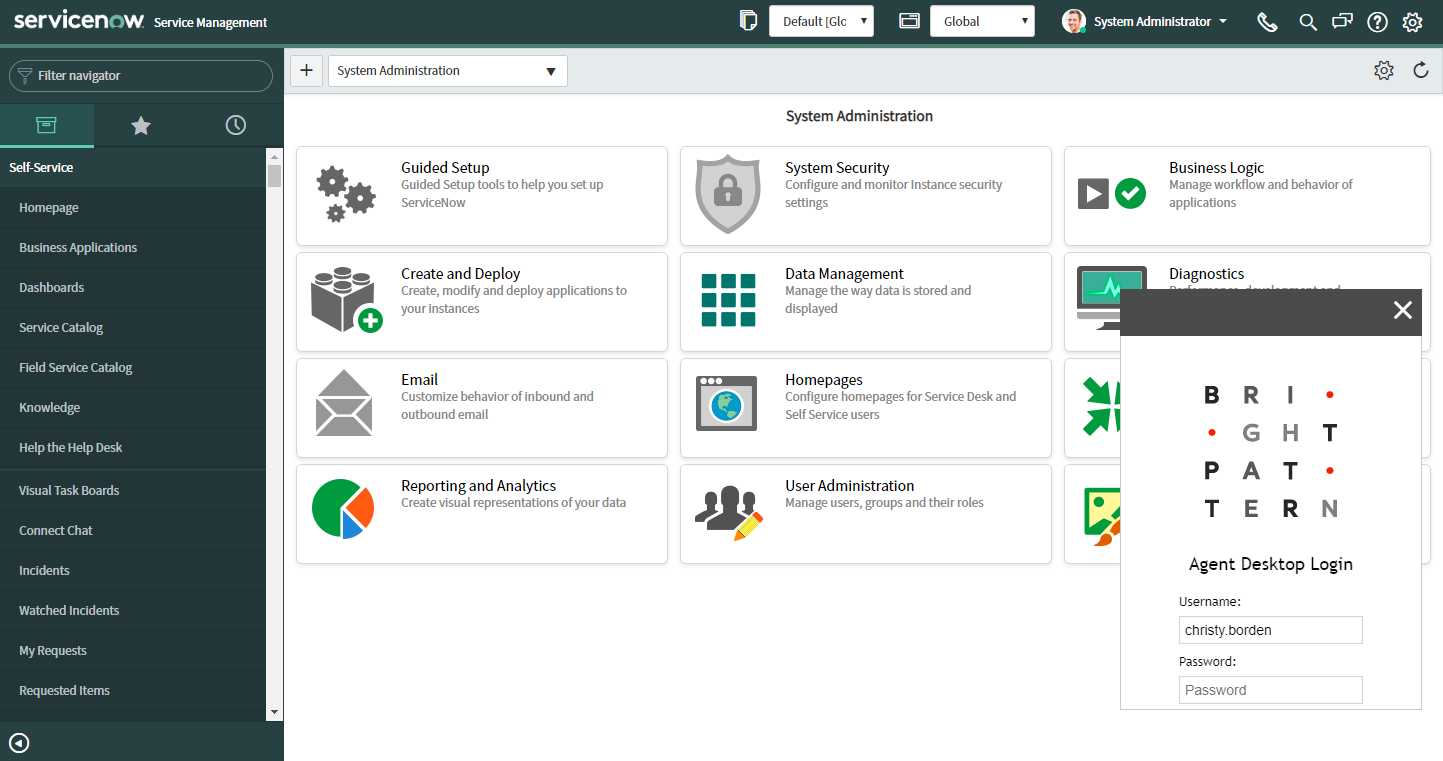
統合ウィジェットからエージェントデスクトップにログイン


ステップ 9: エージェントデスクトップのウィジェットのサイズを変更します (オプション) 。
ServiceNowのOpenFrame設定プロパティを調整することにより、エージェントデスクトップのウィジェットの幅と高さを変更できます。このような設定にアクセスするには、ServiceNowで“openframe“を検索するか、ServiceNowの“システムプロパティ“> “OpenFrame“に移動します。
OpenFrameプロパティ上で設定された既定のサイズは、373(W)x 300(H)です。示されている例では、フレームのサイズは300(W)x 750(H)に変更されています。

エージェントデスクトップのウィジェットは、Webページの範囲内にドラッグアンドドロップできます。
ステップ 10: ログインし、エージェントデスクトップの設定を完了します。
- ご希望の電話デバイスを選択した上、ユーザー名とパスワードを使ってエージェントデスクトップにサインインします。
- 初期設定上、 ソフトフォンを使ってログインします。 別のデバイスを選択するには、現在の電話デバイス設定をクリックし、表示されるメニューからご希望のデバイスを選択します。利用可能なデバイスオプションの詳細については、 Bright Patternコンタクトセンターのエージェントガイドの電話デバイスの選択をご覧ください。
- ログイン ボタンをクリックします。パソコンでエージェントデスクトップに初めてログインする場合は、エージェントデスクトップヘルパーアプリケーションをインストールしなければなりません。
Bright Patternコンタクトセンターエージェントデスクトップウィジェットに、コンタクトセンターエージェントが使用できるタブとコントロールの標準セットが表示されます。

エージェントデスクトップのタブとコントロールに関する詳しい情報は、エージェントガイドをご覧ください。これらのコントロールの外観と配置場所は、ServiceNowアプリケーション全体の外観に合わせて変更されています。
受信コールとチャットの受け入れ、発信コールとチャットの開始、他のコンタクトセンターユーザーへのメッセージ送信などができるようになりました。

For more information about the Agent Desktop tabs and controls, see the Agent Guide. Note that the appearance and location of these controls has been modified to match the overall look and feel of the ServiceNow application.
You are now able to accept inbound calls and chats, initiate outbound calls and chats, send messages to other contact center users, and more. The integrated Agent Desktop widget will save activity history for all interactions handled via the widget in your ServiceNow environment.