(Created page with "= 対話型IVRの設定方法 = この記事では、受信音声サービスの対話型IVRを設定する方法について説明します。 Bright Patternの対話型IVR...") |
|||
| (28 intermediate revisions by the same user not shown) | |||
| Line 2: | Line 2: | ||
この記事では、受信音声サービスの対話型IVRを設定する方法について説明します。 Bright Patternの対話型IVRはボットのフロントエンドであるため、ほとんどの設定は、Bright Pattern外、即ちボット側で(つまり、ワークスペースのGoogle、GoVivace、またはIBMを介して)行われます。この手順は、サービスプロバイダーを通じてSTTおよびTTSエンジンを設定した後のステップについて説明します。 | この記事では、受信音声サービスの対話型IVRを設定する方法について説明します。 Bright Patternの対話型IVRはボットのフロントエンドであるため、ほとんどの設定は、Bright Pattern外、即ちボット側で(つまり、ワークスペースのGoogle、GoVivace、またはIBMを介して)行われます。この手順は、サービスプロバイダーを通じてSTTおよびTTSエンジンを設定した後のステップについて説明します。 | ||
| − | + | 詳しい情報については、''コンタクトセンター管理者ガイド''の [[Contact-center-administrator-guide/Concepts/ConversationalIVR | 対話型 IVRとは]]をご覧ください。 | |
| − | == | + | == 設定条件 == |
| − | + | 先に進む前に以下のステップを完了してください: | |
| − | * | + | * [[Tutorials-for-admins/HowtoCreateWatsonAssistant#How_to_Create_a_Watson_Assistant | Watson Assistant]], Alterra Answerボット, [[Tutorials-for-admins/AI/HowtoCreateAmazonLexBot | Amazon Lexボット]]の作成。 |
| − | * | + | *[[Contact-center-administrator-guide/IntegrationAccounts/BotChatSuggestionsEngine | ボット/チャットサジェスト機能エンジン統合アカウント]]の追加。 |
| − | * | + | * 対話型 IVRシナリオテンプレート: [[File:App_Conversational_IVR_Example.zip]]のダウンロードと[[Contact-center-administrator-guide/ScenariosOverview | インポート]]。 |
| − | == | + | == 手順 == |
| − | === | + | === ステップ 1: ご利用のサービスプロバイダーを通じて音声認識エンジンを設定します。 === |
| − | * ''' | + | * '''IBM Watsonをご利用の場合:''' IBM Cloudで音声認識をサービスとして追加します。 |
| − | * ''' | + | * '''Googleをご利用の場合:''' Google Cloud Speech APIを有効にします。 |
| − | * ''' | + | * '''GoVivaceをご利用の場合:''' 音声認識APIを有効にします。 |
| − | === | + | === ステップ 2: 音声認識統合アカウントを追加します。 === |
| − | + | 音声認識統合アカウントは、認証情報を使って、Bright Patternコンタクトセンターを第三者のSTTエンジンに接続します。統合アカウントは、コンタクトセンター管理者アプリケーションで設定されます。 | |
| − | # | + | # ''コンタクトセンター管理者アプリケーション > コールセンター設定 >統合アカウント''で、新しい'''音声認識'''統合アカウントを追加します。 プロパティ詳細については、 ''コンタクトセンター管理者ガイド''の [[Contact-center-administrator-guide/IntegrationAccounts/SpeechToText | 音声認識統合 (STT)]]をご覧ください。<br /><br /> |
| − | # | + | # 新しい統合アカウントを追加しても、音声認識がオプションとして表示されないことは、このオプションはコンタクトセンターで有効になっていないことを意味します。詳しい情報については、ご利用のサービスプロバイダーへお問い合わせください。 |
| − | === | + | === ステップ 3: ご利用のサービスプロバイダーを通じて音声合成エンジンを設定します。 === |
| − | * ''' | + | * '''IBM Watsonをご利用の場合:'''IBM Cloudで音声合成をサービスとして追加します。 |
| − | * ''' | + | * '''Googleをご利用の場合:''' Google Cloud Speech APIを有効にします。 |
| − | === | + | === ステップ 4: 音声合成統合アカウントを追加します。 === |
| − | + | 音声合成統合アカウントも、認証情報を使って、Bright Patternコンタクトセンターを第三者のSTTエンジンに接続します。TTS統合により、サポートされている多数の言語で音声プロンプトを作成して、ボットの応答を自動化できます。 | |
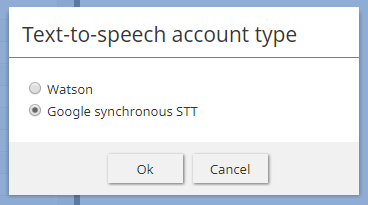
| − | # | + | # ''コンタクトセンター管理者アプリケーション > コールセンター設定 >統合アカウント''で、新しい'''音声合成'''統合アカウントを追加します。 プロパティ詳細については、 ''コンタクトセンター管理者ガイド''の [[Contact-center-administrator-guide/IntegrationAccounts/TextToSpeech | 音声合成統合 (TTS)]]をご覧ください。<br /><br />[[File:Google-TTS-4.PNG|800px|thumb|center| TTS 統合アカウントのタイプを選択します。]]<br /><br /> |
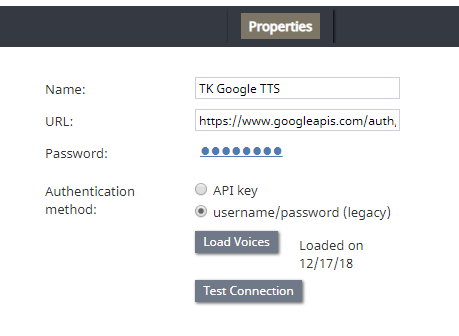
| − | # | + | # '''音声読み上げ''' プロパティをご覧ください。Google TTS統合アカウントの場合、音声読み上げはGoogleで追加ステップを完了した上で行われます。 [[Tutorials-for-admins/Voice/LoadVoicesGoogleTTS | Google Cloud 音声合成 APIからの音声読み上げ方法I]]をご覧ください。<br /><br /><br /><br />[[File:TTS1-53.PNG|800px|thumb|center|Google TTS統合アカウントプロパティ]]<br /><br /> |
| − | # | + | # 次に、'''音声読み上げ'''をクリックします。読み上げに数分がかかる場合があります。読み上げ完了後、読み上げの日を含むメッセージが表示されます: “XX/XX/XX読み上げ済み”<br /><br /> |
| − | # | + | # '''適用'''をクリックします。 |
| − | === | + | === ステップ 5: 再生シナリオブロックおよび ボットシナリオブロックを含む音声シナリオを追加します。 === |
| − | + | [[Scenario-builder-reference-guide/PlayListen | 再生]] シナリオブロックは、対話型IVRの重要な部分です。このブロックは、発信者に対して音声プロンプトを再生し、発信者の応答を聞くために設定した統合TTSおよびSTTアカウントを使用します。 | |
| − | [[Scenario-builder-reference-guide/ChatBotSelectAccount | | + | [[Scenario-builder-reference-guide/ChatBotSelectAccount | チャットボット選択アカウント]] と [[Scenario-builder-reference-guide/AskaBot | Ask a Bot]]ブロックでは、発信者との対話に使う統合ボットを選択できます。 |
| − | # | + | # コンタクトセンター管理者アプリケーションの''シナリオ> 音声''へ進み 、対話型IVRnoシナリオテンプレートを[[Contact-center-administrator-guide/ScenariosOverview | インポート]] します: [[File:App_Conversational_IVR_Example.zip]].<br /><br /> |
| − | # | + | # シナリオ作成エクササイズ、[[Scenario-builder-reference-guide/ConversationalIVRScenario | シナリオで対話型l IVRの使用方法]]に取り組みます。<br /><br /> |
| − | # | + | # ニーズに合わせてシナリオを変更します。必ずシナリオブロックで正しいボットとSTTアカウントを選択してください。 |
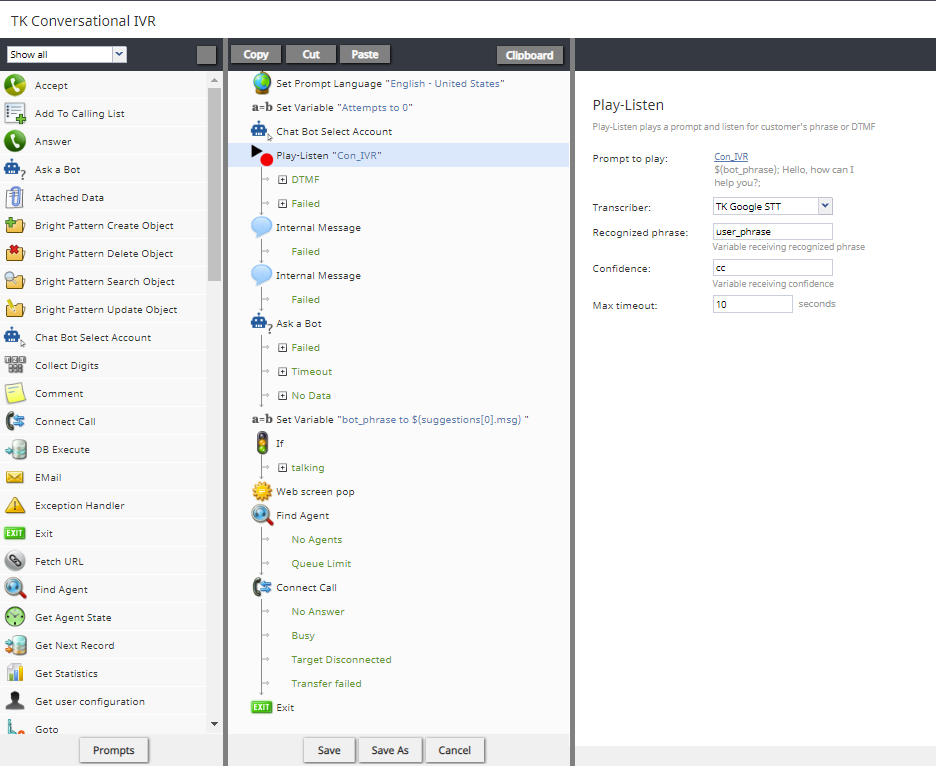
| − | [[File:ConIVR-Example-53.PNG|800px|thumb|center| | + | [[File:ConIVR-Example-53.PNG|800px|thumb|center|対話型 IVRのシナリオ例]] |
| − | === | + | === ステップ 6: シナリオエントリーを追加または選択します。 === |
| − | + | シナリオエントリーは、発信者のエントリポイントです。詳しい情報については、コンタクトセンター管理者ガイドの[[Contact-center-administrator-guide/ScenarioEntriesOverview | シナリオエントリー概要]]をご覧ください。 | |
| − | # | + | #''シナリオエントリー> ダイヤルイン'' へ進み、新しいシナリオエントリーを追加します。<br /><br /> |
| − | # | + | # 先ず追加するのは、 '''名前''', '''シナリオ''', '''サービス''', '''内部番号''', '''外部番号''', '''コールの文字起こし'''です (STTアカウントが設定されていない場合、グレー色で表示されます)。<br /><br /> |
| − | # | + | # '''適用'''をクリックします。<br /><br /> |
| − | === | + | === 設定完了 === |
| − | + | これで対話型IVR設定が完了しました。次に、コンタクトセンターのアクセス番号に電話をかけ、IVRとボットとやり取りを行ってみます。いつでもシナリオやエントリポイントに戻って、再度編集することができます。 | |
| − | == | + | == 参考書 == |
| − | + | 受信音声設定、ボット、統合、シナリオの詳細については、Bright Patternの次のチュートリアルをご覧ください。 | |
| − | * [[Tutorials-for-admins/Services/InboundVoiceServiceConfiguration | | + | * [[Tutorials-for-admins/Services/InboundVoiceServiceConfiguration | 受信音声サービス設定]] |
| − | * [[Tutorials-for-admins/AI/Overview | | + | * [[Tutorials-for-admins/AI/Overview | AIとボットのチュートリアル]] |
| − | * [[Contact-center-administrator-guide/IntegrationAccounts | | + | * [[Contact-center-administrator-guide/IntegrationAccounts | 統合アカウント]] |
| − | * [[Scenario-builder-reference-guide/ScenarioBuilderBasics | | + | * [[Scenario-builder-reference-guide/ScenarioBuilderBasics | シナリオビルダーの基本]] |
| − | * [[Scenario-builder-reference-guide/ConversationalIVRScenario | | + | * [[Scenario-builder-reference-guide/ConversationalIVRScenario | シナリオで対話型IVRの使用方法]] |
Latest revision as of 19:38, 6 April 2020
対話型IVRの設定方法
この記事では、受信音声サービスの対話型IVRを設定する方法について説明します。 Bright Patternの対話型IVRはボットのフロントエンドであるため、ほとんどの設定は、Bright Pattern外、即ちボット側で(つまり、ワークスペースのGoogle、GoVivace、またはIBMを介して)行われます。この手順は、サービスプロバイダーを通じてSTTおよびTTSエンジンを設定した後のステップについて説明します。
詳しい情報については、コンタクトセンター管理者ガイドの 対話型 IVRとはをご覧ください。
設定条件
先に進む前に以下のステップを完了してください:
- Watson Assistant, Alterra Answerボット, Amazon Lexボットの作成。
- 対話型 IVRシナリオテンプレート: File:App Conversational IVR Example.zipのダウンロードと インポート。
手順
ステップ 1: ご利用のサービスプロバイダーを通じて音声認識エンジンを設定します。
- IBM Watsonをご利用の場合: IBM Cloudで音声認識をサービスとして追加します。
- Googleをご利用の場合: Google Cloud Speech APIを有効にします。
- GoVivaceをご利用の場合: 音声認識APIを有効にします。
ステップ 2: 音声認識統合アカウントを追加します。
音声認識統合アカウントは、認証情報を使って、Bright Patternコンタクトセンターを第三者のSTTエンジンに接続します。統合アカウントは、コンタクトセンター管理者アプリケーションで設定されます。
- コンタクトセンター管理者アプリケーション > コールセンター設定 >統合アカウントで、新しい音声認識統合アカウントを追加します。 プロパティ詳細については、 コンタクトセンター管理者ガイドの 音声認識統合 (STT)をご覧ください。
- 新しい統合アカウントを追加しても、音声認識がオプションとして表示されないことは、このオプションはコンタクトセンターで有効になっていないことを意味します。詳しい情報については、ご利用のサービスプロバイダーへお問い合わせください。
ステップ 3: ご利用のサービスプロバイダーを通じて音声合成エンジンを設定します。
- IBM Watsonをご利用の場合:IBM Cloudで音声合成をサービスとして追加します。
- Googleをご利用の場合: Google Cloud Speech APIを有効にします。
ステップ 4: 音声合成統合アカウントを追加します。
音声合成統合アカウントも、認証情報を使って、Bright Patternコンタクトセンターを第三者のSTTエンジンに接続します。TTS統合により、サポートされている多数の言語で音声プロンプトを作成して、ボットの応答を自動化できます。
- コンタクトセンター管理者アプリケーション > コールセンター設定 >統合アカウントで、新しい音声合成統合アカウントを追加します。 プロパティ詳細については、 コンタクトセンター管理者ガイドの 音声合成統合 (TTS)をご覧ください。
- 音声読み上げ プロパティをご覧ください。Google TTS統合アカウントの場合、音声読み上げはGoogleで追加ステップを完了した上で行われます。 Google Cloud 音声合成 APIからの音声読み上げ方法Iをご覧ください。
- 次に、音声読み上げをクリックします。読み上げに数分がかかる場合があります。読み上げ完了後、読み上げの日を含むメッセージが表示されます: “XX/XX/XX読み上げ済み”
- 適用をクリックします。
ステップ 5: 再生シナリオブロックおよび ボットシナリオブロックを含む音声シナリオを追加します。
再生 シナリオブロックは、対話型IVRの重要な部分です。このブロックは、発信者に対して音声プロンプトを再生し、発信者の応答を聞くために設定した統合TTSおよびSTTアカウントを使用します。
チャットボット選択アカウント と Ask a Botブロックでは、発信者との対話に使う統合ボットを選択できます。
- コンタクトセンター管理者アプリケーションのシナリオ> 音声へ進み 、対話型IVRnoシナリオテンプレートを インポート します: File:App Conversational IVR Example.zip.
- シナリオ作成エクササイズ、 シナリオで対話型l IVRの使用方法に取り組みます。
- ニーズに合わせてシナリオを変更します。必ずシナリオブロックで正しいボットとSTTアカウントを選択してください。
ステップ 6: シナリオエントリーを追加または選択します。
シナリオエントリーは、発信者のエントリポイントです。詳しい情報については、コンタクトセンター管理者ガイドの シナリオエントリー概要をご覧ください。
- シナリオエントリー> ダイヤルイン へ進み、新しいシナリオエントリーを追加します。
- 先ず追加するのは、 名前, シナリオ, サービス, 内部番号, 外部番号, コールの文字起こしです (STTアカウントが設定されていない場合、グレー色で表示されます)。
- 適用をクリックします。
設定完了
これで対話型IVR設定が完了しました。次に、コンタクトセンターのアクセス番号に電話をかけ、IVRとボットとやり取りを行ってみます。いつでもシナリオやエントリポイントに戻って、再度編集することができます。
参考書
受信音声設定、ボット、統合、シナリオの詳細については、Bright Patternの次のチュートリアルをご覧ください。


