(Created page with "== 手順 == === ステップ 1: 検索可能なフィールドを含むコールリストを作成します。 === 先ず、コールリストを作成し、Contact-center-...") |
(Created page with "650px") |
||
| (14 intermediate revisions by the same user not shown) | |||
| Line 14: | Line 14: | ||
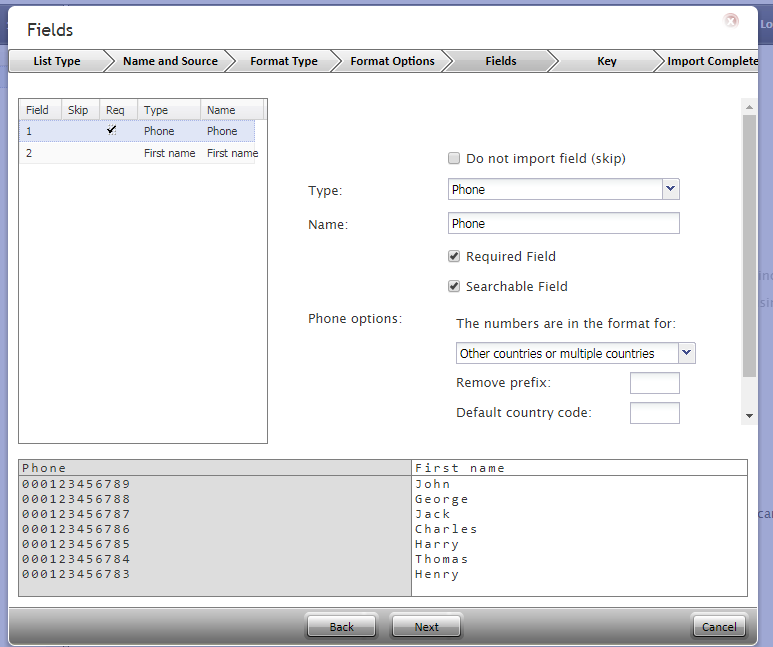
| − | [[File:02-Calling-List-Searchable-Fields-53.png|650px|thumb|center| | + | [[File:02-Calling-List-Searchable-Fields-53.png|650px|thumb|center|該当するフィールドを "検索可能"としてマークします。]] |
| − | === | + | === ステップ 2: コールリストをキャンペーンに関連づけます。 === |
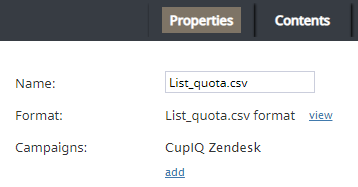
| − | + | コールリストを作成した後、それを[[Contact-center-administrator-guide/ServicesandCampaignsOverview|キャンペーン]]に関連付ける必要があります。それは、リストのセクションで''キャンペーン''の'''追加''' をクリックして実行できます。 | |
| − | [[File:Calling-List-Connect-to-a-Campaign-53.PNG|650px|thumb|center| | + | [[File:Calling-List-Connect-to-a-Campaign-53.PNG|650px|thumb|center|キャンペーンと関連づけられたコールリスト]] |
| − | === | + | === ステップ 3: カスタムのアクティビティ履歴フィールドを作成します。 === |
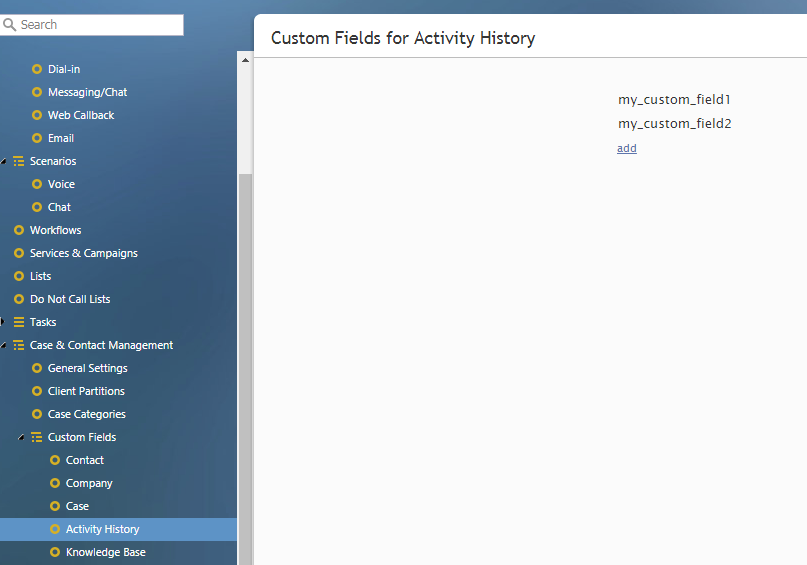
| − | + | 次に、カスタムのアクティビティ履歴フィールドを作成しなければなりません。これは、 [[Contact-center-administrator-guide/CustomFields#Activity_History|カスタムフィールド >アクティビティ履歴]]で実行します。 '''ご注意''': カスタムフィールドを設定するときは、これらのフィールドを [[Contact-center-administrator-guide/CustomFields#Searchable_4|検索可能]]としてマークしなければなりません。そうしないと、検索結果に表示されません。 | |
| − | [[File:03-Custom-Fields-Activity-History-53.png|650px|thumb|center| | + | [[File:03-Custom-Fields-Activity-History-53.png|650px|thumb|center|カスタムのアクティビティ履歴フィールドを作成します。]] |
| − | === | + | === ステップ 4: カスタムアクティビティ履歴フィールドを含むアクティビティフォームを作成します。 === |
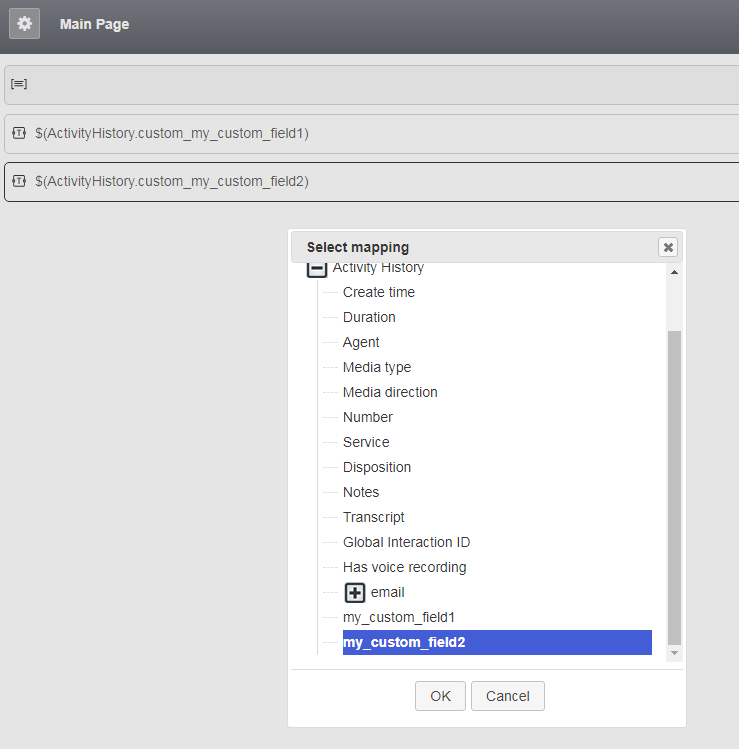
| − | + | 次に、カスタムアクティビティ履歴フィールドを含む[[Contact-center-administrator-guide/ActivityForms|アクティビティフォーム]] を作成します。これを行うには、[[Form-builder-reference-guide/Text#Data_field|データフィールド]] 設定オプション (例えば、 [[Form-builder-reference-guide/Text|テキスト]], [[Form-builder-reference-guide/PhoneNumber|電話番号]], [[Form-builder-reference-guide/Checkbox|チェックボックス]]など)を含むフォームにコントロールを追加します。データフィールドから、カスタムアクティビティ履歴フィールドを選択できます。このアクションを実行すると、カスタムアクティビティ履歴フィールドが、エージェントが操作するアクティビティフォームフィールドにマップされます。 | |
| − | [[File:04-Custom-Fields-Activity-History-in-Activity-Form-53.png|650px|thumb|center| | + | [[File:04-Custom-Fields-Activity-History-in-Activity-Form-53.png|650px|thumb|center|カスタムアクティビティ履歴フィールドをフォームに追加します。]] |
| − | === | + | === ステップ 5: 検索グリッドの列を指定します。 === |
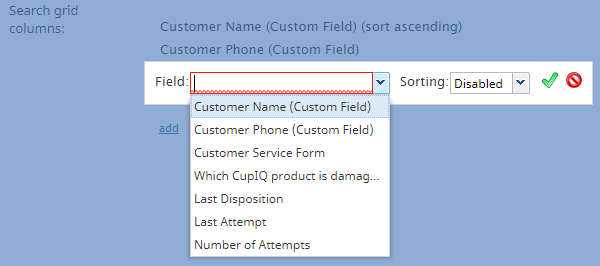
| − | + | [[Contact-center-administrator-guide/ActivityForms|フォーム > アクティビティ]]へ戻り、[[Contact-center-administrator-guide/ActivityForms#Search_grid_columns|"検索グリッドの列"]]を設定しなければなりません。この設定では、アクティビティフォームがポップされたときに検索できるアクティビティフォームフィールドを指定します。さらに、検索結果の表示方法(昇順、降順など)を選択できます。 | |
| − | [[File:Search-Grid-Columns-53.PNG|650px|thumb|center| | + | [[File:Search-Grid-Columns-53.PNG|650px|thumb|center|"検索グリッドの列"の設定]] |
| − | === | + | === ステップ 6: アクティビティフォームのスクリーンポップを有効にします。 === |
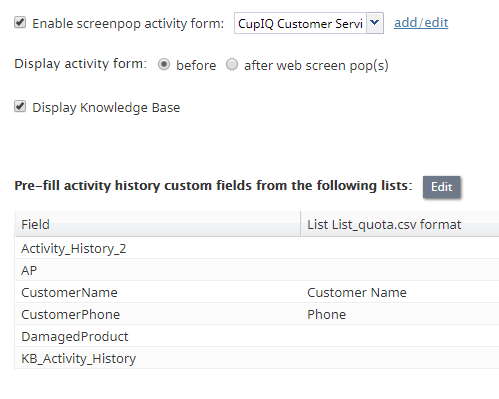
| − | + | [[Contact-center-administrator-guide/ActivityTab|サービス & キャンペーン >アクティビティタブ]]では、[[Contact-center-administrator-guide/ActivityTab#Enable_screenpop_activity_form|"スクリーンポップアクティビティフォームの有効化"]]の設定をしなければなりません。'''追加/編集'''ボタンをクリックし、作成されたアクティビティフォームを選択できます。この設定により、作成したフォームを、対話中にエージェントにポップすることができます。 | |
| − | + | アクティビティ フォームがエージェントにポップするために、このキャンペーンに関連付けられた[[Contact-center-administrator-guide/Voice|音声シナリオ]]には、[[Scenario-builder-reference-guide/WebScreenPop|ウェブスクリーンポップ]]が含まれます。 | |
| − | [[File:06-Enable-Screenpop-Form-53.PNG|650px|thumb|center| | + | [[File:06-Enable-Screenpop-Form-53.PNG|650px|thumb|center|アクティビティフォームのスクリーンポップを有効にします。]] |
| − | === | + | === ステップ 7: カスタムアクティビティ履歴フィールドをコールリストフィールドにマップします。 === |
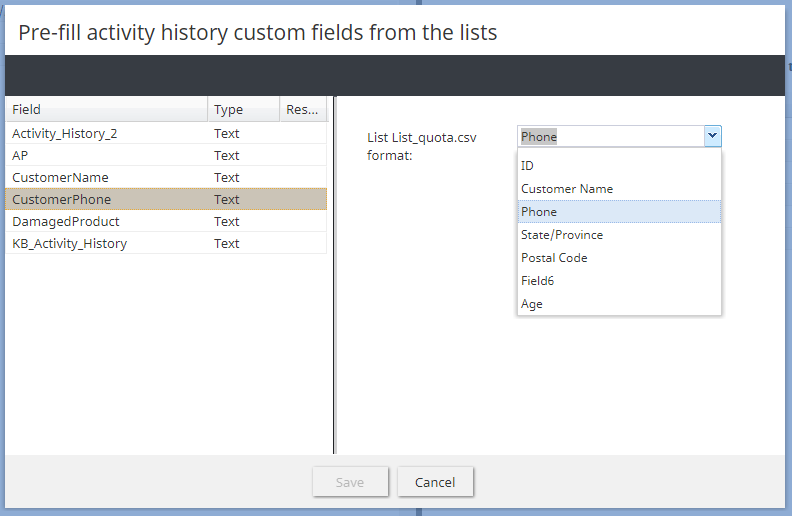
| − | + | コールリストフィールドをカスタムアクティビティ履歴フィールドに関連づけるという最後のステップは一番重要です。[[Contact-center-administrator-guide/ActivityTab#Pre-fill_form_fields_from_the_following_lists|"次のリストのアクティビティ履歴カスタムフィールドを事前入力する"]]という設定をしなければなりません([[Contact-center-administrator-guide/ActivityTab|サービス & キャンペーン >アクティビティタブ]]にもあります)。'''編集'''ボタンをクリックするとメニューが開き、コールリストの列をカスタムのアクティビティ履歴フィールドにマップできます。 | |
| − | [[File:Pre-Fill-Activity-History-Custom-Fields-From_List-53.PNG|650px|thumb|center| | + | [[File:Pre-Fill-Activity-History-Custom-Fields-From_List-53.PNG|650px|thumb|center|フォームフィールドをコールリストフィールドにマップします。]] |
Latest revision as of 20:42, 21 April 2020
アクティビティフォームでの検索可能なコールリストの列の表示方法
コールキャンペーンを実施するコールセンターの場合、コールリスト記録の一部のデータをエージェントの スクリーンポップアクティビティフォームに表示することが望ましいです。この記事では、エージェントデスクトップのアクティビティフォームに検索可能なコールリストの列を表示する方法について説明します。
必須条件
フォームの設定方法について精通する必要がります。詳しい情報は、フォームビルダーガイドのフォームビルダーの概要をご覧ください。さらに、この記事ではスクリーンポップ機能について説明しているため、シナリオビルダーアプリケーションについて精通する必要があります。スクリーンポップを機能させるには、キャンペーンの音声シナリオにウェブスクリーンポップ のブロックを含む必要があります。
手順
ステップ 1: 検索可能なフィールドを含むコールリストを作成します。
先ず、コールリストを作成し、リストにアップロードします。リストインポートウィザードのフィールド画面では、リストの列は、検索可能としてマークしなければなりません。ご注意: コールリストのフィールドは、アップロード完了後に検索可能としてマークすることはできません。そのため、この手順について忘れないようにしなければなりません。
ステップ 2: コールリストをキャンペーンに関連づけます。
コールリストを作成した後、それをキャンペーンに関連付ける必要があります。それは、リストのセクションでキャンペーンの追加 をクリックして実行できます。
ステップ 3: カスタムのアクティビティ履歴フィールドを作成します。
次に、カスタムのアクティビティ履歴フィールドを作成しなければなりません。これは、 カスタムフィールド >アクティビティ履歴で実行します。 ご注意: カスタムフィールドを設定するときは、これらのフィールドを 検索可能としてマークしなければなりません。そうしないと、検索結果に表示されません。
ステップ 4: カスタムアクティビティ履歴フィールドを含むアクティビティフォームを作成します。
次に、カスタムアクティビティ履歴フィールドを含むアクティビティフォーム を作成します。これを行うには、データフィールド 設定オプション (例えば、 テキスト, 電話番号, チェックボックスなど)を含むフォームにコントロールを追加します。データフィールドから、カスタムアクティビティ履歴フィールドを選択できます。このアクションを実行すると、カスタムアクティビティ履歴フィールドが、エージェントが操作するアクティビティフォームフィールドにマップされます。
ステップ 5: 検索グリッドの列を指定します。
フォーム > アクティビティへ戻り、"検索グリッドの列"を設定しなければなりません。この設定では、アクティビティフォームがポップされたときに検索できるアクティビティフォームフィールドを指定します。さらに、検索結果の表示方法(昇順、降順など)を選択できます。
ステップ 6: アクティビティフォームのスクリーンポップを有効にします。
サービス & キャンペーン >アクティビティタブでは、"スクリーンポップアクティビティフォームの有効化"の設定をしなければなりません。追加/編集ボタンをクリックし、作成されたアクティビティフォームを選択できます。この設定により、作成したフォームを、対話中にエージェントにポップすることができます。
アクティビティ フォームがエージェントにポップするために、このキャンペーンに関連付けられた音声シナリオには、ウェブスクリーンポップが含まれます。
ステップ 7: カスタムアクティビティ履歴フィールドをコールリストフィールドにマップします。
コールリストフィールドをカスタムアクティビティ履歴フィールドに関連づけるという最後のステップは一番重要です。"次のリストのアクティビティ履歴カスタムフィールドを事前入力する"という設定をしなければなりません(サービス & キャンペーン >アクティビティタブにもあります)。編集ボタンをクリックするとメニューが開き、コールリストの列をカスタムのアクティビティ履歴フィールドにマップできます。

