(Created page with "アプリを作成するには、ページの右上にあるユーザー名をクリックし、ドロップダウンメニューから '''アプリ '''を選択します。...") |
(Created page with "800px") |
||
| (14 intermediate revisions by the same user not shown) | |||
| Line 5: | Line 5: | ||
[https://developer.twitter.com Twitterデベロッパーサイト]をご覧ください。 | [https://developer.twitter.com Twitterデベロッパーサイト]をご覧ください。 | ||
| − | アプリを作成するには、ページの右上にあるユーザー名をクリックし、ドロップダウンメニューから '''アプリ '''を選択します。 '''アプリ '''ページの '''アプリ作成 '''をクリックすると、[https://developer.twitter.com/en/apps/アプリ作成ページ]へ移動します。 | + | アプリを作成するには、ページの右上にあるユーザー名をクリックし、ドロップダウンメニューから '''アプリ '''を選択します。 '''アプリ '''ページの '''アプリ作成 '''をクリックすると、 [https://developer.twitter.com/en/apps/create アプリ作成ページ]へ移動します。 |
| − | [[File:Twitter-App-Creation-0.8-54.PNG|650px|thumb|center| | + | [[File:Twitter-App-Creation-0.8-54.PNG|650px|thumb|center| ''アプリ''ページへ移動]] |
| − | == | + | == ステップ 1: アプリの詳細タブ == |
| − | + | アプリ作成の最初のステップは、''アプリの詳細''タブの入力です。これは、アプリの基本情報(名前、ウェブサイトなど)を入力する場所です。アプリの詳細を入力するにあたって、次の情報が必要です: | |
| − | * ''' | + | * '''アプリ名''':アプリの名前です。 |
| − | * ''' | + | * '''アプリの説明''':アプリについて説明します。 |
| − | * ''' | + | * '''ウェブサイトURL''':アプリのツイートを関連付けるウェブサイトのURLです。ユーザーの認証画面に表示されます。 |
| − | * ''' | + | * '''アプリの使用方法''':ここで、アプリの目的と機能を詳しく説明します。 |
| − | + | 上記の必須情報の他、次の情報が含まれる場合があります: | |
| − | * ''' | + | * '''アプリアイコン''' |
| − | * | + | * ''' Twitterへのサインインを有効にする'''というチェックボックス:アプリを使って、 Twitterにサインインできます。 |
| − | * ''' | + | * '''コールバックURL ( https://または scheme://)''': ''Twitterへのサインインを有効にする''というチェックボックスを選択すると、このフィールドは入力必須になります。 |
| − | * ''' | + | * '''利用規約のURL''' |
| − | * ''' | + | * '''プライバシーポリシーのURL''' |
| − | * ''' | + | * '''会社名''' |
| − | * ''' | + | * '''会社ウェブサイトのURL''' |
| − | [[File:Twitter-App-Creation-1-54.PNG|800px|thumb|center| | + | [[File:Twitter-App-Creation-1-54.PNG|800px|thumb|center|アプリの詳細タブ]] |
| − | == | + | == ステップ 2: キーとトークンのタブ == |
| − | + | 次に、''キーとトークン'' タブへ移動します。このタブには、''コンシューマーAPIキー''および''アクセストークン& アクセストークンシークレット''が含まれます。この情報はBright Pattern コンタクトセンターの [[Twitter-integration-guide/Configuration/IntegrationAccount|統合アカウント]]を設定するのに必要です。 | |
| − | + | ''コンシューマーAPIキー''の場合、''API キー''と ''APIシークレットキー''は既に作成済みです。ただし、このキーはここで再度生成できます。 | |
| − | + | ''アクセストークン & アクセストークンシークレット''が表示されていない場合、'''作成'''ボタンをクリックします。''コンシューマーAPIキー''と同様に、 ''アクセストークン'' と ''アクセストークンシークレット''は必要に応じて再度生成できます。必要に応じて'''取り消し'''をクリックすると、これらのトークンを取り消すことができます。 | |
| − | ''' | + | '''ご注意''': [[#Permissions_Tab|アプリの権限]] が変更された場合、既存のキーとアクセストークンを再度生成しなければなりません。 |
| − | [[File:Twitter-App-Creation-7-54.PNG|800px|thumb|center| | + | [[File:Twitter-App-Creation-7-54.PNG|800px|thumb|center|キーとトークンのタブ]] |
| − | == | + | == ステップ 3: 権限タブ == |
| − | + | 最後に、アプリの権限を設定するために''権限''タブをクリックします。'''編集''' ボタンをクリックして、''アクセス権限''の設定を''読み取り、書き込み、ダイレクトメッセージ送信''に変えます。 '''ご注意''': アプリ権限が変更されると、[[#Keys_and_Tokens_Tab|既存のキーとアクセストークンの再度生成]] をしなければなりません。 | |
| − | [[File:Twitter-App-Creation-3-54.PNG|800px|thumb|center| | + | [[File:Twitter-App-Creation-3-54.PNG|800px|thumb|center|権限タブ]] |
Latest revision as of 19:52, 13 June 2020
アプリの作成
デベロッパーアカウントが承認されると、デベロッパーサイトに戻り、アプリを作成しなければなりません。アプリには Twitter APIの キーとトークンが含まれます。これらは、Bright Patternコンタクトセンター環境における 統合アカウント を設定する際に必要です。
Twitterからwebhookメッセージを受信するには、プレミアム APIまたは企業用のアカウントアクティビティ APIが必要です。詳しい情報については、 Twitterデベロッパーサイトをご覧ください。
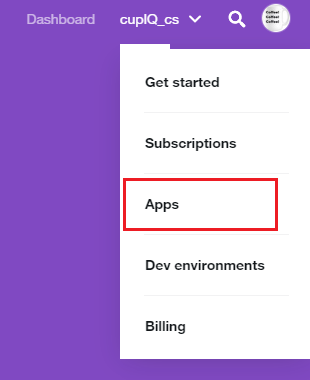
アプリを作成するには、ページの右上にあるユーザー名をクリックし、ドロップダウンメニューから アプリ を選択します。 アプリ ページの アプリ作成 をクリックすると、 アプリ作成ページへ移動します。
ステップ 1: アプリの詳細タブ
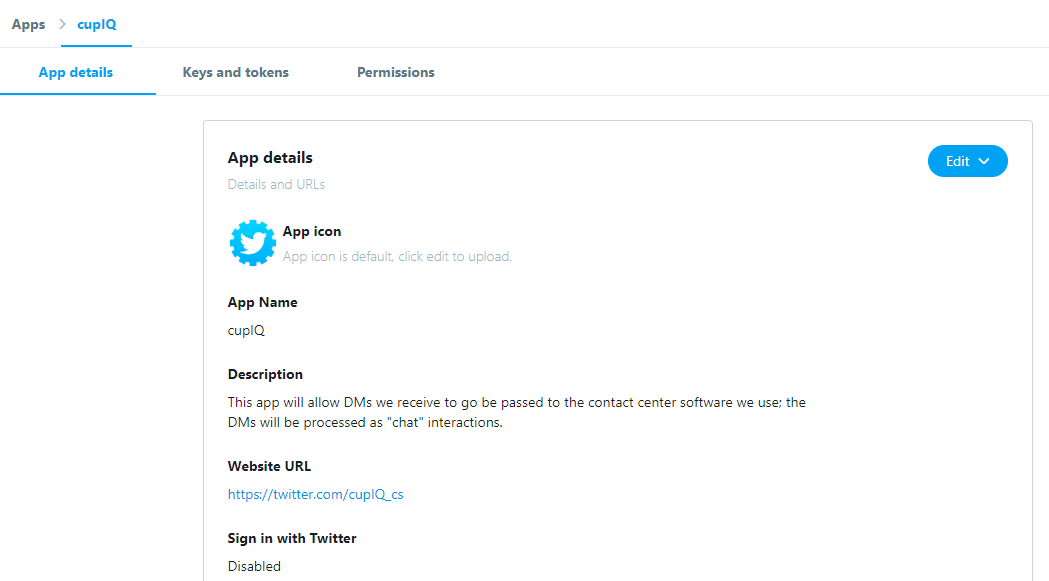
アプリ作成の最初のステップは、アプリの詳細タブの入力です。これは、アプリの基本情報(名前、ウェブサイトなど)を入力する場所です。アプリの詳細を入力するにあたって、次の情報が必要です:
- アプリ名:アプリの名前です。
- アプリの説明:アプリについて説明します。
- ウェブサイトURL:アプリのツイートを関連付けるウェブサイトのURLです。ユーザーの認証画面に表示されます。
- アプリの使用方法:ここで、アプリの目的と機能を詳しく説明します。
上記の必須情報の他、次の情報が含まれる場合があります:
- アプリアイコン
- Twitterへのサインインを有効にするというチェックボックス:アプリを使って、 Twitterにサインインできます。
- コールバックURL ( https://または scheme://): Twitterへのサインインを有効にするというチェックボックスを選択すると、このフィールドは入力必須になります。
- 利用規約のURL
- プライバシーポリシーのURL
- 会社名
- 会社ウェブサイトのURL
ステップ 2: キーとトークンのタブ
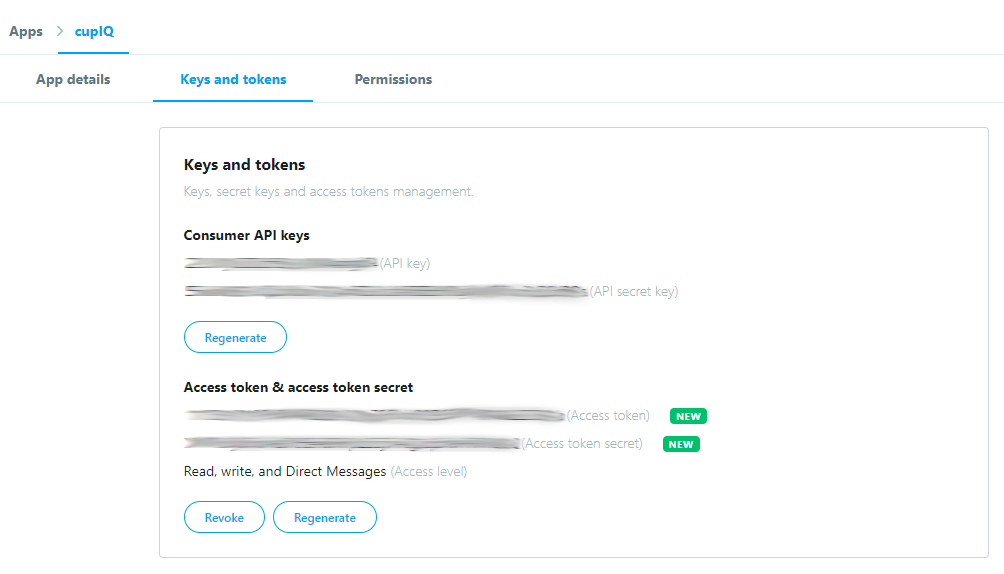
次に、キーとトークン タブへ移動します。このタブには、コンシューマーAPIキーおよびアクセストークン& アクセストークンシークレットが含まれます。この情報はBright Pattern コンタクトセンターの 統合アカウントを設定するのに必要です。
コンシューマーAPIキーの場合、API キーと APIシークレットキーは既に作成済みです。ただし、このキーはここで再度生成できます。
アクセストークン & アクセストークンシークレットが表示されていない場合、作成ボタンをクリックします。コンシューマーAPIキーと同様に、 アクセストークン と アクセストークンシークレットは必要に応じて再度生成できます。必要に応じて取り消しをクリックすると、これらのトークンを取り消すことができます。
ご注意: アプリの権限 が変更された場合、既存のキーとアクセストークンを再度生成しなければなりません。
ステップ 3: 権限タブ
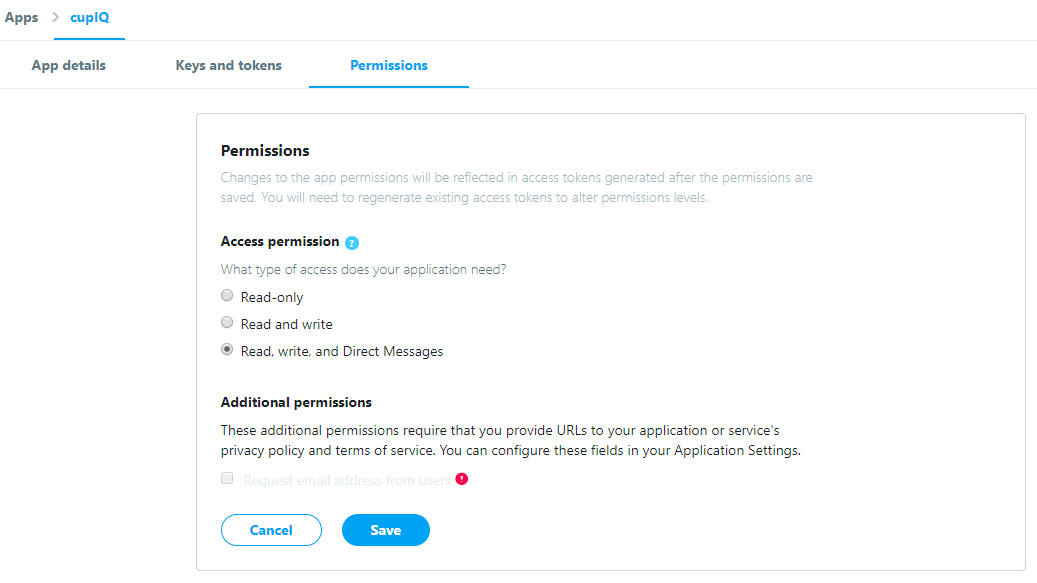
最後に、アプリの権限を設定するために権限タブをクリックします。編集 ボタンをクリックして、アクセス権限の設定を読み取り、書き込み、ダイレクトメッセージ送信に変えます。 ご注意: アプリ権限が変更されると、既存のキーとアクセストークンの再度生成 をしなければなりません。


