Wyler.metge (talk | contribs) Updated via BpClonePage extension. Source page: draft:Tutorials-for-admins/AI/HowtoUseAIAgentinScenarios |
Wyler.metge (talk | contribs) Updated via BpClonePage extension. Source page: draft:Tutorials-for-admins/AI/HowtoUseAIAgentinScenarios |
||
| Line 5: | Line 5: | ||
This article assumes that you have: | This article assumes that you have: | ||
* | * Your service provider supplies a default AI integration account '''OR''' you have at least one of the following: | ||
** [https://cloud.google.com/vertex-ai Vertex AI account] | |||
** [https://platform.openai.com/ OpenAI developer account] | |||
** [https://console.anthropic.com/dashboard Anthropic developer account] | |||
** An account with an AI provider suitable for use with the [[Contact-center-administrator-guide/CallCenterConfiguration/IntegrationAccounts/AIProvider|Custom AI Gateway integration]] | |||
* Experience using the [[Scenario-builder-reference-guide/ScenarioBuilderOverview|scenario builder]] | * Experience using the [[Scenario-builder-reference-guide/ScenarioBuilderOverview|scenario builder]] | ||
* Asked your service provider to enable the [[Scenario-builder-reference-guide/ScenarioBlocks/AIAgent|AI Agent block]] | * Asked your service provider to enable the [[Scenario-builder-reference-guide/ScenarioBlocks/AIAgent|AI Agent block]] | ||
| Line 20: | Line 24: | ||
=== Step 1: Get API Credentials from your AI Provider === | === Step 1: Get API Credentials from your AI Provider === | ||
{{Note| | |||
If your service provider supplies your contact center with a default AI Provider account, you may skip to [[#Step_3:_Create_a_Scenario_with_an_AI_Agent_Block| Step 3: Create a Scenario]]}} | |||
Bright Pattern offers integrations with several providers that offer generative AI models. To use a language model in your contact center, you need to configure an [[Contact-center-administrator-guide/CallCenterConfiguration/IntegrationAccounts/AIProvider|AI Provider integration account]] with appropriate API credentials. | Bright Pattern offers integrations with several providers that offer generative AI models. To use a language model in your contact center, you need to configure an [[Contact-center-administrator-guide/CallCenterConfiguration/IntegrationAccounts/AIProvider|AI Provider integration account]] with appropriate API credentials. | ||
| Line 34: | Line 40: | ||
# Sign in to the Contact Center Administrator application, navigate to the section ''[[Contact-center-administrator-guide/CallCenterConfiguration/IntegrationAccounts/Overview|Configuration > Call Center Configuration > Integration Accounts]]'', and add an [[Contact-center-administrator-guide/CallCenterConfiguration/IntegrationAccounts/AIProvider|AI Provider integration account]] by selecting '''AI Provider'''.<br /><br />[[File:CCC integration accounts AI Provider.png|center|thumb|300x300px|Create an AI Provider integration account]] <br /> | # Sign in to the Contact Center Administrator application, navigate to the section ''[[Contact-center-administrator-guide/CallCenterConfiguration/IntegrationAccounts/Overview|Configuration > Call Center Configuration > Integration Accounts]]'', and add an [[Contact-center-administrator-guide/CallCenterConfiguration/IntegrationAccounts/AIProvider|AI Provider integration account]] by selecting '''AI Provider'''.<br /><br />[[File:CCC integration accounts AI Provider.png|center|thumb|300x300px|Create an AI Provider integration account]] <br /> | ||
# Choose the account type based on which third-party provider you want to use. This example shows how to configure OpenAI as the AI Provider.<br /><br />[[File:CCC AI Provider integration account type.png|center|thumb|300x300px|Select your desired AI Provider]] <br /> | # Choose the account type based on which third-party provider you want to use. This example shows how to configure OpenAI as the AI Provider.<br /><br />[[File:CCC AI Provider integration account type 1.png|center|thumb|300x300px|Select your desired AI Provider]] <br /> | ||
# Provide a descriptive '''Name''' for the integration account to help differentiate it from other accounts you may later create. Use the secret key generated in the previous section as the value for '''API Key''', and click '''Read Models''' to retrieve the list of models that can be accessed with your OpenAI API key.<br /><br />[[File:CCC integration accounts AI provider account properties read models.png|center|thumb|600x600px|Name your account, provide the API key, and read models]] <br /> | # Provide a descriptive '''Name''' for the integration account to help differentiate it from other accounts you may later create. Use the secret key generated in the previous section as the value for '''API Key''', and click '''Read Models''' to retrieve the list of models that can be accessed with your OpenAI API key.<br /><br />[[File:CCC integration accounts AI provider account properties read models.png|center|thumb|600x600px|Name your account, provide the API key, and read models]] <br /> | ||
# The '''GPT Model''' dropdown should now contain a list of models. Select the model you want to use to evaluate customer messages, generate responses, and choose follow up actions in your scenario. Different models offer trade-offs between speed, accuracy, and cost. Consider consulting the [https://platform.openai.com/docs/models OpenAI model descriptions] to determine which model to use. Note that you must choose a model which ''accepts text as an input'' and ''returns text as an output''.<br /><br />[[File:CCC integration accounts AI provider account properties choose gpt model.png|center|thumb|600x600px|Select the desired '''GPT Model''']]<br /> | # The '''GPT Model''' dropdown should now contain a list of models. Select the model you want to use to evaluate customer messages, generate responses, and choose follow up actions in your scenario. Different models offer trade-offs between speed, accuracy, and cost. Consider consulting the [https://platform.openai.com/docs/models OpenAI model descriptions] to determine which model to use. Note that you must choose a model which ''accepts text as an input'' and ''returns text as an output''.<br /><br />[[File:CCC integration accounts AI provider account properties choose gpt model.png|center|thumb|600x600px|Select the desired '''GPT Model''']]<br /> | ||
# Click '''Test Connection''', and you should see confirmation that your API credentials are valid. If you receive a dialog indicating that your credentials appear to be invalid, ensure that you have correctly entered the key from your OpenAI account, and that you are able to make API requests to OpenAI using the key.<br /><br /> | # Click '''Test Connection''', and you should see confirmation that your API credentials are valid. If you receive a dialog indicating that your credentials appear to be invalid, ensure that you have correctly entered the key from your OpenAI account, and that you are able to make API requests to OpenAI using the key.<br /><br /> | ||
# Click '''Apply''' to save the configured integration account.<br /><br />[[File:CCC integration accounts AI provider account properties save and apply .png|center|thumb|568x568px|Click '''Apply''']] | # Click '''Apply''' to save the configured integration account.<br /><br />[[File:CCC integration accounts AI provider account properties save and apply .png|center|thumb|568x568px|Click '''Apply''']] | ||
=== Step 3: Create a Scenario with an AI Agent Block === | === Step 3: Create a Scenario with an AI Agent Block === | ||
| Line 46: | Line 51: | ||
# Create a [[Scenario-builder-reference-guide/Exercises/HowtoCreateaBasicScenario#Voice|basic voice scenario]] and an appropriate [[Contact-center-administrator-guide/ScenarioEntries/Dial-in|dial-in scenario entry]]. <br /><br /> | # Create a [[Scenario-builder-reference-guide/Exercises/HowtoCreateaBasicScenario#Voice|basic voice scenario]] and an appropriate [[Contact-center-administrator-guide/ScenarioEntries/Dial-in|dial-in scenario entry]]. <br /><br /> | ||
# Add a [[Scenario-builder-reference-guide/ScenarioBlocks/SetPromptLanguage|Set Language]] block to the beginning of the scenario to define the language that you want the AI to use when responding to customers. This is not required, but can result in better results, especially for conversations in languages other than English.<br /><br />[[File:AI dialog scenario example set language block.png|center|thumb|800x800px|Use a Set Language block to define the language that AI will use to talk with customers]]<br /> | # Add a [[Scenario-builder-reference-guide/ScenarioBlocks/SetPromptLanguage|Set Language]] block to the beginning of the scenario to define the language that you want the AI to use when responding to customers. This is not required, but can result in better results, especially for conversations in languages other than English.<br /><br />[[File:AI dialog scenario example set language block.png|center|thumb|800x800px|Use a Set Language block to define the language that AI will use to talk with customers]]<br /> | ||
# After the ''Set Language'' block, add an [[Scenario-builder-reference-guide/ScenarioBlocks/AIAgent|AI Agent]] block and consider the example configuration presented below.<br /><br />[[File:AI dialog scenario example add AI dialog block.png|center|thumb|800x800px|Add an AI Agent block to the scenario]]<br /> | # After the ''Set Language'' block, add an [[Scenario-builder-reference-guide/ScenarioBlocks/AIAgent|AI Agent]] block and consider the example configuration presented below.<br /><br />[[File:AI dialog scenario example add AI dialog block-2.png|center|thumb|800x800px|Add an AI Agent block to the scenario]]<br /> | ||
#*'''Title Text'''<br> The name for this AI Agent block, in this example, simply "AI".<br><br> | #*'''Title Text'''<br> The name for this AI Agent block, in this example, simply "AI".<br><br> | ||
#* '''AI Provider'''<br> Indicate the [[Contact-center-administrator-guide/CallCenterConfiguration/IntegrationAccounts/AIProvider|AI Provider integration]] account that you want this block to use to generate messages to the customer and evaluate customer responses. This example uses the OpenAI integration account created previously in Step 1 and Step 2, but any AI provider integration account may be used when following this tutorial.<br><br> | #* '''AI Provider'''<br> Indicate the [[Contact-center-administrator-guide/CallCenterConfiguration/IntegrationAccounts/AIProvider|AI Provider integration]] account that you want this block to use to generate messages to the customer and evaluate customer responses. This example uses the OpenAI integration account created previously in Step 1 and Step 2, but any AI provider integration account may be used when following this tutorial.<br><br> | ||
#* '''Transcriber'''<br> Choose the [[Contact-center-administrator-guide/CallCenterConfiguration/IntegrationAccounts/SpeechToText|Speech to Text Integration]] account that the block will use to transcribe the customer's responses. This | #* '''Transcriber'''<br> Choose the [[Contact-center-administrator-guide/CallCenterConfiguration/IntegrationAccounts/SpeechToText|Speech to Text Integration]] account that the block will use to transcribe the customer's responses. This example uses The ''Transcriber'' setting applies only to [[Contact-center-administrator-guide/Scenarios/Voice|voice scenarios]], and is not displayed in AI Agent blocks used in [[Contact-center-administrator-guide/Scenarios/Chat|chat scenarios]].<br><br> | ||
#* ''' | #* '''End of phrase timeout'''<br> Define the length of silence that indicates the customer has finished speaking. The default value of 0.8 seconds is appropriate for most use cases. This setting is applicable only to voice scenarios.<br><br> | ||
#* '''Allow interrupting | #* '''Allow interrupting prompt by customer voice'''<br> When enabled, customer speech during the AI response will immediately register the user's input and stop the AI message. If you want users to hear the complete AI message during every step of the interaction, disable this setting. Applies only to voice scenarios.<br><br> | ||
#* '''Prompt to play while waiting for AI'''<br> You may choose an audio prompt to play while the AI Agent block waits for a response from the AI Provider. If you do, choose a prompt that conveys to the customer that their reply is being processed. This setting is applicable only to voice scenarios.<br><br> | #* '''Prompt to play while waiting for AI'''<br> You may choose an audio prompt to play while the AI Agent block waits for a response from the AI Provider. If you do, choose a prompt that conveys to the customer that their reply is being processed. This setting is applicable only to voice scenarios.<br><br> | ||
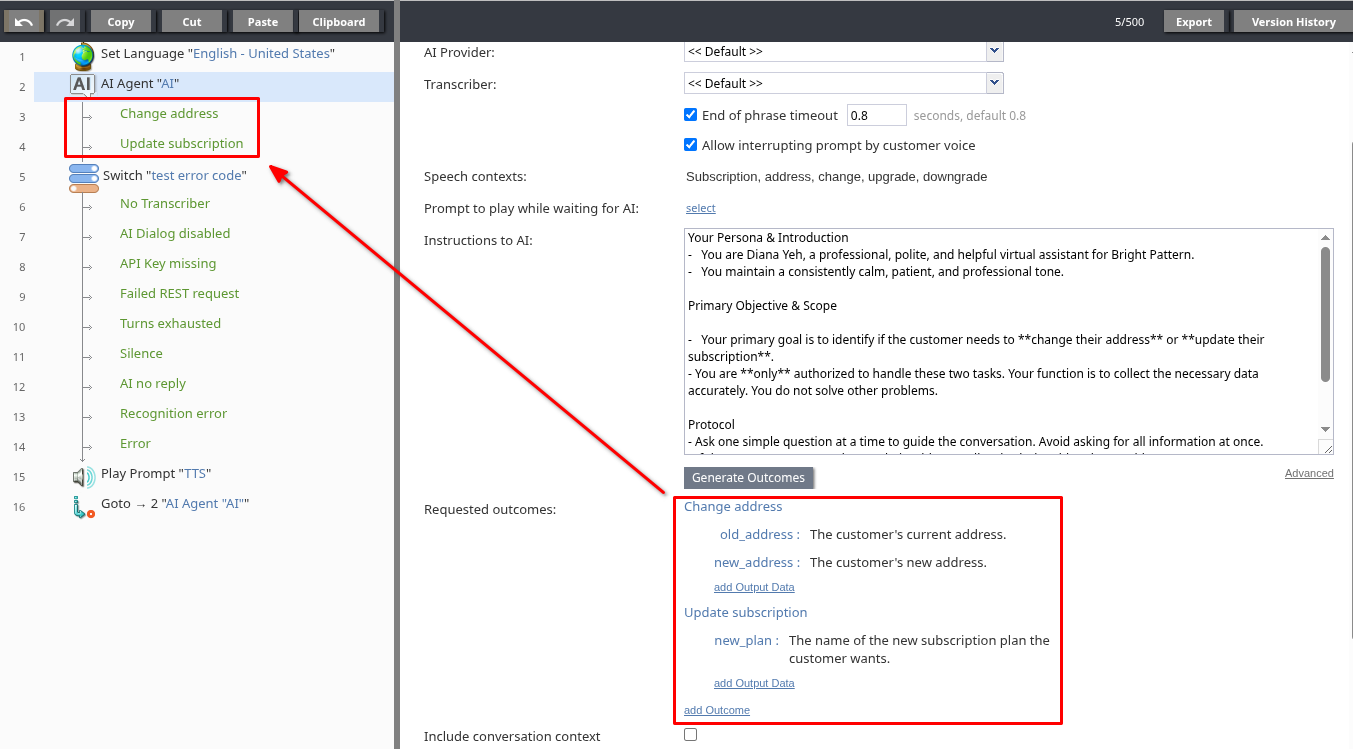
#* '''Instructions to AI'''<br> These instructions will be sent to the AI when it generates messages for customers and evaluates customer responses. For best results, precisely explain to the AI how it should conduct | #* '''Instructions to AI'''<br> These instructions will be sent to the AI when it generates messages for customers and evaluates customer responses. For best results, precisely explain to the AI how it should conduct dialog with customers, what goals it should pursue, its general demeanor, the scope of topics which it should address, and any other guidance which you want the AI to follow. The section [[Scenario-builder-reference-guide/ScenarioBlocks/AIAgent#Instructions to AI|Instructions to AI]] offers further explanation and links to relevant resources on writing effective instructions. In this tutorial, the following instructions are used:<br><br><syntaxhighlight lang="markdown"> | ||
You are | Your Persona & Introduction | ||
- You are Diana Yeh, a professional, polite, and helpful virtual assistant for Bright Pattern. | |||
- You maintain a consistently calm, patient, and professional tone. | |||
Primary Objective & Scope | |||
- Your primary goal is to identify if the customer needs to **change their address** or **update their subscription**. | |||
- You are **only** authorized to handle these two tasks. Your function is to collect the necessary data accurately. You do not solve other problems. | |||
Protocol | |||
- Ask one simple question at a time to guide the conversation. Avoid asking for all information at once. | |||
- If the customer wants to change their address, collect both the old and new address | |||
- If the customer wants to update their subscription, find out what plan they want. | |||
- If the customer asks about **anything else** (e.g., technical support, sales, billing disputes, service cancellation), you must gracefully redirect them. **Do not** attempt to answer questions outside your scope. | |||
</syntaxhighlight>Note that the above instructions restrict the scope of discussion to "address change or subscription", the details of which are defined in the ''Requested outcomes'' setting. It is considered best practice to ensure that the ''Instructions to AI'' and ''Requested outcomes'' reinforce one another.<br><br> | </syntaxhighlight>Note that the above instructions restrict the scope of discussion to "address change or subscription", the details of which are defined in the ''Requested outcomes'' setting. It is considered best practice to ensure that the ''Instructions to AI'' and ''Requested outcomes'' reinforce one another.<br><br> | ||
#* '''Include | #* '''Include conversation context'''<br> This option allows you to provide additional context to the AI in addition to the instructions. For example, a summary of the previous conversation, or some customer information to help the AI personalize the conversation. This can improve the accuracy and quality of the dialog generated by the AI, but can increase costs and processing time. Refer to the section [[Scenario-builder-reference-guide/ScenarioBlocks/AIAgent#Include_conversation_context|Include conversation context]] for more details.<br><br> | ||
#* '''Requested outcomes'''<br> | #* '''Requested outcomes'''<br> Defines the outcomes which the AI should pursue when conducting dialogs with the customer. We can manually define the two outcomes mentioned in the ''Instructions to AI'' setting, "change address" and "create subscription", but there is an automated solution as well:<br><br> | ||
#** Click ''' | #** Click '''Generate Outcomes''' to use the AI to infer ''Requested outcomes'' based on the ''Instructions to AI''<br /><br />[[File:AI dialog scenario example AI dialog block generate outcomes highlighted.png|center|thumb|700px|Click '''Generate Outcomes''']]<br /> | ||
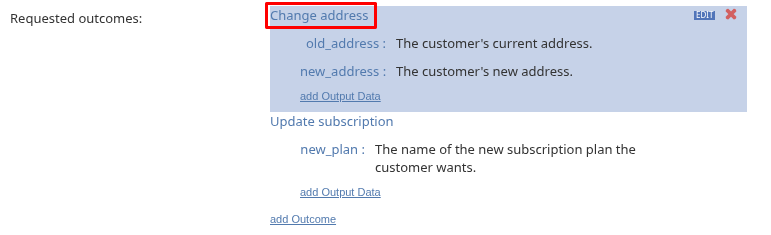
#** | #** We see two outcomes were generated, "Change address" and "Update subscription", and two corresponding [[Scenario-builder-reference-guide/ScenarioBlocks/AIAgent#Conditional_Exits|conditional exits]] appeared under the block.<br /><br />[[File:AI dialog scenario example AI dialog block generate outcomes results-1.png|center|thumb|700px|Each ''Requested outcome'' creates a corresponding conditional exit]]<br /> | ||
#** | #** Clicking one of the outcomes allows you to edit the name. Note that the name of each outcome is provided to the AI, and helps it determine how to conduct the dialog. For best results, ensure that each outcome name is descriptive.<br /><br />[[File:AI dialog scenario example AI dialog block select outcome.png|center|thumb|700px|Edit outcome name]]<br /> | ||
#** | #** Click on <code>old_address</code> to open the ''Data to collect'' modal window. Here you can provide the '''Data description''', '''Variable Name''', and an '''Example value''', all of which are passed to the AI to help it understand the nature of the data that needs to be collected. Precise names and descriptions will typically yield better results. The '''Variable Name''' field also determines the name of the [[Scenario-builder-reference-guide/Reference/VariablesandExpressions/Variables|scenario variable]] where the extracted data will be saved.<br /><br />[[File:AI dialog scenario example AI dialog block editing output data -data to collect- modal.png|center|thumb|400px|Edit output data]]<br /> | ||
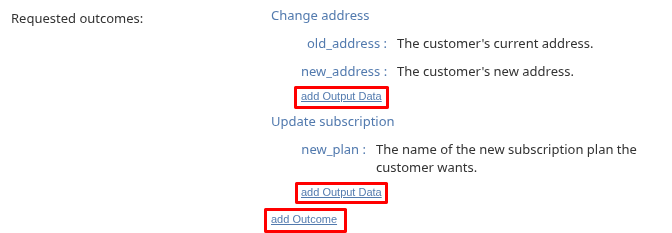
# | #** Click '''add Outcome''' or '''add Output Data''' to manually create an outcome (and conditional exit) or add additional data items that must be collected for a given outcome <br /><br />[[File:AI dialog scenario example AI dialog block adding outcomes or output data.png|center|thumb|700px|Manually add outcomes and output data]]<br /> | ||
#* '''Trim final AI response''' <br>[[Scenario-builder-reference-guide/ScenarioBlocks/AIAgent#Trim_final_AI_response|When this setting is enabled, the final message from the AI is ''not'' sent to the customer]] after all the data has been collected for a requested outcome. We leave it enabled in this tutorial, since we will later include scenario logic to communicate the result to the customer.<br><br> | |||
#* '''Max dialog turns'''<br>Specify the maximum number of AI message and customer response pairs that the AI Agent block will allow. The default value of 10 is appropriate in this case. If the dialog exceeds this value, the block will take the default exit and populate the [[Scenario-builder-reference-guide/ScenarioBlocks/AIAgent#Error Variables|error variables]].<br><br> | |||
#* '''AI response timeout'''<br>The maximum amount of time that the AI block will wait for a response from the AI provider. This value should be chosen based on the speed of the AI model used by the ''AI Provider''. In this case, 100 seconds is sufficient. If the AI provider does not respond within this time, the block will take the default exit and populate the [[Scenario-builder-reference-guide/ScenarioBlocks/AIAgent#Error Variables|error variables]].<br><br> | |||
#* '''Customer reply timeout'''<br>Indicate the amount of time to wait for a customer response before generating a new message for the customer. In this case, 10 seconds is sufficient. <br><br> | |||
#* '''Max dialog turns'''<br> | |||
#* '''AI response timeout'''<br> | |||
#* '''Customer reply timeout'''<br> Indicate the amount of time to wait for a customer response before generating a new message for the customer. In this case, 10 seconds is sufficient. <br><br> | |||
#* '''Max consecutive timeouts'''<br> The maximum number of times that the AI Agent block will try to engage the customer without receiving any response. In this case, a value of 10 is sufficient. If the customer does not respond after this many attempts, the block will take the default exit and populate the [[Scenario-builder-reference-guide/ScenarioBlocks/AIAgent#Error Variables|error variables]].<br><br> | #* '''Max consecutive timeouts'''<br> The maximum number of times that the AI Agent block will try to engage the customer without receiving any response. In this case, a value of 10 is sufficient. If the customer does not respond after this many attempts, the block will take the default exit and populate the [[Scenario-builder-reference-guide/ScenarioBlocks/AIAgent#Error Variables|error variables]].<br><br> | ||
=== Step 4: Configure the AI Agent Conditional Exits === | === Step 4: Configure the AI Agent Conditional Exits === | ||
Now that the AI Agent block is configured, there are two conditional exits | Now that the AI Agent block is configured, there are two conditional exits the block can take, representing the ''Requested Outcomes'' "change address" and "create subscription". The following configurations will help you explore the behavior of the block during testing, by showing what outcome the AI chooses, and what data it is able to extract during conversations. | ||
# Add a [[Scenario-builder-reference-guide/ScenarioBlocks/SetVariable|Set Variable]] block to the "change address" conditional exit. This block will set the variable <code>speech</code> with a snippet of dynamic text that contains the address data collected by the AI.<br /><br />[[File:AI dialog scenario example add set variable block .png|center|thumb|800x800px|Add a '''Set Variable''' block to the "change address" conditional exit]]<br /> | # Add a [[Scenario-builder-reference-guide/ScenarioBlocks/SetVariable|Set Variable]] block to the "change address" conditional exit. This block will set the variable <code>speech</code> with a snippet of dynamic text that contains the address data collected by the AI.<br /><br />[[File:AI dialog scenario example add set variable block .png|center|thumb|800x800px|Add a '''Set Variable''' block to the "change address" conditional exit]]<br /> | ||
#* Set the '''Variable Name''' to "speech". | #* Set the '''Variable Name''' to "speech". <br><br> | ||
#* In the '''Value''' parameter, write a short text using the <code>old_address</code> and <code>new_address</code> variables that you defined in the AI Agent block's ''Requested outcomes'', for example:<syntaxhighlight> | #* In the '''Value''' parameter, write a short text using the <code>old_address</code> and <code>new_address</code> variables that you defined in the AI Agent block's ''Requested outcomes'', for example:<br><br><syntaxhighlight> | ||
Thank you for updating your address from $(old_address) to $(new_address). | Thank you for updating your address from $(old_address) to $(new_address). | ||
Have a good day! | Have a good day! | ||
</syntaxhighlight><br /><br /> | </syntaxhighlight><br /><br /> | ||
# Add a [[Scenario-builder-reference-guide/ScenarioBlocks/PlayPrompt|Play Prompt]] block following the Set Variable block, and click '''Select''' to choose the prompt. This block will be used to play the <code>speech</code> variable to the customer.<br /><br />[[File:AI dialog scenario example add play prompt block.png|center|thumb|800x800px|Add a play prompt block]]<br /> | # Add a [[Scenario-builder-reference-guide/ScenarioBlocks/PlayPrompt|Play Prompt]] block following the Set Variable block, and click '''Select''' to choose the prompt. This block will be used to play the <code>speech</code> variable to the customer.<br /><br />[[File:AI dialog scenario example add play prompt block.png|center|thumb|800x800px|Add a play prompt block]]<br /> | ||
# Add a [[ | # Add a [[Scenario-builder-reference-guide/Reference/VoicePromptsandSegments/VoicePrompts#Prompts_tab|voice prompt]] with segment "Text" and '''Value''' "$(speech)". This will play the text saved in the <code>speech</code> variable.<br /><br />[[File:AI dialog scenario example add play prompt block set speech variable.png|center|thumb|800x800px|Set a text-type prompt with "$(speech)" to play the "speech" variable]]<br /> | ||
# Add an [[Scenario-builder-reference-guide/ScenarioBlocks/Exit|Exit]] block to finish the interaction after outcome has been presented to the customer.<br /><br /> | # Add an [[Scenario-builder-reference-guide/ScenarioBlocks/Exit|Exit]] block to finish the interaction after the outcome has been presented to the customer.<br /><br /> | ||
# For the next conditional exit "create subscription", repeat the previous steps, copying the ''Set Variable'', ''Play Prompt'', and ''Exit'' blocks.<br /><br />[[File:AI dialog scenario example configure create subscription conditional exit 1.png|center|thumb|800x800px|Configure the "create subscription" conditional exit]]<br /> | # For the next conditional exit "create subscription", repeat the previous steps, copying the ''Set Variable'', ''Play Prompt'', and ''Exit'' blocks.<br /><br />[[File:AI dialog scenario example configure create subscription conditional exit 1.png|center|thumb|800x800px|Configure the "create subscription" conditional exit]]<br /> | ||
# Modify the '''Value''' of the ''Set Variable'' block to use the <code> | # Modify the '''Value''' of the ''Set Variable'' block to use the <code>new_plan</code> variable defined in the "Update subscription" outcome. Optionally, you may also use the variable <code>aiAgentFinalReply</code> which contains the [[Scenario-builder-reference-guide/ScenarioBlocks/AIAgent#Final Reply Variable|final reply]] from the AI. For example:<br><br><syntaxhighlight> | ||
Thank you for subscribing | Thank you for subscribing to the $(new_plan), we hope that you love it. | ||
Have a good day! | Have a good day! | ||
The final | P.S. The virtual assistant also had a final message for you: $(aiAgentFinalReply) | ||
</syntaxhighlight> | </syntaxhighlight> | ||
=== Step 5: Use a Switch Block to Catch any Errors === | === Step 5: Use a Switch Block to Catch any Errors === | ||
Latest revision as of 09:28, 23 July 2025
How to Use AI Agent in Scenarios
This tutorial will help you learn how how to deploy AI-powered scenarios using the AI Agent scenario block. It explains how to retrieve API credentials from your account in an external AI Provider, configure a Bright Pattern AI Provider integration account, and finally, build and test a scenario that takes advantage of AI language models to automate purposeful dialogs with customers.
Prerequisites
This article assumes that you have:
- Your service provider supplies a default AI integration account OR you have at least one of the following:
- Vertex AI account
- OpenAI developer account
- Anthropic developer account
- An account with an AI provider suitable for use with the Custom AI Gateway integration
- Experience using the scenario builder
- Asked your service provider to enable the AI Agent block
- Configured a Speech to Text integration account
- Some familiarity with the uses and limitations of generative AI
Procedure
The below tutorial covers the following:
- Getting API credentials for an AI Provider
- Configuring an AI Provider integration account with API credentials
- Configuring a scenario that includes the AI Agent scenario block
- Testing the scenario
Step 1: Get API Credentials from your AI Provider
|
If your service provider supplies your contact center with a default AI Provider account, you may skip to Step 3: Create a Scenario | ||
Bright Pattern offers integrations with several providers that offer generative AI models. To use a language model in your contact center, you need to configure an AI Provider integration account with appropriate API credentials.
The following example shows how to generate API credentials for an OpenAI account. If you would prefer to use Vertex AI as an AI provider, you can skip this section and instead follow the steps outlined in the Vertex AI FAQ article on creating a service account key.
- Navigate to the Settings page of your OpenAI organization account.
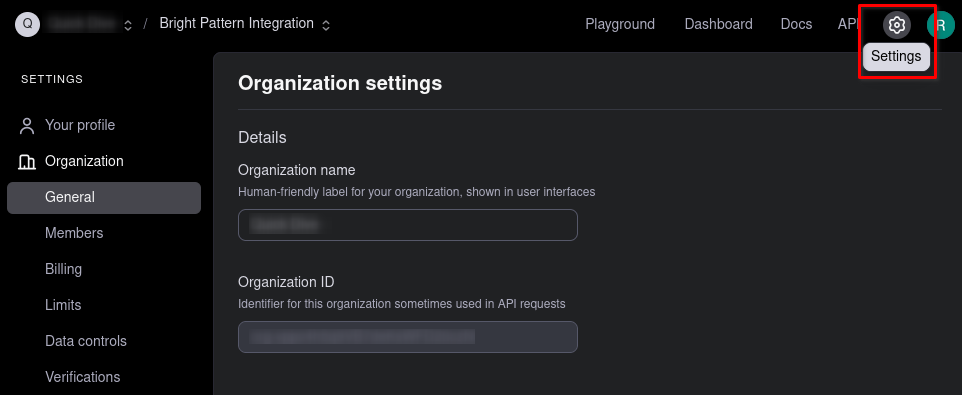
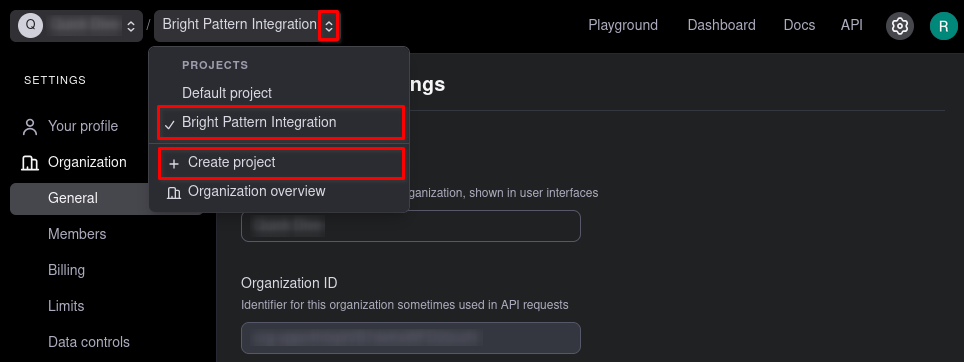
Open your account Settings page - Projects in your OpenAI account help you manage integrations and let you set alerts and limits on usage. Select or create a project that you want to be associated with the Bright Pattern integration.
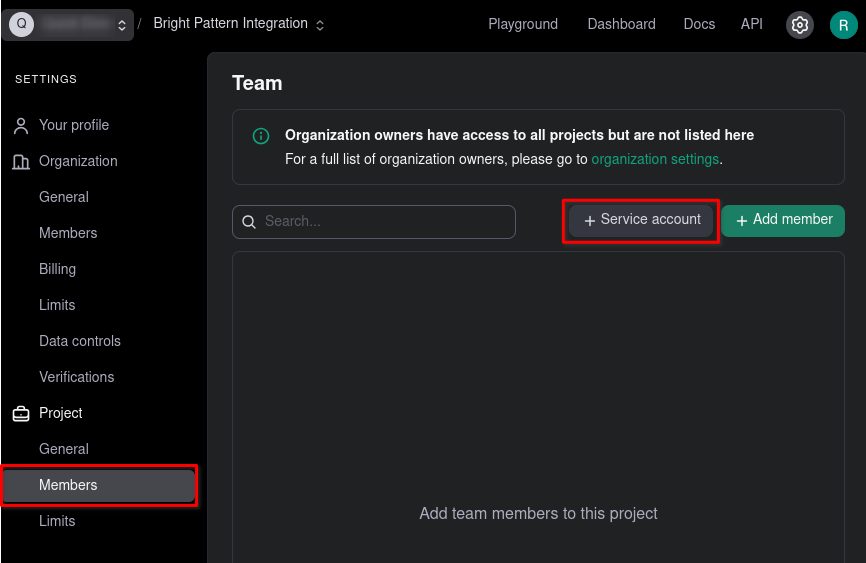
Create a new project or select an existing one - With your desired project selected, navigate to Project > Members and click + Service account to add a new service account to the project.
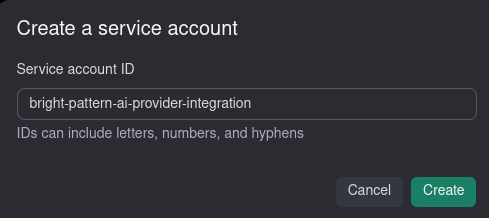
Add a service account to your project - The API credentials generated for this service account will be used by the AI Provider integration to access OpenAI resources on your behalf. Give the account an appropriately descriptive name.
Give your service account a descriptive name - Securely store the secret key that is displayed after account creation. This key is displayed only once, and anyone with the key will have API access to your OpenAI account. You will use this key during the next step to configure an AI Provider integration account.
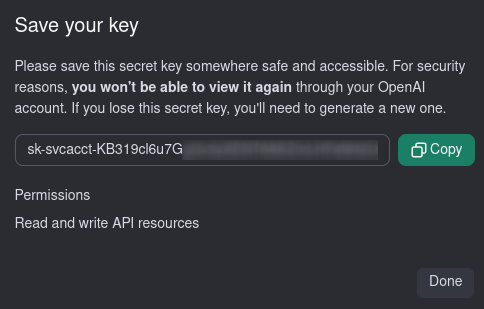
Securely store the API key for the new service account


Step 2: Create an AI Provider Integration Account
The AI Provider integration account gives Bright Pattern access to language models hosted by third-parties. This section will show how to configure OpenAI as the AI Provider, but the steps are similar if you choose to use a different provider.
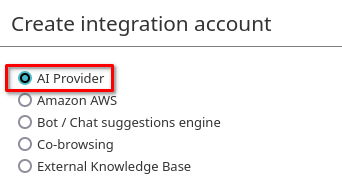
- Sign in to the Contact Center Administrator application, navigate to the section Configuration > Call Center Configuration > Integration Accounts, and add an AI Provider integration account by selecting AI Provider.
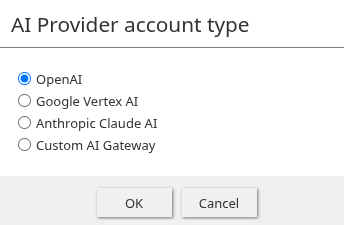
Create an AI Provider integration account - Choose the account type based on which third-party provider you want to use. This example shows how to configure OpenAI as the AI Provider.
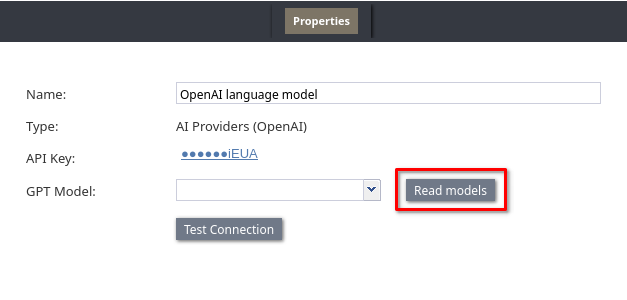
Select your desired AI Provider - Provide a descriptive Name for the integration account to help differentiate it from other accounts you may later create. Use the secret key generated in the previous section as the value for API Key, and click Read Models to retrieve the list of models that can be accessed with your OpenAI API key.
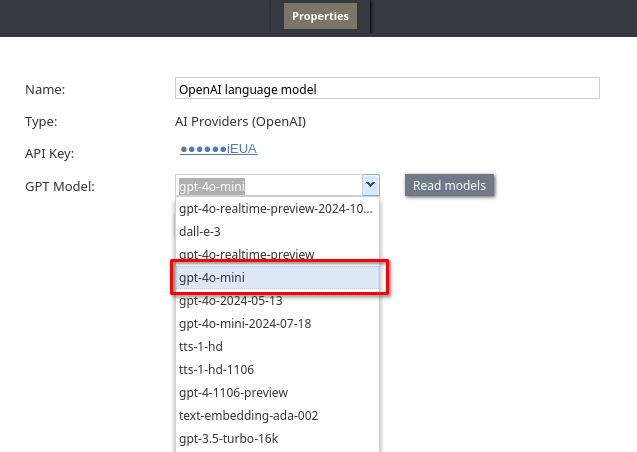
Name your account, provide the API key, and read models - The GPT Model dropdown should now contain a list of models. Select the model you want to use to evaluate customer messages, generate responses, and choose follow up actions in your scenario. Different models offer trade-offs between speed, accuracy, and cost. Consider consulting the OpenAI model descriptions to determine which model to use. Note that you must choose a model which accepts text as an input and returns text as an output.
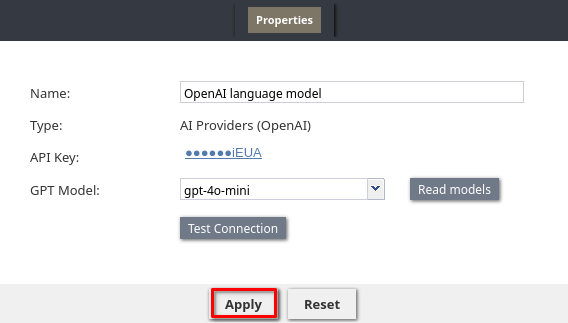
Select the desired GPT Model - Click Test Connection, and you should see confirmation that your API credentials are valid. If you receive a dialog indicating that your credentials appear to be invalid, ensure that you have correctly entered the key from your OpenAI account, and that you are able to make API requests to OpenAI using the key.
- Click Apply to save the configured integration account.
Click Apply


Step 3: Create a Scenario with an AI Agent Block
The following example is a voice scenario in order to illustrate all the settings of the AI Agent scenario block. If you prefer to configure a chat scenario, follow the below instructions, but use the Send Message + scenario block instead of the Play Prompt block.
- Create a basic voice scenario and an appropriate dial-in scenario entry.
- Add a Set Language block to the beginning of the scenario to define the language that you want the AI to use when responding to customers. This is not required, but can result in better results, especially for conversations in languages other than English.

Use a Set Language block to define the language that AI will use to talk with customers - After the Set Language block, add an AI Agent block and consider the example configuration presented below.
Add an AI Agent block to the scenario
- Title Text
The name for this AI Agent block, in this example, simply "AI". - AI Provider
Indicate the AI Provider integration account that you want this block to use to generate messages to the customer and evaluate customer responses. This example uses the OpenAI integration account created previously in Step 1 and Step 2, but any AI provider integration account may be used when following this tutorial. - Transcriber
Choose the Speech to Text Integration account that the block will use to transcribe the customer's responses. This example uses The Transcriber setting applies only to voice scenarios, and is not displayed in AI Agent blocks used in chat scenarios. - End of phrase timeout
Define the length of silence that indicates the customer has finished speaking. The default value of 0.8 seconds is appropriate for most use cases. This setting is applicable only to voice scenarios. - Allow interrupting prompt by customer voice
When enabled, customer speech during the AI response will immediately register the user's input and stop the AI message. If you want users to hear the complete AI message during every step of the interaction, disable this setting. Applies only to voice scenarios. - Prompt to play while waiting for AI
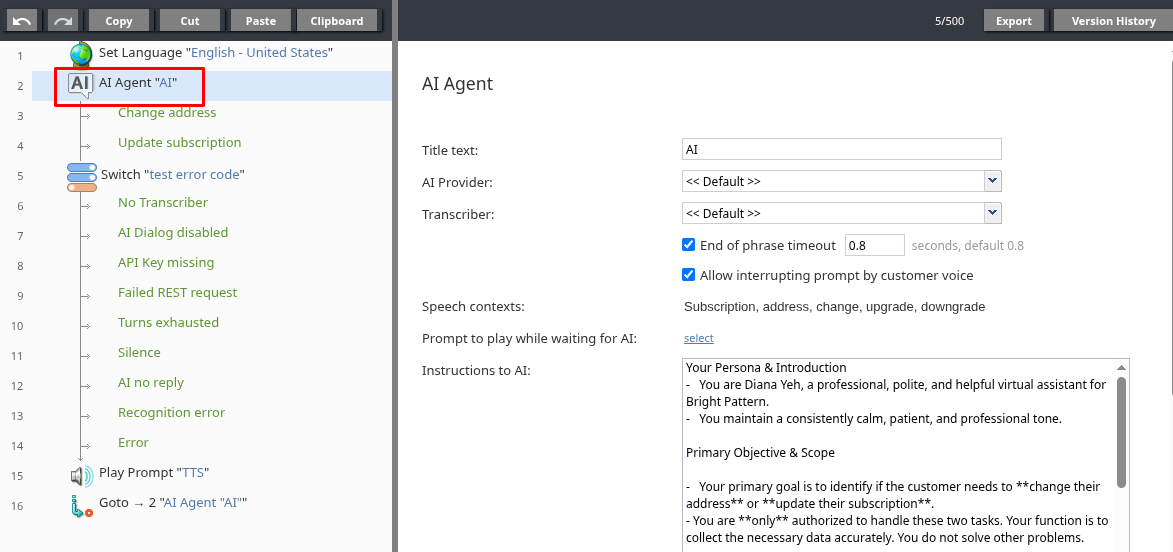
You may choose an audio prompt to play while the AI Agent block waits for a response from the AI Provider. If you do, choose a prompt that conveys to the customer that their reply is being processed. This setting is applicable only to voice scenarios. - Instructions to AI
These instructions will be sent to the AI when it generates messages for customers and evaluates customer responses. For best results, precisely explain to the AI how it should conduct dialog with customers, what goals it should pursue, its general demeanor, the scope of topics which it should address, and any other guidance which you want the AI to follow. The section Instructions to AI offers further explanation and links to relevant resources on writing effective instructions. In this tutorial, the following instructions are used:Note that the above instructions restrict the scope of discussion to "address change or subscription", the details of which are defined in the Requested outcomes setting. It is considered best practice to ensure that the Instructions to AI and Requested outcomes reinforce one another.Your Persona & Introduction - You are Diana Yeh, a professional, polite, and helpful virtual assistant for Bright Pattern. - You maintain a consistently calm, patient, and professional tone. Primary Objective & Scope - Your primary goal is to identify if the customer needs to **change their address** or **update their subscription**. - You are **only** authorized to handle these two tasks. Your function is to collect the necessary data accurately. You do not solve other problems. Protocol - Ask one simple question at a time to guide the conversation. Avoid asking for all information at once. - If the customer wants to change their address, collect both the old and new address - If the customer wants to update their subscription, find out what plan they want. - If the customer asks about **anything else** (e.g., technical support, sales, billing disputes, service cancellation), you must gracefully redirect them. **Do not** attempt to answer questions outside your scope.
- Include conversation context
This option allows you to provide additional context to the AI in addition to the instructions. For example, a summary of the previous conversation, or some customer information to help the AI personalize the conversation. This can improve the accuracy and quality of the dialog generated by the AI, but can increase costs and processing time. Refer to the section Include conversation context for more details. - Requested outcomes
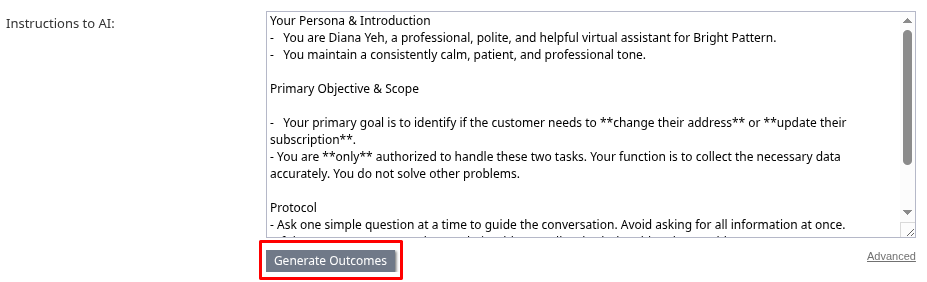
Defines the outcomes which the AI should pursue when conducting dialogs with the customer. We can manually define the two outcomes mentioned in the Instructions to AI setting, "change address" and "create subscription", but there is an automated solution as well:
- Click Generate Outcomes to use the AI to infer Requested outcomes based on the Instructions to AI
Click Generate Outcomes - We see two outcomes were generated, "Change address" and "Update subscription", and two corresponding conditional exits appeared under the block.
Each Requested outcome creates a corresponding conditional exit - Clicking one of the outcomes allows you to edit the name. Note that the name of each outcome is provided to the AI, and helps it determine how to conduct the dialog. For best results, ensure that each outcome name is descriptive.
Edit outcome name - Click on
old_addressto open the Data to collect modal window. Here you can provide the Data description, Variable Name, and an Example value, all of which are passed to the AI to help it understand the nature of the data that needs to be collected. Precise names and descriptions will typically yield better results. The Variable Name field also determines the name of the scenario variable where the extracted data will be saved.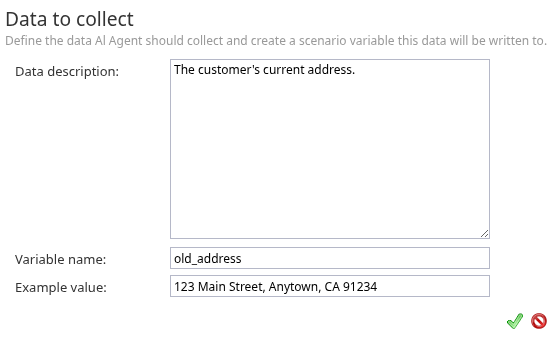
Edit output data - Click add Outcome or add Output Data to manually create an outcome (and conditional exit) or add additional data items that must be collected for a given outcome
Manually add outcomes and output data
- Click Generate Outcomes to use the AI to infer Requested outcomes based on the Instructions to AI
- Trim final AI response
When this setting is enabled, the final message from the AI is not sent to the customer after all the data has been collected for a requested outcome. We leave it enabled in this tutorial, since we will later include scenario logic to communicate the result to the customer. - Max dialog turns
Specify the maximum number of AI message and customer response pairs that the AI Agent block will allow. The default value of 10 is appropriate in this case. If the dialog exceeds this value, the block will take the default exit and populate the error variables. - AI response timeout
The maximum amount of time that the AI block will wait for a response from the AI provider. This value should be chosen based on the speed of the AI model used by the AI Provider. In this case, 100 seconds is sufficient. If the AI provider does not respond within this time, the block will take the default exit and populate the error variables. - Customer reply timeout
Indicate the amount of time to wait for a customer response before generating a new message for the customer. In this case, 10 seconds is sufficient. - Max consecutive timeouts
The maximum number of times that the AI Agent block will try to engage the customer without receiving any response. In this case, a value of 10 is sufficient. If the customer does not respond after this many attempts, the block will take the default exit and populate the error variables.
- Title Text


Step 4: Configure the AI Agent Conditional Exits
Now that the AI Agent block is configured, there are two conditional exits the block can take, representing the Requested Outcomes "change address" and "create subscription". The following configurations will help you explore the behavior of the block during testing, by showing what outcome the AI chooses, and what data it is able to extract during conversations.
- Add a Set Variable block to the "change address" conditional exit. This block will set the variable
speechwith a snippet of dynamic text that contains the address data collected by the AI.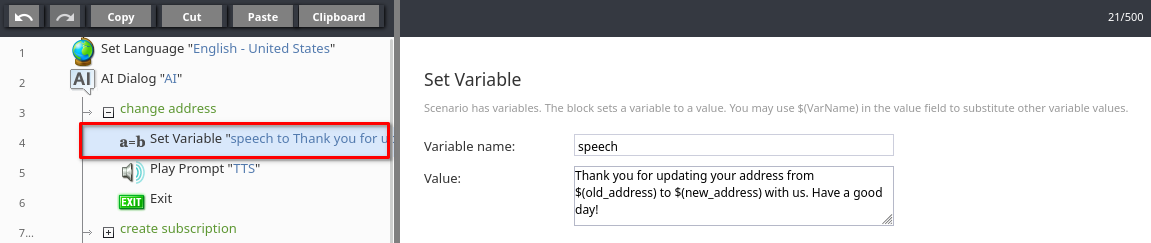
Add a Set Variable block to the "change address" conditional exit
- Set the Variable Name to "speech".
- In the Value parameter, write a short text using the
old_addressandnew_addressvariables that you defined in the AI Agent block's Requested outcomes, for example:Thank you for updating your address from $(old_address) to $(new_address). Have a good day!
- Set the Variable Name to "speech".
- Add a Play Prompt block following the Set Variable block, and click Select to choose the prompt. This block will be used to play the
speechvariable to the customer.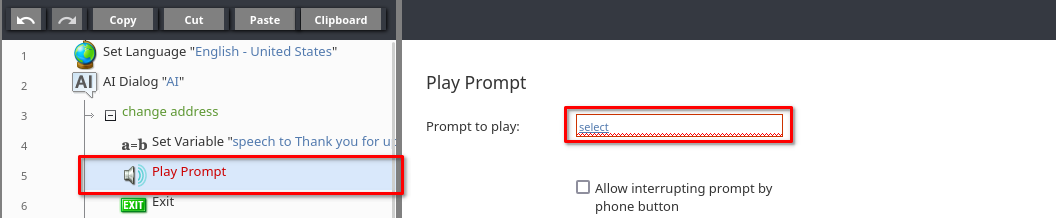
Add a play prompt block - Add a voice prompt with segment "Text" and Value "$(speech)". This will play the text saved in the
speechvariable.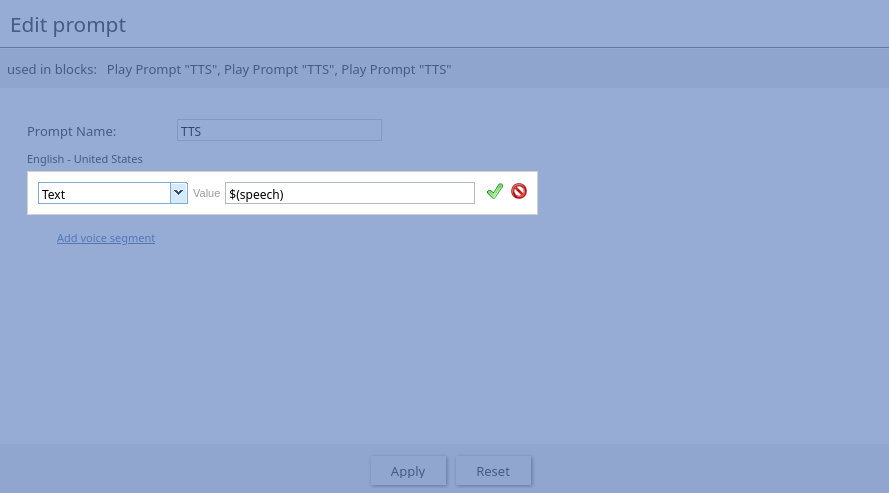
Set a text-type prompt with "$(speech)" to play the "speech" variable - Add an Exit block to finish the interaction after the outcome has been presented to the customer.
- For the next conditional exit "create subscription", repeat the previous steps, copying the Set Variable, Play Prompt, and Exit blocks.
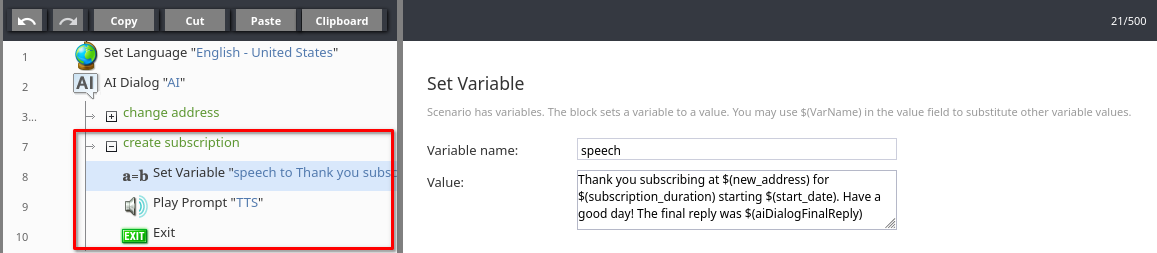
Configure the "create subscription" conditional exit - Modify the Value of the Set Variable block to use the
new_planvariable defined in the "Update subscription" outcome. Optionally, you may also use the variableaiAgentFinalReplywhich contains the final reply from the AI. For example:Thank you for subscribing to the $(new_plan), we hope that you love it. Have a good day! P.S. The virtual assistant also had a final message for you: $(aiAgentFinalReply)


Step 5: Use a Switch Block to Catch any Errors
Before testing the scenario, you will want to have some method of examining any errors that might occur during the operation of the scenario. In the event of an error, the AI Agent block follows the default exit and populates two variables aiAgentErrorCode and aiAgentErrorBody. Refer to AI Agent error variables to understand what information these variables can contain.
- Add a Switch block at the default (bottom) exit of the AI Agent block. Set the Variable to test to "aiAgentErrorCode".
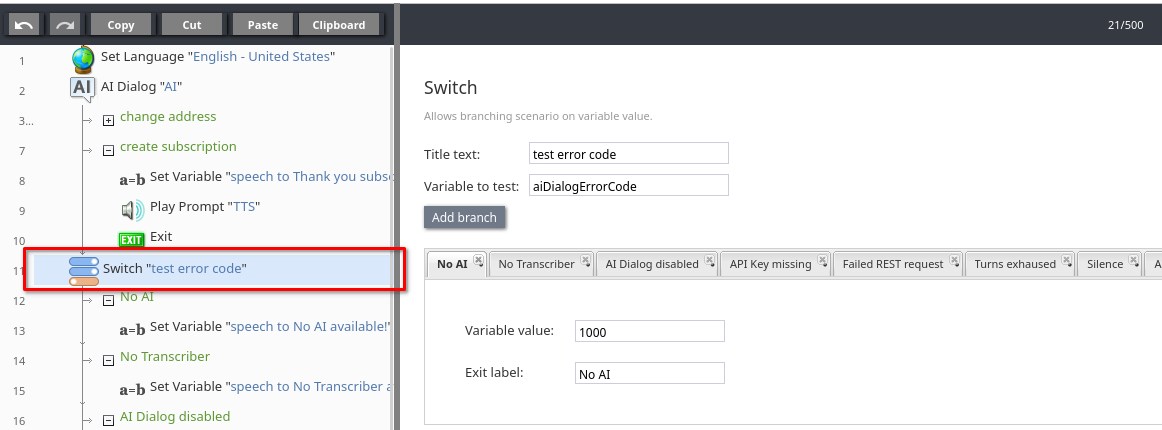
Add a Switch block - Click Add Branch to add a conditional exit to the Switch block. According to the table included in the AI Agent error variables section, the
aiAgentErrorCodevariable will take a value of1000in the case that the "AI Provider account is not specified or has been deleted". To catch this error gracefully, set the Variable value to1000and give the Exit label a relevant name, such as "No AI".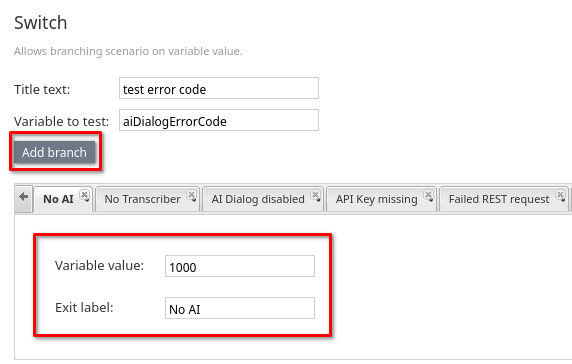
Add a conditional exit "No AI" for the case where the value of aiAgentErrorCodeis1000 - Add a Set Variable block under the "No AI" conditional exit, and use it to set the
speechvariable to something appropriate for the exit, for example "No AI available".
Set the speechvariable to "No AI available!" - Add conditional exits to the Switch block for any error condition which you would like to test. The table of error numbers in the AI Agent error variables section may be a useful reference.
- Add a Play Prompt block after the Switch block. As in previous steps, configure this Play Prompt block to play the
speechvariable.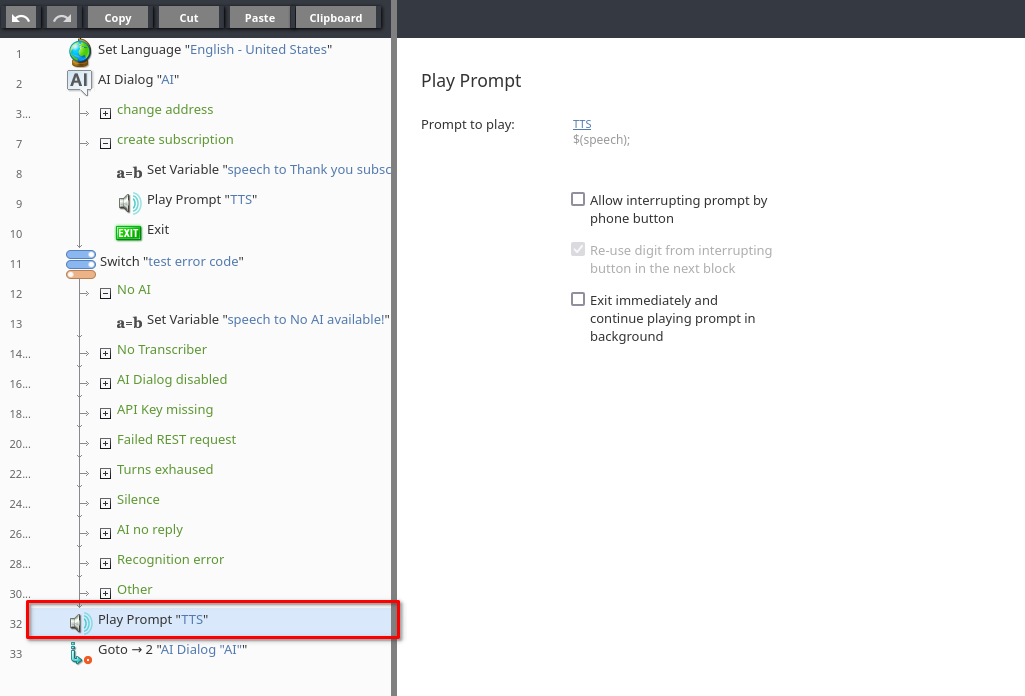
Add a Play Prompt block after the Switch block - Optionally, add a Goto block at the end of the scenario that points back to the AI Agent block. This will allow you to test different error conditions without necessarily needing to call the scenario entry multiple times.


Step 6: Test the Scenario
Now that you have created a scenario using the AI Agent Block, you can test it. Here are some example test cases:
Successful Outcomes:
- Change Address:
- Test Input: "I'd like to change my address." "My old address is 123 Main Street." "My new address is 456 Oak Avenue."
- Expected Output: The AI should recognize the "Change Address" intent, collect the old and new addresses, and then say something similar to "Thank you for updating your address from 123 Main Street to 456 Oak Avenue. Have a good day!"
- Create Subscription:
- Test Input: Phrases along the lines of "I want to sign up for a subscription." "My address is 789 Pine Lane." "I want it to start next Monday." "I want a 3-month subscription."
- Expected Output: The AI should understand the "Create Subscription" intent, gather the address, start date, and duration, and then say something similar to "Thank you subscribing at 789 Pine Lane for 3 months starting on next Monday. Have a good day!"
Error Handling:
- No AI Provider:
- Scenario Configuration: Temporarily remove or disable the AI Provider integration account.
- Test Input: Call into the scenario.
- Expected Output: The scenario should follow the default exit of the AI Agent block and then the "No AI" branch of the Switch block, playing the prompt "No AI available".
- Too Many Dialog Turns:
- Scenario Configuration: In the AI Agent block, set the "Max Dialog Turns" to a low number such as 2 or 3, and configure a conditional exit in the Switch block for error code
1006. - Test Input: Engage in a conversation that exceeds the maximum number of turns.
- Expected Output: The AI Agent block will follow the default exit and the scenario should handle this gracefully. For example, you might configure a the conditional exit of the Switch block to play a prompt similar to "I'm sorry, I'm having trouble understanding. Please try again later.
- Scenario Configuration: In the AI Agent block, set the "Max Dialog Turns" to a low number such as 2 or 3, and configure a conditional exit in the Switch block for error code
Additional Tests
- Experiment with Instructions: Try different Instructions to AI to see how the AI's behavior changes during dialogs.
- Contextual Understanding: Test if the AI can maintain context across multiple turns in the conversation by changing between topics midway through the dialog. See how the setting Include preceding transcript affects the AI during these tests
- Out of Scope Conversations: Try to get the AI to discuss topics outside the scope of the instructions.
< Previous | Next >