From Bright Pattern Documentation
(Marked this version for translation) |
|||
| Line 1: | Line 1: | ||
| − | <translate>= Importing Localization Resources= | + | <translate>= Importing Localization Resources= <!--T:1--> |
Localization resources are imported to Jaspersoft Studio so that reports are displayed in multiple languages. These resources are found in the ''com'' subfolder of the ''report-template-libs'' folder in the package that you previously downloaded and extracted. | Localization resources are imported to Jaspersoft Studio so that reports are displayed in multiple languages. These resources are found in the ''com'' subfolder of the ''report-template-libs'' folder in the package that you previously downloaded and extracted. | ||
| − | == How to Import == | + | == How to Import == <!--T:2--> |
To import the localization resources, follow these steps. | To import the localization resources, follow these steps. | ||
| − | === Step 1: In the ''MyReports'' project, create a folder called ''resources'' === | + | === Step 1: In the ''MyReports'' project, create a folder called ''resources'' === <!--T:3--> |
* In Jaspersoft Studio, navigate to the ''Project'' tab in the left-hand part of the screen.<br /><br /> | * In Jaspersoft Studio, navigate to the ''Project'' tab in the left-hand part of the screen.<br /><br /> | ||
* Select '''MyReports'''.<br /><br /> | * Select '''MyReports'''.<br /><br /> | ||
| Line 12: | Line 12: | ||
* Click '''Finish'''. | * Click '''Finish'''. | ||
| − | === Step 2: Import files === | + | === Step 2: Import files === <!--T:4--> |
* Right-click the '''resources''' folder and select '''Import…'''.<br /><br /> | * Right-click the '''resources''' folder and select '''Import…'''.<br /><br /> | ||
* In the dialog window that pops up, select '''File System'''.<br /><br /> | * In the dialog window that pops up, select '''File System'''.<br /><br /> | ||
| Line 20: | Line 20: | ||
| + | <!--T:5--> | ||
[[File:reporting-db-spec-image3.png|thumb|600px|center|]] | [[File:reporting-db-spec-image3.png|thumb|600px|center|]] | ||
| + | <!--T:6--> | ||
''MyReports'' now contains folder ''resources'' and subfolder ''com''. | ''MyReports'' now contains folder ''resources'' and subfolder ''com''. | ||
| + | <!--T:7--> | ||
[[File:Resources-Com.png|350px|thumbnail|center|MyReports > Resources > Com]] | [[File:Resources-Com.png|350px|thumbnail|center|MyReports > Resources > Com]] | ||
| − | === Step 3: Build paths to the files within the project folder === | + | === Step 3: Build paths to the files within the project folder === <!--T:8--> |
| + | <!--T:9--> | ||
Right-click '''resources''' and select '''Build Path > Use As Source Folder'''. Doing so makes ''resources'' a source folder available at the top of ''MyReports''. | Right-click '''resources''' and select '''Build Path > Use As Source Folder'''. Doing so makes ''resources'' a source folder available at the top of ''MyReports''. | ||
| + | <!--T:10--> | ||
[[File:Build-Path-Use-As.png|450px|thumbnail|center|Making ''resources'' a source folder within the project folder]] | [[File:Build-Path-Use-As.png|450px|thumbnail|center|Making ''resources'' a source folder within the project folder]] | ||
Revision as of 22:41, 11 November 2019
• 日本語
<translate>= Importing Localization Resources= Localization resources are imported to Jaspersoft Studio so that reports are displayed in multiple languages. These resources are found in the com subfolder of the report-template-libs folder in the package that you previously downloaded and extracted.
How to Import
To import the localization resources, follow these steps.
Step 1: In the MyReports project, create a folder called resources
- In Jaspersoft Studio, navigate to the Project tab in the left-hand part of the screen.
- Select MyReports.
- Right-click MyReports and then select New > Folder.
- In the dialog box that pops up, select parent folder MyReports and name the new folder resources. This is the folder that will contain your localization resources.
- Click Finish.
Step 2: Import files
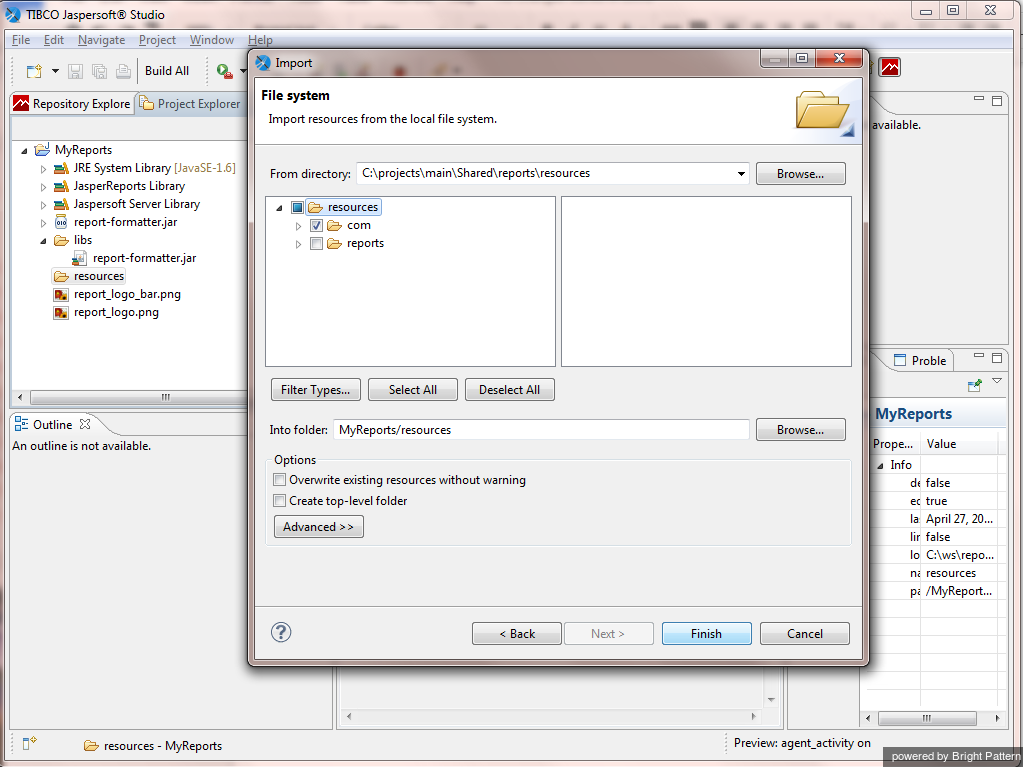
- Right-click the resources folder and select Import….
- In the dialog window that pops up, select File System.
- Click Next.
- Open the report-template-libs folder of the previously downloaded and extracted package and click OK.
- Select the com subfolder and click Finish.
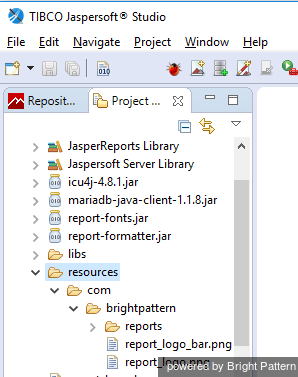
MyReports now contains folder resources and subfolder com.
Step 3: Build paths to the files within the project folder
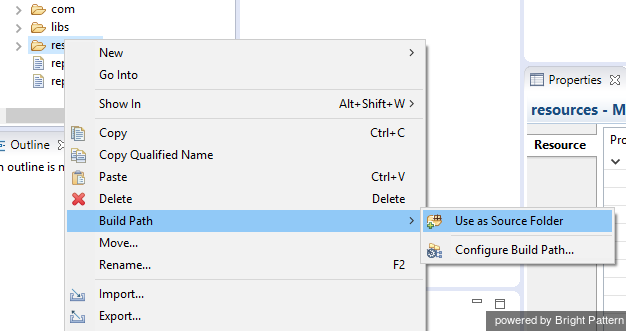
Right-click resources and select Build Path > Use As Source Folder. Doing so makes resources a source folder available at the top of MyReports.
</translate>


