(Created page with "<translate> = Complete an Interaction = You can terminate an interaction to end it immediately, but...") |
|||
| Line 1: | Line 1: | ||
<translate> | <translate> | ||
= Complete an Interaction = | = Complete an Interaction = | ||
| − | You can [[Embedded-agent-desktop- | + | You can [[Embedded-agent-desktop-api-specification/Methods/terminateInteraction | terminate an interaction]] to end it immediately, but that doesn't close and remove it from your desktop. For it to be completely wrapped up, the interaction has to be marked as Complete. You can use the [[Embedded-agent-desktop-api-specification/Methods/completeInteraction | completeInteraction]] method to complete an interaction for an agent. |
| − | completeInteraction is best used with [[Embedded-agent-desktop- | + | completeInteraction is best used with [[Embedded-agent-desktop-api-specification/Methods/getState | getState]] and [[Embedded-agent-desktop-api-specification/Methods/terminateInteraction | terminateInteraction]]. getState retrieves agent state information, including the interaction ID that you will need in order to end the interaction. terminateInteraction allows you to end the interaction and place the agent in the after-call work (ACW) state. |
The completeInteraction method can be attached to a web element, such as a button, on your webpage. When clicked, the button will process the API method. | The completeInteraction method can be attached to a web element, such as a button, on your webpage. When clicked, the button will process the API method. | ||
In this article, you will learn how to: | In this article, you will learn how to: | ||
| − | * Attach [[Embedded-agent-desktop- | + | * Attach [[Embedded-agent-desktop-api-specification/Methods/getState | getState]] to a button |
| − | * Attach [[Embedded-agent-desktop- | + | * Attach [[Embedded-agent-desktop-api-specification/Methods/terminateInteraction | terminateInteraction]] to a button and item ID to a field |
| − | * Attach [[Embedded-agent-desktop- | + | * Attach [[Embedded-agent-desktop-api-specification/Methods/completeInteraction | completeInteraction]] to a button and item ID to a field |
* Place sample JavaScript into HTML | * Place sample JavaScript into HTML | ||
| − | == | + | == Sample Code == |
| − | + | In this sample code, the methods are attached to button elements. | |
| − | + | Copy this sample code for pasting into your HTML file. This is the bare minimum that you need for the SDK to work. Make sure you replace "<tenant>" with the name of your Agent Desktop web server (e.g., "example.brightpattern.com"). | |
| − | |||
| − | |||
| − | |||
| − | |||
| − | |||
| − | |||
| − | + | <syntaxhighlight lang="javascript"> | |
| − | |||
| − | |||
| − | |||
<script type="text/javascript" src="https://<tenant>.brightpattern.com/agentdesktop/libs/servicepattern-sdk-v1.js"> | <script type="text/javascript" src="https://<tenant>.brightpattern.com/agentdesktop/libs/servicepattern-sdk-v1.js"> | ||
</script> | </script> | ||
| − | <iframe id="repeater" style="position:absolute; right: 8px; width: 300px; height: 700px;" src="https://<tenant>.brightpattern.com/agentdesktop/UniversalRepeater.jsp"></iframe> | + | <iframe id="repeater" style="position:absolute; right: 8px; width: 300px; height: 700px;" src="https://<tenant>.brightpattern.com/agentdesktop/UniversalRepeater.jsp"></iframe> |
| − | <button onclick="bpspat.api.getState(log)">Get State</button> | + | <button onclick="bpspat.api.getState(log)">Get State</button> |
| − | < | + | <br> |
| − | < | + | <br> |
| − | <input id="item" type="text" placeholder="Interaction Id, see Logs"/> | + | <input id="item" type="text" placeholder="Interaction Id, see Logs"/> |
| − | < | + | <br> |
| − | < | + | <br> |
| − | <button onclick="bpspat.api.terminateInteraction(document.getElementById('item').value)">Terminate</button> | + | <button onclick="bpspat.api.terminateInteraction(document.getElementById('item').value)">Terminate</button> |
| − | <button onclick="bpspat.api.completeInteraction(document.getElementById('item').value)">Complete</button> | + | <button onclick="bpspat.api.completeInteraction(document.getElementById('item').value)">Complete</button> |
| − | < | + | <br> |
| − | < | + | <br> |
| − | < | + | <div id="log">Logs...</div> |
| − | < | + | <br> |
| − | < | + | <br> |
| − | <script type="text/javascript"> | + | <script type="text/javascript"> |
| − | window.bpspat.api.init("https://<tenant>.brightpattern.com"); | + | window.bpspat.api.init("https://<tenant>.brightpattern.com"); |
function log(data) { | function log(data) { | ||
let div = document.createElement("div"); | let div = document.createElement("div"); | ||
| Line 56: | Line 47: | ||
</script> | </script> | ||
| + | </syntaxhighlight> | ||
| + | |||
| + | |||
| + | == Example Exercise == | ||
| + | There are many ways to style your page elements and Agent Desktop widget display. The following is provided for example purposes only. | ||
| + | |||
| + | # Paste the [[5.3:Embedded-agent-desktop-sdk-specification/UseCases/SetDisposition#Sample_Code | | ||
| + | sample code]] into the body of your HTML file.<br /><br /> | ||
| + | # Save and open the page in your web browser. Make sure the agent is logged in and "Ready."<br /><br /> | ||
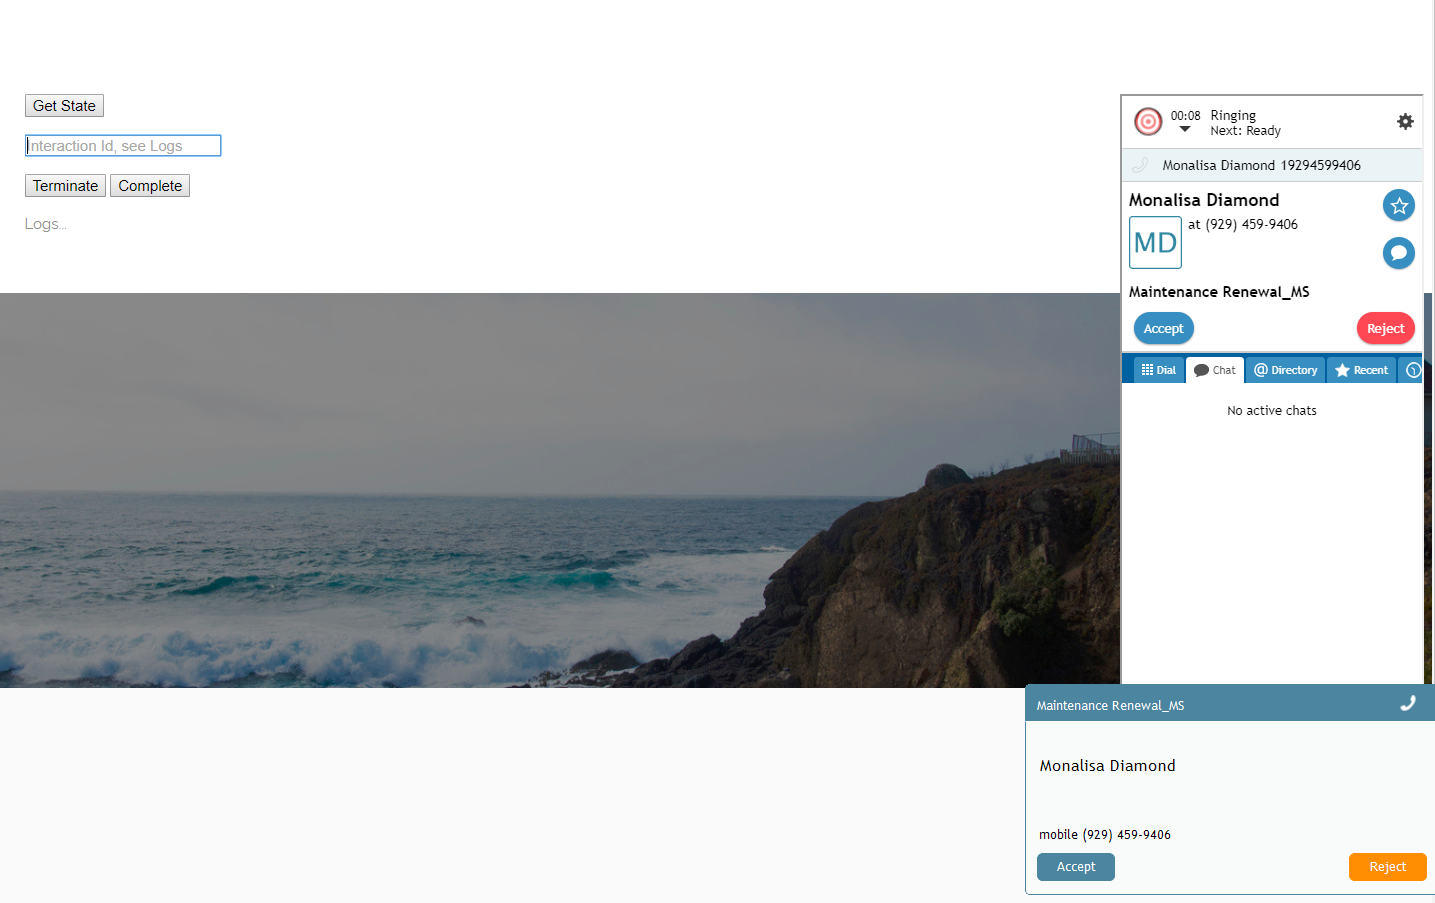
| + | # A call comes in and the agent accepts it.<br /><br />[[File:TerminateInteraction1-53.PNG|800px|center|Incoming call]]<br /><br /> | ||
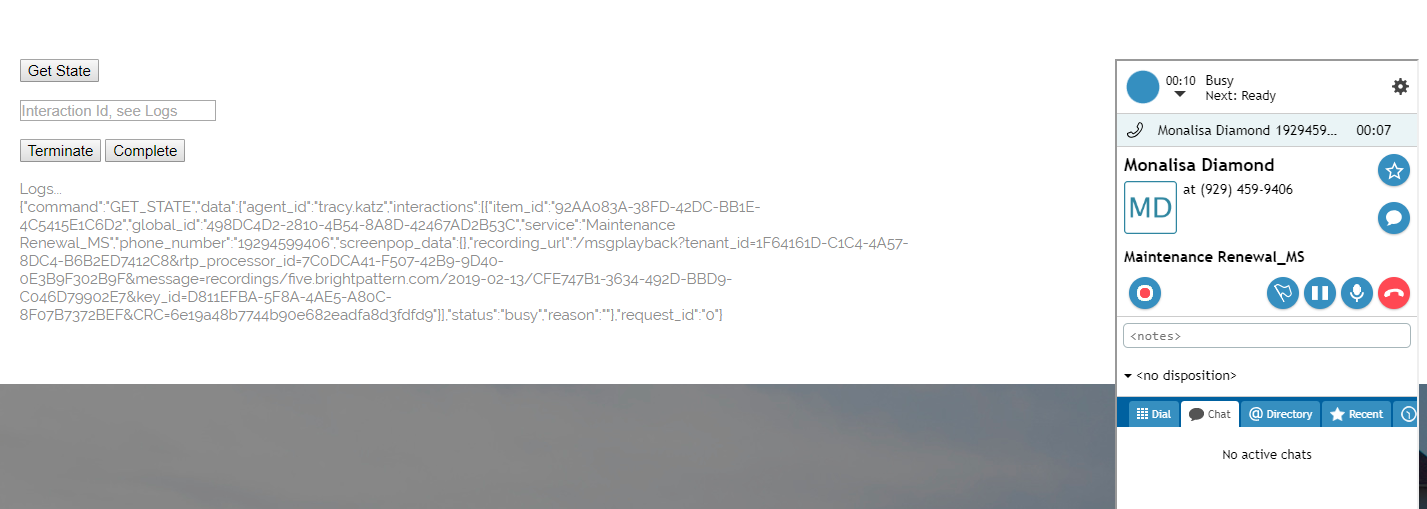
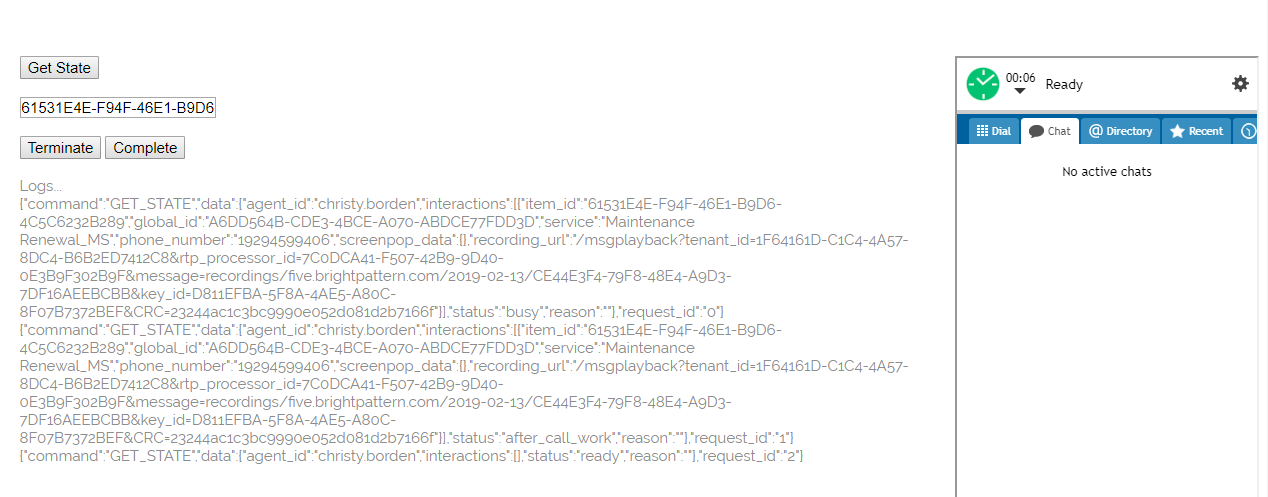
| + | # During the call, click '''Get State''', which brings up the agent status and interaction log data.<br /><br />[[File:TerminateInteraction2-53.PNG|800px|center|Agent status information shown in logs]]<br /><br /> | ||
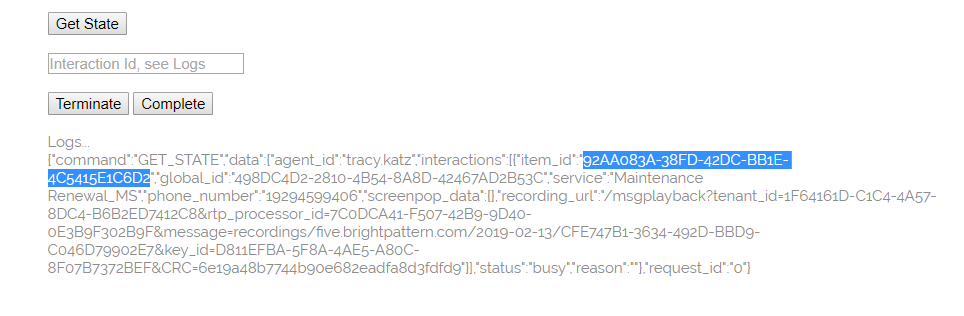
| + | # Copy the '''item_ID''' from the logs.<br /><br />[[File:TerminateInteraction3-53.PNG|800px|center|Entering disposition code field]]<br /><br /> | ||
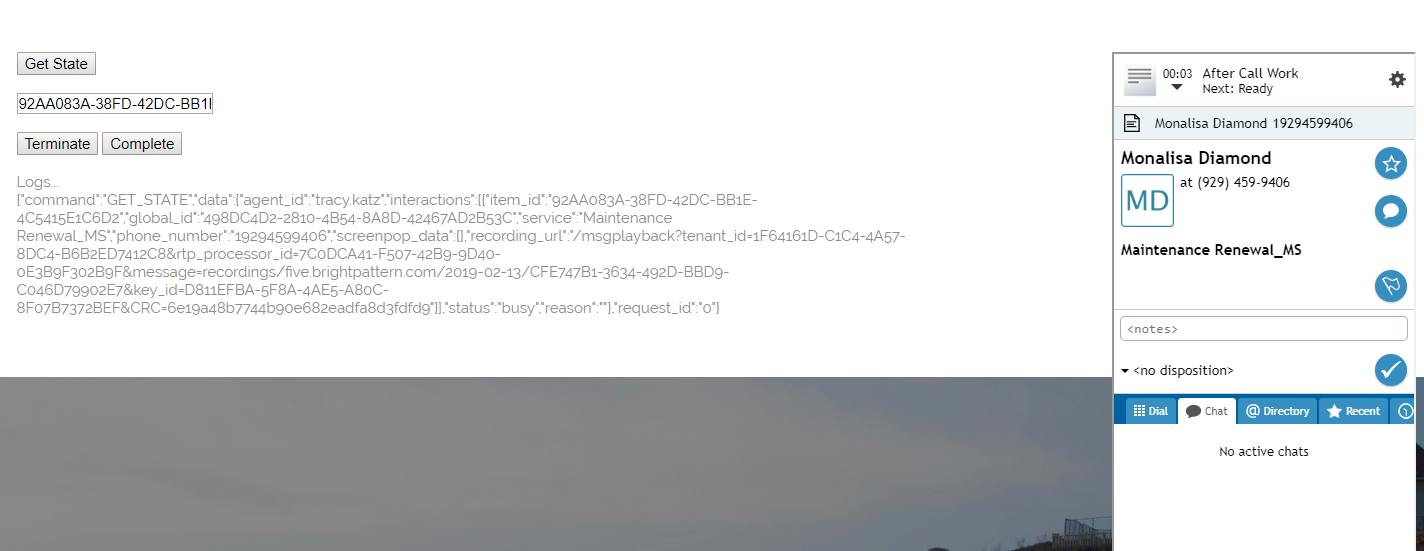
| + | # Paste it into the Interaction ID field, and click '''Terminate''' to end the call. This places the agent in the after-call work state.<br /><br />[[File:TerminateInteraction4-53.PNG|800px|center|Terminate the interaction]]<br /><br /> | ||
| + | # Click '''Complete''' to complete the call. This places the agent in the Ready state.<br /><br />[[File:CompleteInteraction2-53.PNG|800px|center|Complete the interaction]]<br /><br /> | ||
| + | |||
| + | |||
Revision as of 22:04, 26 March 2019
<translate>
Complete an Interaction
You can terminate an interaction to end it immediately, but that doesn't close and remove it from your desktop. For it to be completely wrapped up, the interaction has to be marked as Complete. You can use the completeInteraction method to complete an interaction for an agent.
completeInteraction is best used with getState and terminateInteraction. getState retrieves agent state information, including the interaction ID that you will need in order to end the interaction. terminateInteraction allows you to end the interaction and place the agent in the after-call work (ACW) state.
The completeInteraction method can be attached to a web element, such as a button, on your webpage. When clicked, the button will process the API method.
In this article, you will learn how to:
- Attach getState to a button
- Attach terminateInteraction to a button and item ID to a field
- Attach completeInteraction to a button and item ID to a field
- Place sample JavaScript into HTML
Sample Code
In this sample code, the methods are attached to button elements.
Copy this sample code for pasting into your HTML file. This is the bare minimum that you need for the SDK to work. Make sure you replace "<tenant>" with the name of your Agent Desktop web server (e.g., "example.brightpattern.com").
 <script type="text/javascript" src="https://<tenant>.brightpattern.com/agentdesktop/libs/servicepattern-sdk-v1.js">
 </script>

 <iframe id="repeater" style="position:absolute; right: 8px; width: 300px; height: 700px;" src="https://<tenant>.brightpattern.com/agentdesktop/UniversalRepeater.jsp"></iframe>

 <button onclick="bpspat.api.getState(log)">Get State</button>
 <br>
 <br>
 <input id="item" type="text" placeholder="Interaction Id, see Logs"/>
 <br>
 <br>
 <button onclick="bpspat.api.terminateInteraction(document.getElementById('item').value)">Terminate</button>
 <button onclick="bpspat.api.completeInteraction(document.getElementById('item').value)">Complete</button>
 <br>
 <br>
 <div id="log">Logs...</div>
 <br>
 <br>

 <script type="text/javascript">
 window.bpspat.api.init("https://<tenant>.brightpattern.com");
 function log(data) {
 let div = document.createElement("div");
 div.innerHTML = JSON.stringify(data);
 document.getElementById("log").appendChild(div);
 }

 </script>
Example Exercise
There are many ways to style your page elements and Agent Desktop widget display. The following is provided for example purposes only.
- Paste the
sample code into the body of your HTML file.
- Save and open the page in your web browser. Make sure the agent is logged in and "Ready."
- A call comes in and the agent accepts it.
- During the call, click Get State, which brings up the agent status and interaction log data.
- Copy the item_ID from the logs.
- Paste it into the Interaction ID field, and click Terminate to end the call. This places the agent in the after-call work state.
- Click Complete to complete the call. This places the agent in the Ready state.


</translate>