Skill-Based Call Routing with an Auto Attendant Choice
In the Bright Pattern Contact Center realm, skills are the various abilities of users that can be defined in the Contact Center Administrator application. Skills can be defined as any topic or language pertinent to your contact center (e.g., accounting, Arabic, IT, etc.) Skills are rated in section Skill Levels per user from 0 to 100 (i.e., 0 being the lowest skill possible, and 100 being the highest skill possible). Additionally, users can be skilled for a service or campaign.
Through scenarios, it is possible to route interactions to higher-skilled agents before lower-skilled ones. This lets your customers interact with your most knowledgeable agents, which provides the best customer service experience. Additionally, skill-based routing is great to use when training new, lower-skilled agents; this provides them the opportunity to learn while preventing them from being overwhelmed with interactions.
This scenario details how to configure basic skill-based routing with an option for customers to enter in an extension directly (i.e., "auto attendant"). The skills used in this example are Auxiliary Skills but they may be changed to Language Skills (e.g., your contact center provides services in English, French, and Spanish).
Scenario Example
Click the following link to download an annotated version of this chat scenario example.
File:App Skill-Based Call Routing + Auto Attendant.zip
For instructions on how to import this file into your contact center, see the Contact Center Administrator Guide, section Scenarios Overview > How to Export and Import Scenarios.
For general information about scenarios, refer to section Scenario Builder Overview.
Scenario Flow
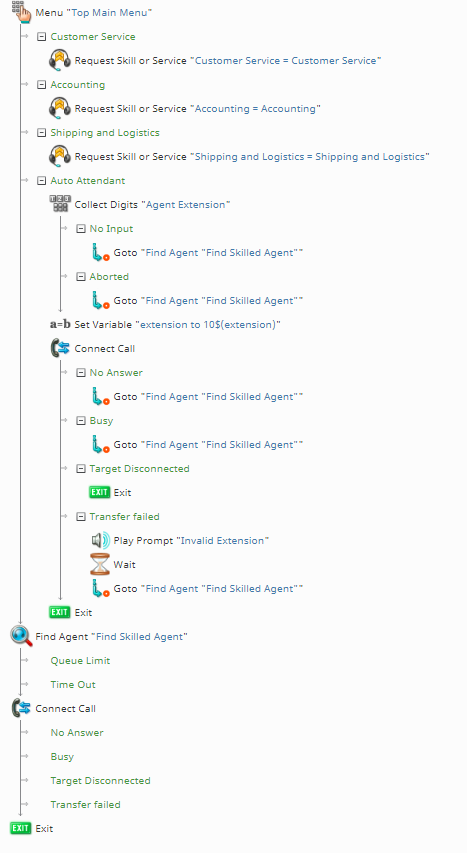
This voice scenario uses a menu to route customers to skilled agents and includes an option to dial the extension of a specific agent. This is accomplished by using the following blocks: Menu, Request Skill or Service, Collect Digits, Set Variable, Find Agent, and two instances of Connect Call.
Note that this is an example scenario only and not intended for production use. All conditional exits should be defined with actions for production use.
Scenario Overview
The diagram shown illustrates what the complete scenario looks like when designed in the Scenario Builder application.
Action 1: Create a Menu with Skill-Based Choices and an Auto Attendant Choice
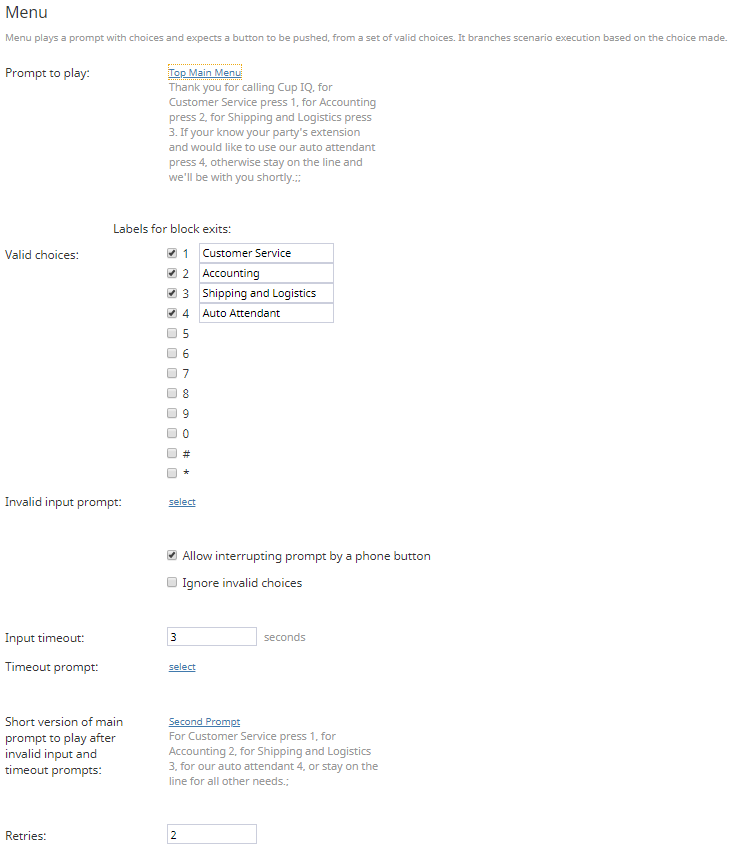
In this scenario, the Menu block allows callers to select a menu choice that routes them to either a skilled agent or allows them to enter the extension of a specific agent directly.
When configuring the Menu block, we create a prompt to play, then configure our valid menu choices. In this example call center, the skills are "Customer Service," "Accounting," and "Shipping and Logistics," so we create valid choices in the block for each of these. Additionally, we create the choice for the "Auto Attendant" (i.e., the caller can enter an extension).
Action 1a: For Skill-Based Menu Choices, Use the Request Skill or Service Block
Next, for each skill-based choice we added in the Menu block, we add the Request Skill or Service block and configure the corresponding skill. This is done by selecting the skill group from the first drop-down menu (i.e., auxiliary, language, etc.), then the specific skill from the skill group in the next drop-down menu.
Note that the Request Skill or Service block acts as a connector between the Menu block and the Find Agent block, where the skill-based routing happens.
Action 2: Begin Configuring Auto Attendant with Collect Digits
For the Menu block choice "Auto Attendant," we allow customers to connect to a specific agent via the agent's extension number. This is accomplished by using the Collect Digits block, the Set Variable block, and a Connect Call block.
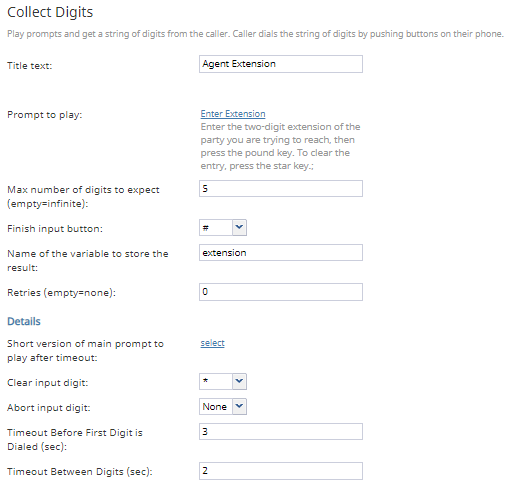
All extensions in our example call center begin with 10 (e.g., 1003), so, rather than have the customer enter in the full four-digit extension, we configure a prompt to play that tells them to enter the last two digits of the extension.
The Collect Digits block records the two digits the customer enters and stores them in the variable configured in the field Name of the variable to store the result; in our example, we call this variable extension.
Action 2a: Use Set Variable to Alter Information from Collect Digits
Next, the variable extension we created in the Collect Digits block is passed to the Set Variable block; this is where the first two digits of the actual extension are added back on to the variable. This is done by appending the number "10" before the begining of the variable like so: 10$(extension)
For example, a customer enters in 39 in the Collect Digits block, which, when passed through Set Variable, becomes 1039, the actual extension.
Action 2b: Have Connect Call Receive the Altered Information from Set Variable
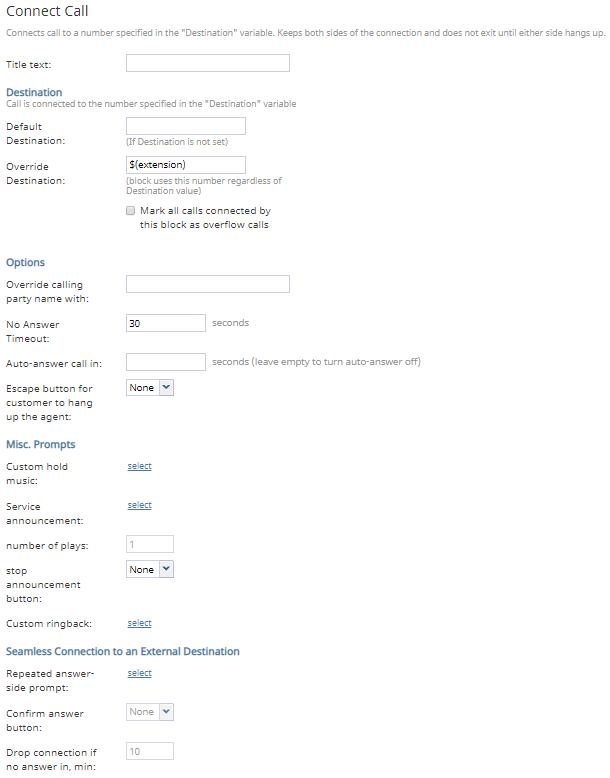
Finally, the variable $(extension) we created in the Set Variable block is passed to the following Connect Call block and entered in the Override Destination field. This ensures the call will go to the specific extension rather than any available agent.
Note that in this branch of the scenario (i.e., the "Auto Attendant" menu choice), if the customer does not enter an extension or the system does not recognize it, we use Goto blocks to route the caller to the Find Agent block.
Action 3: Configure Skill-Based Routing in Find Agent
If the caller selected a skill-based choice from the menu (i.e., they did not select the "Auto Attendant" choice), we will need the call to go to the most appropriately skilled agent.
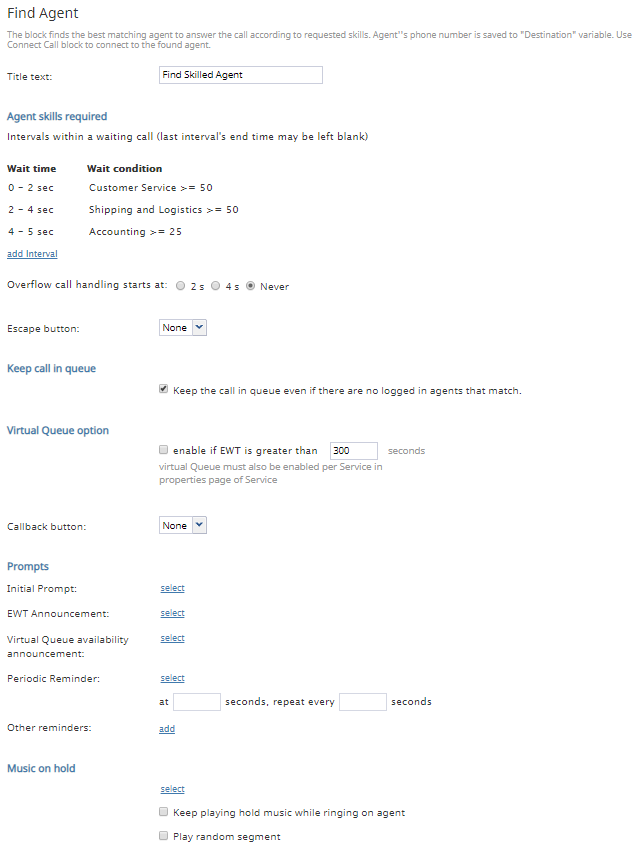
To accomplish this, the Request Skill or Service blocks we configured for each Menu block choice are configured as Wait Conditions in the Find Agent block. The Wait Condition allows the system to find the most appropriately skilled agent for the interaction; however, if the skill condition is not met within the Wait time, the caller will be routed to the next skill group, and ultimately, any available agent.
Action 4: Connect the Call
After an agent has been found, the call is connected in the Connect Call block. For more information about Find Agent and Connect Call, see How to Create a Basic Scenario. As a reminder, define all conditional exits.

