SFDCオブジェクト用にスクリーンポップURLの配置または作成
SFDC 統合は、 原則としてSFDCシステム管理者により提供されるスクリーンポップシナリオブロックURLを使うことによって、Saleforce.com (SFDC)の特定のオブジェクトをスクリーンポップ候補とし、アクセスを可能にします。 一方、以下の手順は、SFDCオブジェクトスクリーンポップURLの作成方法を説明する例として挙げられます。
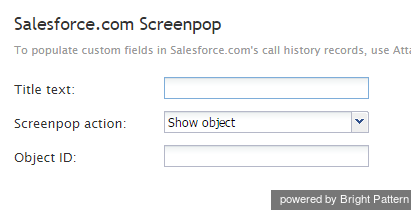
Bright Patternコンタクトセンターは、 Salesforce.com スクリーンポップ シナリオブロックを使って、エージェントデスクトップアプリケーションでSFDCレコード(オブジェクト)を表示します。このブロックは、各オブジェクトIDの選択を許可する他、更にスクリーンポップオブジェクトのSFDC URLを提供します。
ご注意: オブジェクトID URLは、Service CloudとSales Cloudで異なる場合があります。従って、一つのシナリオが企業全体に対応できない場合があります。
Sales Cloudの SFDCスクリーンポップURLの配置
Salesforceを使って, スクリーンポップURLを介して実行したいタスクを手動で実行します。例えば、Sales Cloudにおけるアカウントと特定のコンタクトから新しいケースを開くには、次の手順に従って実行します:
ステップ 1: Sales Cloud アカウントを選んで新しいケースを作成します。
- Sales Cloudから > アカウントを選択します。
- コンタクトまでスクロールします。
- サンプルのコンタクトを選択します。
- コンタクトレコードから ケースまでスクロールし、新しいケースを選択します。図の通り、新しいケースレコードが開きます。
ステップ 2: スクリーンポップのSFDCオブジェクトを識別するURLを設定します。
- 先ずは、ページURLをコピーします:
https://bpdemo-dev-ed.my.salesforce.com/500/e?retURL=%2F003E000000NoeJj&def_contact_id=003E000000NoeJj&def_account_id=001E000000NK3Pl - このURLは、スクリーンポップに必要なSFDCオブジェクトパラメータを識別します。SFDC URLの最初のセグメント(https://bpdemo-dev-ed.my.salesforce.com/) は不要ですので、削除します。デスクトップ統合では、設定されたドメインURLが使用されます。結果は次のとおりです:
500/e?retURL=%2F003E000000NoeJj&def_contact_id=003E000000NoeJj&def_account_id=001E000000NK3Pl - オブジェクトパラメータ (contact_id と account_id)は、シナリオにより定義されたオブジェクト/変数に置き換えられます。例えば:
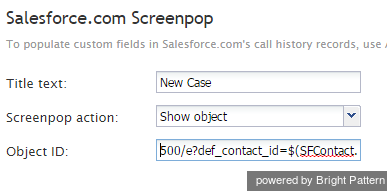
500/e?retURL=%2F003E000000NoeJj&def_contact_id=$(SFContact.Id)&def_account_id=$(SFContact.Account.Id)
備考
一般の オブジェクトIDの識別子 (先頭の3つのフィールド文字により識別)は以下の通りです:
- 001 = アカウント
- 003 = コンタクト
- 00T = タスク
原則として、 retURLまたは Return URLは、特定のオブジェクトに戻る必要がない限り、使用しません。 Return URLを削除すると、既定のアクションは元のワークオブジェクトに戻されます。
- 削除します:
retURL=%2F003E000000NoeJj&
- 最終 URLとは:
500/e?def_contact_id=$(SFContact.Id)&def_account_id=$(SFContact.Account.Id)
このURLは、 Salesforce.comスクリーンポップブロックの オブジェクトID フィールドに配置されます。
Service Cloud (Service Console) の SFDCスクリーンポップURLの検索
Salesforceを使って, スクリーンポップURLを介して実行したいタスクを手動で実行します。例えば、Service Cloudにおけるアカウントと特定のコンタクトから新しいケースを開くには、次の手順に従って実行します:
Step 1: Select a Service Cloud account and create a new case
- From within Service Cloud, select > Accounts.
- Scroll down to a specific account.
- Select a sample account.
- From the Account record selected, scroll down to Contacts.
- Select a sample contact with which to work.
- From the Contact record, scroll down to Cases, and then select New Case. A new Case record should open.
- To locate the behind-the-scenes URL, select the down arrow on the left side, as shown.
Step 2: Edit the new case
Select New Case and click the edit link. This should result in the Link to Share dialog box.
In Link to Share, three options are available:
- Include all primary tabs and subtitles
- Include only this tab
- Create standard Salesforce URL
Step 3: Configure the URL that identifies the SFDC Object for screen pop
- Select “Include only this tab” to provide the simple URL for the screen pop described.
- Copy the page URL as your starting reference:
https://bpdemo-dev-ed.my.salesforce.com/console#%2F500%2Fe%3Fdef_contact_id%3D003E000000NoeJk%26def_account_id%3D001E000000NK3Pm
The URL identifies the SFDC Object parameters required for your screen pop. The initial SFDC URL segment is not required (https://bpdemo-dev-ed.my.salesforce.com/) and should be removed--the desktop integration will use the configured domain URL. The result is:
console#%2F500%2Fe%3Fdef_contact_id%3D003E000000NoeJk%26def_account_id%3D001E000000NK3Pm
The Object parameters def_contact_id and def_account_id would be replaced by the scenario-defined objects/variables.
The URI data format is as follows (for reference only):
%3D = “=”

%26 = “&”

%2F = “/”

%3F = “?”
Thus the result would be the following:
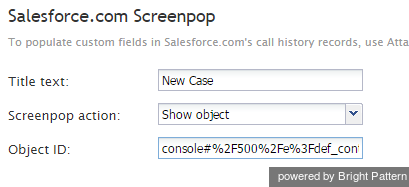
console#%2F500%2Fe%3Fdef_contact_id%3D$(SFContact.Id)%26def_account_id%3D$(SFContact.Account.Id)
一般の オブジェクトIDの識別子 (先頭の3つのフィールド文字により識別)は以下の通りです:
- 001 = アカウント
- 003 = コンタクト
- 00T = タスク
This URL will be placed in the Salesforce.com Screenpop scenario block's Object ID field:


