チャットウィジェットのスタイル設定
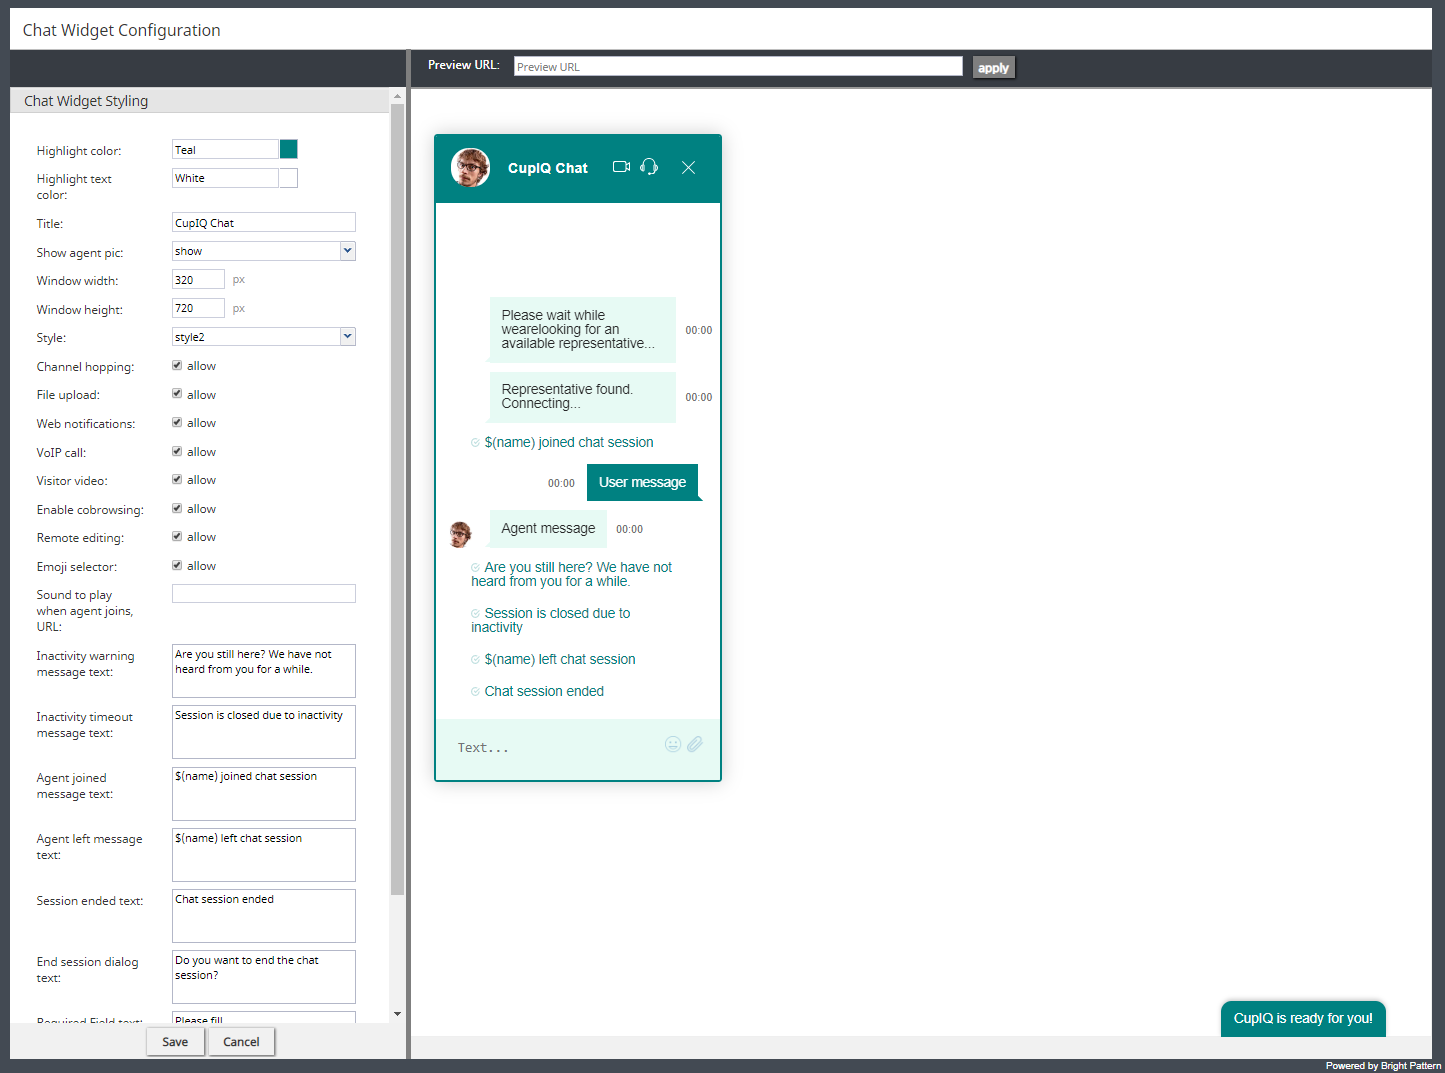
チャットウィジェット設定アプリケーションでは、貴社のブランド、ウェブサイトのスタイル、ロゴなどに合わせてチャットウィジェットのスタイルを編集できます。
プロパティ
次のプロパティによって、チャットウィジェットの全体的な外観が決定されます。スタイルプロパティを編集すると、画面右側のプレビューペインに、ウィジェットに加えた変更が表示されます。
ハイライトカラー
ハイライトカラーは、システムによる自動送信されるメッセージ(例えば、"チャットセッションが終了しました")のテキストカラーやお客様が送信するテキストの背景色としてウィジェットの上部に表示される色です。このカラーは、40の色を含むWebカラーリストから選択できます。
ハイライトテキストカラー
ハイライトテキストカラーは、お客様が送るテキストの色です。40の色を含むWebカラーリストから選択できます。これによって、お客様のテキストとエージェントのテキストを区別できます。
Title
Title is the name of your chat widget. Having a title is helpful when you have multiple chat widget configurations and need to identify them quickly.
Show agent pic
Select the Show agent pic checkbox if you wish the agent's user profile photo to be shown during a chat interaction. Select from the following options:
- none
- show
- always show default
Window width
The window width can be specified in pixels.
Window height
The window height can be specified in pixels.
Style
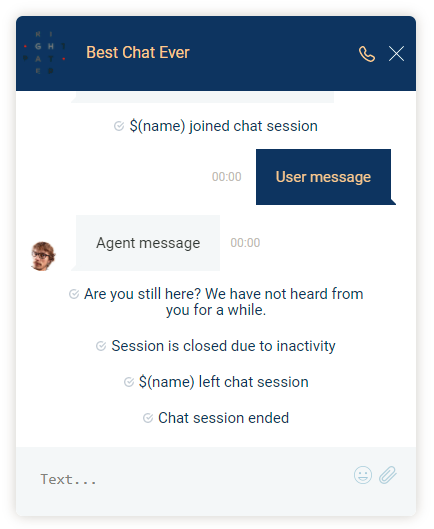
There are two display styles from which to choose: style1 and style2. Style1 places a border around the entire widget, and style2 has no border.
Channel hopping
To enable customers to move the conversation from rich web chat to another media channel (i.e., SMS, Facebook Messenger, LINE, Telegram, Viber), select the allow checkbox. Note that channel hopping can be enabled only if the other channel types are supported and configured for your contact center.
File upload
To allow customers to upload photos, documents, or other such files to a chat interaction, select the allow checkbox.
Web notifications
Select allow for web notifications to appear for new chat messages.
VoIP call
Select allow to enable the customer and agent to talk on a VoIP call while chatting. Notice that when you select allow, the headset icon appears on the chat widget. Either customers or agents can click the headset icon to initiate the VoIP call. The call can be disconnected by clicking the phone button.
Visitor video
Select allow to enable the customer and agent to talk on a video call while chatting. Notice that when you select allow, the video camera icon appears on the chat widget. Either customers or agents can click the video camera icon to initiate the video call. The video can be disconnected by clicking the phone button.
Enable cobrowsing
Select allow to enable the customer to share their screen with the agent and follow the customer’s scrolling movements. Co-browsing is initiated during the chat by the customer--not the agent--and screen sharing ends when either the customer clicks Co-browsing button or when the chat is terminated.
For customers upgrading to version 5.3.5 or later who configured chat per the full chat code on older versions of Bright Pattern Contact Center: If the togetherJS_enabled variable was used to enable co-browsing, after you upgrade this option will have priority over the variable after any changes are made and saved in Chat Widget Styling. If you wish to configure co-browsing, we recommend enabling this setting in Chat Widget Styling.
Remote editing
When enabled, remote editing allows agents to enter or update data via the customer’s screen. Note that this option is available only if the setting Enable cobrowsing is enabled, and if so, this setting is enabled by default.
Emoji selector
If the emoji selector option is enabled, agents and customers can click on the emoji icon, which pops the emoji selector tab; when selected, the emojis will appear in chat messages. Note that this option is enabled by default.
Sound to play when agent joins, URL
If a sound should be played when an agent joins the conversation, enter the URL of the sound here.
Inactivity warning message text
When a chat interaction has been idle for too long, the inactivity warning message text will appear on both the agent's and customer's screens. Enter the contents of the message in the text entry field (e.g., "Your chat session will expire due to inactivity.").
Inactivity timeout message text
Upon timeout, inactive chat interactions will pop the inactivity timeout message text on both the agent's and customer's screens. Enter the contents of the message in the text entry field (e.g., "Your chat session has expired due to inactivity.").
Agent joined message text
The "agent joined message text is added to the chat interaction when an agent accepts it. Enter the message to appear in the chat interaction (e.g., "Agent $(first.name) has joined the chat."). You can use variables in the message.
Agent left message text
The "agent left message text is added to the chat interaction when the agent has either left completed the interaction or transferred it to another agent. Enter the message to appear in the chat interaction (e.g., "Agent $(first.name) has left the chat."). You can use variables in the message.
Session ended text
The session ended text appears in the chat interaction when the chat has been terminated (e.g., "This chat session has ended. Have a great day!").
End session dialog text
The end session dialog text message appears when customers attempt to end the chat by closing the chat widget (e.g., "Do you want to end the chat session?").
Required Field text
The Required Field text field lets you configure the message that appears when pre-chat form required fields are not filled out (e.g., "Please fill").
Refers to Required Fields text
The Refers to Required Fields text field lets you configure the message that appears when referring to required fields (e.g., "* Refers to Required Fields").
Invalid Input Field text
The Invalid Input Field text field allows you to configure the text that appears when invalid input is entered in a field.
Notifications prompt
The Notifications prompt field lets you configure the text that appears at the top of the chat widget that prompts users to allow notifications from their web browsers.


