提供: Bright Pattern Documentation
< 5.19:Agent-guide | Setup | Voicemail
ボイスメールの設定
内線番号へ直接発信されるコールは、応答できない場合ボイスメールシステムへ転送できます。ボイスメールの挨拶を自分で録音し、エージェントデスクトップアプリケーションを通じてボイスメールを有効/無効にすることができます。あらゆる状況に応じる挨拶が3件まで録音可能です。
ボイスメールの配信を行うには、メールアドレスが必要です。ボイスメールの設定を行う前に、設定 > ユーザープロフィール > コンタクト情報 > メールアドレスでメールアドレスが登録されているか、ご確認ください。
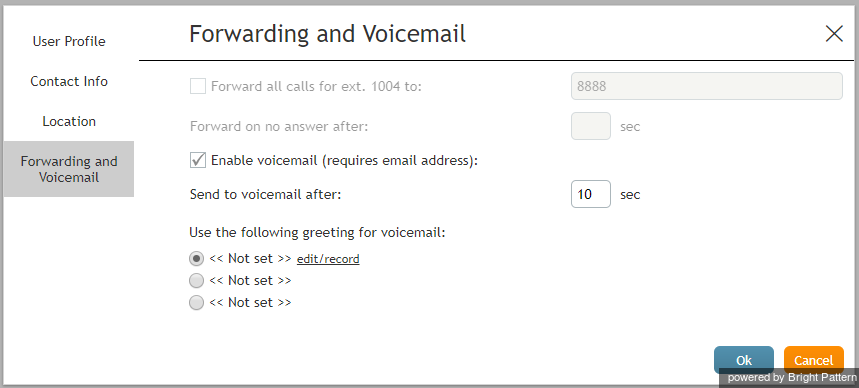
ステップ 1: ユーザープロフィール設定の転送とボイスメールタブへ移動します。
- 設定をクリックし、ユーザープロフィールを選択し、転送とボイスメールタブをクリックします。
- このタブには、コール転送およびボイスメール機能に関連する設定が含まれています。 ボイスメールに関連する設定が表示されない場合は、先ず '全てのコールを転送する チェックボックスのチェックを外します。
- このステップで、ボイスメールの有効化 (メールアドレスが必要) と ボイスメール送信までの時間 フィールドを変更しないでください。ボイスメール挨拶を録音した後、これらのフィールドに戻ります。
ステップ 2: カスタマイズした挨拶を作成します。
システムは、事前に録音された一般的なボイスメールの挨拶を提供します:内線番号[エージェントの内線番号]は、只今お答えできません。 発信音の後にご用件をお話ください。
上記の既定の挨拶をエージェントの声で録音した挨拶に置き換えることができます(自分で録音した挨拶を使っていいかどうかは、システム管理者にご確認ください)。
- 次のボイスメールの挨拶を利用するの下にある一番目のラジオボタンを選択します。保存された挨拶がない場合は、ボタンの横に << 未設定 >> が表示されます。
- 編集/録音 リンクをクリックします。
- 挨拶文を用意します。
- ヘッドセットを付けます。
- 表示されるウィンドウで、挨拶のタイトルを入力します (例えば、 毎日の挨拶)
- 録音開始
ボタンをクリックします。録音開始のシングルトーンが聞こえます。 ボタンの外観が変更し、 停止
コントロールが表示されます。
- マイクに向かって挨拶を話します。終了したら、 録音停止
ボタンをクリックします。
ステップ 3: 録音した挨拶を再確認します。
録音した挨拶を確認するには、再生ボタンをクリックします。 編集したい場合は、上記のステップ1とステップ2を繰り返します。 それ以外の場合は、Okをクリックし確定します。 後でいつでも挨拶の確認、タイトル変更、挨拶の再録音が可能です。
あらゆる状況(例:日常、旅行、休暇)に応じる挨拶が3件録音できます。 新しい挨拶を録音するには、“未使用”のラジオボタンを選択して、ステップ2から録音を行います。
ステップ 4: ボイスメールを有効にします。
すべての挨拶が録音されたら、ボイスメールを有効にできます。
- Use Send to voicemail after to specify the no-answer timeout (i.e., the time in seconds after which an incoming call will be forwarded to voicemail when you are logged in and cannot answer it). Note that when you are logged out or if you are logged in with option No phone, incoming calls will be sent to your voicemail immediately regardless of this setting.
- If you have multiple greetings, under the Use the following voicemail greeting setting, select the radio button corresponding to the greeting to be used at this time.
- Select the Enable voicemail for ext… checkbox. Your voicemail is now activated.
Additional Information
- You can select another personal greeting as your current greeting at any time without disabling and re-enabling your voicemail.
- Instead of recording your voicemail greetings via the Agent Desktop application, you can record them offline and store them as audio files. The process of configuring your greetings is the same, except for step 3 and step 4; instead of recording controls, you click the Upload button and select the desired audio file.
- All voicemail settings can be preconfigured for you and changed at any time by your system administrator. This includes the upload of greeting audio files, the selection of the current greeting, setting the no-answer timeout, and activation and deactivation of voicemail.
- Call forwarding settings take priority over the voicemail settings. A temporary activation of call forwarding will automatically disable the voicemail function; however, your existing voicemail configuration (the no-answer timeout and current greeting) will be preserved and will take effect as soon as call forwarding is deactivated.
< 前へ | 次へ >


