Configuring Your Voicemail
Calls made directly to your extension number can be forwarded to your voicemail when you cannot answer them. You can record your personalized voicemail greetings and activate/deactivate your voicemail via your Agent Desktop application. Up to three different messages can be recorded and used as greetings in various situations.
Note that the system uses email for delivery of voicemail messages. Before you configure your voicemail settings, make sure that you have an email address specified in Settings > User Profile > Contact Info > Email.
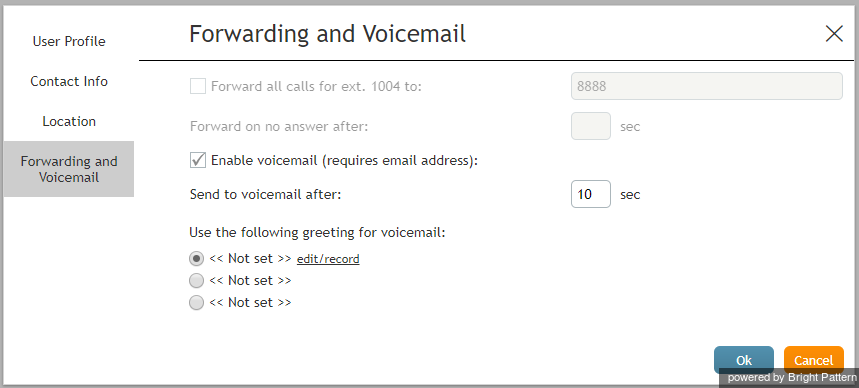
- Click Settings, select User Profile, and click the Forwarding and Voicemail tab.
- Note that this tab contains settings related to call forwarding and voicemail functions. If you do not see any setting related to voicemail, unselect the Forward all calls… checkbox first.
- Notice the fields for Enable voicemail (requires email address) and Send to voicemail after but do not make changes to them yet. You will come back to these fields after you have recorded your voicemail greetings.
Step 2: Create a personal greeting
The system provides a prerecorded generic voicemail greeting: The person at extension [your extension number] is not available. Please leave a message after the tone.
You can replace this generic greeting with a personal greeting recorded in your own voice. (If in doubt whether you may/should use personal greetings, ask your system administrator.)
- Select the first radio button under the Use the following voicemail greeting setting. If you do not have any saved greetings, you will see << Not set >> beside the button.
- Click the edit/record link.
- Prepare the text of your greeting.
- Put on your headset.
- In the window that appears, specify the greeting title (e.g., My everyday greeting.)
- Click the Start recording
button. You will hear a single ringing tone, which indicates the beginning of the recording. The button appearance will change to show the stop
control.
- Speak your greeting into the microphone. When you are finished, click the Stop recording
button.
Step 3: Check your recorded greeting
To check your recorded greeting, click the playback button. If you are not satisfied with your greeting, repeat step 1 and step 2 of this process. Otherwise, click Ok to confirm. You can review your greeting at any time afterward, change the title, and/or rerecord the greeting itself.
You can prepare up to three different greetings that can be used in various situations (e.g., everyday, travel, vacation). To record another greeting, select an “unused” radio button and repeat the process, starting with step 2.
Step 4: Enable your voicemail
Once all your greetings are recorded, you can enable your voicemail.
- Use Send to voicemail after to specify the no-answer timeout (i.e., the time in seconds after which an incoming call will be forwarded to voicemail when you are logged in and cannot answer it). Note that when you are logged out or if you are logged in with option No phone, incoming calls will be sent to your voicemail immediately regardless of this setting.
- If you have multiple greetings, under the Use the following voicemail greeting setting, select the radio button corresponding to the greeting to be used at this time.
- Select the Enable voicemail for ext… checkbox. Your voicemail is now activated.
Additional Information
- You can select another personal greeting as your current greeting at any time without disabling and re-enabling your voicemail.
- Instead of recording your voicemail greetings via the Agent Desktop application, you can record them offline and store them as audio files. The process of configuring your greetings is the same, except for step 3 and step 4; instead of recording controls, you click the Upload button and select the desired audio file.
- All voicemail settings can be preconfigured for you and changed at any time by your system administrator. This includes the upload of greeting audio files, the selection of the current greeting, setting the no-answer timeout, and activation and deactivation of voicemail.
- Call forwarding settings take priority over the voicemail settings. A temporary activation of call forwarding will automatically disable the voicemail function; however, your existing voicemail configuration (the no-answer timeout and current greeting) will be preserved and will take effect as soon as call forwarding is deactivated.
< Previous | Next >


