Configuring Your User Profile
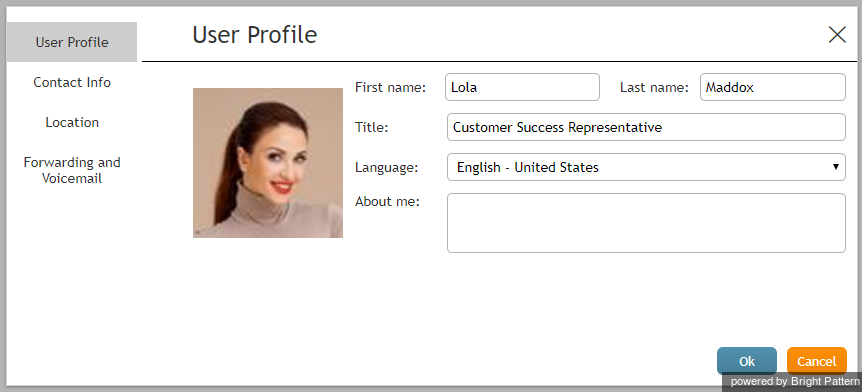
Your user profile is a collection of information about you that may be relevant to the tasks assigned to you as an employee. Typically, you can enter and/or edit your profile yourself. For example, the chat nickname you select for yourself may be displayed to customers, and they will be likely to use that nickname when chatting with you.
Navigate to Settings > User Profile to view and edit your profile data.
Some elements of your profile may be preconfigured for you by your system administrator. Whether you can change such preconfigured profile elements, and whether you are expected to enter and subsequently update any undefined elements of your profile, depends entirely on your contact center practices. You will receive detailed instructions regarding your profile setup and maintenance from your system administrator.
The elements of your user profile are divided into the following tabs.
User profile tab
First name
Your first name.
Last name
Your last name.
Title
Your job title.
Language
Your preferred language. This property is used for information only and does not affect the process of delivery of customer interactions to you. If, as an agent, you provide services in different languages, those languages will be configured as your skills by your system administrator elsewhere in the system.
This setting also does not affect the display language of your Agent Desktop user interface. The display language is determined by the language settings of your browser and availability of the Bright Pattern product in this locale.
About me
You can optionally provide more information about yourself.
Photo
If uploaded to your profile, your photo will appear in the Contact Info Panel of the Agent Desktop applications of other employees during your internal communications.
Depending on your contact center configuration, this photo may also be displayed to customers when they communicate with you using chat. To upload the photo, hover over the photo area and click Change photo. To remove the photo, hover over the photo area and click the “x” symbol in the upper right corner.
The default maximum size of uploaded photos is 10 MB; the photo will be compressed to fit the user interface elements where it is displayed. Note that the maximum size of uploaded files may be further limited by your system administrator.
Contact Info tab
Chat nickname
The name that will be displayed to other parties when they communicate with you via chat.
Phone extension
The number assigned to you in the system. It is read-only.
Work phone
Your direct work phone number is used for information only. For the duration of your working session, your phone number will be determined by the phone device option that you selected at the time of login.
Mobile phone
Your mobile phone number is used for information only. For the duration of your working session, your phone number will be determined by the phone device option that you selected at the time of login.
Your work email address. The system will use this address for delivery of password reset instructions and your voicemail messages. It must be specified if you have permission and intention to use voicemail. For more information about voicemail delivery, see section Listening to Voicemail Messages.
Location tab
Time zone
The time zone where you normally reside. It is used for information only. For any time-dependent tasks, the system will determine you time zone based on your contact center configuration.
Country
The country where you normally reside. This property is used for information only.
State/Province
The state or province where you normally reside. This property is used for information only.
City
The city where you normally reside. This property is used for information only.
Forwarding and Voicemail tab
Forward all calls for ext. XXXX to
Select the checkbox and enter a phone extension to enable call forwarding.
Forward on no answer after
Specify the number of seconds to wait before forwarding a call.
Enable voicemail (requires email address)
Select the checkbox to enable voicemail.
Send to voicemail after
Specify the number of seconds to wait before the voicemail is emailed.
Use the following greeting for voicemail
Select the voicemail greeting you would like to use.
Refer to the section Configuring Your Voicemail for detailed instructions on how to set up voicemail.

