Accessing Zendesk Data from Scenarios
If you do not wish to configure your Bright Pattern Contact Center for Single Sign-On with Zendesk, you can access Zendesk data directly from Bright Pattern scenarios instead. The instructions that follow will walk you through the process.
Perform the following preliminary steps only if you skipped the Single Sign-On configuration process; otherwise, proceed directly to Step 1 of this procedure.
- Open the Bright Pattern Contact Center Administrator application.
- Go to Call Center Configuration > Integration Accounts.
- Click Add account, select Zendesk, and click OK.
- Create a Name for this integration account.
- Copy your Zendesk domain URL and paste it to the URL field.
- Click Apply to save your changes.
Procedure
Step 1: Manage settings for your Zendesk API
If using API token as the authorization type
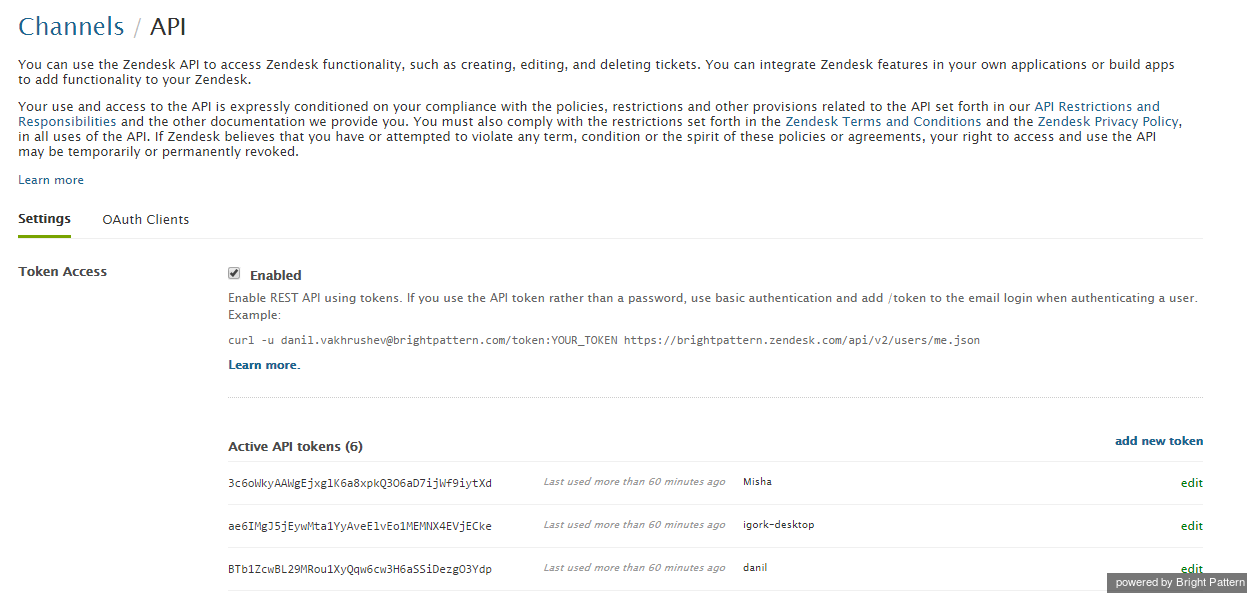
- In Zendesk, go to Admin > Channels > API.
- Make sure Token Access is enabled (i.e., checkbox selected).
- Click the add new token link.
- Enter a label for this new token and click Create. The new token will appear in the Active API tokens list.

If using OAuth access token as the authorization type
- In Zendesk, go to Admin > Channels > API > OAuth Clients, and then click Add OAuth Client on the right side of the client list.
- Complete the following fields to create a client:
- Client Name - Enter a name for your app. This is the name that users will see when asked to grant access to your application and when they check the list of third-party apps that have access to their Zendesk.
- Description - Optional. This is a short description of your app that users will see when asked to grant access to it.
- Company - Optional. This is the company name that users will see when asked to grant access to your application. The information can help them understand to whom they are granting access.
- Logo - Optional. This is the logo that users will see when asked to grant access to your application. The image can be a JPG, GIF, or PNG. For best results, upload a square image. It will be resized for the authorization page.
- Unique Identifier - The field is auto-populated with a reformatted version of the name you entered for your app. You can change it if desired.
- Redirect URLs - Set "https://<yourcluster.yourdomain.com>/redirect".
- Client Name - Enter a name for your app. This is the name that users will see when asked to grant access to your application and when they check the list of third-party apps that have access to their Zendesk.
Step 2: Save the new token
If using API token as the authorization type
- From the Active API tokens list, select the new token and copy it to the clipboard.
- Click Save.
If using OAuth access token as the authorization type
- Click Save.
- After the page refreshes, a new pre-populated Secret field will appear on the lower side. This is the "client_secret" value.
- Copy the Secret value to your clipboard.
- Click Save.
Step 3: In Bright Pattern Contact Center, set up access to the integrated Zendesk account
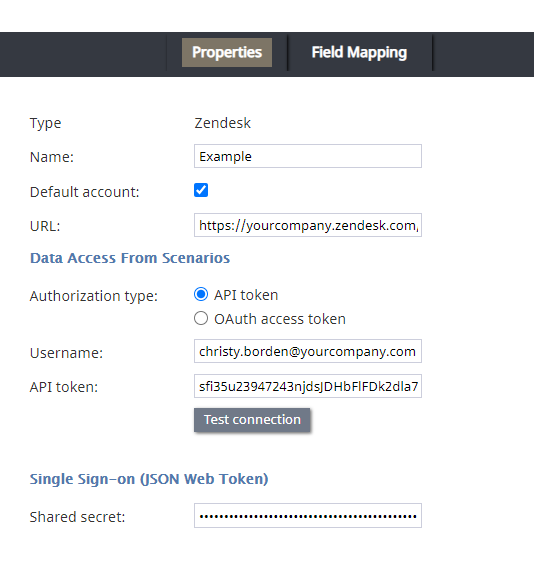
- In the Contact Center Administrator application, go to Call Center Configuration > Integration Accounts.
- Open the earlier created Zendesk account.
- If using API token as the authorization type:
- Paste the clipboard content to the API token field.
- Select the Default account checkbox.
- In the Username field, specify username of the Zendesk account on whose behalf requests for Zendesk data from Bright Pattern scenarios will be made. Make sure this account has sufficient privileges to access all data that may be used in the Bright Pattern Contact Center IVR and routing applications.
- Paste the clipboard content to the API token field.
- If using OAuth access token as the authorization type:
- Select authorization type OAuth access token.
- Click the Request token button and fill all required fields:
- Client ID - The unique identifier
- Client secret - The secret that was copied during initial setup
- Username/Password - Your credentials from the Zendesk account
- Client ID - The unique identifier
- Note that if the OAuth access token is specified, it shall be used for authentication of requests made by any Zendesk scenario block using this corresponding integration account (i.e., it is added as header "Authorization: Bearer {access_token}").
- Click OK.
- Select authorization type OAuth access token.
- Click Apply.

Step 4: Confirm your connection to Zendesk data
Click the Test connection button. You should receive confirmation that the connection between the Bright Pattern Contact Center platform and Zendesk data repository is valid.
Step 5: Use scenario blocks to access Zendesk data
To access Zendesk data and enable screen-pop, use the following blocks of the Bright Pattern Contact Center Scenario Builder application:
- Zendesk Search to obtain Zendesk data
- Zendesk Create Object to create new tickets and users in Zendesk
- Zendesk Update Object to update existing Zendesk tickets and users
- Zendesk Screen Pop to synchronize delivery of calls and related Zendesk records to the agents
- Attached Data to populate custom fields in Zendesk activity history
The Zendesk Integration Guide contains a scenario example that illustrates how the Search and Screen Pop blocks can be used to obtain Zendesk data and display it to the agent upon interaction delivery.
Note that you can create multiple Zendesk integration accounts for access to different Zendesk systems. If you have multiple integration accounts, use scenario block Zendesk Select Account to specify the integration account that will be used by Zendesk blocks in the given scenario. If this block is not used, all Zendesk blocks in the given scenario will use access data from the integration account marked as Default account. (See Step 3 of this procedure.)