The logic of processing of an inbound email interaction is initially determined by the email address that was used by the email sender. In the simplest case, such email addresses can correspond to your email services (e.g., your sales@company-name.com and support@company-name.com may be associated with your Sales and Support services, respectively). In a more complex configuration, you may want to apply some keyword-based analysis of email texts to associated emails with appropriate services (e.g., an email coming to support@company-name.com can be further categorized into Smartphone Support and Tablet Support services based on the presence of the words phone and tablet in the text of email messages).
The logical entity that describes the association between email addresses and keywords on the one hand and email services, on the other hand, is called email scenario entry. Unlike the other types of scenario entries, the email entries do not currently refer to any actual scenarios. All information required for association of incoming emails with services in the current release is contained in the configuration settings of the email entries themselves.
Note that before you configure an email scenario entry, you should set up a corresponding email service. If you plan any keyword-based categorization, it may also be easier to define upfront all of the known services to which the emails arriving via this entry may be attributed. Once the email entry is set up according to your initial needs, you can add more services and update the categorization rules at any time.
Note: Bright Pattern Contact Center stores all processed emails for activity history, reporting, and quality management purposes. These storage practices may not coincide with the general email retention policies of your organization. For compliance with such general retention policies, we recommend that you always store copies of all emails received to and sent from the email addresses used for email scenario entries.
Email scenario entries are managed in the Contact Center Administrator application. To set up and manage email scenario entries, navigate to Configuration > Scenario Entries > Email.
Note: This option is visible and available to you only if the email management capability is enabled for your contact center at the service provider level.
If you have no email scenario entries set up, create them by clicking the "+" button. Once you have added an email scenario entry, screen properties will be visible on the right-hand pane of the screen.
Note: Email attachment limits are set by the service provider. By default, these limits are:
- Single email attachment size: 10 MB
- Single email with attachments size: 25 MB
Screen Properties
The screen properties for email scenario entries are organized into three tabs: Account, Services, and Case Fields. The settings for each tab are described as follows.
Account tab
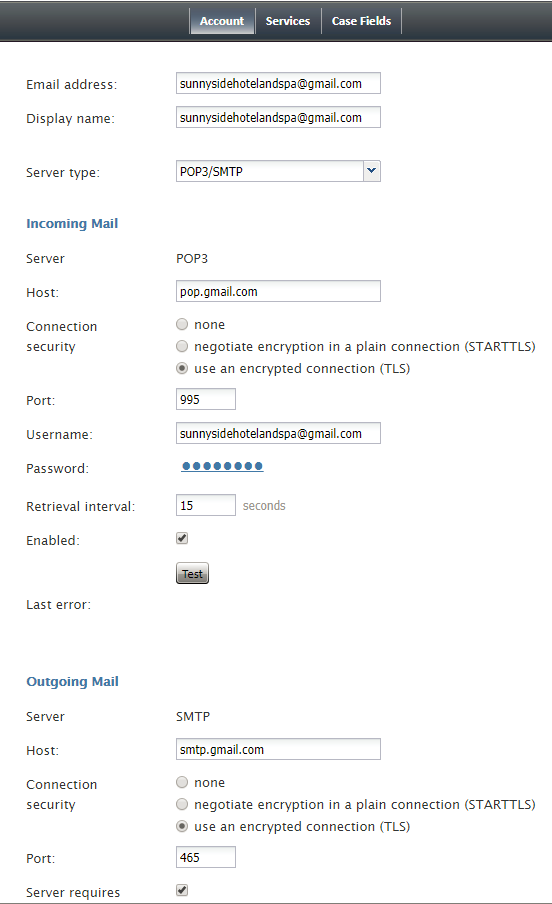
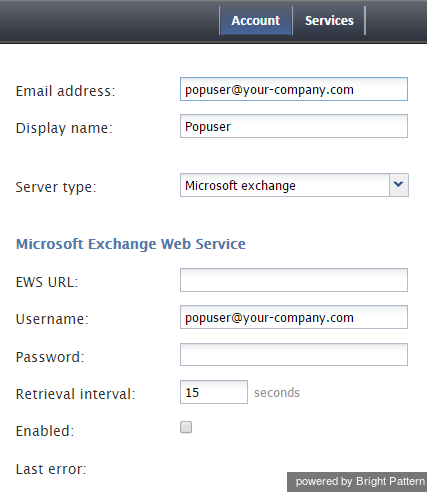
Email address
Email address is the address that customers will use to send emails to a specific service or a range of services. This address will also appear in the From: field of corresponding email replies as well as any outbound emails related to services associated with this scenario entry. This parameter is mandatory.
Display name
Display name is the name that will be shown for the email address that customers will use to send emails to a specific service or a range of services (e.g., "Bright Pattern Support" is a display name for "support@brightpattern.com"). This parameter is mandatory.
Server type
Server type defines what protocols are used to send and retrieve email messages. The POP3/SMTP protocol is supported, as is the Microsoft Exchange Web Services protocol.
The pull-down menu provides two options: POP3/SMTP and Microsoft Exchange. The email settings that follow are dependent on the server type that you select.
Microsoft Exchange email retrieval and email sending is supported as of Bright Pattern Contact Center version 3.15. The protocol works for users who have on-premise Microsoft Exchange 2013 accounts with only the Exchange Web Services protocol available (i.e., for users who without POP3), as well as for users who plan to move to an Outlook365 managed service. The protocol works with Exchange 2013, Outlook.com, and Hotmail.com managed services.
POP3 Properties
Selecting server type POP3/SMTP will bring up the following properties for Incoming Mail and Outgoing Mail.
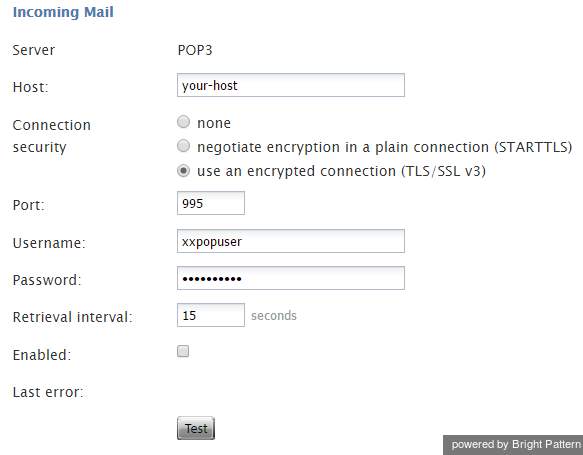
Incoming Mail
Server type
Server type is the type of server used for the transmission of email messages to the email address. It is read-only. The POP3 protocol is supported.
Host
Host is the name of the host where the server is run. This parameter is mandatory.
Connection security
Connection security provides indication of whether a cryptographic protocol (TLS or SSL) will be used to secure this connection.
- For a nonsecure connection, select none.
- To negotiate encryption in a plain connection, select negotiate encryption in a plain connection (STARTTLS).
- For an immediate secure connection, select use an encrypted connection (TLS/SSL v3).
Port
Port is the port assigned to the server on the host. This parameter is mandatory.
Username
Username is the username for email client authentication. This parameter is mandatory.
Password
Password is the password for email client authentication. This parameter is mandatory.
Retrieval interval
Retrieval interval is the mail retrieval period. By default, the account is checked for the presence of new mail every 15 seconds. Some POP3 mail servers may be configured to lock out accounts that access mailboxes at this rate due to excessive activity. If this is the case, use this Incoming Mail, Retrieval interval parameter to increase the retrieval period to any value between 15 and 86400 seconds.
Enabled
Enabled indicates whether the account is currently enabled. Accounts can be disabled manually or automatically, as described. Accounts can only be enabled manually.
After incoming emails have been retrieved for processing, Bright Pattern Contact Center normally deletes those emails from the mailbox. However, if the POP3 server is configured for read-only access, the emails will stay in the mailbox and will be retrieved repeatedly until the system runs out of disk space. To prevent this from happening, the system will automatically disable the email account if an attempt to delete incoming mail returns an error from the POP3 server.
If an account is disabled, you should check the Last error message. If the message indicates that the account has been disabled for the aforementioned reason, reconfigure your POP3 server for full access, and enable the account manually.
Last error
In case the account has been disabled automatically (see above), the Last error parameter displays the error message that caused the system to disable the account. This parameter is read-only.
Test
The Test button is used to verify the correctness of your connection settings.
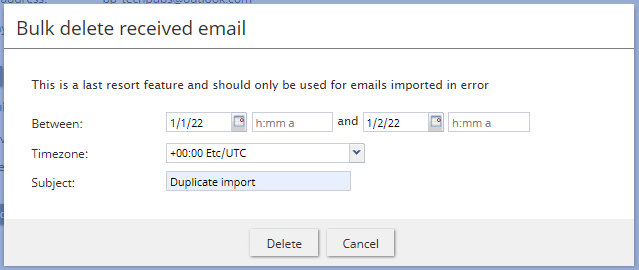
Bulk delete received email
This button allows you to delete emails received by the system in bulk. Specifically, when the button is selected a window pops, which allows you to configure emails to be deleted that were received between a range of dates and hours for a selected time zone. Note that you must select the Delete button in the window in order to confirm the bulk deletion.
Note: This button is available to users with credentials for the Service Provider application only. That is, you must log in to the Contact Center Administrator application with your system credentials (e.g., sys:user_name).
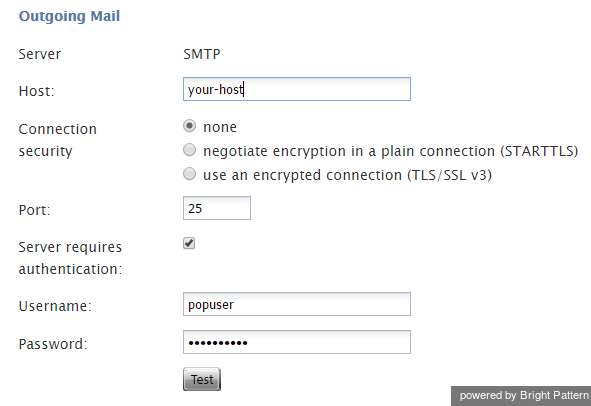
Outgoing Mail
Server type
Server type defines what protocols are used to send and retrieve email messages. It is read-only. The SMTP protocol is supported.
Host
Host is the name of the host where the server is run. This parameter is mandatory.
Connection security
Connection security provides indication of whether a cryptographic protocol (TLS or SSL) will be used to secure this connection.
- For a nonsecure connection, select none.
- To negotiate encryption in a plain connection, select negotiate encryption in a plain connection (STARTTLS).
- For an immediate secure connection, select use an encrypted connection (TLS/SSL v3).
Port
Port is the port assigned to the server on the host. This parameter is mandatory.
Server requires authentication
Selecting the Server requires authentication checkbox forces the user to enter a username and password for email client authentication. If you do not select the checkbox, a username and password will not be necessary.
Username
Username is the username for email client authentication. This parameter is mandatory.
Password
Password is the password for email client authentication. This parameter is mandatory.
Test
The Test button is used to verify the correctness of your connection settings.
Microsoft Exchange Web Services Properties
Selecting server type Microsoft exchange will bring up the following properties for Incoming Mail and Outgoing Mail.
Note that Microsoft Exchange Web Services (EWS) consumes extra memory when processing email attachments. It will consume approximately 4 times the size of a single email attachment sent in a message. For example, if the single attachment is 15 MB, you will need an extra 60 MB allocated to the email service.
EWS URL
EWS URL is the Exchange Web Services URL from which the email will be retrieved.
Username
Username is the username for email client authentication. This parameter is mandatory.
Password
Password is the password for email client authentication. This parameter is mandatory.
Retrieval interval
Retrieval interval is the mail retrieval period. By default, the account is checked for the presence of new mail every 15 seconds. Some mail servers may be configured to lock out accounts that access mailboxes at this rate due to excessive activity. If this is the case, use this Incoming Mail, Retrieval interval parameter to increase the retrieval period to any value between 15 and 86400 seconds.
Enabled
Enabled indicates whether the account is currently enabled. Accounts can be disabled manually or automatically, as described. Accounts can only be enabled manually.
After incoming emails have been retrieved for processing, the emails will stay in the mailbox, will be marked as read, and will be retrieved repeatedly. The system will detect that the emails already exist in the database and will not create multiple copies in the database/disk. It is possible to delete emails from EWS by setting up retention rules directly on the exchange server. Note that deleting them from the system does not impact the emails on EWS, as they are marked as read and are still kept on EWS.
If an account is disabled, you should check the Last error message. If the message indicates that the account has been disabled, reconfigure your Microsoft Exchange Web Services server for full access, and enable the account manually.
Last error
In case the account has been disabled automatically (see above), the Last error parameter displays the error message that caused the system to disable the account. This parameter is read-only.
Bulk delete received email
This button allows you to delete emails received by the system in bulk. Specifically, when the button is selected a window pops, which allows you to configure emails to be deleted that were received between a range of dates and hours for a selected time zone. Note that you must select the Delete button in the window in order to confirm the bulk deletion.
Note: This button is available to users with credentials for the Service Provider application only. That is, you must log in to the Contact Center Administrator application with your system credentials (e.g., sys:user_name).
Services tab
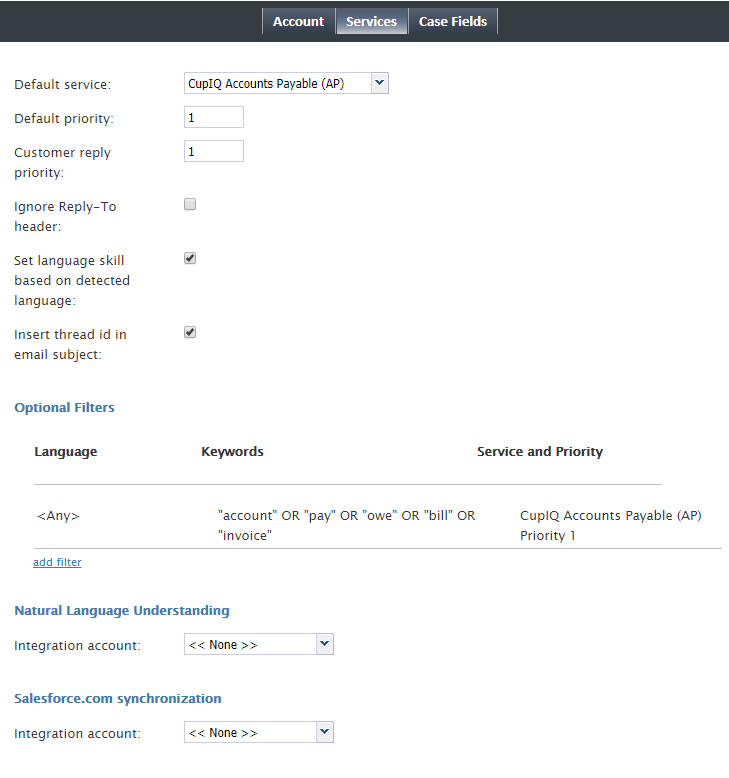
The Services tab presents settings related to email services.
Default service
Default service is the email service that will be associated with emails arriving via this entry if categorization rules are not set or do not provide any keyword matches. This parameter is mandatory.
Default priority
Default priority is the queueing priority that will be given to emails attributed to the default service. Priority determines the position of the email interaction requesting the default service in the queue, relative to email interactions associated with other services that are competing for the same agents.
The value range is from 1 (the lowest and the default value) to 100. Unlike other media types, the priority of email is absolute (i.e., an email with a higher priority always will be distributed to a qualified resource before emails with lower priority regardless of the time any of those emails spent in the queue).
Customer reply priority
Customer reply priority is the queuing priority of customer emails related to existing email threads.
The system automatically checks whether an incoming email may be part of an existing email thread (e.g., after receiving a reply to an original email request, the customer may have additional questions). Such emails bypass the keyword-based analysis. Instead, they are automatically attributed to the same service as the original request. This parameter allows you to distribute such emails with a higher priority than any new email requests.
For more information about email priority, see the description of the Default priority setting.
Ignore Reply-To Header
The Ignore Reply-To Header checkbox, when selected, allows the system to ignore the header in the reply-to field of an email. When this setting is checked, the behavior is as follows:
- The From field is used for identification.
- The From field is used for agent replies.
- The Return-Path header is used for auto-replies.
If this setting is unchecked, the behavior is as follows:
- If a reply-to header is present, it is used for identification, agent replies, and auto-replies.
- If a reply-to header is missing, the behavior is the same as if the Ignore Reply-To Header box is checked.
Set Language Skill Based on Detected Language
The Set Language Skill Based on Detected Language checkbox, when selected, allows the following:
- Emails with undetected languages will be sent to the default email service regardless of keyword matches.
- If the detected language of an email is not in the call center's list of configured languages, the email will be sent to the default email service, regardless of keyword matches.
Insert thread id in email subject
When disabled, the Insert thread id in email subject checkbox excludes the email case’s thread ID from the email’s subject line. Note that this setting is automatically enabled for existing email entries; if you are creating a new scenario entry for email, this setting is not enabled.
Note that if you disable this option, the thread ID will instead be inserted in one of the hidden fields in the email body. In this case, possible auto-replies (e.g., "out of the office" messages) may not always be processed correctly as part of the case. Therefore, if processing of auto-replies is important for your case workflow, you should keep this the thread ID in the email subject.
Optional Filters
Optional Filters is where you add the list of filters that will be used to assign emails arriving at the given email scenario entry to different services using keyword-based analysis of the email subjects and body text.
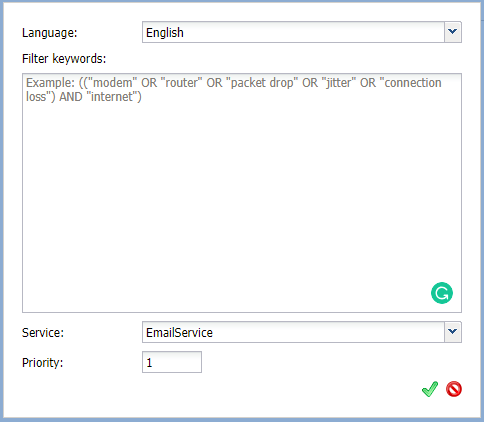
To add a filter, click add.
Filters are checked for possible keyword matches in the order in which they appear on the list. As soon as a match is found, the corresponding service and priority are assigned to the email interaction. Note that this order may be affected by the language setting of the filter. See the description of the Language setting for more details.
Newly created filters will appear at the end of the list. To change the position of a filter in the list, drag it to the desired location.
To edit or remove an existing filter, hover over it and select the desired function.
Language
The Language setting is where you select the language in which the keywords of the given filter will be written. This setting only matters if the filter’s keywords may have different meanings in different languages. Otherwise, leave this parameter set to the default value <Any>. The list of languages here is limited to the configured Language Skills that are auto-detectable.
Initially, the system will try to detect the language of the email text automatically. If the language is not identified, only the filters set to Any will be checked for keyword matches. If the language is identified, the system will first check the filters set to Any and then check the filters set to the detected language.
Keywords
Keywords are the keyword expressions that you specify. Each keyword/phrase in the expression must be set in quotation marks. Logical expressions can include logical operators AND, OR, XOR, NOT, and parentheses (e.g., “connection loss” AND (“router” OR “modem”)).
Service and Priority
The Service is the email service that will be associated with email interactions matching this filter.
The Priority is the priority that will be assigned to email interactions matching the filter. For more information about email priority, see the description of the Default priority setting.
Natural Language Understanding
Our contact center solution integrates with IBM Watson to provide Natural Language Understanding (NLU) functionality and sentiment analysis capabilities to your tenant on a per-service basis. To enable NLU for email scenario entries, select the applicable integration account from the Natural Language Understanding drop-down menu.
Integration account
The default integration account is < < None > >. If no integration accounts are listed, that means no integration accounts of the type "Natural Language Understanding" have been configured for your tenant. To add an integration account, see section Integration Accounts of the Contact Center Administrator Guide.
Salesforce.com synchronization
If your contact center is integrated with Salesforce.com (SFDC), emails from the Agent Desktop application can be synchronized with SFDC for routing and reporting. Emails from Agent Desktop link to SFDC Person Accounts, Contacts, and Accounts. Note that you may configure Screenpop URL to make synchronized SFDC cases pop in Agent Desktop.
With this setting enabled, the following happens for all incoming and outgoing email:
- Emails are received and processed by agents in Agent Desktop.
- After emails are processed, the system conducts a search in Salesforce.com using Salesforce Object Query Language (SOQL). The search looks in Contact objects for field Email (i.e., the customer's email, specifically “from” or “to” fields based on the message direction). The search also looks in Users objects for field Email (i.e., the agent’s email, specifically the “from” field based on message direction).
- If multiple matches are found, the search takes the first result.
- If a new Agent Desktop case was created, a new SFDC case is created.
- Whether a match was found or a new case was created, the system creates an EmailMessage object for the match, which passes case ID, related case ID, activity ID, and attachment data.
- If an email contains an attachment, the system creates an Attachment object.
- Finally, the system creates a Task object, which contains user, case, account, and contact data.
If neither a matching contact nor a matching user is found, the case is not created (i.e., only known addresses are synchronized); if the case is not created, neither the first nor subsequent messages are synchronized.
If the Screenpop URL setting is configured with a Salesforce URL, note the following:
- After emails are received and processed in Agent Desktop, cases and emails are synchronized to SFDC as cases and emails in Activity history, and they are linked to an agent (user) and a contact.
- The first email routed in such a way results in a screen pop of the customer/contact record in SFDC.
- Agent Desktop will also display the contact and activity history (if contact feature is used).
- Each subsequent email results in a screen pop of the SFDC case.
- Bright Pattern Contact Center would retain all of the routing control and reporting data. Switching between two screens (Agent Desktop and SFDC) is required.
Note that Bright Pattern and SFDC need to be integrated on both the server and client side. For more information on SFDC integration, see the Salesforce.com Integration Guide.
Integration account
The default integration account is < < None > >. If no integration accounts are listed, that means no integration accounts of the type "Salesforce.com" have been configured for your tenant. To add an integration account, see the the Contact Center Administrator Guide, section Integration Accounts.
Case Fields Tab
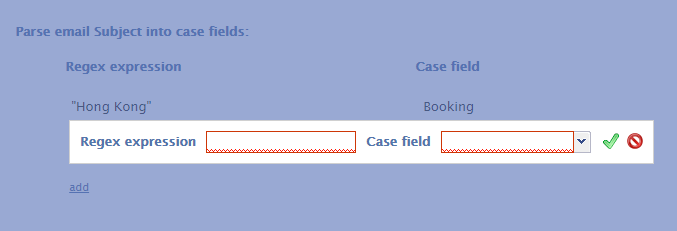
You may utilize custom case fields when configuring email to pull data from email subject line and body; these custom case fields then can be used in custom reporting fields.
Parse email Subject into case fields
To create case fields from the text in an email subject line, you will need to first configure a regex expression. Once this has been configured, name the configured expression in the case field field.
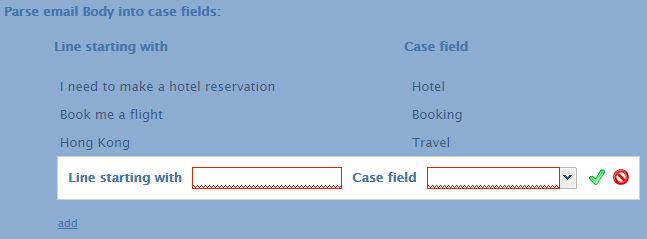
Parse email Body into case fields
To create case fields from the text in an email body, enter in words or phrases your customers use at the beginning of sentences in the Line starting with field. Once configured, name the field in case field.

