Enable Single Sign-On in Salesforce Lightning
Single Sign-on (SSO) functionality allows call center users to log in to Salesforce and Bright Pattern Contact Center applications simultaneously from a single login.
Step 1: Register and deploy organizational domain to users
- In Salesforce Lightning Setup, go to Settings > Company Settings > My Domain to register a new organizational domain (if you don't already have one).
- Click Configure a Domain Name.
- Enter your desired domain name, such as your company name, and check for availability. When the name is shown to be available, you may register it. The registration process will take a few minutes; you will receive an email when your domain is registered and ready for testing. For more information on registration, refer to Salesforce Help.

Register your domain - Log in to the domain to test it, and then click Deploy to users.
- All users must log in using this domain URL, which should be in the following format:
https://<your-domain-name>.my.salesforce.com/

Step 2: Enable identity provider
After your domain name is registered, you will be able to enable your identity provider, which is necessary for SSO. Once you complete this step, you will not have to do it again.
Use Quick Find to go to the Identity Provider page and click on Enable Identity Provider.

Step 3: Get the certificate
The certificate is used in the Add Salesforce Integration Account section of this guide to establish Salesforce as the identity provider for single sign-on.
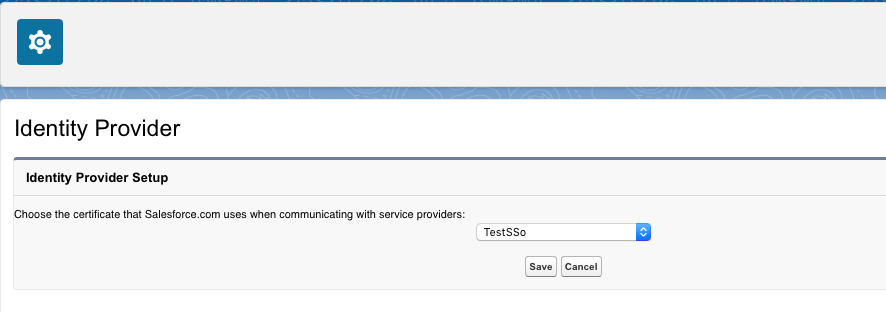
- In Identity Provider Setup, select the actual certificate to be used. If no certificates are shown, you should either create a new self-signed certificate or import a certificate from your setup.
Select the certificate - Use the download certificate button if the certificate was previously downloaded.
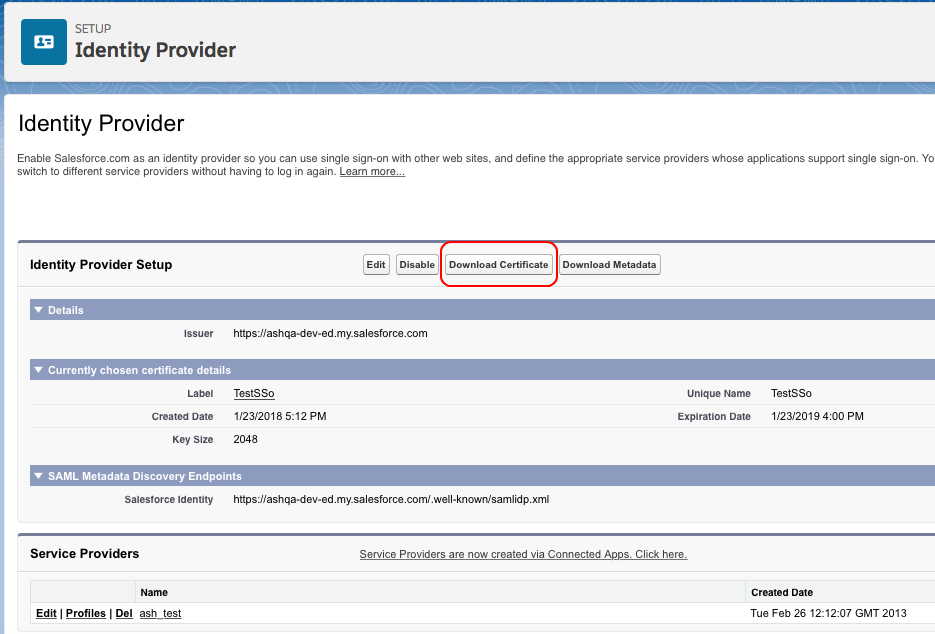
You may need to click "Download Certificate"


Step 4: Customize your connected app
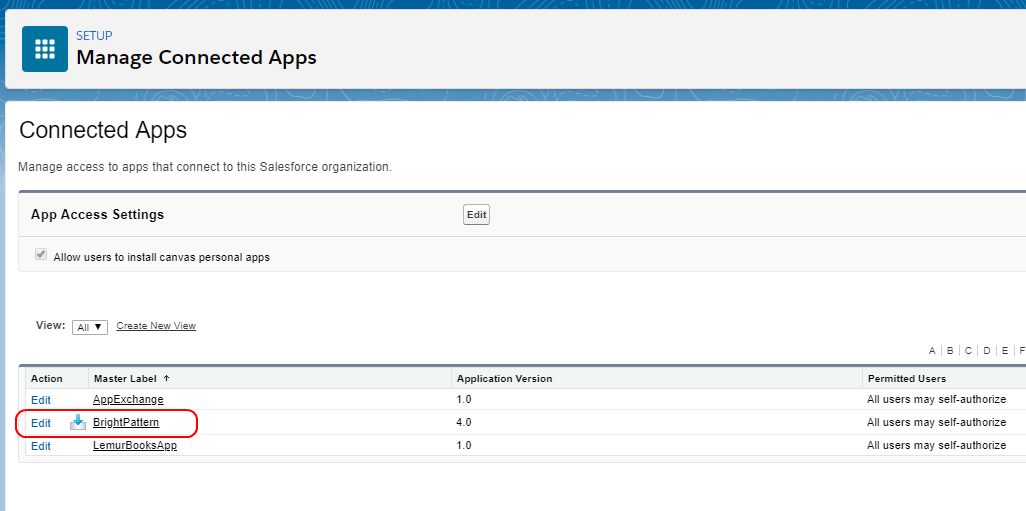
- Go to your Connected App Detail page and select BrightPattern from the list of connected apps.
Connected Apps - On the Connected App Detail page that opens, click Edit Policies (at the top).
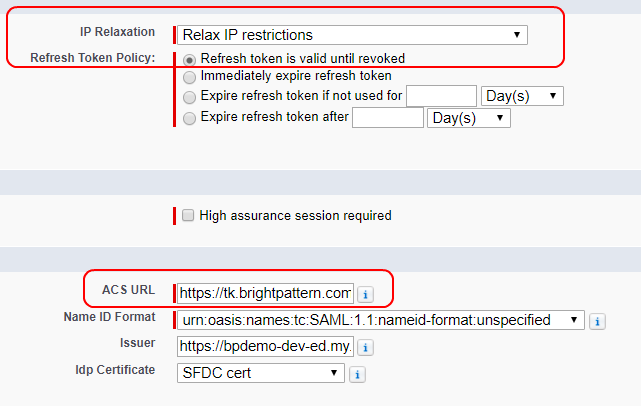
- Set the following app settings:
- IP Relaxation - Relax IP restrictions
- Refresh Token Policy - Refresh token i s valid until revoked
- ACS URL - The URL should take the following form, where "<your-tenant>" is your contact center name: https://<your-tenant>.brightpattern.com/agentdesktop/agentdesktop/sfsso/response
Settings to edit
- IP Relaxation - Relax IP restrictions
- Click Save.


Step 5: Configure user profiles and field mapping (login mapping – custom attribute)
SSO requires user profiles assigned for users that are going to utilize Bright Pattern Contact Center to be authenticated by the Salesforce Identity Provider. The following process maps the SSO parameters to the Bright Pattern Contact Center login ID.
- Go back to Administer > Manage Apps > Connected Apps, and select BrightPattern to get to the Connected App Detail page.
- Scroll all the way down to Custom Attributes and click Edit.
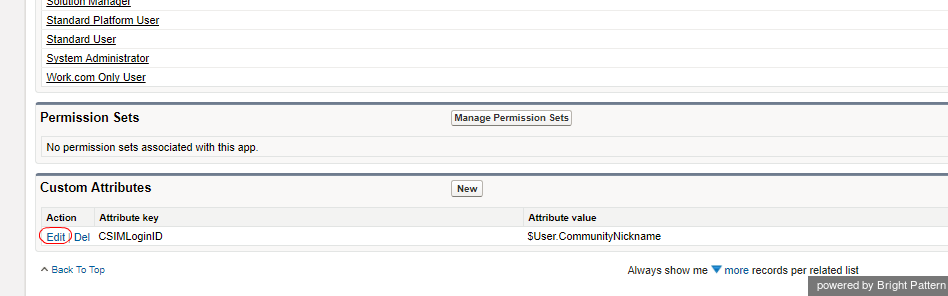
Edit custom attributes - In the Update Custom Attribute page that opens, set the following:
- Attribute key - CSIMLoginID
- Attribute value - $User.CommunityNickname
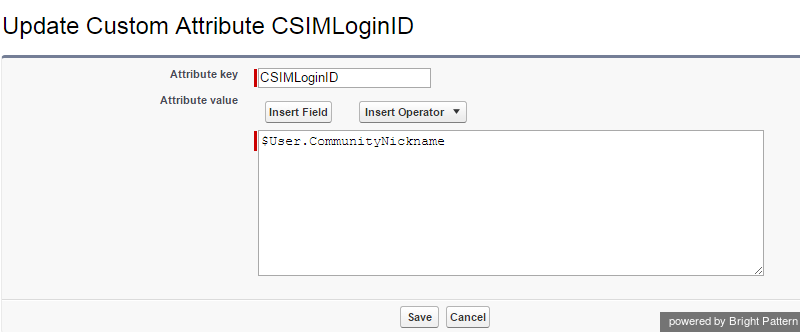
- Attribute key - CSIMLoginID


Bright Pattern Contact Center uses one optional custom service provider “Attribute key”: CSIMLoginID. This Attribute could be matched with any user’s field. By default, it is configured to match the Salesforce user nickname ($User.CommunityNickname).
Note: If this attribute mapping is removed and no other attribute is specified, then the login ID will be used with or without the domain suffix based on the Strip domain suffix from login names: option.
Step 6: Get the identity provider initiated login URL
- Still on the BrightPattern Connected App Detail page, see section SAML Login Information.
- Copy the full URL from the Idp-initiated Login URL.
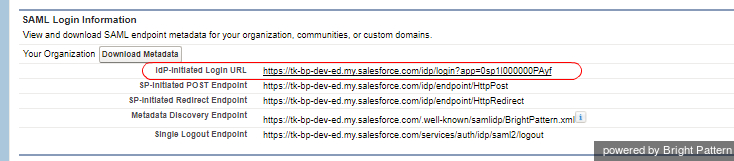
- Save this URL for when you add the Salesforce integration account in the Bright Pattern Contact Center Administrator application. This URL will go in the "Identity provider initiated login URL" property.

Step 7: Set up SSO integration with Bright Pattern Contact Center
SSO integration configuration is completed when you paste the certificate and Idp-initiated Login URL into Salesforce integration account properties in Bright Pattern's Contact Center Administrator application.