(Redirected from latest:Tutorials-for-admins/HowtoCreateAmazonLexBot)
How to Create an Amazon Lex Bot
Bright Pattern Contact Center integrates with Amazon Lex, a platform for building, testing, and deploying chatbots from the AWS Management Console. Lex provides both automatic speech recognition (ASR) and natural language understanding (NLU) technologies, enabling chatbots to recognize customers’ speech and text input, understand intent, and transcribe speech input. Integration with Lex lets your contact center access Lex through chat scenarios and provide bot assistance from within chat interactions.
In this article, you will learn how to create a basic Amazon Lex bot that can be used as a conversational bot with your configured chat service.
Please note that Bright Pattern only supports version 1 Amazon Lex bots at this time.

Procedure
This procedure will walk you through the process of setting up your first Amazon Lex bot. For a deeper understanding of Amazon Lex and other AWS resources, refer to AWS’s Amazon Lex Developer Guide.
Step 1: Create an AWS account
- If you haven’t already done so, set up an AWS account.
Step 2: Create an IAM user, grant administrative permissions, and save credentials
Our integration accounts require access keys to connect to and use your Amazon Lex bot. Access keys are created and managed in AWS Identity and Access Management (IAM) services.
To get an access key, you need to:
- Go to your AWS Management Console > IAM Dashboard. If you don't know where it is, search AWS Services for "IAM."
- From the IAM root menu, click Users and then click Add user to create an IAM user and grant administrative permissions. Adding a user creates credentials that are used to access AWS.
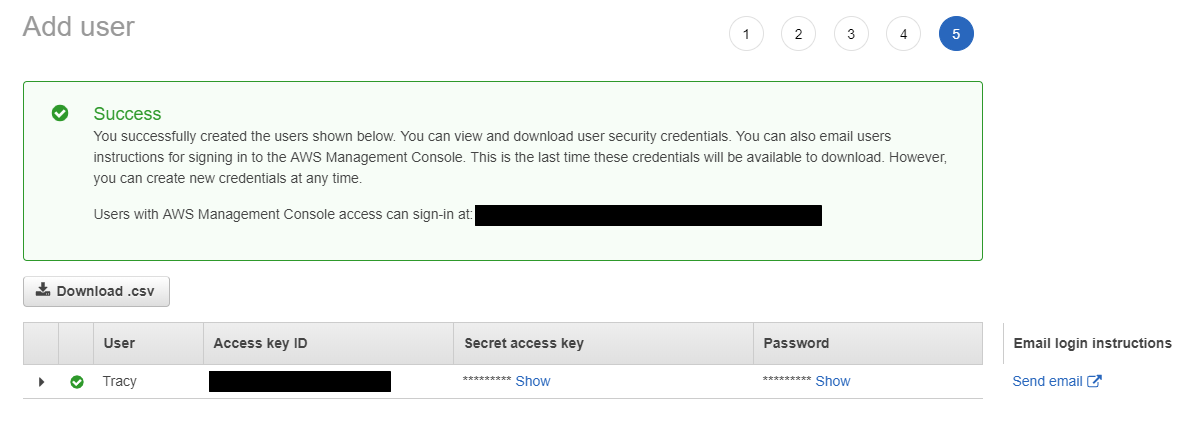
Add IAM User - Copy the access key ID (e.g., AKIAIOSFODNN7EXAMPLE) and the secret access key (e.g., wJalrXUtnFEMI/K7MDENG/bPxRfiCYEXAMPLEKEY). Save this for when you set up an AWS Lex bot/chat suggestions integration account.

For more information, see Managing Access Keys for IAM Users.
Step 3: Add Lex as a service and create a sample bot
- Sign in to the AWS Management Console and open the Amazon Lex console.
- On the Create your bot page, you can create a custom bot or create a ready-to-use one with a sample template. For the sake of this example procedure, select the Book Trip sample.
- The Create Your Bot page will open. That is where you develop your Amazon Lex bot.

Step 4: Review the bot workspace
The bot workspace will open. Notice that there are four tabs at the top: Editor, Settings, Channels, and Monitoring. In this exercise, we will be focusing on the Editor tab only. You can come back to the other tabs later.

The Editor tab includes the properties for every intent.
Step 5: Edit intent properties
Intents are actions triggered by keywords entered by your customer. You can think of intents as what customers want to do. For example, the first intent included in our sample Lex bot is "BookCar," which is what the customer wants to do (book a car) and what the bot recognizes it needs to do based on the customer's text input.
Properties
- Sample utterances - Phrases (i.e., keywords) that trigger the intent (e.g., "Reserve a car" or "make a car reservation" or "book a car")
- Lambda initialization and validation - AWS Lambda Function that validates the customer's input
- Slots - Data the customer must provide in order to fulfill the intent action (e.g., slot "PickUpCity" collects customer data about the city in which the car will be picked up)
- Confirmation prompt - Questions that confirm the intent actions and prompt the customer to input data (e.g., "Okay, I have you down for a car to be picked up in {PickUpCity}. Should I continue booking the car?")
- Fulfillment - AWS's business logic required to fulfill the customer's intent
- AWS Lamda Function - The function used as a code hook for your Amazon Lex bot; this can perform initialization and validation, fulfillment, or both
- Return parameters to client - Sends the intent information to the client application (i.e., Bright Pattern scenario) for intent fulfillment
- AWS Lamda Function - The function used as a code hook for your Amazon Lex bot; this can perform initialization and validation, fulfillment, or both
- Response - Message(s) or response cards that close the intent or invoke a different one
Step 6: Save and build
- For this example procedure, leave everything on the Editor tab as-is.
- If you did change something, be sure to click Save at the bottom.
- Click Build at the top of the page. This builds the bot with the configured intents.
Step 7: Test it
Once the build is complete, you can test the bot in the chat window.
- On the right side of the screen, click Test chatbot to pop out the chat window.
- Try typing a request such as, “I want to book a trip.” See what happens.

Step 8: Publish your bot
- At the top of the page, click Publish.
- In the Publish dialog that opens, choose or create a new alias (e.g., “TripBooker”) for this bot. The alias is used to point to the specific version of the bot. Having multiple aliases for the same bot allows you to keep and access different intents and properties for the same bot.
- Click Publish again.

Next Steps
You have now set up a very basic Amazon Lex bot that can be integrated with Bright Pattern Contact Center. You may now:
- Read AWS documentation, explore Amazon Lex intents and slot types, and edit as desired
- Create an AWS Lex bot/chat suggestions integration account
- Edit a chat scenario that uses your bot
- Configure web chat to work with bots
< Previous | Next >