Configuration Section A: Enable Scenarios and Access to Dynamics 365
Step 1: Add a new registered app
Adding a new registered app allows the Microsoft Azure Active Directory to communicate to Bright Pattern Contact Center software via Dynamics 365. This step also enables the integration of scenarios.
- In the Azure Portal > Azure Active Directory > App Registrations, click + New registration to add a new registered app.
- Give this app a name.
- In section Supported Account Types, choose who can use this application or access this API. In this example, we are choosing “Accounts in this organizational directory only.”

- In section Redirect URI, select Web and include a link to our callback file in the following format:
https://<tenant>/admin/msdynamicscallback.html
(e.g., "https://example.brightpattern.com/admin/msdynamicscallback.html")
- Click Register.
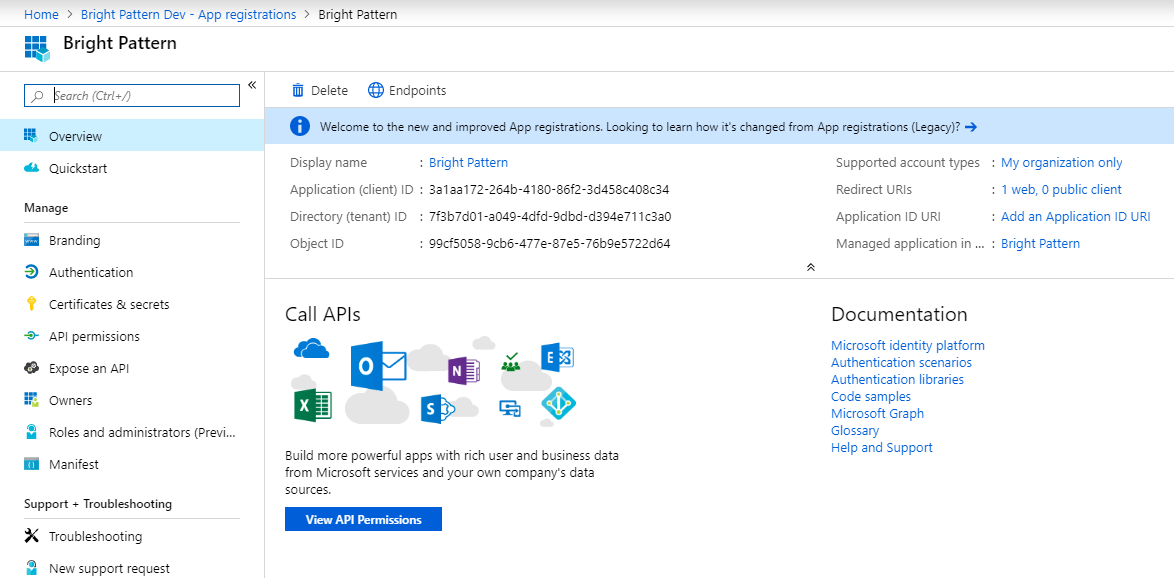
- The new registered app’s Overview page will open.


Step 2: In Bright Pattern, create a Dynamics 365 integration account
At this point, we will be linking the registered app to Bright Pattern Contact Center by copying values from your registered app and pasting them into your Bright Pattern Dynamics 365 integration account. To facilitate easy copying and pasting from one app to the other, we recommend keeping the Bright Pattern Contact Center Administrator application open in a separate browser tab.
- In a new tab, sign in as admin to https://<tenant>.brightpattern.com/admin
- Go to Call Center Configuration > Integration Accounts and click + to add a new integration account.
- Select Microsoft Dynamics 365 as the account type.
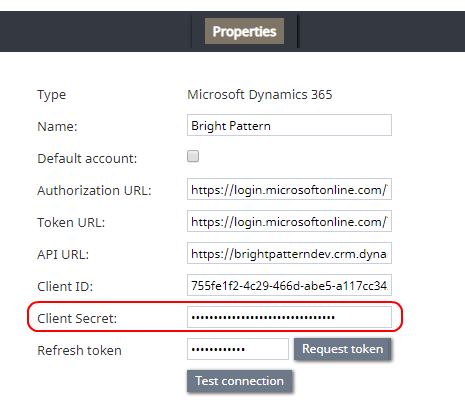
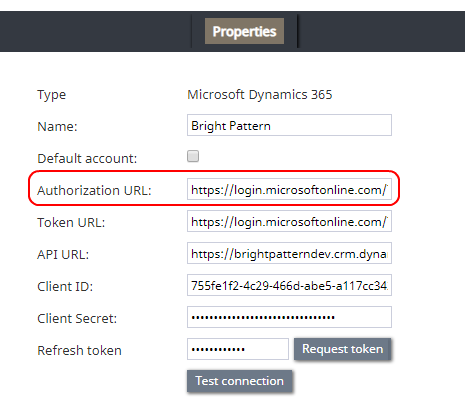
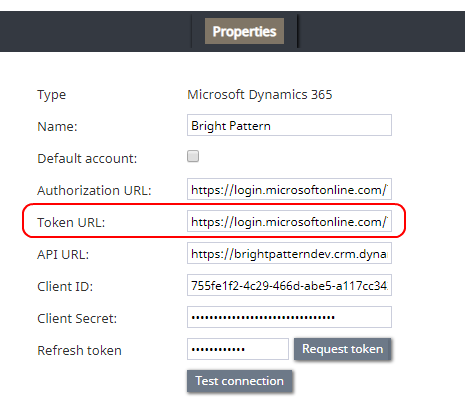
- The Microsoft Dynamics 365 integration account properties will open.
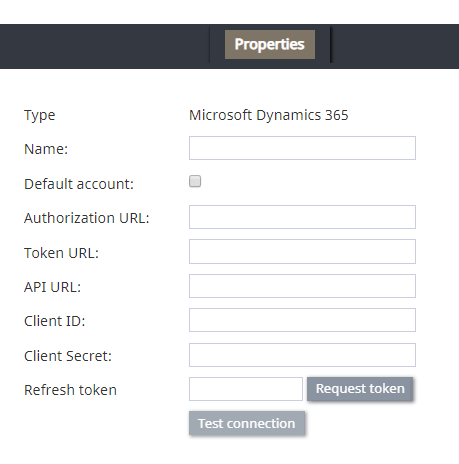
- Keep the properties window handy because this is where you will be pasting Dynamics 365 values in later steps.

Step 3: Get the Application (client) ID
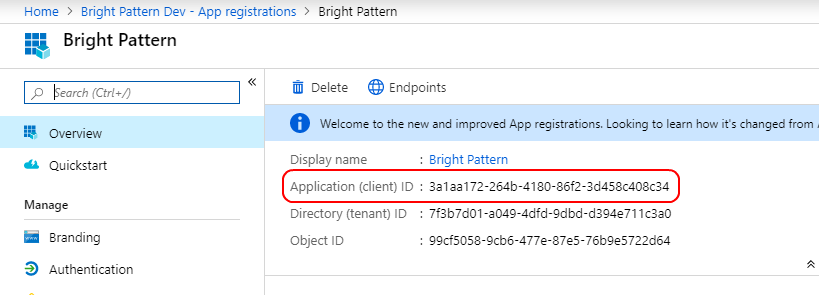
After the registered app is created, you will need its Application (client) ID, which is the unique identifier of the app.
- In the Microsoft Azure portal, view the registered app’s Overview page.
- Locate the Application (client) ID and copy this value.
- Tab over to Bright Pattern Contact Center > integration account properties.
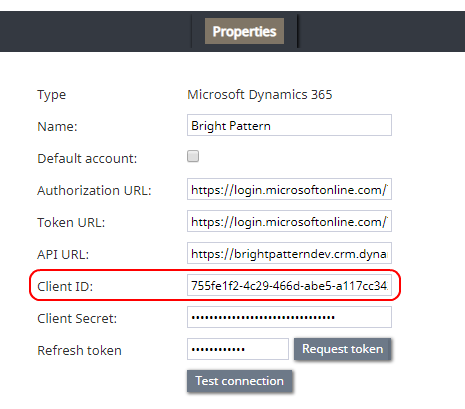
- In field Client ID, paste the value you just copied.
- In field Client ID, paste the value you just copied.


Step 4: Get the client secret
The client secret is your registered app key.
- In the Azure portal, in the registered app, go to Manage > Certificates & secrets.
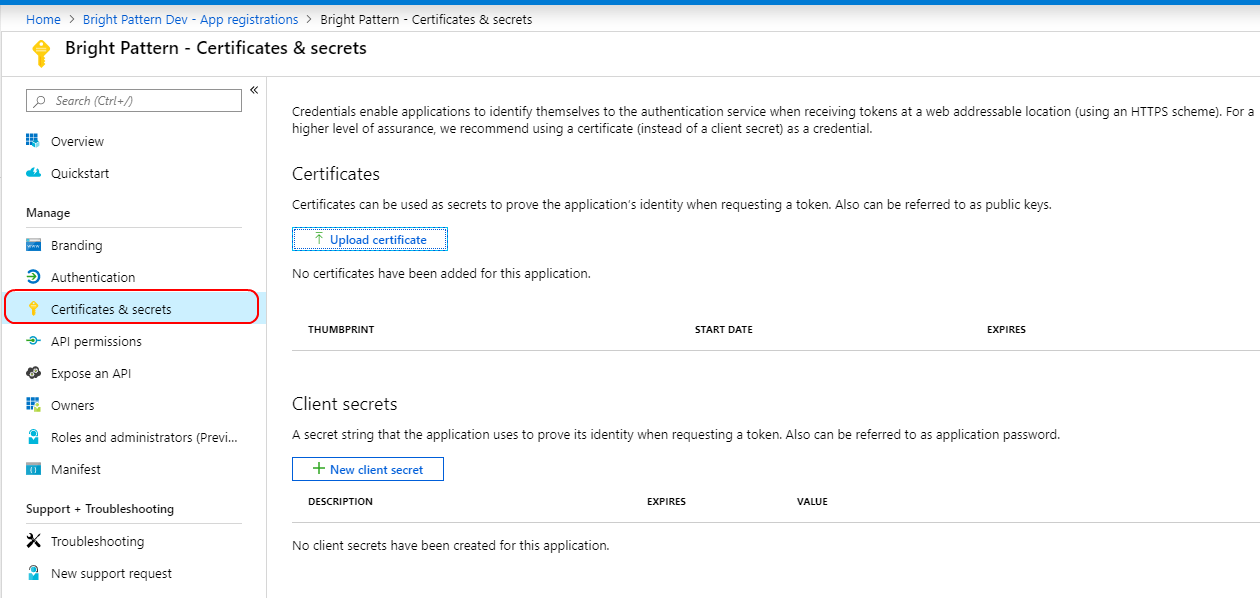
- Required: Click + New client secret to open the Add a client secret dialog.
- In Description, add any description
- In Expires, set to Never.
- Click Add.
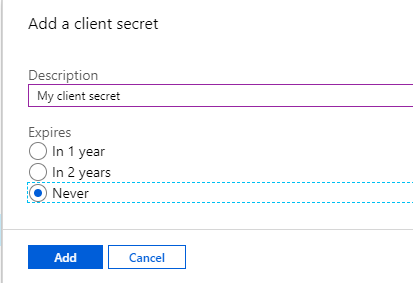
- In Description, add any description
- The client secret will be created and shown. Copy the client secret now because you will never see it again.
- Tab over to Bright Pattern Contact Center > integration account properties.
- In field Client Secret, paste the value you just copied.
- In field Client Secret, paste the value you just copied.
- Optional: If your organization has a certificate, you can click Upload certificate to add a certificate (public key) in .cer, .pem, .crt format at this time. This is done in the Azure portal, in the registered app, in Manage > Certificates & secrets.


Step 5: Get the Authorization URL and OAuth 2.0 token
- In the Azure portal, in the registered app, go to Overview and click Endpoints.
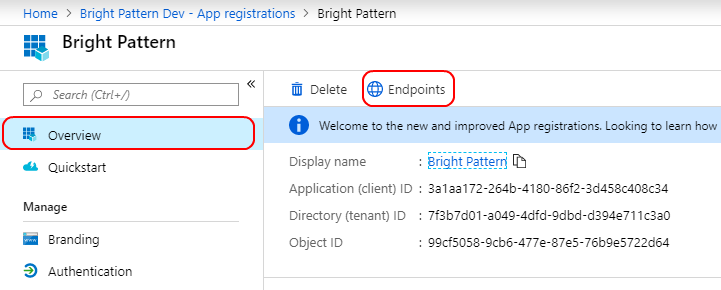
- In the Endpoints dialog that opens, you will be copying two values.
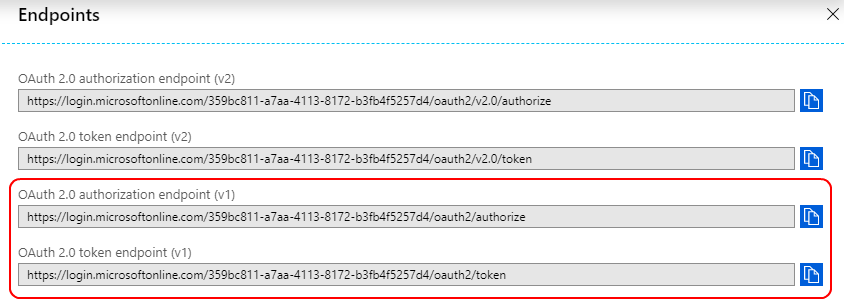
- First, copy the value for OAuth 2.0 authorization endpoint (v1).
- Tab over to Bright Pattern Contact Center > integration account properties.
- In field Authorization URL, paste the value you just copied.
- Tab over to Bright Pattern Contact Center > integration account properties.
- Second, copy the value for OAuth 2.0 token endpoint (v1).
- Tab over to Bright Pattern Contact Center > integration account properties.
- In field Token URL, paste the value you just copied.
- Tab over to Bright Pattern Contact Center > integration account properties.


Step 6: Add users to the app
In the Azure portal, you will need to add users who have permission to use this application (i.e., users who will log into the Dynamics instance and use Microsoft’s API). We recommend adding system users and yourself and/or at least one user who will act in an admin capacity (i.e., changes made by scenarios will be made on behalf of this user).
- In the Azure portal, in the registered app, go to Azure Active Directory > Enterprise applications and select your registered app from the list of all applications shown.
- Then go to Manage > Users & Groups.
- Click + Add user to add yourself as a user to the application.
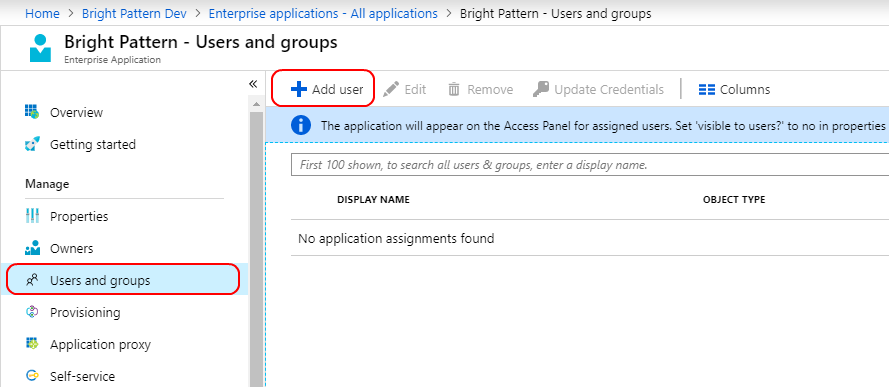
- In the Add assignment section on the right-hand side of the screen, you will be selecting yourself as a user who can access this application.
- Select your name from the Users list.
- Set Default access so that you can complete configuration. Changes made by scenarios will be made on behalf of this user. If you would like to customize access, you may click on Properties to set something other than default access.
- Click Select for the user.
- Click Assign.

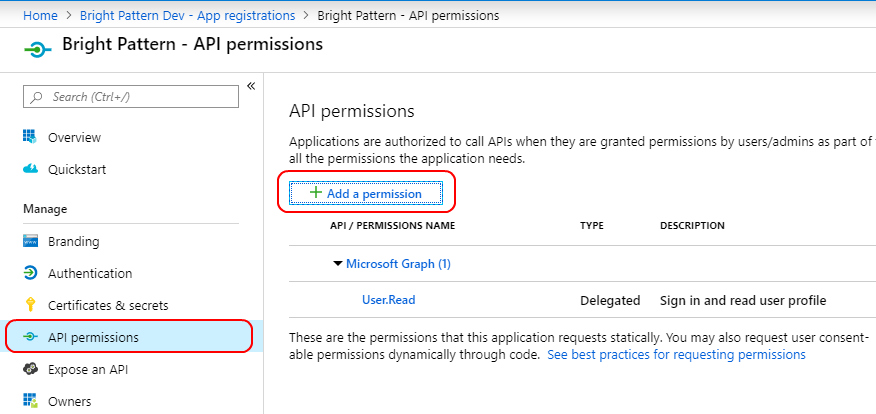
Step 7: Add API access
- Go to Azure Active Directory > App registrations and select your app name.
- Then select API permissions and click + Add a permission.
- In Request API permissions, click the tab called APIs my organization uses and search for “Dataverse” (formerly Common Data Service)
- When it appears in the list, select Dataverse.
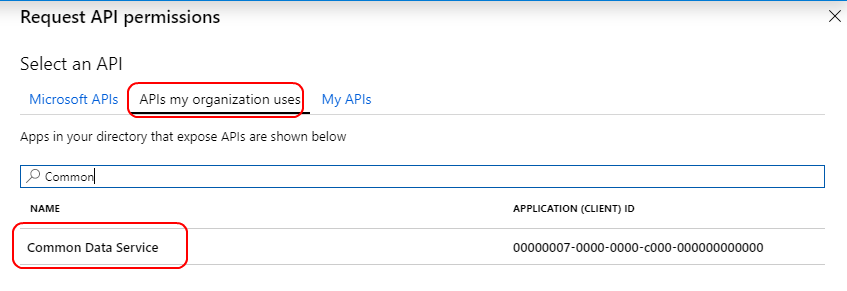
- Note: If you have more than one application using Dataverse, make sure you select the Dynamics app and not the PowerApps app.
- Note: If you have more than one application using Dataverse, make sure you select the Dynamics app and not the PowerApps app.
- In the next screen that opens:
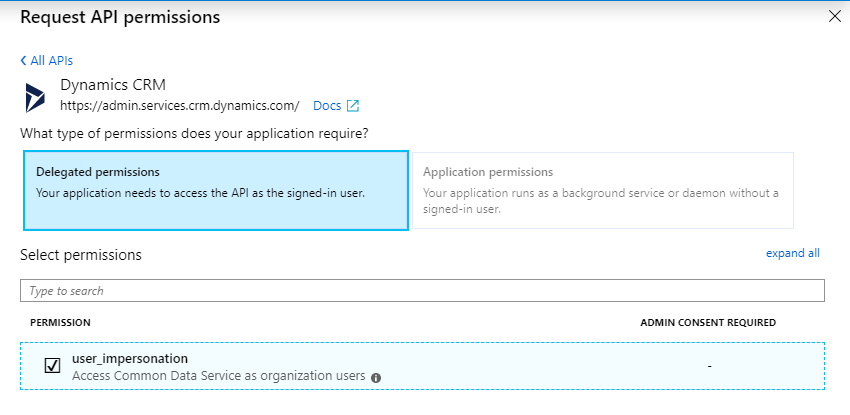
- Select Delegated permissions, which means your app has to access the API as a signed user.
- Check box for user_impersonation, which means you give permission to access the Dataverse API.
- At bottom of screen, click Add permissions.
- Select Delegated permissions, which means your app has to access the API as a signed user.


Step 8: Complete integration account properties setup
- Tab over to Bright Pattern Contact Center > integration account properties.
- Name the integration account.
- Select checkbox for Default account if you will have multiple Dynamics 365 integration accounts and you want this one to be used as default.
- In API URL, set the URL in the following format:
https://<your-organization>.crm.dynamics.com/api/data/v9.0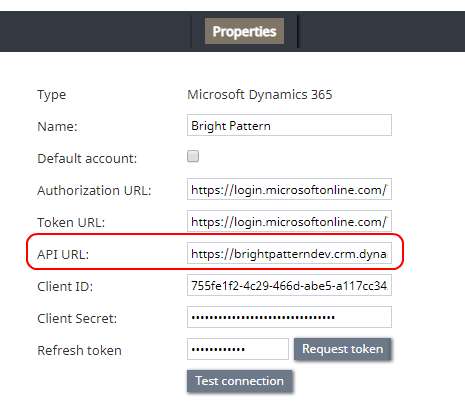
- Next to Refresh token, click Request token.
- In a pop-up dialog, you will be asked to authenticate your Microsoft account. Click consent on behalf of your organization.
- If all goes well, a dialog will show, “Connection is valid.” After this step is completed, you will be able to use Microsoft blocks in scenarios.
- Click Apply to save your integration account properties.

For more information, see section How to Add an Integration Account.
This part of configuration is now complete.